Table of Contents
Advertisement
Advertisement
Table of Contents

Subscribe to Our Youtube Channel
Related Manuals for Matco Tools FixAdvisor MD70


Summary of Contents for Matco Tools FixAdvisor MD70
- Page 2 Table of Contents INTRODUCTION WHAT IS OBD? ..................YOU CAN DO IT! ................... SAFETY PRECAUTIONS SAFETY FIRST! ................... ABOUT THE FIXADVISOR™ VEHICLES COVERED ................. BATTERY REPLACEMENT ..............ADJUSTMENTS AND SETTINGS ............FIXADVISOR™ CONTROLS CONTROLS AND INDICATORS ............DISPLAY FUNCTIONS ................ ONBOARD DIAGNOSTICS COMPUTER ENGINE CONTROLS .............
- Page 3 Introduction WHAT IS OBD? WHAT IS OBD? The FixAdvisor is designed to work on all OBD2 compliant vehicles. All 1996 and newer vehicles (cars, light trucks and SUVs) sold in the United States are OBD2 compliant. One of the most exciting improvements in the automobile industry was the addition of on- board diagnostics (OBD) on vehicles, or in more basic terms, the computer that activates the...
- Page 4 You Can Do It! EASY TO USE - EASY TO VIEW - EASY TO DEFINE Easy To Use ..Connect the FixAdvisor to the vehicle’s test connector. Turn the ignition key "On.” DO NOT start the engine. The tool will automatically link to the vehicle’s computer.
-
Page 5: Safety First
Safety Precautions SAFETY FIRST! SAFETY FIRST! To avoid personal injury, instrument damage and/or damage to your vehicle; do not use the FixAdvisor Pro before reading this manual. This manual describes common test procedures used by experienced service technicians. Many test procedures require precautions to avoid accidents that can result in personal injury, and/or damage to your vehicle or test equipment. -
Page 6: Safety Precautions
Safety Precautions SAFETY FIRST! To prevent damage to the on-board computer when taking vehicle electrical measurements, always use a digital multimeter with at least 10 MegOhms of impedance. Fuel and battery vapors are highly flammable. To prevent an explosion, keep all sparks, heated items and open flames away from the battery and fuel / fuel vapors. -
Page 7: Vehicles Covered
™ About the FixAdvisor VEHICLES COVERED VEHICLES COVERED The FixAdvisor is designed to work on all OBD2 compliant vehicles. All 1996 and newer vehicles (cars and light trucks) sold in the United States are OBD2 compliant. Federal law requires that all 1996 and newer cars and light trucks sold in the United States must be OBD2 compliant;... -
Page 8: Battery Replacement
™ About the FixAdvisor BATTERY REPLACEMENT On some Asian and European vehicles the DLC is located behind the “ashtray” (the ashtray must be removed to access it) or on the far left corner of the dash. If the DLC cannot be located, consult the vehicle’s service manual for the location. -
Page 9: Adjustments And Settings
™ About the FixAdvisor ADJUSTMENTS AND SETTINGS ADJUSTMENTS AND SETTINGS The FixAdvisor lets you make several adjustments and settings to configure the FixAdvisor for your particular needs. The following adjustments and settings are available: Adjust Brightness: Adjusts the brightness of the display screen. Audible Tone: Turns the FixAdvisor’s audible tone “on”... - Page 10 ™ About the FixAdvisor ADJUSTMENTS AND SETTINGS Enabling the Audible Tone 1. Use the UP and DOWN buttons, as necessary, to highlight Audible Tone in the Tool Settings Menu, then press the ENTER button. The Audible Tone screen displays. 2. Press the UP or DOWN button, as necessary, to highlight On or Off as desired.
- Page 11 ™ About the FixAdvisor ADJUSTMENTS AND SETTINGS 3. When the desired display language is highlighted, press the ENTER button to save your changes and return to the Tool Settings Menu (shown in the selected display language). Setting the Unit of Measurement 1.
-
Page 12: Controls And Indicators
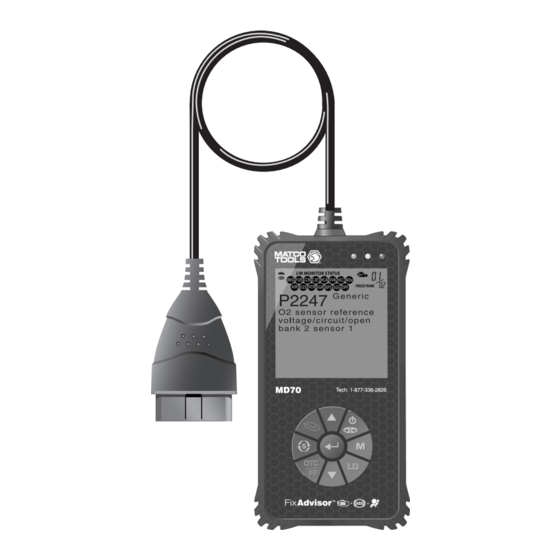
™ FixAdvisor Controls CONTROLS AND INDICATORS CONTROLS AND INDICATORS Figure 1. Controls and Indicators See Figure 1 for the locations of items 1 through 14, below. ERASE button - Erases Diagnostic Trouble Codes (DTCs), and “Freeze Frame” data from your vehicle’s computer, and resets Monitor status. -
Page 13: Display Functions
™ FixAdvisor Controls DISPLAY FUNCTIONS UP button - When in MENU mode, scrolls UP through the menu and submenu selection options. When LINKED to a vehicle, scrolls UP through the current display screen to display any additional data. DOWN button - When in MENU mode, scrolls DOWN through the menu and submenu selection options. - Page 14 ™ FixAdvisor Controls DISPLAY FUNCTIONS 1. I/M MONITOR STATUS field - Identifies the I/M Monitor status area. 2. Monitor icons - Indicate which Monitors are supported by the vehicle under test, and whether or not the associated Monitor has run its diagnostic testing (Monitor status). When a Monitor icon is solid, it indicates that the associated Monitor has completed its diagnostic testing.
- Page 15 ™ FixAdvisor Controls DISPLAY FUNCTIONS 15. Code Number Sequence - The FixAdvisor assigns a sequence number to each DTC that is present in the computer’s memory, starting with “01.” This number indicates which code is currently displayed. Code number “01” is always the highest priority code, and the one for which “Freeze Frame”...
-
Page 16: Computer Engine Controls
Onboard Diagnostics COMPUTER ENGINE CONTROLS COMPUTER ENGINE CONTROLS The Introduction of Electronic Engine Controls Electronic Computer Control Systems make it possible for vehicle manufacturers to comply with the tougher emissions and fuel efficiency standards mandated by State and Federal Governments. As a result of increased air pollution (smog) in large cities, such as Los Angeles, the California Air Resources Board (CARB) and the Environmental Protection Agency (EPA) - Page 17 Onboard Diagnostics COMPUTER ENGINE CONTROLS The Basic Engine Computer Control System The Computer Control System consists of an on-board computer and several related control devices (sensors, switches, and actuators). The on-board computer is the heart of the Computer Control System. The computer contains several programs with preset reference values for air/fuel ratio, spark or ignition timing, injector pulse width, engine speed, etc.
- Page 18 Onboard Diagnostics COMPUTER ENGINE CONTROLS Vehicle operating conditions are constantly changing. The computer continuously makes adjustments or corrections (especially to the air/fuel mixture and spark timing) to keep all the engine systems operating within the preset reference values. On-Board Diagnostics - First Generation (OBD1) With the exception of some 1994 and 1995 vehicles, most vehicles from 1982 to 1995 are equipped with some type of first generation On-Board Diagnostics.
- Page 19 Onboard Diagnostics COMPUTER ENGINE CONTROLS Because OBD1 systems only detect failed components, the degraded components were not setting codes. Some emissions problems related to degraded components only occur when the vehicle is being driven under a load. The emission checks being conducted at the time were not performed under simulated driving conditions.
- Page 20 Onboard Diagnostics COMPUTER ENGINE CONTROLS Powertrain Control Module (PCM) - The PCM is the OBD2 accepted term for the vehicle’s “on-board computer.” In addition to controlling the engine management and emissions systems, also participates in controlling the powertrain (transmission) operation. Most PCMs also have the ability to communicate with other computers on the vehicle (ABS, ride control, body, etc.).
-
Page 21: Diagnostic Trouble Codes (Dtcs)
Onboard Diagnostics DIAGNOSTIC TROUBLE CODES (DTCs) OBD2 Drive Cycle - An OBD2 Drive Cycle is an extended set of driving procedures that takes into consideration the various types of driving conditions encountered in real life. These conditions may include starting the vehicle when it is cold, driving the vehicle at a steady speed (cruising), accelerating, etc. - Page 22 Onboard Diagnostics DIAGNOSTIC TROUBLE CODES (DTCs) Manufacturer-Specific DTCs are codes that are controlled by the vehicle manufacturers. The Federal Government does not require vehicle manufacturers to go beyond the standardized generic DTCs in order to comply with the new OBD2 emissions standards.
- Page 23 Onboard Diagnostics DIAGNOSTIC TROUBLE CODES (DTCs) DTCs and MIL Status When the vehicle’s on-board computer detects a failure in an emissions-related component or system, the computer’s internal diagnostic program assigns a diagnostic trouble code (DTC) that points to the system (and subsystem) where the fault was found.
-
Page 24: Obd2 Monitors
Onboard Diagnostics OBD2 MONITORS If the conditions that caused the MIL to light are no longer present for the next three trips in a row, the computer automatically turns the MIL “Off” if no other emissions-related faults are present. However, the DTCs remain in the computer’s memory as a history code for 40 warm-up cycles (80 warm-up cycles for fuel and misfire faults). - Page 25 Onboard Diagnostics OBD2 MONITORS Non-Continuous Monitors The other twelve Monitors are “non-continuous” Monitors. “Non- continuous” Monitors perform and complete their testing once per trip. The “non-continuous” Monitors are: Oxygen Sensor Monitor Oxygen Sensor Heater Monitor Catalyst Monitor Heated Catalyst Monitor EGR System Monitor EVAP System Monitor Secondary Air System Monitor...
- Page 26 Onboard Diagnostics OBD2 MONITORS computer. Fuel Trim is a set of positive and negative values that represent adding or subtracting fuel from the engine. This program is used to correct for a lean (too much air/not enough fuel) or rich (too much fuel/not enough air) air-fuel mixture.
- Page 27 Onboard Diagnostics OBD2 MONITORS the downstream sensor signal voltage becomes almost the same as the upstream sensor signal. In this case, the monitor fails the test. The Catalyst Monitor is supported by “spark ignition” vehicles only. The Catalyst Monitor is a “Two-Trip” Monitor. If a fault is found on the first trip, the computer temporarily saves the fault in its memory as a Pending Code.
- Page 28 Onboard Diagnostics OBD2 MONITORS solenoid (depending on solenoid design). The purge solenoid opens a valve to allow engine vacuum to draw the fuel vapors from the canister into the engine where the vapors are burned. The EVAP Monitor checks for proper fuel vapor flow to the engine, and pressurizes the system to test for leaks.
- Page 29 Onboard Diagnostics OBD2 MONITORS functions when the computer is in closed-loop. A properly operating oxygen sensor reacts quickly to any change in oxygen content in the exhaust stream. A faulty oxygen sensor reacts slowly, or its voltage signal is weak or missing. The Oxygen Sensor Monitor is supported by “spark ignition”...
- Page 30 Onboard Diagnostics OBD2 MONITORS NOx Aftertreatment Monitor - NOx aftertreatment is based on a catalytic converter support that has been coated with a special washcoat containing zeolites. NOx Aftertreatment is designed to reduce oxides of nitrogen emitted in the exhaust stream. The zeolite acts as a molecular "sponge"...
- Page 31 Onboard Diagnostics OBD2 MONITORS through the walls between the channels, filtering the particulate matter out. The filters are self-cleaning by periodic modification of the exhaust gas concentration in order to burn off the trapped particles (oxidizing the particles to form CO2 and water). The computer monitors the efficiency of the filter in trapping particulate matter, as well as the ability of the filter to regenerate (self-clean).
- Page 32 Onboard Diagnostics OBD2 MONITORS Name of Monitor Comprehensive Continuous Component Monitor Misfire Monitor 3 - similar Continuous (Type 1 and 3) conditions Misfire Monitor 3 - similar Continuous (Type 2) conditions Fuel System Monitor 3 - similar Continuous 1 or 2 conditions Catalytic Converter Once per...
-
Page 33: Preliminary Vehicle Diagnostic Worksheet
Preparation for Testing PRELIMINARY VEHICLE DIAGNOSTIC WORKSHEET PRELIMINARY VEHICLE DIAGNOSTIC WORKSHEET The purpose of this form is to help you gather preliminary information on your vehicle before you retrieve codes. By having a complete account of your vehicle's current problem(s), you will be able to systematically pinpoint the problem(s) by comparing your answers to the fault codes you retrieve. - Page 34 Preparation for Testing PRELIMINARY VEHICLE DIAGNOSTIC WORKSHEET WHEN DID YOU FIRST NOTICE THE PROBLEM: Just Started Started Last Week Started Last Month Other: LIST ANY REPAIRS DONE IN THE PAST SIX MONTHS: PROBLEMS STARTING No symptoms Cranks, but will not start Will not crank Starts, but takes a long time...
- Page 35 Preparation for Testing PRELIMINARY VEHICLE DIAGNOSTIC WORKSHEET AUTOMATIC TRANSMISSION PROBLEMS (if applicable) No symptoms Vehicle does not move when in gear Shifts too early or too late Jerks or bucks Changes gear incorrectly PROBLEM OCCURS Morning Afternoon Anytime ENGINE TEMPERATURE WHEN PROBLEM OCCURS Cold Warm DRIVING CONDITIONS WHEN PROBLEM OCCURS...
-
Page 36: Before You Begin
Preparation for Testing BEFORE YOU BEGIN BEFORE YOU BEGIN The FixAdvisor aids in monitor- ing electronic- and emissions- related faults in your vehicle and retrieving fault codes related to malfunctions in these systems. Mechanical problems such as low oil level or damaged hoses, wiring or electrical connectors can cause poor engine performance and may also cause a fault code to set. -
Page 37: Vehicle Service Manuals
Preparation for Testing VEHICLE SERVICE MANUALS VEHICLE SERVICE MANUALS Always refer to the manufacturer’s service manual for your vehicle before performing any test or repair procedures. Contact your local car dealership, auto parts store or bookstore for availability of these manuals. -
Page 38: Code Retrieval Procedure
™ Using the FixAdvisor CODE RETRIEVAL PROCEDURE CODE RETRIEVAL PROCEDURE Retrieving and using Diagnostic Trouble Codes (DTCs) for troubleshooting vehicle operation is only one part of an overall diagnostic strategy. Never replace a part based only on the DTC definition. Each DTC has a set of testing procedures, instructions and flow charts that must be followed to confirm the location of the problem. - Page 39 ™ Using the FixAdvisor CODE RETRIEVAL PROCEDURE If replacing the fuse(s) does not correct the problem, consult your vehicle’s repair manual to identify the proper computer (PCM) fuse/circuit, and perform any necessary repairs before proceeding. 6. The FixAdvisor will automatically start a check of the vehicle’s computer to determine which type of communication protocol it is O n e m o m e n t...
- Page 40 ™ Using the FixAdvisor CODE RETRIEVAL PROCEDURE The Select Make screen displays. 10. Use the UP and DOWN buttons, as necessary, to highlight the desired vehicle make, then press the ENTER button. To view other pages of the list, select Next Page.
- Page 41 ™ Using the FixAdvisor CODE RETRIEVAL PROCEDURE - Ensure your vehicle is OBD2 compliant. See VEHICLES COVERED on page 5 for vehicle compliance verification information. The FixAdvisor will display a code only if codes are present in the vehicle’s computer memory. If no codes are present, the message “No Powertrain DTCs or Freeze Frame Data presently stored in the vehicle’s computer.
- Page 42 ™ Using the FixAdvisor CODE RETRIEVAL PROCEDURE Refer to DISPLAY FUNCTIONS on page 11 for a description of display elements. A visible icon indicates that the FixAdvisor is being powered through the vehicle’s DLC connector. A visible icon indicates that the FixAdvisor is linked to (communicating with) the vehicle’s computer.
- Page 43 ™ Using the FixAdvisor CODE RETRIEVAL PROCEDURE A. A PENDING CODE IS PRESENT – If the yellow LED is illuminated, it may indicate a Pending code is present. Check the FixAdvisor’s display for confirmation. A Pending code is con- firmed by the presence of a numeric code and the word PENDING on the Scan Tool’s display.
-
Page 44: The System Menu
™ Using the FixAdvisor THE SYSTEM MENU 19. If more than one DTC was retrieved, and to view Freeze Frame Data, press and release the DTC/FF button, as necessary. Each time the DTC/FF button is pressed and released, the Scan Tool will scroll and display the next DTC in sequence until all DTCs in its memory have displayed. -
Page 45: Viewing Oem Enhanced Dtcs
™ Using the FixAdvisor VIEWING OEM ENHANCED DTCs To access the “System Menu,” press the SYSTEM button. Use the UP DOWN buttons, as necessary, to highlight the desired option, then press the ENTER button to view the selected information. If the manufacturer selected during the code retrieval procedure (see CODE RETRIEVAL PROCEDURE on page 36) was Chrysler, Jeep, Ford, Mazda, General Motors, Isuzu,... - Page 46 ™ Using the FixAdvisor VIEWING OEM ENHANCED DTCs Chrysler/Jeep OEM Enhanced DTCs When OEM Enhanced is selected from the System Menu (and the manufacturer selected during the code retrieval procedure was Chrysler or Jeep), the Chrysler Enhanced menu displays. You may view either “ECM/PCM DTCs”...
- Page 47 ™ Using the FixAdvisor VIEWING OEM ENHANCED DTCs The FixAdvisor will display a code only if codes are present in the vehicle’s computer memory. If no codes are present, a “No Enhanced DTC’s are presently stored vehicle’s computer” displayed. Press SYSTEM button to return to the System Menu.
- Page 48 ™ Using the FixAdvisor VIEWING OEM ENHANCED DTCs 2. An “instructional” message shows on the FixAdvisor’s display. Perform test procedures as appropriate. If the Continuous Memory or KOEO test was selected, turn the ignition OFF, then back ON. Press the ENTER button to start the test.
- Page 49 ™ Using the FixAdvisor VIEWING OEM ENHANCED DTCs The FixAdvisor will display a code only if codes are present in the vehicle’s computer memory. If no codes are pre- sent, a “No Enhanced DTC’s are pre- sently stored in the vehicle’s computer” is displayed.
- Page 50 ™ Using the FixAdvisor VIEWING OEM ENHANCED DTCs The upper right hand corner of the display shows the number of the code currently being displayed, the total number of codes retrieved. The Diagnostic Trouble Code (DTC) and related code definition are shown in the lower section of the LCD display.
- Page 51 ™ Using the FixAdvisor VIEWING OEM ENHANCED DTCs 1. Use the UP and DOWN buttons, as necessary, to highlight the desired option, then press the ENTER button. A “One moment please” message displays while the FixAdvisor retrieves the selected DTCs. If the FixAdvisor fails to link to the vehicle’s computer, a “Linking Failed”...
- Page 52 ™ Using the FixAdvisor VIEWING OEM ENHANCED DTCs 4. When the last retrieved DTC has been displayed and the DTC/FF button is pressed, the FixAdvisor returns to the Honda/Acura Enhanced menu. To view additional enhanced DTCs, repeat steps 1 through 4, above. To exit the enhanced mode, press the SYSTEM MENU button.
-
Page 53: Viewing Abs Dtcs
™ Using the FixAdvisor Pro VIEWING ABS DTCS In the case of long code definitions, a small arrow is shown in the upper/lower right-hand corner of the code display area to indicate the presence of additional information. Use the buttons, as necessary, to view the additional information. -
Page 54: Viewing Srs Dtcs
™ Using the FixAdvisor Pro VIEWING SRS DTCS Refer to DISPLAY FUNCTIONS on page 11 for a description of LCD display elements. A visible icon indicates that the FixAdvisor is being powered through the vehicle’s DLC connector. A visible icon indicates that the FixAdvisor is linked to (communicating with) the vehicle’s computer. - Page 55 ™ Using the FixAdvisor VIEWING SRS DTCS 1. When SRS is chosen from the System Menu, a "One moment please" message displays while the FixAdvisor retrieves the selected DTCs. A "One moment please" message displays while the FixAdvisor retrieves the selected DTCs. If the FixAdvisor fails to link to the vehicle’s computer, a "Linking Failed"...
-
Page 56: Erasing Diagnostic Trouble Codes (Dtcs)
™ Using the FixAdvisor ERASING DIAGNOSTIC TROUBLE CODES Whenever the Scroll function is used to view additional codes, the FixAdvisor’s communication link with the vehicle’s computer disconnects. To re-establish communication, press the POWER/ LINK button again. 4. When the last retrieved DTC has been displayed and the DTC/FF button is pressed, the FixAdvisor returns to the first DTC. -
Page 57: I/M Readiness Testing
™ Using the FixAdvisor I/M READINESS TESTING To erase OEM enhanced, ABS or SRS DTCs: Press the SYSTEM MENU button to display the System menu. Use the UP and DOWN buttons, as necessary, to highlight the desired option, then press the ENTER button. - Page 58 ™ Using the FixAdvisor I/M READINESS TESTING On OBD2 systems, the I/M program is enhanced by requiring vehicles to meet stricter test standards. One of the tests instituted by the Federal Government is called I/M 240. On I/M 240, the vehicle under test is driven under different speeds and load conditions on a dynamometer for 240 seconds, while the vehicle's emissions are measured.
- Page 59 ™ Using the FixAdvisor I/M READINESS TESTING If a Monitor was able to meet all the conditions required to enable it to perform the self-diagnosis and testing of its assigned engine system, it means the monitor "HAS RUN.” If a Monitor has not yet met all the conditions required for it to perform the self-diagnosis and testing of its assigned engine system;...
- Page 60 ™ Using the FixAdvisor I/M READINESS TESTING Monitors with a "Has Not Run" status have not yet met the conditions they need to perform diagnosis and testing of their assigned engine area (system), and have not been able to perform diagnostic testing on that system. The green, yellow and red LEDs provide a quick way to help you determine if a vehicle is ready for an Emissions Test (Smog Check).
- Page 61 ™ Using the FixAdvisor I/M READINESS TESTING - From the code retrieval procedure, determine the status of each Monitor (a solid Monitor icon shows Monitor "Has Run" status, a flashing Monitor icon indicates "Has Not Run" status). Take this information to an emissions professional to determine (based on your test results) if your vehicle is ready for an Emissions Test (Smog Check).
-
Page 62: About Repairsolutions
™ Using the FixAdvisor ABOUT REPAIRSOLUTIONS® Misfire, Fuel and Comprehensive Component Monitors run continuously and their icons will always be on solid, even after the erase function is performed. Each DTC is associated with a specific Monitor. Consult the vehicle's service manual to identify the Monitor (or Monitors) associated with the faults that were repaired. - Page 63 ™ Using the FixAdvisor ABOUT REPAIRSOLUTIONS® And much more. Please visit www.innova.com for additional information. Hardware Requirements: Matco Diagnostic Tool Mini USB Cable (included with tool) Minimum System Operating Requirements: Windows® PC System Windows® XP, Windows® Vista, or Windows® 7 128 MD Ram Pentium III Processor One available USB port...
-
Page 64: Viewing Live Data
Live Data Mode VIEWING LIVE DATA The FixAdvisor is a special Scan Tool that communicates with the vehicle's computer. The FixAdvisor lets you view and/or "capture" (record) "real-time" Live Data. This information includes values (volts, rpm, temperature, speed etc.) and system status information (open loop, closed loop, fuel system status, etc.) generated by the various vehicle sensors, switches and actuators. -
Page 65: Customizing Live Data (Pids)
Live Data Mode CUSTOMIZING LIVE DATA (PIDs) If communication with the vehicle is lost while viewing Live Data, Communication Lost" message shows on the FixAdvisor’s display. 4. Press and release the ENTER button to view the currently selected PID in “graph” mode. -
Page 66: Recording (Capturing) Live Data
Live Data Mode RECORDING (CAPTURING) LIVE DATA If Live Data is not supported by the currently selected module, an advisory message shows on the FixAdvisor’s display. If custom Live Data was previously selected, display shows currently selected PIDs. To reselect custom Live Data, use the UP DOWN buttons, as necessary, to... - Page 67 Live Data Mode RECORDING (CAPTURING) LIVE DATA Record by DTC Trigger This function automatically records (captures) Live Data information when a DTC sets and saves it in the FixAdvisor’s memory. The recorded (captured) data can be a valuable troubleshooting aid, particularly if you are experiencing a fault that is causing a DTC to set.
- Page 68 Live Data Mode RECORDING (CAPTURING) LIVE DATA 5. Use the UP and DOWN buttons to scroll through the available PIDs. When the PID you wish to record is highlighted, press the ENTER button to select it. (a “checkmark” will show in the checkbox to the right of the PID to confirm your selection).
- Page 69 Live Data Mode RECORDING (CAPTURING) LIVE DATA - If you chose to cancel the recording process before recording completed, an advisory message displays, asking if you would like to view the Live Data list that was recorded. Use the UP DOWN buttons, as necessary, to select Yes or No, as desired, then...
- Page 70 Live Data Mode RECORDING (CAPTURING) LIVE DATA The Record Live Data Menu displays. 4. Use the UP and DOWN buttons, as necessary, to highlight Record by manual trigger, then press the ENTER button. The Select Data Set screen displays. You can record the entire Live Data list or a custom Live Data list.
-
Page 71: Live Data Playback
Live Data Mode LIVE DATA PLAYBACK All three LEDs will blink for three seconds to indicate that Live Data is being recorded, and a "One moment please. . ." message shows on the display, along with the number of the frame being recorded. - Page 72 Live Data Mode LIVE DATA PLAYBACK The display shows the recorded Live Data, beginning with the "trigger" frame. When you select Yes from the Record Live Data confirmation screen, the Scan Tool enters the "Live Data Playback" mode, and the display shows the recorded Live Data, beginning with the "trigger"...
-
Page 73: O2 Sensor Test
Additional Tests O2 SENSOR TEST In addition to retrieving Diagnostic Trouble Code (DTC) and viewing Live Data, you can use the FixAdvisor to perform additional diagnostic tests, and to view diagnostic and vehicle information stored in your vehicle's on-board computer. Additional tests are accessed through the "Special Test Menu."... -
Page 74: Non-Continuous Test
Additional Tests NON-CONTINUOUS TEST “Bank One” indicates the side of the engine where cylinder number one is located (V0type engines). Bank Two is opposite of Bank One. Y or YY - These characters identify the location of the O2 sensor in relation to the exhaust system catalyst. -
Page 75: Evap Leak Test
Additional Tests EVAP LEAK TEST 1. From the "Special Test Menu ", use the UP and DOWN buttons, as necessary, to highlight Non-Continuous Test, then press the ENTER button. 2. A “One moment please. . .” message displays while the request is sent to the vehicle’s on-board computer. -
Page 76: Vehicle Information
Additional Tests VEHICLE INFORMATION The FixAdvisor does not perform the leak test, but signals to vehicle's on-board computer to initiate the test. The vehicle manufacturer determines the criteria and method for stopping the test once it has been started. BEFORE using the EVAP Leak Test function, refer to the vehicle's service repair manual to determine the procedures necessary to stop the test. - Page 77 Additional Tests VEHICLE INFORMATION 1. While linked to the vehicle, press and release the M button. The “Main Menu” displays. 2. Use the UP and DOWN buttons, as necessary, to highlight Vehicle Infor- mation, then press the ENTER button. “Vehicle Information Menu”...
- Page 78 Additional Tests VEHICLE INFORMATION 4. When the retrieval process is completed, a complete list of modules supported by the vehicle under test is shown on the FixAdvisor’s display. Use the UP DOWN buttons, as necessary, to view the entire list. 5.
-
Page 79: Using The Dtc Library
Additional Tests USING THE DTC LIBRARY USING THE DTC LIBRARY You can use the FixAdvisor to locate the definition for a specified OBD2 DTC. 1. With the FixAdvisor in OBD2 mode, press and release the M button. The Main Menu displays. 2. -
Page 80: Using The Dlc Locator
Additional Tests USING THE DLC LOCATOR - If the correct manufacturer is shown, use the UP DOWN buttons, as necessary, to highlight Yes then press the ENTER button to continue. - If the correct manufacturer is not shown, use the UP DOWN buttons, as necessary, to highlight No then press the ENTER... -
Page 81: Viewing The Firmware Version
Additional Tests VIEWING THE FIRMWARE VERSION 5. Use the UP and DOWN buttons, as necessary, to highlight the desired vehicle make, then press the ENTER button. The Select Vehicle Model screen displays. 6. Use the UP and DOWN buttons, as necessary, to highlight the desired vehicle model, then press the ENTER button. -
Page 82: Generic (Global) Obd2 Pid List
Generic (Global) OBD2 PID List The following is a list of Generic (Global) PIDs and their descriptions. Tool Display Unit Value PID Description ACC Pedal D XXX.X Accelerator Pedal Position D ACC Pedal E XXX.X Accelerator Pedal Position E ACC Pedal F XXX.X Accelerator Pedal Position F Air Status... - Page 83 Generic (Global) OBD2 PID List Tool Display Unit Value PID Description EQ Ratio 14 X.XXX Bank 1 - Sensor 4 Equivalence Ratio EQ Ratio 21 X.XXX Bank 2 - Sensor 1 Equivalence Ratio EQ Ratio 22 X.XXX Bank 2 - Sensor 2 Equivalence Ratio EQ Ratio 23 X.XXX...
- Page 84 Generic (Global) OBD2 PID List Tool Display Unit Value PID Description O2S B1 S1 X.XXX Bank 1 - Sensor 1 O2S Current O2S B1 S1 V X.XXX Bank 1 - Sensor 1 O2S Voltage O2S B1 S2 X.XXX Bank 1 - Sensor 2 O2S B1 S2 X.XXX Bank 1 - Sensor 2 O2S Current...
- Page 85 Generic (Global) OBD2 PID List Tool Display Unit Value PID Description O2S Location O2S42 Oxygen Sensor, Bank 4, Sensor 2 OBD Support OBD2 OBD Requirements OBD Support OBD Requirements OBD Support OBD and OBD Requirements OBD2 OBD Support OBD1 OBD Requirements OBD Support No OBD OBD Requirements...
- Page 86 Generic (Global) OBD2 PID List Tool Display Unit Value PID Description Veh Speed km/h XXX / XXX Vehicle Speed Sensor Warm-up DTC # Warm-ups since DTC Cleared MD70...
-
Page 87: Abs Applications – Domestic
Vehicle Applications - ABS ABS APPLICATIONS – DOMESTIC Chrysler Chrysler Model Year Model Year 2011-2012 Crossfire SRT-6 2005-2006 2005-2011 1996-2001 300 SRT-8 2005-2010 New Yorker 1996 300M 1999-2004 Pacifica 2004-2007 Aspen 2007-2009 PT Cruiser 2001-2010 Cirrus 1996-2000 Sebring 1996-2010, 2012 Concorde 1998-2004 Town &... - Page 88 Vehicle Applications - ABS Ford Ford Model Year Model Year Contour 1996-2000 F-550 2000-2012 Crown Victoria 1996-2011 Fiesta 2011-2012 E-150 1997-2012 Five Hundred 2005-2007 E-250 1997-2012 Flex 2009-2012 E-350 1997-2012 Focus 2000-2012 E-450 2004-2012 Freestar 2004-2007 Edge 2007-2012 Freestyle 2005-2007 Escape 2001-2012 Fusion...
- Page 89 Vehicle Applications - ABS Buick Model Year Model Year Century 1996-2005 Rainier 2004-2007 Enclave 2008-2011 Regal 1996-2004, 2011 LaCrosse 2005-2011 Rendezvous 2002-2007 LeSabre 1996-2005 Skylark 1996-1998 Lucerne 2006-2011 Terraza 2005-2007 Park Avenue 1996-2005 Cadillac Model Year Model Year Catera 1997-2001 Fleetwood 1996 Brougham...
- Page 90 Vehicle Applications - ABS Model Year Model Year Acadia 2007-2011 Sonoma 1996-2004 C 1500 1996-2003 Safari Van 1996-2005 C 2500 1996-2003 Savana 1500 1998-2011 C 3500 1996-2003 Savana 2500 1998-2011 Canyon 2004-2011 Savana 3500 1998-2011 Envoy 1998-2000, Savana 4500 2009-2011 2002-2009 G 1500 1996-1997...
-
Page 91: Abs Applications – Asian
Vehicle Applications - ABS ABS APPLICATIONS – ASIAN Honda Acura Model Year Model Year 1998-1999, 2002-2006 2001-2003 CL Type S 2001-2003 RSX Type S 2002 Integra 1998-2001 1996-1999 Integra Type R 1998, 2000-2001 1997-2012 2001-2012 TL Type S 2002 2000-2004 2004-2012 2007-2012 2010-2012... - Page 92 Vehicle Applications - ABS Scion Model Year Model Year 2012 2004-2006, 2008-2012 2005-2012 2008-2012 2004-2006 Toyota Model Year Model Year 4Runner 2001-2012 Prius C 2012 Avalon 2002-2012 Prius Plug-In 2012 Camry 2000-2012 Prius V 2012 Celica 2000-2005 RAV4 2001, 2003-2012 Corolla 2000-2012 Sequoia...
-
Page 93: Srs Applications – Domestic
Vehicle Applications - SRS SRS APPLICATIONS – DOMESTIC Chrysler Chrysler Model Year Model Year 2011-2012 1998-2001 2005-2011 Pacifica 2004-2007 300 SRT-8 2005-2010 PT Cruiser 2001-2010 300M 1999-2004 Sebring 2001-2010, 2012 Aspen 2007-2009 Town & Country 2001-2012 Cirrus 1996-2000 Voyager 2001-2003 Concorde 1996-2004 Dodge... - Page 94 Vehicle Applications - SRS Ford Ford Model Year Model Year Contour 1999-2000 F-450 2000-2012 Crown Victoria 1996-2011 F-550 2000-2012 E-150 1997-2012 Fiesta 2011-2012 E-250 1997-2012 Five Hundred 2005-2007 E-350 1997-2012 Flex 2009-2012 E-450 2004-2012 Focus 2000-2012 Edge 2007-2012 Freestar 2004-2007 Escape 2001-2012 Freestyle...
- Page 95 Vehicle Applications - SRS Buick Model Year Model Year Century 1996-2005 Rainier 2004-2007 Enclave 2008-2011 Regal 1996-2004, 2011 LaCrosse 2005-2011 Rendezvous 2002-2007 LeSabre 1996-2005 Skylark 1996-1998 Lucerne 2006-2011 Terraza 2005-2007 Park Avenue 1996-2005 Cadillac Model Year Model Year Catera 1997-2001 Fleetwood 1996 Brougham...
- Page 96 Vehicle Applications - SRS Model Year Model Year Acadia 2007-2011 Sonoma 1996-2004 C 1500 1996-2003 Safari Van 1996-2005 C 2500 1996-2003 Savana 1500 1998-2011 C 3500 1996-2003 Savana 2500 1998-2011 Canyon 2004-2011 Savana 3500 1998-2011 Envoy 1998-2000, Savana 4500 2009-2011 2002-2009 G 1500 1996-1997...
-
Page 97: Srs Applications – Asian
Vehicle Applications - SRS SRS APPLICATIONS – ASIAN Honda Acura Model Year Model Year 1997-1999, 2002-2006 2001-2003 CL Type S 2001-2002 RSX Type S 2002 Integra 1996-2001 1996-1999 Integra Type R 1998, 2000-2001 1996-2011 2001-2011 TL Type S 2002 2007-2011 2004-2011 1996-2011 2010-2011... - Page 98 Vehicle Applications - SRS Scion Model Year Model Year 2012 2004-2012 2005-2012 2008-2012 2004-2006 Toyota Model Year Model Year 4Runner 1999-2012 Prius C 2012 Avalon 1999-2012 Prius Plug-In 2012 Camry 1999-2012 Prius V 2012 Celica 1999-2005 RAV4 1998-2001, 2003-2012 Corolla 1998-2012 Sequoia 2001-2012...
-
Page 99: Glossary Of Terms And Abbreviations
Glossary GLOSSARY OF TERMS AND ABBREVIATIONS CARB – California Air Resources Board CCM – Central Control Module Computer Control System – An electronic control system, consisting of an on-board computer and related sensors, switches and actuators, used to ensure peak performance and fuel efficiency while reducing pollutants in the vehicle’s emissions. - Page 100 Glossary OBD2 – On-Board Diagnostics Version 2 (also referred to as “OBD II”) On-Board Computer – The central processing unit in the vehicle’s computer control system. PCM – Powertrain Control Module Pending Code – A code recorded on the “first trip” for a “two-trip” code. If the fault that caused the code to be set is not detected on the second trip, the code is automatically erased.
- Page 101 Notes MD70...
- Page 102 Notes MD70...
-
Page 103: Limited One Year Warranty
Warranty and Servicing LIMITED ONE YEAR WARRANTY The Manufacturer warrants to the original purchaser that this unit is free of defects in materials and workmanship under normal use and maintenance for a period of one (1) year from the date of original purchase.
Need help?
Do you have a question about the FixAdvisor MD70 and is the answer not in the manual?
Questions and answers
does this tool require updates and how is that done matco md75/80