
Related Manuals for Dräger Polytron 7500


Summary of Contents for Dräger Polytron 7500
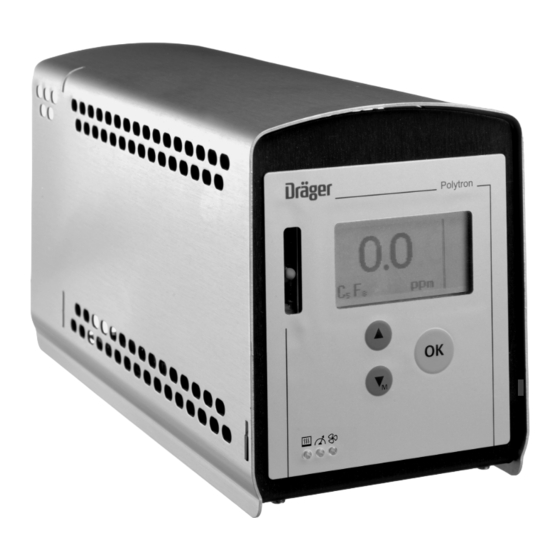
- Page 1 Dräger Polytron 7500 Instructions for Use Page 1 of 72 Pages 9023927 - 2nd edition - May 2007...
-
Page 2: Table Of Contents
............8 Installing the Dräger Polytron 7500 . - Page 3 ........... .59 Polytron 7500 Operation via LON .
-
Page 4: For Your Safety
For Your Safety Strictly follow the Instructions for Use Any use of the Polytron 7500 requires full understanding and strict observation of these Instructions for Use. The Polytron 7500 is only to be used for the purpose specified here. Maintenance The Polytron 7500 must be inspected and serviced regularly by suitably qualified... -
Page 5: Intended Use
ATTENTION! Explosion hazard! Do not operate underground or in explosion-hazard areas! The Polytron 7500 does not meet the standards for flameproofing and explo- sion protection. Not to be used for intake from explosion-hazard areas! The concentration of flammable substances in the intake air must be limited... - Page 6 This module permits the local switching of actuators, alarm generators, etc. on the basis of the measured gas concentration. Dräger Polytron 7500 software dongles For activation of additional functions of the Dräger Polytron 7500. Page 6 of 72 Pages 9023927 - 2nd edition - May 2007...
-
Page 7: Installing Dräger Polytron 7500
— Relevant regulations concerning the connection and routing of electric power supply and signal lines. — The full scope of environmental factors to which the Polytron 7500 may be ex- posed (ambient conditions: see Technical Data, page 63). — The specific uses (e.g. possible leaks). -
Page 8: Installing The Pyrolyzer Docking Station
— Install in an area with low vibrations and stable temperatures. — Do not install in an area where there are draughts of very warm air (>40 1 During installation, the slots for fitting the Polytron 7500 must point upwards on the upper edge. - Page 9 Installing Dräger Polytron 7500 – Connecting to the central unit with a central power supply Connect shield to GND of central unit (e.g. housing, earth bar, etc.). 4 ... 20 mA shunt – Central unit Maximum line lengths Installing a remote central unit with power supply by 3-wire connection the voltage drop due to the line resistance [R ] has to be taken in consideration.
- Page 10 Use the menu item "Polling Address" to assign a different polling address in the range "1" to "15" to each Polytron 7500, which is to be connected to the multidrop cable. It is best to assign sequential polling addresses, starting with "1".
- Page 11 Installing Dräger Polytron 7500 4-wire connection – Installing the LON communication Install the 4-wire connection cable in the cable gland, cut to length and strip ends (about 80 mm). Shorten the shield (if installed) to prevent short-circuiting. Connecting the cable: secure in terminals of 4-pin connecting terminal block –...
-
Page 12: Installing The Dräger Polytron 7500
1 gently pull apart the cover on both sides and 2 lift upwards. Fit the Polytron 7500 using the metal hooks into the slots provided on the docking station. Attention! The electrical connection via the edge connector must be clean, i.e. -
Page 13: Installing Accessories
Installing accessories Installing accessories Various accessories are available for the Dräger Polytron 7500 and may also be installed later. Relay module Polytron 7500 Intended Use — For switching of actuators, alarm generators, etc. on the basis of the measured gas concentration. - Page 14 Installing accessories Inserting the relay module into the docking station Remove the cover of the Polytron 7500. To do this 4 gently pull apart the cover on both sides and 5 lift upwards. 6 Insert connector with clip of the relay cable into opening on the back-plate of the Polytron 7500.
-
Page 15: Dräger Polytron 7500 Software Dongles
Installing accessories Dräger Polytron 7500 software dongles Intended Use Dräger Polytron 7500 software dongle – 83 17 618, 83 17 619 or 8317860: — For activating additional functions in the Dräger Polytron 7500: Data Dongle — Activates the Event Logger, the Datalogger 83 17 618 and the graphical concentration display. -
Page 16: Start-Up
Start-up Switch on power supply. — The balls in the flow tube should be floating at half way. — The Polytron 7500 begins its warm-up routine: Pioneering Solutions Polytron 7000 — The software version, the date and the time are displayed. -
Page 17: Analogue Signal
— A current between 4 and 20 mA flows through the current loop during normal op- eration. This current is proportional to the gas concentration. — The Polytron 7500 uses various current values to indicate the operating status: Current Meaning... -
Page 18: Displays Of Control Leds
Start-up Displays of control LEDs 1 LED » « – pyrolysis oven lights green when there is no error lights red when the pyrolysis oven is defect. Replace the pyrolysis oven, page 26. 2 LED » « – pump measurement branch lights green when there is no error lights red when the flow rate in the measurement branch is not sufficient. -
Page 19: Activating Info Mode
Start-up Activating info mode The info mode is used to display information about general unit settings and the unit status. Press and hold the » « key (longer than 3 seconds) – information about the units is displayed on several screens. —... - Page 20 Start-up If "xx.xx.xx xx:xx" is displayed instead of the date and time, or if an incorrect date and time are displayed: (only after the clock has been reset due to a power failure) Set the date and time, see page 48. Note: If the date and time are not set correctly, some functions (such as calibra- tion) cannot be executed.
-
Page 21: Maintenance
The interval for regular calibration depends on the sensor being used and on the operating conditions. Polytron 7500 calculates, from the selected calibration interval (see page 58) when the next calibration is due. Specific calibration data for the sensor, see the Instructions for Use for the Dräger sensor. -
Page 22: Calibrating The Unit
— Ensure that the sensor is warmed up before it is calibrated. Warming-up time: see the Instructions for Use for the DrägerSensor. — The Polytron 7500 can be calibrated by the operator on site. — For critical applications, the calibration intervals are to be defined in accordance with the recommendations in EN 50073 or. -
Page 23: Replacing The Sensor
1 Fit sensor adapter onto the sensor. Refit the cover of the Polytron 7500. Check the sensor function. — The configuration of the Polytron 7500 is kept in its entirety, see also “– Sensor lock” on page 57. Disposal of electrochemical sensors: —... - Page 24 Maintenance Sensor diagnostic function This function is active only if the Polytron 7500 is equipped with a sensor diagnostic dongle (Order No. 83 17 860). — Extended sensor self-test function, taking such things as the temperature, gas monitoring and remaining sensitivity into account.
-
Page 25: Replacing The Pump
Maintenance Replacing the pump Disable the supply voltage. Remove the cover of the Polytron 7500. To do this 1 gently pull apart the cover on both sides and 2 lift upwards. Attention! When the unit is opened, there is the danger of scalding yourself on hot parts of the Polytron 7500. -
Page 26: Replacing The Pyrolysis Oven
When the unit is opened, there is the danger of scalding yourself on hot parts of the Polytron 7500. Only use a pyrolysis oven, which is suitable for use with the Polytron 7500 with the defined gas type, see “Order List” on page 64. -
Page 27: Replacing The Internal Dust Filter
— The internal dust filter can be replaced without interrupting the supply voltage. Attention! The measurement result that is displayed during the replacement is not correct. Remove the cover of the Polytron 7500. To do this 1 gently pull apart the cover on both sides and 2 lift upwards. Attention! When the unit is opened, there is the danger of scalding yourself on hot parts of the Polytron 7500. -
Page 28: Fault - Cause - Remedy
Check the sensor plug or install a new sensor. # 101 Sensor data error in the unit. Remove the sensor and install it again, page 23. If this error occurs again: Have the Polytron 7500 checked by suitably qualified persons e.g. service personnel from Dräger Safety. # 102 Unit does not support this Use a compatible sensor, see page 23. - Page 29 Datalogger or the dongle func- » Instrument «, » Init. device «, page 49. tions may not be available. If this error occurs again: Have the Polytron 7500 checked by suitably qualified persons e.g. service personnel from Dräger Safety.
- Page 30 # 135 Information such as the Part No. and the Disconnect the unit from the mains and restart it. Serial No. is not available. If this error occurs again: Have the Polytron 7500 checked by DrägerService. Fault Cause Remedy LED »...
-
Page 31: Menu Functions
— from a HART-compatible Hand Held Terminal (HHT), — from a HART-compatible control unit or — a Polytron 7500 Palm Pilot 515 (non-Ex version) or Palm Pilot 515x ex-version. The menus are operated with the three keys – » «, »... - Page 32 Menu functions Default password settings when the unit leaves the factory: Password for the menu » Calibration «: _ _ _ 1 Password for the menu » Settings «: _ _ _ 2 Overview of the menu structure Back to measure Information Information page 35...
-
Page 33: Basic Operating Procedures
Basic operating procedures Basic operating procedures Switching to quick-menu mode Press the » « for longer than 1 second but less than back to measure Instrument 3 seconds to open the quick menu. Sensor Datalogger Here is the information on the status and settings of the transmitter, see page 35. -
Page 34: Navigation In The Menu
Basic operating procedures Navigation in the menu Graphical symbols (icons) simplify the navigation through the various menus: Together with the text » Back «, » Menu «, etc. » — Exit from the menu or return to previous menu. Closed folder —... -
Page 35: The Menu » Information
The menu » Information « The menu » Information « The menu » Information « contains all information about the unit status, the sensors and the Datalogger. Overview Information Information Calibration Instrument Instrument page 36 Settings Sensor Warnings page 37 page 36 Datalogger Faults... -
Page 36: Sub-Menu » Instrument
The menu » Information « Sub-menu » Instrument « The sub-menu » Instrument Info « contains all functions for interrogating the unit sta- tus. Warnings — This function displays any existing warnings in clear text with the warning number, see page 29. The icon »... -
Page 37: Sub-Menu » Sensor
The sub-menu » Sensor « contains the functions for interrogating the sensor status. Sensor vitality This function is active only if the Polytron 7500 is equipped with the sensor diagnos- tic dongle, see page 15. — This function displays the remaining sensitivity of the sensor. -
Page 38: Sub-Menu » Datalogger
The sub-menu » Datalogger « contains the functions for interrogating the Datalog- ger. Datalogger status This function is active only if the Polytron 7500 is equipped with the data dongle 83 17 618, see page 15. — This function displays the status of the Datalogger and the Eventlogger. -
Page 39: The Menu » Calibration
Connect a hose with a length of 0.5 m and a diameter which is larger than the hose for the Polytron 7500 to the third connection of the T-piece. Attention! Never release zero gas directly (without T-piece) from a com- pressed air cylinder! Calibration procedure (using the DrägerSensor XS NF... -
Page 40: Sub-Menu » Span. Cal
— The recommended calibration gas concentration for optimum accuracy is be- tween 40 % and 100 % of the measuring range end value. 1 Remove the inlet line on the Polytron 7500. 2 Fill gas bag (Order No. 68 07 068) with the calibration gas and connect to the in- let connection of the Polytron 7500. -
Page 41: Autocalibration
— The message » Supply gas: NF with flow rate 500 ml/min « is displayed (this flow rate is not to be observed for the Polytron 7500). — Supply calibration gas to the Polytron 7500. Select » Next « and press the »... - Page 42 The menu » Calibration « — The message » Fresh-air calibration running « is displayed. Expose the sensor to the ambient air (for some sensors, a zero gas such as N must be used – see the information in the section “Zero point calibration / adjust- ment”...
-
Page 43: The Menu » Settings
The sensor shown in this overview serves only as an example and may differ from the actual sensor installed in the unit. This menu function can be executed only if the Polytron 7500 is equipped with the data dongle 83 17 618, see page 15. -
Page 44: Sub-Menu » Instrument
— The flow thresholds are displayed – Flow threshold for fault: e.g. 0.3 L/min Flow threshold for warning: 0.4 L/min (example) The flow thresholds cannot be changed for the Polytron 7500. If this setting is attempted, on the value 0.3 L/min is accepted. – Operating time —... - Page 45 The menu » Settings « Alarm / Relay settings Alarms can be output via a relay and a digital interface if a relay module is installed. This group contains the setting functions for the alarms. – Alarm on/off — This function is used to enable and disable alarm monitoring. Select the menu items »...
- Page 46 The menu » Settings « Use the » « and » « keys to set each digit of the value and press the » « key to confirm the setting. Select » Next « and press the » « key. —...
- Page 47 The menu » Settings « – Test alarm A2 — This function simulates the A2 alarm state for testing purposes. Select the menu items » Settings «, » Instrument «, » Alarm « and » Test alarm A2 « in this order, pressing the » «...
- Page 48 The menu » Settings « Date and time — This function is used to set the date and / or time. Select the menu items « Settings «, « Instrument « and « Date and time « in this or- der, pressing the »...
- Page 49 — In measuring mode, briefly pressing the » « key will now activate the selected function. Initialise device This function resets all parameters of the Polytron 7500 to the factory default set- tings. This affects the following parameters: — Sensor lock.
- Page 50 The menu » Settings « SW dongle This group permits the deactivation of individual dongles before they are removed or in the case of a fault in a dongle. A dongle can be reactivated only by restarting the unit. – Data dongle Select the menu items »...
-
Page 51: Sub-Menu » Communication
The menu » Settings « Sub-menu » Communication « The sub-menu » Communication « permits various settings to by made for the inter- faces. HART interface This group contains the setting functions for the HART interface. – Polling address The polling address configures the unit either for the analogue mode (4 to 20 mA) or the multidrop mode. - Page 52 The tag may be used to mark a specific transmitter and comprises up to 8 alphanumeric characters. It can also serve for addressing a Polytron 7500, in order to read the unique identifier using HART command #11 ("Read Unique Identi- fier associated with Tag"), even if the polling address is unknown.
- Page 53 The menu » Settings « – Warning interval This function is used to set the interval between the warning signals » « on the analogue interface. Select the menu items » Settings «, » Communication «, » Analogue interface « and »...
- Page 54 The menu » Settings « Test functions for the analogue interface – Test analogue — This function is used to set various currents in the range 3 to 22 mA on the ana- logue interface. Note: These functions may trigger alarms in the control unit! If necessary, the alarms should be disabled in the control unit before using the functions.
- Page 55 LON: see also “Polytron 7500 Operation via LON” on page 62. – Neuron ID Every Polytron 7500 has a Neuron chip with its own Neuron ID, with which the Poly- tron 7500 can be identified in the LON network. To display the Neuron ID: Select the menu items »...
-
Page 56: Sub-Menu » Sensor
Polytron 7500 (gas type, measuring range, calibration gas, cali- bration interval) remains unchanged. Otherwise, the default values for the sensor (see Instructions for Use for the Dräger- Sensor) are used by the Polytron 7500 if the sensor-lock function (page 57) is disa- bled. Autocalibration setting —... - Page 57 » « key to activate it. — If the sensor self test is enabled, the Polytron 7500 continually tests the sensor in order to ensure reliable operation. If the sensor does not pass the self test, a suit- able warning or fault is generated.
- Page 58 The menu » Settings « Sensor configuration (using XS–NF as an example): This group contains the setting functions for the sensor. – Gas setting — This function is used to change the settings for the gas to be measured. Select the menu items » Settings «, » Sensor «, » XS–NF «...
-
Page 59: Sub-Menu » Datalogger
The sub-menu » Datalogger « permits various settings to be made for the Datalogger and the Eventlogger. These functions are available only if the Polytron 7500 is equipped with the Data Dongle 83 17 618, see page 15. The contents of the Datalogger or Eventlogger can be evaluated only with the PC software GasVision (Version 5.5 or higher). - Page 60 The menu » Settings « – Peak / average — This function can be used to select whether the Datalogger is to save peak or av- erage values. Select the menu items » Settings «, » Datalogger «, » Set Datalogger « and » Peak/average «...
- Page 61 The menu » Settings « – Stack/roll — This function can be used to set the operating mode of the Datalogger and the Eventlogger. Select the menu items » Settings «, » Datalogger «, » Set Datalogger « and » Stack/roll « in this order, pressing the » «...
-
Page 62: Polytron 7500 Operation Via Lon
When the green LED flashes it indicates a warning in the Polytron 7000. Every Polytron 7500 has a Neuron Chip with its own Neuron ID, with which the Poly- tron 7500 can be identified in the LON network. -
Page 63: Technical Data
Technical Data Technical Data The measuring range and the measuring properties depend on the DrägerSensor – see the Instructions for Use of the DrägerSensor being used. Type Microprocessor controlled transmitter with pump and pyrolysis oven Measuring range and the measuring depend on the type –... -
Page 64: Order List
68 11 125 for Dräger Polytron 7500 – 83 18 824 DrägerSensor XS PFC 68 11 120 for Dräger Polytron 7500 – 83 18 825 and 83 18 826 Pyrolysis oven NF3 83 18 340 Pyrolysis oven PFC 83 18 820... -
Page 65: Index
Index Index 3-wire technology ............8 4-wire connection . - Page 66 Installing the Polytron 7500 ........
- Page 67 Index Menu structure – Overview ..........32 Modules .
- Page 68 Index Settings for sensor test ..........57 Settings for the analogue interface .
-
Page 69: Drilling Templates
Drilling templates Drilling templates Pyrolyzer Docking Station 95 mm Page 69 of 72 Pages 9023927 - 2nd edition - May 2007... - Page 70 Page 70 of 72 Pages 9023927 - 2nd edition - May 2007...
- Page 71 Page 71 of 72 Pages 9023927 - 2nd edition - May 2007...
- Page 72 Thank you for reading this data sheet. For pricing or for further information, please contact us at our UK Office, using the details below. UK Office Keison Products, P.O. Box 2124, Chelmsford, Essex, CM1 3UP, England. Tel: +44 (0)330 088 0560 Fax: +44 (0)1245 808399 Email: sales@keison.co.uk...
Need help?
Do you have a question about the Polytron 7500 and is the answer not in the manual?
Questions and answers