Table of Contents
Advertisement
Quick Links
EAR EXPORT CONTROLLED --- The attached documents contain technology and technical data within the definition of the
U.S. Export Administration Regulations (EAR). Transfer of this data by any means to a foreign person, whether in the
U.S. or abroad, may require a U.S. Department of Commerce export license or other approval.
XTD-400C
Operation and
Installation Manual
Document Number: MN5-0386-901
Revision:
1
Applicable to:
305-0386-901
This is a controlled document.
The official version of this document is located
in Xicom Technology Document Control.
Printed copies are for reference only.
408-213-3000 Phone •408-213-3001 Fax
3550 Bassett Street
Santa Clara, CA 95054 USA
www.xicomtech.com
Advertisement
Chapters
Table of Contents

Related Manuals for Comtech EF Data XTD-400C


Summary of Contents for Comtech EF Data XTD-400C
- Page 1 XTD-400C Operation and Installation Manual Document Number: MN5-0386-901 Revision: Applicable to: 305-0386-901 This is a controlled document. The official version of this document is located in Xicom Technology Document Control. Printed copies are for reference only. 3550 Bassett Street Santa Clara, CA 95054 USA 408-213-3000 Phone •408-213-3001 Fax...
- Page 2 Document Number: MN5-0386-901 Revision: 1 Date: March 2013 EAR EXPORT CONTROLLED --- The attached documents contain technology and technical data within the definition of the U.S. Export Administration Regulations (EAR). Transfer of this data by any means to a foreign person, whether in the U.S.
- Page 3 XTD-400C Operation and Installation Manual Document Number: MN5-0386-901 Revision: Applicable to: 305-0386-901 This is a controlled document. The official version of this document is located in Xicom Technology Document Control. Printed copies are for reference only. 3550 Bassett Street Santa Clara, CA 95054 USA 408-213-3000 Phone •408-213-3001 Fax...
- Page 4 NOTICE Copyright 2013 This document contains proprietary information that is protected by copyright. All rights are reserved. The information in this document is subject to change without notice. Please contact Xicom Technology for current technical specifications. Xicom Technology reserves the right to revise this publication and to make changes from time to time in the content hereof without obligation of Xicom Technology to notify any person of such revision or changes.
-
Page 5: About This Manual
XTD-400C Operation and Installation Manual About this manual This manual provides operators and technicians with a set of tools for operating and maintaining the Digital Outdoor Unit Family of Xicom Power Amplifiers. This Prefix contains a Table of Contents that applies to the entire manual and a Record of Changes page that applies only to this Prefix. -
Page 6: Who Should Use This Manual
XTD-400C Operation and Installation Manual Who should use this manual This manual is designed for use by trained operators and technicians who have a thorough knowledge of satellite transmitting and receiving equipment. Persons using this manual should familiarize themselves with the information in the Appendices before reading the main sections. - Page 7 XTD-400C Operation and Installation Manual Record of Changes ELECTRONIC APPROVAL. SEE PLM. Revision ECO Description Date Initiated By Initial Release 03/18/2013 M. Gray MN5-0386-901 Revision 1 EAR EXPORT CONTROLLED --- The attached documents contain technology and technical data within the definition of the U.S.
- Page 8 XTD-400C Operation and Installation Manual Table of Contents Paragraph Title Page Number List of Abbreviations and Acronyms MNC-0000-010 Chapter 1 Overview MNC-0100-003 Chapter 2 Safety MNC-0200-001 Chapter 3 Unpacking and Installation MNC-0300-036 Chapter 4 Operation MNC-0400-048 Chapter 5 Preventive Maintenance...
- Page 9 List of Abbreviations, Acronyms, and CE Symbols List of Abbreviations, Acronyms, and CE Symbols Record of Changes ELECTRONIC APPROVAL. SEE PLM. Revision ECO Description Date Initiated By 9735 Original Release 04/17/2002 A.L. Crozier, Jr. 10179 Add numerous abbreviations 08/21/2002 A.L. Crozier, Jr. 10646 Add more abbreviations;...
- Page 10 MNC-0000-010 2 of 10 Revision A7 EAR EXPORT CONTROLLED: The information contained in this Manual refers or relates to a product that is subject to the U.S. Export Administration Regulations (EAR). Transfer of data herein by any means to a Foreign Person, whether in the U.S.
- Page 11 List of Abbreviations, Acronyms, and CE Symbols List of Abbreviations, Acronyms, and CE Symbols References The following documents are used as reference material for this chapter: International Standard ISO-7000: 1989. Graphical symbols for use on • equipment — Index and synopsis International Standard CEI/IEC 60417-2: 1998.
- Page 12 List of Abbreviations, Acronyms, and CE Symbols Abbreviation or Definition Acronym BDELIM band elimination binary digit beamwidth btry battery Block Upconverter buzzer bandwidth °C degree Celsius calibration CATE computer aided test equipment component board CCTWT Coupled Cavity Traveling Wave Tube commsat communications satellite central processing unit...
- Page 13 List of Abbreviations, Acronyms, and CE Symbols Abbreviation or Definition Acronym helix voltage °F degree Fahrenheit farad First Article Test field-effect transistor FGIPA Fixed Gain Intermediate Power Amplifier freq frequency Filament Time Delay (TWTA, KPA) Giga (one billion) Giga Hertz henry Process using a high voltage power supply to verify high voltage Hi-pot...
- Page 14 List of Abbreviations, Acronyms, and CE Symbols Abbreviation or Definition Acronym Line Driver Amplifier Light Emitting Diode Local Oscillator Low Power Amplifier Mega (million) M&C Monitor and Control milli Ampere MSDC Multistage Depressed Collector Mega Hertz miprcs microprocessor Modular Power Supply MSDC Multi-Stage Depressed Collector mean sea level...
- Page 15 List of Abbreviations, Acronyms, and CE Symbols Abbreviation or Definition Acronym In a standard 19-inch rack, a set of four mounting holes spaced as follows: .625 inches between holes 1, 2, and 3. .5 inches between holes three and four. RU = 1.75 inches.
- Page 16 List of Abbreviations, Acronyms, and CE Symbols Abbreviation or Definition Acronym XMIT Transmit Xicom Technology Analog Outdoor Amplifier Xicom Technology Controller Xicom Technology Digital Outdoor Amplifier Xicom Technology Klystron Amplifier XTKD Xicom Technology Klystron Amplifier with Flat Display Xicom Technology Klystron High Efficiency Amplifier — Flat XTKH Display with Multistage Depressed Collector XTPS...
- Page 17 List of Abbreviations, Acronyms, and CE Symbols CE Symbols Symbol Definition Alternating Current (AC) CE Marking symbol for equipment and documentation meeting European Quality Standards. Earth Ground Fuse Input Local OFF for a part of equipment ON for a part of equipment MNC-0000-010 9 of 10 Revision A7...
-
Page 18: Power Off
List of Abbreviations, Acronyms, and CE Symbols Symbol Definition Output Power OFF Power ON Protective Earth Ground Remote Reset Transmitted Power Monitor MNC-0000-010 10 of 10 Revision A7 EAR EXPORT CONTROLLED: The information contained in this Manual refers or relates to a product that is subject to the U.S. - Page 19 Overview, Digital ODU HPAs Overview, Digital ODU HPAs Record of Changes Revision ECO Description Date Initiated By 9295 Original Release 11/29/2001 A.L. Crozier, Jr. 10359 Update Contacting Xicom Technology 10/14/2002 A.L. Crozier, Jr. paragraph 11301 Update to reflect Waveguide Switching 08/08/2003 A.L. Crozier, Jr. MNC-0100-003 Revision C EAR EXPORT CONTROLLED: The information contained in this Manual refers or relates to a product that is subject...
-
Page 20: Table Of Contents
Overview, Digital ODU HPAs Table of Contents Paragraph Title Page Number Overview ............3 Product Overview . -
Page 21: Overview
Overview, Digital ODU HPAs Overview, Digital ODU HPAs Product Overview This manual is for the Xicom Technology ODU (Outdoor Unit) Power Amplifier with microprocessor control. The ODU may be mounted on an antenna or other outdoor location without the need for an additional watertight enclosure. -
Page 22: Figure 1, Typical Odu Antenna Mount Amplifier Block Diagram
Overview, Digital ODU HPAs Figure 1, Typical ODU Antenna Mount Amplifier Block Diagram MNC-0100-003 Revision C EAR EXPORT CONTROLLED: The information contained in this Manual refers or relates to a product that is subject to the U.S. Export Administration Regulations (EAR). Transfer of data herein by any means to a Foreign Person, whether in the U.S. -
Page 23: Physical Characteristics
Overview, Digital ODU HPAs Physical Characteristics Refer to Appendix titled Mechanical Drawings for the Physical Characteristic Specifications of your amplifier. The Xicom ODUs are air cooled where the outside cooling air does not pass through the microwave tube and power supply enclosure. The tube and power supply are conduction cooled. -
Page 24: Contacting Xicom Technology
Overview, Digital ODU HPAs Contacting Xicom Technology Assistance If you need to contact Xicom Technology for assistance with your product you may use one of the following: Address: Xicom Technology 3550 Bassett Street Santa Clara, CA 95054 USA Telephone: 408-213-3000 Facsimile: 408-213-3001 www.xicomtech.com Technical Support —... - Page 25 Safety/Sicherheit Safety/Sicherheit Record of Changes Revision ECO Description Date Initiated By Preliminary Release 08/2001 A.L. Crozier, Jr. Format changes 08/2001 A.L. Crozier, Jr. Format change—Table of Contents, List 09/2001 A.L. Crozier, Jr. of Figures, List of tables 9183 Original Release 10/12/2001 A.L.
- Page 26 Safety/Sicherheit Table of Contents Paragraph Title Page Number Safety/Sicherheit............. . . 3 General Information .
-
Page 27: Safety/Sicherheit
Safety/Sicherheit Safety/Sicherheit General Information This chapter identifies the safety requirements to be applied when performing any of the procedures specified in this manual. It is the responsibility of the user to follow all applicable safety regulations when using this manual. This chapter contains safety summaries consisting of general safety and health precautions. - Page 28 Safety/Sicherheit WARNING — A procedure, technique, restriction, etc., if not followed exactly, could result in injury or death to personnel. WARNING This symbol denotes an ELECTRICAL SHOCK HAZARD WARNING in a procedural step and is used whenever death or injury to personnel could result from electrical shock.
-
Page 29: General Warnings And Cautions
Safety/Sicherheit Note — A procedure, technique, restriction, special interest, etc., that requires emphasis or consideration for the performance of a procedural step or steps. Note This symbol denotes a NOTE in a procedural step. A NOTE is used whenever emphasis or consideration for the performance of a procedural step or steps is necessary. -
Page 30: Ladder Hazards
Safety/Sicherheit WARNING To prevent electrical shock when servicing a Klystron Tube or a 2 kW Power Amplifier: ensure the Bus Indicator LED located in the Power Supply Drawer • High Voltage side is out. use shorting probe before taking measurements on the capacitor •... -
Page 31: Rf Radiation Hazards
Safety/Sicherheit RF Radiation Hazards WARNING The power amplifier is capable of generating high power microwave radiation that can cause bodily harm. Prior to operation ensure that: the technician assigned to perform the maintenance does not wear • a pacemaker. all the microwave connections are securely fastened. •... -
Page 32: Sicherheit
Safety/Sicherheit Sicherheit Allgemeine Information Dieses Kapitel benennt die Sicherheitsvorkehrungen, die bei der Durchführung eines jeden in diesem Handbuch angeführten Verfahrens getroffen werden müssen. Der Benutzer ist bei der Verwendung dieses Handbuches verpflichtet, alle zutreffenden Sicherheitsvorschriften zu befolgen. Dieses Kapitel fasst allgemeine Sicherheitsbestimmungen und Gesundheitsschutz zusammen. -
Page 33: Ear Export Controlled: The Information Contained In This Manual Refers Or Relates To A Product That Is Subject
Safety/Sicherheit WARNUNG —Wenn ein Verfahren, eine Technik, Einschränkung usw. nicht genau befolgt werden, könnte dies zur Verletzung oder zum Tode von Mitarbeitern führen. WARNUNG Dieses Symbol bedeutet eine WARNUNG VOR DER GEFAHR EINES ELEKTRISCHEN SCHLAGES bei einem Verfahrensschritt und wird stets verwendet, wenn Mitarbeiter durch einen elektrischen Schlag getötet oder verletzt werden könnten. -
Page 34: Allgemeine Warnungen Und Vorsichtshinweise
Safety/Sicherheit Hinweis Dieses Symbol bedeutet einen HINWEIS bei einem Verfahrensschritt. Ein HINWEIS wird stets verwendet, wenn bei der Durchführung eines Verfahrensschrittes oder mehrerer Verfahrensschritte Nachdruck oder Berücksichtigung erforderlich sind. Allgemeine Warnungen und Vorsichtshinweise Hochspannungsgefahren WARNUNG Der Leistungsverstärker des ODU (Outdoor Unit/Gerät für den Außenbereich) ist nicht mit internen Sicherheits- Verriegelungsschaltern ausgerüstet. - Page 35 Safety/Sicherheit WARNUNG Zur Vermeidung eines elektrischen Schlages bei der Wartung einer Klystron Röhre oder eines 2 kW Leistungsverstärkers: stellen Sie sicher, dass die auf der Hochspannungsseite der • Stromversorgung befindliche Bus-LED-Anzeige erloschen ist. benutzen Sie eine Kurzschluss-Sonde, bevor Sie Messungen an •...
-
Page 36: Gefahren Bei Leiterbenutzung
Safety/Sicherheit Gefahren bei Leiterbenutzung WARNUNG Wenn Sie eine Leiter benutzen müssen, stellen Sie sicher, dass: der Boden im Bereich der Leiteraufstellung frei von Gegenständen • ist, die zur Instabilität der Leiter führen könnten. Sie ALLE an der Leiter angebrachten Etiketten gelesen und •... -
Page 37: Magnetfeld
Safety/Sicherheit Magnetfeld Vorsicht Eine Mikrowellenröhre hat ein sehr starkes magnetisches Feld. Die Röhre kann beschädigt werden, wenn sie in Kontakt mit magnetischen Objekten oder Werkzeugen kommt. WAS SIE NICHT DÜRFEN: den Verstärker auf einer magnetischen Lagerfläche abstellen. • für Aufbau, Wartung oder Reparatur magnetisches Werkzeug •... - Page 38 Safety/Sicherheit MNC-0200-001 14 of 14 Revision E EAR EXPORT CONTROLLED: The information contained in this Manual refers or relates to a product that is subject to the U.S. Export Administration Regulations (EAR). Transfer of data herein by any means to a Foreign Person, whether in the U.S.
- Page 39 Unpacking and Installation Unpacking and Installation Record of Changes ELECTRONIC APPROVAL. SEE PLM. Revision ECO Description Date Initiated By Preliminary Release 01/13/2005 A.L. Crozier, Jr. Correct the RF output analog formulas 01/25/2005 A.L. Crozier, Jr. Correct RF Output Analog pin; add new RF 03/21/2005 A.L.
- Page 40 Unpacking and Installation Table of Contents Paragraph Title Page Number Unpacking and Installation............5 Unpacking and Inspection .
- Page 41 Unpacking and Installation List of Figures Number Title Page Number Figure 1, Typical 4 Screw Mounting Flange Tightening Sequence ..... . . 8 Figure 2, Typical 8 Screw Mounting Flange Tightening Sequence .
- Page 42 Unpacking and Installation List of Tables Number Title Page Number Table 1, Digital Monitor and Control Connector J1 Pinouts ......11 Table 2, RF Inhibit Conditions .
-
Page 43: Unpacking And Installation
Unpacking and Installation Unpacking and Installation Note This document is intended for Outdoor TWTAs and other products with Rabbit Microprocessors. Unpacking and Inspection Inspect the inside and outside of the shipping container for signs of damage. If any shipping damage is detected, call the shipping carrier and submit a damage report. -
Page 44: Waveguide Connection
Unpacking and Installation Waveguide Connection Vorsicht Ziehen Sie die Hohlleiter-Befestigungsschrauben nicht zu fest an. Überdrehen kann das Gewinde in der Hohlleiterflansch ausleiern. Nichtbeachtung könnte zu Beschädigung des Gerätes führen. Caution Do not overtighten the waveguide mounting screws. Overtightening may strip the threads in the waveguide flange. - Page 45 Unpacking and Installation Vorsicht Wenn Hohlleiterflansche nicht an das externe Hohlleitersystem oder eine terminierte Ladung angeschlossen sind, sollten sie mit einer Schutzkappe oder Klebeband abgedeckt werden das beim Entfernen keine Klebstoffreste hinterlässt. Xicom empfiehlt die Verwendung von Kapton® Band, 3M Brand, #92, Xicom P/N 602-0001-001.
-
Page 46: Air Circulation
Unpacking and Installation When you reach the first screw tightened in this step (#1) increase • the torque on the screw and repeat the process until the screws have all been tightened to the correct torque. Figure 1, Typical 4 Screw Mounting Flange Tightening Sequence Figure 2, Typical 8 Screw Mounting Flange Tightening Sequence Air Circulation The power amplifier is cooled with a built-in fan. -
Page 47: Power And Interface Interconnections
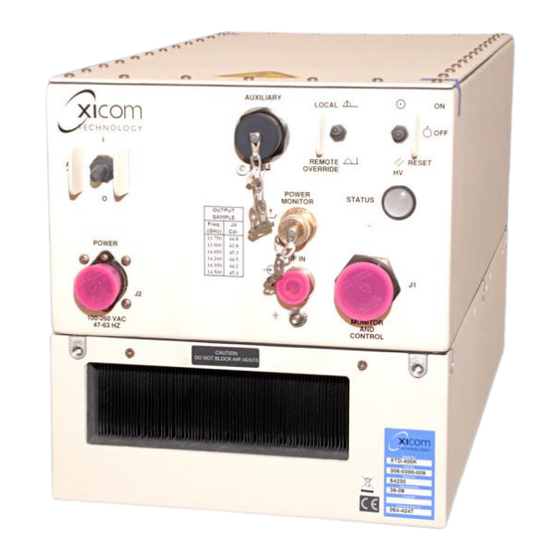
Unpacking and Installation Power and Interface Interconnections When performing the procedures in this section refer to the Wiring and Interconnect Drawings for your specific amplifier. These drawings are located in the appendix titled Interconnect Drawings. Prime Power Connections The AC Prime Power receptacle is located on the amplifier front panel. Nominal line voltage is 100 to 260 VAC (180 to 260 VAC on some high power units), 47-63 Hz, single phase. -
Page 48: Monitor And Control Connector
Unpacking and Installation Monitor and Control Connector To externally control the amplifier a M&C interface is provided. The connector is a 32-pin MIL style waterproof connector. The Monitor and Control connector provides these interfaces for the use of the customer: COM1 —... - Page 49 Unpacking and Installation Table 1, Digital Monitor and Control Connector J1 Pinouts Signal Description Reserved Reserved RS-232 RS-232 Reserved Reserved RS-232 Reserved Reserved Reserved Reserved Reserved Reserved Reserved Reserved System GND System GND RS-422/485 Transmit + RS-422/485 Transmit - RS-422/485 Receive + RS-422/485 Receive -...
-
Page 50: A/B Amp Select J1-D
Unpacking and Installation Note Refer to Table 1“, Digital Monitor and Control Connector J1 Pinouts,” on page 11 for the definition of the pins listed in the following paragraphs. A/B AMP Select J1-d Refer to Figure 5. The Amplifier A/B select is an Opto isolator input. When the input at J1-d is LO, amplifier address B is selected. -
Page 51: Output Voltages
Unpacking and Installation Output Voltages A + 24 VDC voltage is supplied that can deliver up to 100 mA. This supply voltage is available on Pins b and c. The return for this voltage is either Pin a or Pin Z. A +15 VDC voltage is supplied that can deliver up to 10 mA. -
Page 52: Rf Inhibit With External Source
Unpacking and Installation Figure 6, RF Inhibit with Internal Source RF Inhibit with External Source Caution Do not mix internal and external references because there may a difference in ground potential between the external source and the HPA. Failure to comply could result in damage to the equipment. -
Page 53: Rf Inhibit With Switch A Opened
Unpacking and Installation Figure 7, RF Inhibit with External Source RF Inhibit with Switch A Opened Refer to Figure 8. The RF Inhibit circuit also can be used with inverted logic. The figure illustrates a RF inhibit circuit using an external resistor. RF will be inhibited when switch A is opened and Polarity Input is Hi. -
Page 54: Rf Output Analog Output
Unpacking and Installation RF Output Analog output The Digital Monitor and Control provides the analog output voltage correspondence to the RF output power. The conversion formula is: (PdBm – 47.27)/19.05 = 10 [log10(Vo)] or P = 47.27 + 19.05 With P = RF Output power in dBm Waveguide Switch Connection Waveguide switch control is an optional feature. - Page 55 Unpacking and Installation The manufactured date range on the amplifier can also be used to determine if the updated waveguide switch interface is used. The manufactured date is listed on the product serial number label. The first two digits indicate the week of the year, while the last two digits are the year.
- Page 56 Unpacking and Installation Table 3, J6 Waveguide Switch Connector Pinouts Legacy Interface Function Updated Interface Function WG SW1 POS A CMD WG SW1 POS A CMD WG SW1 POS B CMD WG SW1 POS B CMD WG SW2 POS A CMD WG SW2 POS A CMD WG SW2 POS B CMD WG SW 2 POS B CMD...
-
Page 57: Wg Switches Position Select
Unpacking and Installation WG Switches Position select Refer to Figure 10. The WG Switches Position can be selected via serial interface. When a WG switch position is selected, a +24 V will be sent to the WG Switch to initiate the switch rotation. Figure 10, WG SW1 Position A Select Command WG Switches Position Indicate Refer to Figure 11. -
Page 58: Sum Fault Input
Unpacking and Installation Sum Fault Input Refer to Figure 12. The Sum Fault input comes from the other amplifier. The Sum Fault input provides a pull up resistor of 100K to + 13V for an open collector input at J6-M. A logic HI is present when the other amplifier faults. -
Page 59: A/B Amp Select
Unpacking and Installation Figure 14, Waveguide SW1 RF Inhibit A/B AMP Select Refer to Figure 15. The Amplifier A/B select is an Opto isolator input. When the input at J6-R is grounded, amplifier address B is selected. Otherwise, amplifier address A is selected. Figure 15, A/B Amplifier Select Diagram MNC-0300-036 21 of 26... -
Page 60: Redundant Configuration
Unpacking and Installation Redundant configuration Refer to Figure 16. The XTD-250KA amplifier has built-in Waveguide switch control and indicator functions. Two HPAs can be configured in a 1:1 redundant system without an external system controller. In Redundant configuration one amplifier constantly monitors the operation of the other amplifier so that if the online amplifier becomes faulted, the backup amplifier will take its place. -
Page 61: Serial Interface Ports
Unpacking and Installation Serial Interface Ports Dual serial interface connectors (COM1 and COM2) are available for remote control operation. Both serial interface ports are always enabled. The amplifier will respond to commands from either interface. The last command received has precedence. COM1 is an RS-232 only serial interface. -
Page 62: Reverse Power
Unpacking and Installation Figure 18, Typical RS-485 4-Wire Full Duplex Implementation Reverse Power The Reverse Power Fault is set to Active Low when the reflected power exceeds P -7 dB, Prated -10 dB in some applications. Refer to the rated specification in Appendix A for detailed specifications of your apmplifier. -
Page 63: Local Operation
Unpacking and Installation Local Operation Xicom Technology digital outdoor units have a built-in microprocessor for Monitor and Control using Xicom Standard Protocol. Refer to the chapter titled Amplifier Communication and Protocol for detailed information. There are three switches on the front panel of the amplifier that allow you some local control of the unit. - Page 64 Unpacking and Installation 7. For High Voltage to be applied place the HV ON switch in the ON position. 8. If a fault occurs the LED will turn red. To reset the fault press the HV switch to the RESET position (all the way down). 9.
- Page 65 Operation, TWTA ODU Amplifier Operation, TWTA ODU Amplifier Record of Changes Revision ECO Description Date Initiated By Preliminary Release 01/04/2005 A.L. Crozier, Jr. 13531 Add German Translations to conform 10/28/2005 A. L. Crozier, Jr. with CE requirements 17062 See ECO 10/05/2010 S.
- Page 66 Operation, TWTA ODU Amplifier Table of Contents Paragraph Title Page Number Operation, TWTA ODU Amplifier ......... . 5 Overview.
- Page 67 Operation, TWTA ODU Amplifier List of Tables Paragraph Title Page Number Table 1 , TWTA Fault Log Troubleshooting ....... 8-14 MNC-0400-048 3 of 14 Revision B...
-
Page 68: Operation, Twta Odu Amplifier
Operation, TWTA ODU Amplifier Operation, TWTA ODU Amplifier Overview The Xicom TWTA Amplifier Digital M&C System is incorporated into all Xicom XTD series amplifiers and provides a common user interface for the entire line of Outdoor TWTA Power Amplifiers. The M&C system can be accessed via a serial remote control interface. -
Page 69: Redundant 1:1 With Load Switching
Operation, TWTA ODU Amplifier Redundant 1:1 With Load Switching This configuration provides another level of switching. Either the online amplifier, the backup amplifier, or both amplifiers may be fed to a dummy load. This ability allows you to perform maintenance on both amplifiers at the same time. The load switch is not part of the automatic switching capability. -
Page 70: Preturn On Procedure
Operation, TWTA ODU Amplifier Preturn On Procedure 1 Ensure the prime power is within the specified limits of the amplifier. The correct power input connector pins must be used. These pins are determined by the voltage level and the prime power source. Refer to the appendix titled Mechanical Drawings and the chapter titled Unpacking and Installation for connector pin outs. -
Page 71: Turn Power On
Operation, TWTA ODU Amplifier Turn Power On Turn ON the Power Switch on the amplifier. When filament time delay is complete the amplifier is ready to transmit. Turn Power Off When the amplifier is going to be OFF for an extended period of time, select Standby, and then push the Power Button on the front panel to turn OFF the power. - Page 72 Operation, TWTA ODU Amplifier Table 1TWTA Fault Log Troubleshooting Fault Log Possible Cause of Action Needed to Description Entry Fault Clear Fault Cbl ILOK Cable Interlock Fault A cable other than Check all cables for the M&C cable has proper connection. come loose.
- Page 73 Operation, TWTA ODU Amplifier Table 1TWTA Fault Log Troubleshooting Fault Log Possible Cause of Action Needed to Description Entry Fault Clear Fault HelixArc Heater Fault Overdriving TWT, a Make sure that the Mal-functining TWT, input drive power is or gassy TWT. not too high.
- Page 74 Operation, TWTA ODU Amplifier Table 1TWTA Fault Log Troubleshooting Fault Log Possible Cause of Action Needed to Description Entry Fault Clear Fault HighPwrA Customer Settable High The output RF 1. Increase RF Forward RF Power Alarm power exceeds the output limit. 2. set limit.
- Page 75 Operation, TWTA ODU Amplifier Table 1TWTA Fault Log Troubleshooting Fault Log Possible Cause of Action Needed to Description Entry Fault Clear Fault LHx Arc Latched Helix Arc Fault The maximum Check for properly number of connected Momentary Helix waveguide, and a Arc faults has been properly terminated detected.
- Page 76 Operation, TWTA ODU Amplifier Table 1TWTA Fault Log Troubleshooting Fault Log Possible Cause of Action Needed to Description Entry Fault Clear Fault MISPHA F Missing Phase. One of the phases Verify A/C wiring to of the 3-phase A/C unit. input is missing. Ovrdrv A Input Over Drive Alarm Input drive level is...
- Page 77 Operation, TWTA ODU Amplifier Table 1 TWT Fault Log Troubleshooting Fault Log Possible Cause of Action Needed to Description Engry Fault Clear Fault Tub ILOK TWT Thermal Interlock Fault The TWT Check cooling temperature has system for air exceeded that blockage and manufacturer’s max properly operating...
- Page 78 Operation, TWTA ODU Amplifier Table 1 TWT Fault Log Troubleshooting Fault Log Possible Cause of Action Needed to Description Engry Fault Clear Fault WG Arc 2 Waveguide Arc Fault 2 on a A waveguide arc Check for properly multi-waeguide arc was detected after connected configuration.
- Page 79 Preventive Maintenance Preventive Maintenance Record of Changes Revision ECO Description Date Initiated By 9295 Original Release 11/29/2001 A.L. Crozier, Jr. 9664 Update Record of Changes page to 03/19/2002 A.L. Crozier, Jr. remove chapter number. 11429 Add paragraph about spare HPA 08/25/2003 A.L.
- Page 80 Preventive Maintenance Table of Contents Paragraph Title Page Number Preventive Maintenance ..........3 Requirements .
-
Page 81: Preventive Maintenance
Preventive Maintenance Preventive Maintenance Requirements Monthly Inspect the Air Inlet and Exhaust Ports. Ensure the ports are unobstructed. Remove any: Lint • Leaves • Straw • Quarterly Inspect and clean: the cooling fins. • the electrical connections; make sure all connections are clean and •... -
Page 82: Maintenance Procedures
Preventive Maintenance Maintenance Procedures Lower Deck Perform the following procedure to remove, inspect, and clean the Lower Deck Cover. 1 Turn the Power Amplifier OFF. 2. Disconnect the Prime Power. 3. Remove and retain the self-locking screws. Refer to the appendix titled Mechanical Drawings. -
Page 83: United States
Preventive Maintenance the manufacturers, importers and users are responsible for the proper disposal or recycling of batteries. In accordance with these directives, the TL-5242/W battery contains no dangerous substances. The reaction products are inorganic and do not represent environmental hazards once the decomposition or neutralization process has terminated. -
Page 84: Europa
Preventive Maintenance vertraut ist. Wir empfehlen Ihnen, sich mit Ihrem örtlichen Büro der Bundesbehörde für Umweltschutz in Verbindung zu setzen. Europa Die Europäische Gemeinschaft (EG) hat zwei Direktiven erlassen: 91/157/EEC und 93/86/EEC. Diese Direktiven werden von den einzelnen Mitgliedsländern unterschiedlich umgesetzt. Daher sind in jedem Land die Hersteller, Importeure und Benutzer für die vorschriftsmäßige Entsorgung oder die Wiederaufbereitung von Batterien verantwortlich. - Page 85 Firmware Update Procedure, HPA Firmware Update Procedure, HPA Record of Changes Revision ECO Description Date Initiated By Preliminary Release 11/21/2002 A.L. Crozier, Jr. 12182 Original Release 05/04/2004 A.L. Crozier, Jr. 12760 Update to apply to both TWT and SSPA 01/03/2005 A.L. Crozier, Jr. MNC-0500-014 1 of 6 Revision B...
- Page 86 Firmware Update Procedure, HPA Table of Contents Paragraph Title Page Number Firmware Update Procedure, HPA ........3 Overview.
- Page 87 Firmware Update Procedure, HPA Firmware Update Procedure, HPA Note This document applies to HPAs with Rabbit Based Microprocessors. Overview This chapter provides the service technician with information and a procedure that will allow the equipment firmware to be updated. Contact Customer Service for assistance. Contact information is located in the chapter titled Overview.
- Page 88 Firmware Update Procedure, HPA Updating HPA Firmware Use this procedure to update the HPA Firmware. 1 Connect the Com1 serial port to the RS-232 connector of the HPA control cable. Set the programming switch on the control cable to the “program” position.
- Page 89 Firmware Update Procedure, HPA Refer to Figure 2. Enter the complete path where the three loader files are stored; or click on the buttons with the three dots and browse to the directory where the files are located and select that file.
- Page 90 Firmware Update Procedure, HPA Refer to Figure 4. Click on the “three dots” button and browse to the directory where the firmware executable file is located and select that file. Press OK. Figure 4, Locate the Flash Image File The Rfu application will begin downloading the files. 10.
- Page 91 Service and Repair Service and Repair Record of Changes Revision ECO Description Date Initiated By Preliminary Release 08/2001 A.L. Crozier, Jr. Incorporate RMA Form and format 08/2001 A.L. Crozier, Jr. change Format changes—Table of Contents, 09/2001 A.L. Crozier, Jr. List of Figures, List of Tables 9183 Original Release 10/12/2001 A.L.
- Page 92 Service and Repair Table of Contents Paragraph Title Page Number Service and Repair ........... . 3 Introduction.
-
Page 93: Return Authorization
Service and Repair Service and Repair Introduction Xicom Technology recommends that all equipment be returned to the Xicom factory or approved service centers for any calibration, tuning and repairs that require internal access to the equipment. Special training, procedures, test equipment, and maintenance manuals are required to service this equipment. -
Page 94: Shipping Information
Service and Repair Shipping Information Return the equipment in the original packing. If the original packing is not available use wooden boxes or double layer corrugated boxes. Ensure there is adequate packing material between the equipment and the outside box. Seal the container with heavy packing tape or metal bands. - Page 95 Service and Repair RMA REQUEST FORM DATE: WARRANTY: RMA: ORIG SHIP DATE: COMPLETED BY: ORIG SO : WARRANTY EXPIRES: CUSTOMER: MODEL: P/N: S/N: MODEL: P/N: S/N: INCLUDED ACCESSORIES Note: Please only return accessories as required to support repair testing REASON FOR RETURN: Has this unit been returned for repair before? Yes: USA:...
- Page 96 Service and Repair MNC-0700-001 Revision F EAR EXPORT CONTROLLED: The information contained in this Manual refers or relates to a product that is subject to the U.S. Export Administration Regulations (EAR). Transfer of data herein by any means to a Foreign Person, whether in the U.S.
- Page 97 HPA SPECIFICATION XTD-400C, 5.85 – 6.425 GHz, RO1 This document is best viewed using the Times New Roman font T HIS DOCUMENT IS T HE P ROPE RT Y OF XI COM TE CHNOLOGY. REP RODUCTI ON OR RE LE ASE WIT HOUT EXP RES S PE RMISS ION I S ST RICT LY P ROHI BITE D.
- Page 98 T HI S DOCUME NT I S T HE P ROP E RT Y OF XI COM T E CHNOLOGY. RE P RODUCT I ON OR RE LE AS E WI T HOUT E XP RE S S P E RMI S S I ON I S S T RI CT LY P ROHI BI T E D. XTD-400C, 5.85 – 6.425 GHz, RO1 Document No.
- Page 99 T HI S DOCUME NT I S T HE P ROP E RT Y OF XI COM T E CHNOLOGY. RE P RODUCT I ON OR RE LE AS E WI T HOUT E XP RE S S P E RMI S S I ON I S S T RI CT LY P ROHI BI T E D. XTD-400C, 5.85 – 6.425 GHz, RO1 Document No.
- Page 100 T HI S DOCUME NT I S T HE P ROP E RT Y OF XI COM T E CHNOLOGY. RE P RODUCT I ON OR RE LE AS E WI T HOUT E XP RE S S P E RMI S S I ON I S S T RI CT LY P ROHI BI T E D. XTD-400C, 5.85 – 6.425 GHz, RO1 Document No.
- Page 101 T HI S DOCUME NT I S T HE P ROP E RT Y OF XI COM T E CHNOLOGY. RE P RODUCT I ON OR RE LE AS E WI T HOUT E XP RE S S P E RMI S S I ON I S S T RI CT LY P ROHI BI T E D. XTD-400C, 5.85 – 6.425 GHz, RO1 Document No.
- Page 102 T HI S DOCUME NT I S T HE P ROP E RT Y OF XI COM T E CHNOLOGY. RE P RODUCT I ON OR RE LE AS E WI T HOUT E XP RE S S P E RMI S S I ON I S S T RI CT LY P ROHI BI T E D. XTD-400C, 5.85 – 6.425 GHz, RO1 Document No.
- Page 103 T HI S DOCUME NT I S T HE P ROP E RT Y OF XI COM T E CHNOLOGY. RE P RODUCT I ON OR RE LE AS E WI T HOUT E XP RE S S P E RMI S S I ON I S S T RI CT LY P ROHI BI T E D. XTD-400C, 5.85 – 6.425 GHz, RO1 Document No.
-
Page 104: Serial Number
T HI S DOCUME NT I S T HE P ROP E RT Y OF XI COM T E CHNOLOGY. RE P RODUCT I ON OR RE LE AS E WI T HOUT E XP RE S S P E RMI S S I ON I S S T RI CT LY P ROHI BI T E D. XTD-400C, 5.85 – 6.425 GHz, RO1 Document No. - Page 105 T HI S DOCUME NT I S T HE P ROP E RT Y OF XI COM T E CHNOLOGY. RE P RODUCT I ON OR RE LE AS E WI T HOUT E XP RE S S P E RMI S S I ON I S S T RI CT LY P ROHI BI T E D. XTD-400C, 5.85 – 6.425 GHz, RO1 Document No.
- Page 106 T HI S DOCUME NT I S T HE P ROP E RT Y OF XI COM T E CHNOLOGY. RE P RODUCT I ON OR RE LE AS E WI T HOUT E XP RE S S P E RMI S S I ON I S S T RI CT LY P ROHI BI T E D. XTD-400C, 5.85 – 6.425 GHz, RO1 Document No.
- Page 107 T HI S DOCUME NT I S T HE P ROP E RT Y OF XI COM T E CHNOLOGY. RE P RODUCT I ON OR RE LE AS E WI T HOUT E XP RE S S P E RMI S S I ON I S S T RI CT LY P ROHI BI T E D. XTD-400C, 5.85 – 6.425 GHz, RO1 Document No.
- Page 108 EAR EXPORT CONTROLLED: The information contained in this Manual refers or relates to a product that is subject to the U.S. Export Administration Regulations (EAR). Transfer of data herein by any means to a Foreign Person, whether in the U.S. or abroad, may require an export license from the U.S. Department of Commerce.
- Page 109 EAR EXPORT CONTROLLED: The information contained in this Manual refers or relates to a product that is subject to the U.S. Export Administration Regulations (EAR). Transfer of data herein by any means to a Foreign Person, whether in the U.S. or abroad, may require an export license from the U.S. Department of Commerce.
- Page 110 EAR EXPORT CONTROLLED: The information contained in this Manual refers or relates to a product that is subject to the U.S. Export Administration Regulations (EAR). Transfer of data herein by any means to a Foreign Person, whether in the U.S. or abroad, may require an export license from the U.S. Department of Commerce.
- Page 111 EAR EXPORT CONTROLLED: The information contained in this Manual refers or relates to a product that is subject to the U.S. Export Administration Regulations (EAR). Transfer of data herein by any means to a Foreign Person, whether in the U.S. or abroad, may require an export license from the U.S. Department of Commerce.
- Page 112 EAR EXPORT CONTROLLED: The information contained in this Manual refers or relates to a product that is subject to the U.S. Export Administration Regulations (EAR). Transfer of data herein by any means to a Foreign Person, whether in the U.S. or abroad, may require an export license from the U.S. Department of Commerce.
- Page 113 EAR EXPORT CONTROLLED: The information contained in this Manual refers or relates to a product that is subject to the U.S. Export Administration Regulations (EAR). Transfer of data herein by any means to a Foreign Person, whether in the U.S. or abroad, may require an export license from the U.S. Department of Commerce.
- Page 114 EAR EXPORT CONTROLLED: The information contained in this Manual refers or relates to a product that is subject to the U.S. Export Administration Regulations (EAR). Transfer of data herein by any means to a Foreign Person, whether in the U.S. or abroad, may require an export license from the U.S. Department of Commerce.
- Page 115 Operation Addendum, HPA Control Utility Operation Addendum, HPA Control Utility Record of Changes Revision ECO Description Date Initiated By Preliminary Release 01/10/2005 A.L. Crozier, Jr. 13824 Complete rewrite to incorporate 03/27/2006 S. Trigero changes and add redundant operation MNC-0000-041 1 of 34 Revision A EAR EXPORT CONTROLLED: The information contained in this Manual refers or relates to a product that is subject to the U.S.
- Page 116 Operation Addendum, HPA Control Utility Table of Contents Paragraph Title Page Number Operation Addendum, HPA Control Utility ........5 Overview.
- Page 117 Operation Addendum, HPA Control Utility List of Figures Paragraph Title Page Number Figure 1, Primary User Interface - Disconnected......5 Figure 2, Primary User Interface –...
- Page 118 Operation Addendum, HPA Control Utility MNC-0000-041 4 of 34 Revision A EAR EXPORT CONTROLLED: The information contained in this Manual refers or relates to a product that is subject to the U.S. Export Administration Regulations (EAR). Transfer of data herein by any means to a Foreign Person, whether in the U.S.
-
Page 119: Operation Addendum, Hpa Control Utility
Operation Addendum, HPA Control Utility Operation Addendum, HPA Control Utility Overview The Xicom HPA Control Utility is a program that has been developed by Xicom Technology to provide a simple and flexible control interface that runs on PCs using the Microsoft Windows operating system. - Page 120 Operation Addendum, HPA Control Utility Figure 2, Primary User Interface – File Menu when disconnected Refer to Figure 3 on page 7. Once communication has been established, the Firmware Revision, Part Number, Serial Number, RS485 Address, Unit Date & Time, Attenuation setting, Forward RF Power, Reverse RF power, Waveguide configuration, Waveguide switch positions (if applicable), heater and beam hours are reported.
- Page 121 Operation Addendum, HPA Control Utility the operation of the amplifier, but when the limits are exceeded the current date, time and alarm condition are recorded in the fault log. Lastly, the “Temperature” window indicates the current tempera- ture of the TWTA. Figure 3, Primary User Interface - Connected Refer to Figure 4 and Figure 5 on page 8.
- Page 122 Operation Addendum, HPA Control Utility Figure 4, Primary User Interface – File Menu when connected Figure 5, Display of Fault Log Refer to Figure 6 on page 9. The Amplifier Configuration menu allows the configuration of the amplifier’s COM ports, the startup configuration, the Maximum power level, Heater standby operation, Ethernet configuration, and the types of power units used for Forward Power, Reverse Power, and the RF Power...
- Page 123 Operation Addendum, HPA Control Utility Figure 6, Configuration Menu Selecting the “Serial Com” option presents a screen shown in Figure 7, which allows you to change the Baud Rate, Parity, number of data bits, and for RS485, 2 wire/4 wire mode and cable termination.
- Page 124 Operation Addendum, HPA Control Utility Normal – the amplifier resumes operation in the last mode it was operating. If the amplifier was on the air and there was a power interruption, it will resume transmitting automatically. If the ampli- fier was off the air for an extended period of time it will complete filament time delay before going back on the air.
- Page 125 Operation Addendum, HPA Control Utility Figure 9, Maximum Power Level Refer to Figure 10. When selected, the Heater Standby option will reduce the voltage applied to the TWT heater circuit when the amplifier is in standby mode, which will increase the life of the tube.
- Page 126 Operation Addendum, HPA Control Utility and the net mask if “Static IP” is selected. If DHCP is selected, a server on your network assigns the IP address. Note Improper selection of IP addresses in Static IP mode may affect the proper operation of your Local Area Network;...
- Page 127 Operation Addendum, HPA Control Utility Figure 12, Communications Menu 12. Refer to Figure 13. The “IP Adrs” menu allows you to tell the HPA Control program the IP address of the amplifier that you wish to communicate with. Figure 13, Set Ethernet IP Address 13.
- Page 128 Operation Addendum, HPA Control Utility Figure 14, COM Port configuration To operate the TWTA HPA in a redundant mode continue to the section titled Redundant Mode Operation. If you are using the TWT HPA in stand-alone configuration it is ready for operation. MNC-0000-041 14 of 34 Revision A...
-
Page 129: Utility Setup For Sspa Operation
Operation Addendum, HPA Control Utility Utility Setup for SSPA Operation Use the following procedure to setup and operate HPA Control Utility for SSPA Operation. Refer to Figure 15 and Figure 16. If this is the initial time running the program, select “Connect” in the lower center, or “File -> Con- nect”... - Page 130 Operation Addendum, HPA Control Utility Figure 16, Primary User Interface – File Menu when disconnected Refer to Figure 17. Once communication has been established, the Firmware Revision, Part Number, Serial Number, RS485 Address, Unit Date & Time, Attenuation setting, Forward RF Power, Reverse RF power, Waveguide configuration, Waveguide switch positions (if applicable), Power Supply and Transmit ON hours are reported.
- Page 131 Operation Addendum, HPA Control Utility the current date, time and alarm condition are recorded in the fault log. Lastly, the “Temperature” window indicates the current tempera- ture of the amplifier. Figure 17, Primary User Interface - Connected Refer to Figure 18 and Figure 19. When the program is connected to an amplifier, the amplifier’s fault log may be viewed by Selecting : “File->...
- Page 132 Operation Addendum, HPA Control Utility Figure 18, Primary User Interface – File Menu when connected Figure 19, Display of Fault Log Refer to Figure 20. The Amplifier Configuration menu allows the configuration of the amplifier’s COM ports, the startup configuration, the Maximum power level, Ethernet configuration, and the types of power units used for Forward Power, Reverse Power, and the RF Power Alarms.
- Page 133 Operation Addendum, HPA Control Utility Figure 20, Configuration Menu Selecting the “Serial Com” option presents a screen shown in Figure 21, which allows you to change the Baud Rate, Parity, number of data bits, and for RS485, 2 wire/4 wire mode and cable termination.
- Page 134 Operation Addendum, HPA Control Utility Refer to Figure 22. If the “Configuration -> Startup Configuration” option is selected, you are presented with a dialog allowing the selection of Normal / Off / On. Normal – the amplifier resumes operation in the last mode it was operating.
- Page 135 Operation Addendum, HPA Control Utility Figure 23, Maximum Power Level Refer to Figure 24. The “Configuration -> Ethernet Configuration” menu allows the selection of the network Host and Domain names, and allows configuration of the IP Address and the net mask if “Static IP”...
- Page 136 Operation Addendum, HPA Control Utility Figure 24, Ethernet Configuration 11. Refer to Figure 25. When two HPAs are configured for 1:1 Redundant operation, the Gain Balance Menu provides a means of adding attenuation to the amplifier that has the most gain of the two.
- Page 137 Operation Addendum, HPA Control Utility Figure 26, Communications Menu 13. Refer to Figure 27. The “IP Adrs” menu allows you to tell the HPA Control program the IP address of the amplifier that you wish to communicate with. Figure 27, Set Ethernet IP Address 14.
- Page 138 Operation Addendum, HPA Control Utility Figure 28, COM Port configuration To operate the SSPA HPA in a redundant mode continue to the section titled Redundant Mode Operation. If you are using the SSPA HPA in stand-alone configuration it is ready for operation. MNC-0000-041 24 of 34 Revision A...
-
Page 139: Redundant Odu Configuration
Operation Addendum, HPA Control Utility Redundant ODU Configuration Overview ODU Amplifiers configured in a system for redundant operation are assembled and tested to function without an external controller unless one is ordered with the system. The two amplifiers are each equipped with internal microprocessors, and each unit contains the programming and hardware wiring that permits control of the RF waveguide switch in a 1:1 system. -
Page 140: Odu Configuration
Operation Addendum, HPA Control Utility There is no external control of the systems except via serial port interface if no controller is installed. The systems are shipped in the “default” configuration: Address “A” and “B” set on the appropriate amplifiers. •... -
Page 141: Required Equipment
Operation Addendum, HPA Control Utility Required Equipment The following equipment is required to configure the ODU system: Windows based computer with an open Serial Port (RS-232 or • RS485) Xicom’s HPA Control Utility for Windows. Xicom PN 809-0007-001. • It is shipped on a CD with the amplifier manual. Appropriate serial cable: •... - Page 142 Operation Addendum, HPA Control Utility If the address or connection speed is unknown, it may be desirable to run “Advanced Search” from the File Menu pulldown. (This may take several minutes as all possible addresses and data speeds are polled to find a configuration that works.) Refer to Figure 31.
- Page 143 Operation Addendum, HPA Control Utility Refer to Figure 32. Set the Waveguide Configuration by clicking on the down-arrow and select one of the four options from the drop-down menu. The “1-For-1” option is the most common. The choices are: 0 - None for stand alone unit 1- 1 for 1 for simple 1:1 system...
- Page 144 Operation Addendum, HPA Control Utility Refer to Figure 33 and Figure 34. Each amplifier can control two waveguide switches. When only one switch is used in a redundant configuration it is always Switch 1.Locate the Waveguide Switches area of the Waveguide CFG Box. Click on the down arrow of the switch you wish to control and select the desired switch position.
- Page 145 Operation Addendum, HPA Control Utility Refer to Figure 35. Once the redundant mode is selected and the waveguide switch is set appropriately, to have a faulted amplifier automatically switched out and the standby amplifier switched in, Automatic Mode must be enabled. Enable Redundant Mode by clicking the “Automatic”...
- Page 146 Operation Addendum, HPA Control Utility Rack Mount Amplifiers Refer to Figure 36 through Figure 38. If you are setting up rack mount amplifiers, you may either perform the ODU Amplifier setup procedure, or you may use the schematic that appears on the front panel showing the waveguide configuration of the redundant system.
- Page 147 Operation Addendum, HPA Control Utility Figure 36, 1 - For - 1 Figure 37, 1 - For - 1 with Load Switching Figure 38, 1 - Plus - 1 MNC-0000-041 33 of 34 Revision A EAR EXPORT CONTROLLED: The information contained in this Manual refers or relates to a product that is subject to the U.S.
- Page 148 Operation Addendum, HPA Control Utility MNC-0000-041 34 of 34 Revision A EAR EXPORT CONTROLLED: The information contained in this Manual refers or relates to a product that is subject to the U.S. Export Administration Regulations (EAR). Transfer of data herein by any means to a Foreign Person, whether in the U.S.
- Page 149 Operation Addendum, Block Upconverter Operation Addendum, Block Upconverter Record of Changes ELECTRONIC APPROVAL. SEE PLM. Revision ECO Description Date Initiated By 10125 Original Release 08/05/2002 A.L. Crozier, Jr. 10516 Add X and DBS Band Information 12/06/2002 A.L. Crozier, Jr. 12612 Add Note about 10 MHz Reference; 10/20/2004 A.L.
- Page 150 Operation Addendum, Block Upconverter Table of Contents Paragraph Title Page Number Operation Addendum, Block Upconverter ........3 Overview.
-
Page 151: Operation Addendum, Block Upconverter
Operation Addendum, Block Upconverter Operation Addendum, Block Upconverter Overview The function of the BUC (Block Upconverter) is to convert the baseband input from a modem at an IF (intermediate frequency) to the system transmit frequency. The BUC accepts an intermediate frequency, mixes it with a highly stable LO (local oscillator) and passes it through a series of circuits that filter and amplify the signal to produce an output in the desired transmission band. -
Page 152: Functional Description
Operation Addendum, Block Upconverter Functional Description The block diagram in Figure 3 provides a schematic for the BUC. The input of the BUC provides diplexing to direct the reference frequency to the LO Synthesizer and IF frequency to the mixer. The synthesizer generates the LO frequency from the reference frequency and filters it to eliminate unwnated harmonics. -
Page 153: Setup And Turn On
Operation Addendum, Block Upconverter Figure 3, Detailed BUC Block Diagram Setup and Turn On In the normal operating condition the modem provides both L-Band and 10 MHz reference inputs. Other BUC configurations have a built-in (internal) 10 MHz references which operate as either standalone or phase locked to the 10 MHz input provided by the modem. - Page 154 Operation Addendum, Block Upconverter The output frequency accuracy depends on the accuracy of the refer- ence and IF frequencies. The determining ratios for the frequency Bands are: Ku Band — (12.8 GHz / Reference Frequency) X Reference • Offset = Output Offset. C Band —...
-
Page 155: Reference Oscillator Drift Compensation
Operation Addendum, Block Upconverter Reference Oscillator Drift Compensation Over extended time periods, the 10MHz reference oscillator changes frequency due to temperature / aging and results in a shift in the output frequency that can exceed +/- 10kHz. Depending on the system budget, the converter must be re-adjusted to stay within its allocated transponder band and within the receiver acquisition range. - Page 156 Operation Addendum, Block Upconverter Figure 5, Internal Phase Locked Oscillator with External Input MNC-0000-015 8 of 10 Revision F EAR EXPORT CONTROLLED: The information contained in this Manual refers or relates to a product that is subject to the U.S. Export Administration Regulations (EAR). Transfer of data herein by any means to a Foreign Person, whether in the U.S.
- Page 157 Operation Addendum, Block Upconverter External Reference Detection and Lock Fault Configuration: There are three faults related to the external reference. The behavior of these faults is configurable via specific factory configuration serial commands. It is best to specify the desired behavior at the time of order, but the configuration may be adjusted in the field by factory trained personnel.
-
Page 158: Factory Default Settings
Operation Addendum, Block Upconverter upconverter fault when the fault condition is corrected, by enabling the Auto Clear Upconverter Fault feature. Factory Default Settings: The factory default settings of the upconverter and reference frequency are listed below in Table 1. These settings have been chosen to allow HPA functionality with the simplest setup.
Need help?
Do you have a question about the XTD-400C and is the answer not in the manual?
Questions and answers