Polycom VVX 201 User Manual
Nextiva cloud service
Hide thumbs
Also See for VVX 201:
- User manual (166 pages) ,
- Owner's manual (58 pages) ,
- Getting started (49 pages)
Table of Contents
Advertisement
Advertisement
Table of Contents

Subscribe to Our Youtube Channel
Related Manuals for Polycom VVX 201


Summary of Contents for Polycom VVX 201
- Page 1 Polycom VVX 201 User Guide nextiva.com/support...
-
Page 2: Table Of Contents
2 | P a g e Contents ..............................2 Installation ................................3 Desk Setup ............................... 3 Wall Mounting ..............................5 Provisioning Instructions ............................6 Using the NextOS 3.0 Beta Portal ........................6 Entering the Provisioning Server ........................8 Enabling the Web Configuration Utility ...................... 14 Additional Setup Options ............................ -
Page 3: Installation
Installation Desk Setup 1. Connect the Polycom VVX 201 as shown in the diagram below. NOTE: Depending on your preference, it may be easier to attach the stand to the phone first (see step 2 below), and then connect the headset, Ethernet cables, and AC adapter (Figure 1-1). - Page 4 4 | P a g e 3. If using an optional headset, follow the diagram in Figure 1-3 to connect the headset. Figure 1-3: Optional Headset Attachment © Nextiva, All Rights Reserved...
-
Page 5: Wall Mounting
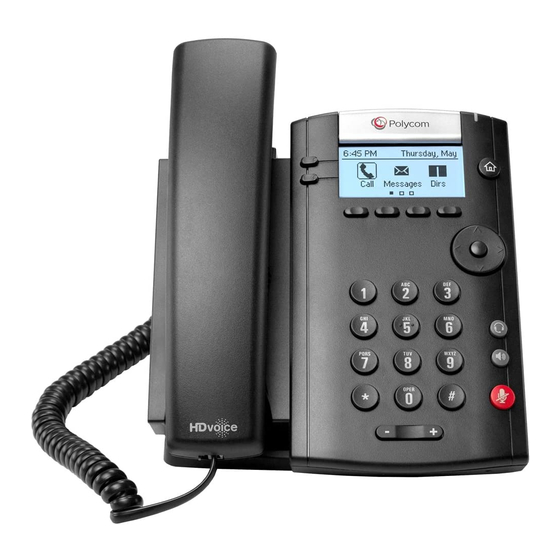
5 | P a g e Wall Mounting Follow the diagram below to mount the Polycom VVX 201 to a wall (Figure 1-4). Figure 1-4: Mounting to the wall Location of Controls The features of the Polycom VVX 201 phone are shown below (Figure 2-1). -
Page 6: Provisioning Instructions
6 | P a g e Provisioning Instructions Before you can make calls with the Polycom VVX 201, it must be added to your Nextiva account, assigned to a user, and provisioned. Follow the instructions below to complete these tasks. - Page 7 7 | P a g e 7. Select the Polycom VVX 201 phone from the drop-down list below the Own Device radio button (Figure 3-3). Figure 3-3: Selecting the Make and Model 8. Enter the MAC address in the MAC Address text box (Figure 3-4).
-
Page 8: Entering The Provisioning Server
Figure 3-5: Confirmation Message Entering the Provisioning Server If the Polycom VVX 201 phone was purchased from Nextiva, then the phone will arrive with the provisioning address already programmed into the phone. If the phone was purchased from a third party, or if the phone required a factory reset, you will need to manually enter the provisioning address into the phone. - Page 9 9 | P a g e 4. Select Admin Settings… Network Config… Provisioning Server… from the menu. You will know if you are on the correct screen because the top option on the Provisioning Server menu says DHCP Menu (Figure 3-7). Figure 3-7: Provisioning Server Menu 5.
- Page 10 10 | P a g e NOTE: To enter a period (.), press the * key once. To enter a forward slash (/), press the # key once (Figure 3-10). Figure 3-10: Special Characters 7. Press the Back softkey at the bottom of the screen, and scroll down using the directional pad until you see Tag SN to UA.
- Page 11 11 | P a g e To determine if the phone is registered (which is necessary to make and receive calls), examine the phone screen. It should display the extension on the left side of the screen, along with a check mark (Figure 3-13).
- Page 12 12 | P a g e NOTE: If you are unable to access the phone using the IP address, the Web Configuration Utility may be disabled. Follow the instructions in the “Enabling the Web Configuration Utility” section to enable this. 3.
- Page 13 13 | P a g e 6. Select HTTP in the Server Type drop-down list at the top of the screen (Figure 3-19). Figure 3-19: Server Type 7. Enter dc.nextiva.com/ucvvx201/ in the Server Address text box and set Tag SN to UA to Enabled.
-
Page 14: Enabling The Web Configuration Utility
14 | P a g e 9. Click the Yes button when the pop-up message appears asking if you want to save the configuration changes (Figure 3-22). The phone should reboot, provision and register. If it does not reboot, proceed to step 10. Figure 3-22: Confirmation Window 10. - Page 15 15 | P a g e 2. Select Settings Advanced… from the menu (Figure 3-24). Figure 3-24: Advanced Settings 3. Enter 456 for the password, and then press the Enter softkey at the bottom of the screen (Figure 3-25). Figure 3-25: Enter Password NOTE: If the phone displays “Sorry, try again”...
- Page 16 16 | P a g e 4. Select Admin Settings Web Server Config… from the menu (Figure 3-27). Figure 3-27: Admin Settings 5. Set the Web Server to Enabled and the Web Config to HTTP/HTTPS (Figure 3-28). Figure 3-28: Web Server Config 6.
-
Page 17: Additional Setup Options
Correcting the Time If the Polycom VVX 201 does not display the correct time, first check the time zone assigned to the user in the NextOS 3.0 Beta portal. If the time zone is correct, you will need to contact Nextiva Support. - Page 18 18 | P a g e 4. Select Admin Settings… Line Configuration… Line 1… from the menu. You will know if you are on the correct screen because the top option on the Line 1 menu displays the name of the user (Figure 4-3).
-
Page 19: Busy Lamp Field (Blf)
Up to 500 third-party contacts to be imported to the account at one time. Each account can have up to 10,000 contacts total. However, the Polycom VVX 201 phone will only store a maximum of 99 contacts at a time. -
Page 20: Speed Dials
20 | P a g e Speed Dials While it is possible to set up speed dials through the menu on the Polycom VVX 201, setting up speed dials using Nextiva’s included speed dial features, Speed Dial 8 or Speed Dial 100, is preferred. - Page 21 21 | P a g e Speed Dials under Basic Phone Usage later in this guide. From the NextOS 3.0 Portal 1. For Administrators, log in to the NextOS 3.0 Beta portal by visiting www.nextiva.com clicking on the customer Login found at the top right. 2.
- Page 22 22 | P a g e 4. Hover your cursor over the user you want to set up speed dials for, and click the pencil icon to the right (Figure 4-8). Figure 4-8: Edit User 5. Scroll down and select the Routing section (Figure 4-9). Figure 4-9: Routing Section ©...
- Page 23 23 | P a g e 6. Click the pencil icon to the right of Speed dial (Figure 4-10). Figure 4-10: Speed Dial 7. Click the plus sign at the bottom-right (Figure 4-11). Figure 4-11: Add Speed Dial © Nextiva, All Rights Reserved...
- Page 24 24 | P a g e 8. Select the speed dial number from the Option drop-down list (Figure 4-12). Figure 4-12: Select Speed Dial Number 9. Enter a descriptive name for the speed dial in the Name text box, and then enter the phone number or extension in the Phone Number text box.
- Page 25 25 | P a g e 10. Click the green Save button at the bottom-right of the Speed dial menu. A pop-up message appears stating that the speed dial 100 settings have been saved successfully (Figure 4-14). Figure 4-14: Confirmation Message For instructions on how to use Speed Dial 8, see the section titled “...
-
Page 26: Automatic Call Distribution (Acd)
” in this guide. Automatic Call Distribution (ACD) The Polycom VVX 201 supports phone integration with Nextiva Call Center Pro and Nextiva Call Center Enterprise’s ACD states, allowing the users to sign in, sign out or go unavailable in a Call Center from their phone’s interface. -
Page 27: Basic Phone Usage
Basic Phone Usage Making a Call NOTE: If you dial the full 10-digit phone number of the party you want to call, the Polycom VVX 201 will automatically start dialing, so pressing the Send softkey is not necessary. Using the Handset: 1. -
Page 28: Making A Second Call
If you dial the full 10 digit number of the party you want to call, the Polycom VVX 201 phone will automatically start dialing, so pressing the Send softkey is not necessary (Figure 5-4). - Page 29 2. Dial the phone number or extension of the party you want to call, and press the Send softkey. If you dial the full 10 digit number of the party you want to call, the Polycom VVX 201 phone will automatically start dialing, so pressing the Send softkey is not necessary (Figure 5-7).
- Page 30 2. Dial the phone number or extension of the party you want to call, and press the Send softkey. If you dial the full 10 digit number of the party you want to call, the Polycom VVX 201 phone will automatically start dialing, so pressing the Send softkey is not necessary (Figure 5-10).
-
Page 31: Accepting A Call
31 | P a g e 3. When finished, press the HEADSET button on the bottom-right of the phone, or press the End softkey at the bottom of the screen to disconnect the call with the party to whom you are speaking (Figure 5-11). -
Page 32: Accepting A Second Call
32 | P a g e Using a Headset (optional): 1. While the phone is ringing, press the HEADSET button on the bottom-right of the phone. Accepting a Second Call Using the Handset: 1. When you hear the call waiting tone through the handset, press the Ans softkey on the bottom of the screen. - Page 33 33 | P a g e Using the Speakerphone: 1. When you see the second incoming call on the screen, press the Ans softkey on the bottom of the screen. The first party is put on hold, and you are connected to the second call through the speakerphone (Figure 5-16).
- Page 34 34 | P a g e Using a Headset (optional): 1. When you see the second incoming call on the screen, press the Ans softkey on the bottom of the screen. The first party is put on hold, and you are connected to the second call through the headset (Figure 5-18).
-
Page 35: Terminating A Call
35 | P a g e Terminating a Call Using the Handset: 1. While on a call, go on-hook or press the End softkey at the bottom of the screen (Figure 5- 20). Figure 5-20: End Call Using the Speakerphone: 1. -
Page 36: Transferring A Call
36 | P a g e Using a Headset (optional): 1. While on a call, press the HEADSET button on the bottom-right of the phone, or press the End softkey at the bottom of the screen (Figure 5-22). Figure 5-22: End Call Transferring a Call There are two types of transfers –... - Page 37 37 | P a g e 2. Dial the phone number or extension of the party to whom you want to transfer the call, and press the Send softkey at the bottom of the screen. Wait for the other party to answer, so you can speak with them before transferring the call (Figure 5-24).
- Page 38 Enter softkey at the bottom of the screen. If you dial the full 10 digit number of the party you want to call, the Polycom VVX 201 phone will automatically start dialing, so pressing the Enter softkey is not necessary (Figure 5-27).
-
Page 39: Conferencing
(Figure 5-29). Figure 5-29: Enter Second Number NOTE: If you dial the full 10-digit phone number of the party you want to call, the Polycom VVX 201 will automatically start dialing, so pressing the Send softkey is not necessary. -
Page 40: Checking Voicemail
When you have a new unread voicemail message, the message waiting indicator light on the upper- right of the Polycom VVX 201 phone flashes red. The icon to the left of the extension on the screen changes to an envelope, and the number of unread messages you have is displayed in the upper- right corner of the screen (Figure 5-30). -
Page 41: Using Directories
To set up a custom No Answer greeting, which is the default greeting that plays if you do not answer your phone after 3 rings, follow the instructions below. 1. Dial extension 9999 from the Polycom VVX 201 phone using the instructions using the instructions in Making a Call. - Page 42 42 | P a g e 4. When finished, press the End softkey at the bottom of the screen to disconnect the call (Figure 5-33). Figure 5-33: End Call During a Transfer 1. While on a call, press the Tsfr softkey at the bottom of the screen. The party you were speaking to is put on hold, and you will hear a dial tone (Figure 5-34).
- Page 43 43 | P a g e 3. Select Contact Dir… from the menu (Figure 5-36). Figure 5-36: Contact Directory 4. Scroll through the list of names. Select the contact you would like to call, and press the Dial softkey at the bottom of the screen. Wait for the other party to answer, so you can speak to them before transferring the call (Figure 5-37).
- Page 44 44 | P a g e During a Conference Call 1. While on a call, press the More softkey at the bottom of the screen once. Then press the Conf softkey at the bottom of the screen. The party you were speaking to is put on hold, and you will hear a dial tone (Figure 5-39).
-
Page 45: Call Lists
45 | P a g e 4. Scroll through the list of names, select the contact you would like to call, and then and press the Dial softkey at the bottom of the screen. Wait for the other party to answer, so you can speak to them before transferring the call (Figure 5-42). - Page 46 46 | P a g e 2. If you have more than one call, use the up ↑ and down ↓ navigation keys to scroll through the list of calls select the contact you would like to call back, and press the Dial softkey at the bottom of the screen (Figure 5-44).
- Page 47 47 | P a g e The Call Lists screen shows all of your missed calls, received (incoming) calls, and placed (outgoing) calls. To distinguish between them, use the icon to the left of the call. Missed calls display an X to the left of the call.
- Page 48 48 | P a g e 5. To return to the original party, press the Res softkey at the bottom of the screen (Figure 5- 50). Figure 5-50: Resume Previous Call During a Transfer 1. While on a call, press the Tsfr softkey at the bottom of the screen. The party you were speaking to is put on hold, and you will hear a dial tone (Figure 5-51).
- Page 49 49 | P a g e 3. Select Recent Calls… from the menu (Figure 5-53). Figure 5-53: Recent Calls List NOTE: To cancel the transfer at this point, press the HOME button on the upper-right of the phone twice to return to the Transfer to screen, and then press the Cncl softkey at the bottom of the screen (Figure 5-54).
- Page 50 50 | P a g e 5. Use the up ↑ and down ↓ navigation keys to scroll through the list of calls. Select the contact you would like to call, and then press the Dial softkey at the bottom of the screen (Figure 5-56).
- Page 51 51 | P a g e 2. Press the Dir softkey at the bottom of the screen. 3. Select Recent Calls… from the menu (Figure 5-59). Figure 5-59: Recent Calls List NOTE: To cancel the conference call at this point, press the HOME button on the upper-right of the phone twice to return to the Conference with screen, and then press the Cncl softkey at the bottom of the screen (Figure 5-60).
-
Page 52: Speed Dials
52 | P a g e 5. Use the up ↑ and down ↓ navigation keys to scroll through the list of calls. Select the contact you would like to call, and then press the Dial softkey at the bottom of the screen. Wait for the other party to answer so you can speak to them before conferencing in the original party (Figure 5-62). - Page 53 53 | P a g e 3. When finished, go on-hook or press the End softkey at the bottom of the screen to disconnect the call (Figure 5-64). Figure 5-64: End Call Using the Speakerphone: 1. Press the SPEAKERPHONE button on the bottom-right of the phone. 2.
- Page 54 54 | P a g e Using a Headset (optional): 1. Press the HEADSET button on the bottom-right of the phone. 2. Enter the speed dial number on the keypad, and press the Send softkey at the bottom of the screen (Figure 5-67).
-
Page 55: Changing Acd States
55 | P a g e Changing ACD States In order for an agent to change their ACD state from a Polycom VVX 201 phone, ACD functionality needs to be enabled on the phone. To do this, please contact Nextiva Support. -
Page 56: Going Unavailable
Then press the Unavl softkey at the bottom of the screen to go unavailable. This should only be done after the last active call has ended on the Polycom VVX 201 phone and the phone is idle (Figure 6-3). -
Page 57: Going Available
57 | P a g e Going Available When returning to your desk from a break, meeting, etc., you need to change your ACD state to Available (go available) again. To do this, press the More softkey at the bottom of the screen once. Then press the Avl softkey at the bottom of the screen to go Available (Figure 6-5). -
Page 58: Accepting A Call
Accepting a Call By default, when a call routes to your Polycom VVX 201 phone, statistics for the queue will display on the screen, and the Ans softkey will not be visible without pressing the Exit softkey at the bottom of the screen first (Figure 6-7). - Page 59 59 | P a g e 2. Enter the disposition code given to you by the administrator for your Nextiva account (Figure 6-9). Figure 6-9: Entering the Disposition Code 3. Press the Enter softkey at the bottom of the screen. You are taken back to the main screen which shows the caller ID of the incoming call and the running length of the call (Figure 6- 10).
-
Page 60: Wrap-Up
Nextiva account has enabled Wrap-Up on the call center, then immediately after the last active call ends on your Polycom VVX-201 phone, the icon to the left of the extension changes to reflect the new Wrap-Up status, and the Agent State displays as Wrap-Up in the upper-right corner of the screen (Figure 6-11). -
Page 61: Signing Out
More softkey at the bottom of the screen once, and then press the ASOt softkey at the bottom of the screen to sign out. It does not matter whether there is still a call in progress on the Polycom VVX 201 phone when you do this (Figure 6-13). -
Page 62: Additional Features
Additional Features Do Not Disturb By default, the Polycom VVX 201 has a DND softkey on the main screen. To enable and disable DND, follow the instructions below. 1. Press the DND softkey at the bottom of the screen to enable DND. The icon to the left of the extension changes to a dash (Figure 7-1). -
Page 63: Factory Reset
Once the factory reset is complete, you will be able to access the advanced settings on the phone using the default Polycom password of 456. NOTE: If the phone does not accept the MAC address as the password, go through the factory reset process a second time.
Need help?
Do you have a question about the VVX 201 and is the answer not in the manual?
Questions and answers