Otto Bock VENTUS Instructions For Use Manual
Hide thumbs
Also See for VENTUS:
- Service manual (68 pages) ,
- Instructions for use manual (40 pages) ,
- Instructions for use manual (40 pages)

Related Manuals for Otto Bock VENTUS


Summary of Contents for Otto Bock VENTUS
- Page 1 Ventus Instructions for use (user) ..................
- Page 2 2 | Ottobock Ventus...
-
Page 3: Table Of Contents
6.15 Head and neckrest ..........................6.16 Additional options ..........................6.17 Disassembly and transport ........................6.18 Use in vehicles for transporting persons with reduced mobility ..............6.19 Care ..............................6.19.1 Cleaning ............................6.19.1.1 Cleaning Seat Cushions ........................Ventus Ottobock | 3... - Page 4 ....................Disposal ................................Disposal Information ..........................Legal information .............................. Liability .............................. CE Conformity ............................ Warranty ............................Service Life ............................Trademarks ............................Appendices ................................ 10.1 Technical data ............................ 10.2 Threshold values for wheelchairs transportable by train ................4 | Ottobock Ventus...
-
Page 5: Foreword
The wheelchair is designed solely for individual use by persons who are unable to walk or who have a walking impediment, and can be operated either by the patient or by another person. The wheelchair can be used on solid ground both indoors and outdoors. Ventus Ottobock | 5... -
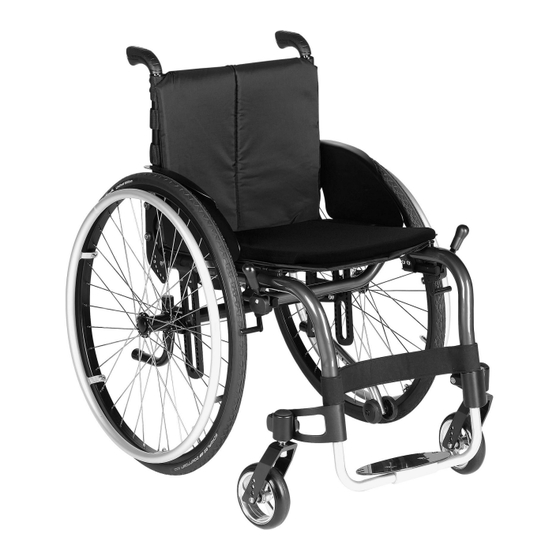
Page 6: Product Overview
Max. load capacity: 100 kg (effective seat width: 280–440 mm); 140 kg (effective seat width: 460–500 mm) The lightweight Ventus wheelchair is a modular rigid-frame wheelchair for active use in open frame design. The one-piece light metal frame, combined with a single-panel footrest or a foot stirrup, offers high stability with a low net weight. -
Page 7: Safety Instructions For Use
Tipping over, falling due to errors in handling the product ► Practice on level, open ground first. ► Learn with the support of an assistant how the wheelchair reacts to changes in the centre of gravity. Ventus Ottobock | 7... - Page 8 Risk of collisions with other traffic participants due to lack of lighting ► Wear bright clothing or clothing with reflectors. ► Install active lighting on your product. ► Ensure that the reflectors on the product are clearly visible. 8 | Ottobock Ventus...
- Page 9 Use under incorrect environmental conditions Damage to product due to corrosion or abrasion ► Do not use the product in salt water. ► Also avoid – if possible – sand or other dirt particles that may damage the wheel bearings. Ventus Ottobock | 9...
-
Page 10: Further Information
Options according to the order • Instructions for use (user) 4.2 Options The standard model can be fitted to the user's personal requirements thanks to a large range of options. For use of these options: see Page 12 ff. 10 | Ottobock Ventus... -
Page 11: Storage
4) If necessary: Fit the seat cushion. The seat cushion is secured against sliding by being pressed on to the hook-and-loop fastener (see Page 15). 5) If necessary: Fasten the calf strap to the frame tube above the caster attachment device (see Page 14). Ventus Ottobock | 11... -
Page 12: Use
► Activate the wheel lock each time before you get into or out of or transfer to or from the wheelchair. ► Always get into the wheelchair from the side, where possible. ► Never step on the footrests/footplates when getting in and out. ► Do not support yourself on the wheel lock when getting in/out. 12 | Ottobock Ventus... -
Page 13: Footrests
► Fold up the footplates before getting in. The user's feet can be placed on the footrest. The height of the footrest has been adjusted by qualified personnel to the length of the user's lower leg. Ventus Ottobock | 13... -
Page 14: Adjusting The Footrest (Footplate)
► The seat and backrest upholstery as well as padding fulfil the requirements for flame resistance according to ISO 8191-2 and DIN EN 1021-2. However, they may still ignite if fire is handled improperly or negligently. ► Keep away from all ignition sources, especially lit cigarettes. 14 | Ottobock Ventus... -
Page 15: Removing And Fastening The Seat Cushion
INFORMATION: The part of the flap that can be fastened prevents sliding or falling through the gaps between the straps and protects against draughts. 6) Fasten the seat pad (see fig. 13, item 1) and the seat cushion. Ventus Ottobock | 15... -
Page 16: Side Panels
Subsequent adjustments may be made only by qualified personnel. 6.6.2 Folding down the side panels Folding away for getting in (example: "clothing protector" side panel) To make getting into the wheelchair easier, the side panels can be folded up. 16 | Ottobock Ventus... -
Page 17: Removing The "Padded" Armrest
To make getting in and transporting the wheelchair easier, the armrests can be folded away or removed. 1) Pull the armrests up out of the holders (see fig. 24). 2) Fold the armrests away by 90° (see fig. 25) or remove them. 3) After getting in, slide the armrests down into the holders again. Ventus Ottobock | 17... -
Page 18: Adjusting A Channel Forearm Pad With Swivel Unit
1) Pull the release button downwards (see fig. 29, item 1). 2) Move the channel forearm pad to the desired rotation setting (see fig. 29, item 2). 3) Let go of the release button. The channel forearm pad will be secured in its position. 18 | Ottobock Ventus... -
Page 19: Push Handles
1) Release the clamping lever. 2) Adjust the height of the push handle. 3) Close the clamping lever tightly. INFORMATION: Both push handles must be adjusted to the same height. Ventus Ottobock | 19... -
Page 20: Rear Wheels
The lock-release assist allows the rear wheels to be installed even with heavily restricted movement of the arms and hands. 1) Open the lock-release assist according to the grip setting (see fig. 33= push down; see fig. 34 = pull up). The lock is open when the bar is horizontal (90° position). 20 | Ottobock Ventus... -
Page 21: Caster Wheels And Caster Forks
The caster wheels and caster forks have been chosen by the qualified personnel according to the needs of the users. 6.9.1 Approach in case of stiffness In case of stiffness, the caster wheel axles should be cleaned and oiled. Ventus Ottobock | 21... -
Page 22: Wheel Locks
1) Reach under the seat and pull the handle of the scissor wheel lock rearwards from the side (see fig. 38). → The wheel lock bolt secures the wheel. 2) Pull the handle of the scissor wheel lock forwards to unfold (see fig. 39). → The wheel lock bolt releases the wheel. 22 | Ottobock Ventus... -
Page 23: Anti-Tipper/Tip-Assist
1) From above, press on the anti-tipper with the hand or foot until it disengages (see fig. 42, item 1; see fig. 43, item 1). 2) Rotate the anti-tipper forward by 180° and release it (see fig. 42, item 1; see fig. 43, item 1). Ventus Ottobock | 23... -
Page 24: Using The Tip-Assist
This wheelbase extension option version is intended especially for the adaption of handbikes (see fig. 45). For an adapted handbike the rear wheels must be moved from the front axle (see fig. 46, item 1) to the rear axle (see fig. 46, item 2). 24 | Ottobock Ventus... -
Page 25: Shock Absorber System
After the rear wheels have been moved, the "clothing protector" side panels can only be slightly folded out against the tyres (see fig. 48). 6.13 Shock absorber system The shock absorber system absorbs loading peaks, for example when driving over steps or curbs or on uneven ground. Ventus Ottobock | 25... -
Page 26: Lap Belt
If the lap belt is too loose, the user can shift/slide out to the front. • During the installation/adjustment, the safety belt is led over parts of the seating system (for instance over arm rests or seat pads). This causes the lap belt to lose its retaining function. 26 | Ottobock Ventus... -
Page 27: Head And Neckrest
→ Pull the backrest cable until the locking mechanism releases the backrest. → Fold the backrest down towards the seat surface and press until the locking bolts lock in on both sides. 5) Place the wheelchair in its folded-up state in the vehicle (see fig. 55). Ventus Ottobock | 27... -
Page 28: Use In Vehicles For Transporting Persons With Reduced Mobility
Clean plastic parts, frame parts and the chassis and wheels with a mild cleaner and a damp cloth. Dry thor oughly afterwards. 6.19.1.1 Cleaning Seat Cushions Standard seat cushion ► Clean the seat cushion according to the attached care label. 28 | Ottobock Ventus... -
Page 29: Cleaning Belts
If the product is used by more than one person, using a conventional disinfectant is required. • Only use colourless water-based disinfectants. Observe the instructions for use provided by the manufacturer. 7 Maintenance and repair 7.1 Maintenance • The function of the product should be checked before each use. Ventus Ottobock | 29... -
Page 30: Maintenance Intervals
► No person is permitted to sit in the wheelchair during tyre replacement ► Before removing a wheel, support the product so it cannot tip over. ► Always replace the tyres in pairs. Two differently worn tyres affect the directional stability of the wheelchair. 30 | Ottobock Ventus... - Page 31 4) Insert the tube into the tyre. 5) Mount the other side of the tyre on the rim, starting from the position across the valve. Ensure that the tube is not pinched between the tyre and rim during this process. Ventus Ottobock | 31...
-
Page 32: Disposal
All brands, trade names or company names may be registered trademarks and are the property of the respective owners. Should trademarks used in this document fail to be explicitly identified as such, this does not justify the conclusion that the denotation in question is free of third-party rights. 32 | Ottobock Ventus... -
Page 33: Appendices
– cannot be adjusted in the mm range but only in increments of approx. 0.5 cm or 1 cm. ► Note that the values achieved during adjustment may deviate from the values specified below. The deviation can be ±10 mm and ±2°. General information Ventus Maximum load capacity [kg] 100 (for seat width 280–440) 140 (for seat width 460–500) Weight [kg] approx. -
Page 34: Threshold Values For Wheelchairs Transportable By Train
Appendices Ventus Minimum Maximum Horizontal axle position [mm] In accordance with ISO 7176-5 10.2 Threshold values for wheelchairs transportable by train INFORMATION ► The wheelchairs in this series fully satisfy the minimum technical requirements of regulation (EU) No. 1300/2014 for wheelchairs transportable by train. However, not all versions can comply with all threshold values due to different settings. - Page 35 · www.ottobock.com.au Otto Bock Bulgaria Ltd. info@ottobock.sk · www.ottobock.sk 41 Tzar Boris III‘ Blvd. · 1612 Sofia · Bulgaria Beijing Otto Bock Orthopaedic Industries Co., Ltd. T +359 2 80 57 980 · F +359 2 80 57 982 Otto Bock Sava d.o.o. B12E, Universal Business Park info@ottobock.bg · www.ottobock.bg Industrijska bb ·...
- Page 36 Ihr Fachhändler | Your specialist dealer Otto Bock Mobility Solutions GmbH Lindenstraße 13 · 07426 Königsee-Rottenbach/Germany www.ottobock.com Ottobock has a certified Quality Management System in accordance with ISO 13485.
Need help?
Do you have a question about the VENTUS and is the answer not in the manual?
Questions and answers