
Subscribe to Our Youtube Channel
Related Manuals for Dexcom G6 Pro


Summary of Contents for Dexcom G6 Pro
- Page 1 Dexcom G6 Pro Continuous Glucose Monitoring System User Guide Dexcom G6 Pro CGM System and pictured smart devices are sold separately. Graphic of Dexcom CLARITY report is for illustration only.
- Page 3 G6 Pro. Patients should discuss with their healthcare professional (HCP) how they should use the information displayed on the G6 Pro to help manage their diabetes. The product instructions contain important information on troubleshooting the G6 Pro and on the performance characteristics of...
- Page 4 Page intentionally left blank...
- Page 5 10.4 Blinded and Unblinded – Remove Chapter 5: Getting Started with G6 Pro ......76 G6 Pro Appendices 5.1 Introduction .
- Page 6 Appendix D: Maintenance of G6 Pro System � � � � � � � � � � � � � � � � � � � 103 Appendix E: Going Through Security � � � � � � � � � � � � � � � � � 107 Appendix F: Warranty �...
- Page 7 How? By looking at your patient’s results, you can give them insights to better control their diabetes. G6 Pro can be used either in real time (unblinded) where your patient sees their sensor readings, gets the Urgent Low alarm and G6 Pro alerts, trend arrows or blinded, where they don’t see their data.
- Page 8 This user guide has one section and an appendix. The first section introduces you to the G6 Pro. It helps you determine which mode is best for your patient. For both blinded and unblinded patients, it guides you through inserting the sensor in your patient and what they’ll see when their sensor session is ending.
- Page 9 In-App Help If your unblinded patient wants additional help within their smart device, from the home page, they go to Settings>Help Here they can review information on G6 Pro, such as: • FAQs • Safety Statements • Sensor removal • Setup Wizard •...
- Page 10 Page intentionally left blank...
- Page 11 The Dexcom G6 Pro System is also intended to interface with digitally connected devices. The Dexcom G6 Pro System can be used alone or in conjunction with these digitally connected medical devices for managing diabetes or assessing glycemic variability.
- Page 12 If glucose alerts and readings from G6 Pro do not match symptoms or expectations, use a fingerstick blood glucose value from blood glucose meter to make diabetes treatment decisions. Your patient should seek medical attention when appropriate. Please review the product instructions with your patient before using the G6 Pro.
- Page 13 When in doubt, get meter out. No Number, No Arrow, No CGM Treatment Decision If G6 Pro doesn’t show a number or arrow, or readings don’t match symptoms, use meter to make diabetes treatment decisions. No number, no arrow, no treatment decision. When in doubt, get meter out.
- Page 14 5 minutes and at full volume after 10 minutes. The smart device vibrations for alerts aren’t different than vibrations originating from sources other than the Dexcom CGM app. (Vibratory annunciation only available in smart devices with vibratory functionality.) Alarm and important alerts sound and display information even when volume is low or muted.
- Page 15 Lock screen. This will allow notifications to be seen without unlocking the phone. Apple Devices: During G6 Pro setup, enable Dexcom app notifications or patient won’t get alarm/alerts. Battery: The app must always be running in the background and may drain smart device battery.
- Page 16 The transmitter is small part and poses a choking hazard, particularly for children. Use Meter During Sensor Warmup When a new sensor is started, there won’t be any G6 Pro readings or alarm/alerts. Use meter to make treatment decisions during the 2-hour sensor warmup period.
- Page 17 G6 Pro, make sure there are no cracks in transmitter, and transmitter holder. If you find a crack, please contact Technical Support. Do not allow these skin care products to contact the G6 Pro. After using skin care products, wash hands before touching G6 Pro. If any skin care products get on G6 Pro, immediately wipe with a clean cloth.
- Page 18 Where to Insert: Things to Check Don’t remove sensor or transmitter from packaging until you are ready to use. Keep the safety guard on until you put the G6 Pro applicator against the patient’s skin. If you remove the safety guard first, you may hurt the patient by accidentally pushing the button that inserts the sensor before you mean to.
- Page 19 Advanced Imaging Technology (AIT) body scanner (also called a millimeter wave scanner) or putting any part of the G6 Pro in the baggage x-ray machine. Your patient can wear the G6 Pro for the walk-through metal detector.
- Page 20 2.5 Caution US Federal law restricts the sale of G6 Pro to the sale by or on the order of a physician. G6 Pro User Guide...
- Page 21 • Local skin irritation from adhesive patch • Additional risks of using the G6 Pro app are: • Not getting alarm/alerts • Your patient using G6 Pro to make treatment decisions when they shouldn’t This section covers each of those risks in detail.
- Page 22 Not Getting Alarm/Alerts If the user is using the G6 Pro system in real-time and isn’t getting alarm/alerts, they could have severe low or high glucose without knowing it. Check smart device: • Battery charged: If the smart device battery is dead, the user won’t get readings or alarm/ alerts.
- Page 23 Using G6 Pro for Treatment Decisions You can use your G6 Pro to treat for a low or dose for a high in all but these few situations. See table below for details. Situation Treatment Decision Tool How you feel is consistent with...
- Page 24 Knowing Your Patient’s Trends The G6 Pro sends a reading every 5 minutes. It also provides reports and displays of your patient’s information so you can detect and reflect on trends, patterns, and how your patient’s body responds to different things, like exercise, stress, or food your patient has eaten.
- Page 25 Endocr Pract. 21(6):613-620. doi: 10.4158/ EP14520.OR. Vigersky, Robert, Shrivastav, Maneesh. 2017. “Role of continuous glucose monitoring for type 2 diabetes management and research.” Journal of Diabetes and Its Complications. 31(1):280-287. Doi: 10.1016/j.jdiacomp.2016.10.007. G6 Pro User Guide Chapter 3: Risks and Benefits...
- Page 26 Page intentionally left blank...
- Page 27 This chapter gives you an overview of the system and your role in helping your patient. 4.2 G6 Pro Components In this section, you’ll learn about the G6 Pro components, and how they work together. G6 Pro has three main parts: 1.
- Page 28 Images are representational only. Your system may look different. Unblinded CGM Patient Display Device Unblinded Only • To receive sensor information, patient downloads the G6 Pro app on their compatible smart phone (dexcom.com/compatibility). • Patient can do this in your office, but the Pro system was designed to have them do this at home.
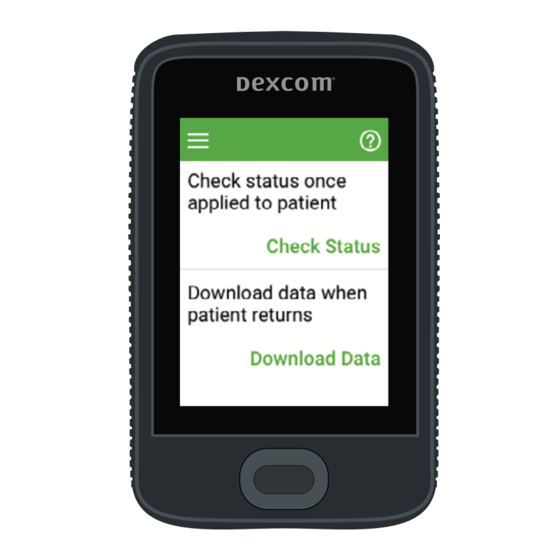
- Page 29 4.3 G6 Pro Reader There’s also a separate G6 Pro Reader (reader). Refer to the G6 Pro Reader instructions for information on how to use the reader with the G6 Pro CGM System. The reader can check system status and download patient data when they return the transmitter to you.
- Page 30 Transmitter retains sensor session data. After sensor session, patient returns transmitter to you. Compatible Data Tool: See G6 Pro Reader User Guide for complete information. Before patient leaves, and after sensor insertion, you have the option to check the G6 Pro system status.
- Page 31 Once the reader information is uploaded to Dexcom CLARITY, generate a report and review the patient’s results with them. Unblinded If you want your patient to use G6 Pro unblinded, first check to make sure their smart device is compatible with the Dexcom app. Go to: dexcom.com/compatibility.
- Page 32 Other patients may not be as interested in following their glucose patterns on a daily basis. Blinded allows them to use G6 Pro and, after the sensor session is over, you can share their results using the Dexcom CLARITY reports.
- Page 33 Save the reports on your computer or print them out. The transmitter only captures your patient’s glucose readings. If they entered Events into the G6 Pro app, they won’t be reflected on your Dexcom CLARITY report unless your patient gives you permission to view all of their information.
- Page 34 Page intentionally left blank...
- Page 35 G6 Pro 5.1 Introduction In the previous chapter, you received a high-level overview of the G6 Pro system. Now it’s time to learn about inserting the sensor and attaching the transmitter. After this chapter, you’ll be able to: • Get ready for your patient’s visit •...
- Page 36 Transmitter Only use transmitter and sensor inside the same box Patient Materials • Blinded CGM • Unblinded CGM (2-parts) You provide 1. Safety Gloves 2. Alcohol wipes G6 Pro User Guide Chapter 5: Getting Started with G6 Pro...
- Page 37 • Insert into an area with some padding and avoid muscle • Place away from waistband, muscles, scarring, tattoos, irritation, and bones Don’t: • Use bony sites, such as over ribs G6 Pro User Guide Chapter 5: Getting Started with G6 Pro...
- Page 38 To order overpatch, call Technical Support. Do not put tape over the transmitter. Insert Sensor STEP Insert Sensor Wash and dry hands. Put on safety gloves. G6 Pro User Guide Chapter 5: Getting Started with G6 Pro...
- Page 39 Let dry. STEP Insert Sensor Open applicator pack. STEP Insert Sensor Remove both labels. Don’t touch adhesive. G6 Pro User Guide Chapter 5: Getting Started with G6 Pro...
- Page 40 STEP Insert Sensor Fold and break safety guard. STEP Insert Sensor Press button. G6 Pro User Guide Chapter 5: Getting Started with G6 Pro...
- Page 41 The transmitter SN is for your unblinded patient’s app set up. Don’t give it to your blinded patient. If you do, your blinded patient may get unblinded data without you knowing. G6 Pro User Guide Chapter 5: Getting Started with G6 Pro...
- Page 42 Only use alcohol. STEP Attach Transmitter Insert tab into slot. Slot STEP Attach Transmitter Snap firmly into place. G6 Pro User Guide Chapter 5: Getting Started with G6 Pro...
- Page 43 For more information about the reader, see your Dexcom G6 Pro Reader User Guide. G6 Pro User Guide Chapter 5: Getting Started with G6 Pro...
- Page 44 Chapter 10 for removal information. Chapters 5–9 don’t pertain to blinded patients. Blinded patient information starts again at Chapter 10 and continues through the Appendices. G6 Pro User Guide Chapter 5: Getting Started with G6 Pro...
- Page 45 Unblinded The next steps for your unblinded patient are learning about the system, the home screen, alarm and alerts, along with making treatment decisions. In other words, using the G6 Pro on a day-to-day basis. Using the Unblinded material, review: •...
- Page 46 Page intentionally left blank...
- Page 47 G6 Pro. Go to dexcom.com/compatibility. To get started, have your patient download the G6 Pro app from the app store. Once downloaded, the patient opens the app and follows the onscreen setup instructions and unblinded patient materials.
- Page 48 Follow onscreen instructions. STEP Setting Up System When prompted, patient enters transmitter SN from materials. Enters code starting with “3”. G6 Pro User Guide Chapter 6: Unblinded – Using the G6 Pro...
- Page 49 After the 2-hour warmup, your patient begins getting their sensor readings. If your patient turns off their smart device, when they turn it back on, the app must be restarted. G6 Pro User Guide Chapter 6: Unblinded – Using the G6 Pro...
- Page 50 6.2 Home Screen Overview Your patient will spend most of their time viewing the home screen. It gives your patient their G6 Pro sensor glucose readings (sensor readings) and trend information. The home screen allows them to navigate to other app features.
- Page 51 Settings Siri: Your unblinded patient can ask Siri to tell them their G6 Pro readings and trend anytime their app is running! When Siri answers, their graph shows on the iPhone’s lock screen. Tell patient to go to their app settings and set up a Siri shortcut.
- Page 52 Android Settings Menu SHARE SETTINGS G6 Pro Reading Trend Arrow mg/dL Trend Graph High Alert Level Current Reading Low Alert Level Event History Events G6 Pro User Guide Chapter 6: Unblinded – Using the G6 Pro...
- Page 53 Changing 1–2 mg/dL each minute Rising or falling Changing 2–3 mg/dL each minute Rapidly rising or falling Changing more than 3 mg/dL each minute No arrow Can’t determine trend G6 Pro User Guide Chapter 6: Unblinded – Using the G6 Pro...
- Page 54 • Yellow: Sensor readings are above the High Glucose Alert setting • Red: Sensor readings are below the Low Glucose Alert setting Yellow = High Gray = In Target Red = Low G6 Pro User Guide Chapter 6: Unblinded – Using the G6 Pro...
- Page 55 Home Screen Issues Sometimes your patient doesn’t get G6 Pro readings or they won’t see a number, just a message. Those are times they won’t get alarm/alerts. What You See What It Means Your patient’s G6 Pro reading is 40 mg/dL or below.
- Page 56 Tap to: • Customize your patient’s CGM, such as alert settings. Events Tap to add or delete these events: • Carbohydrates • Insulin • Stress or illness • Exercise G6 Pro User Guide Chapter 6: Unblinded – Using the G6 Pro...
- Page 57 Have your patient make all alerts visible on their smart phone’s lock screen. Depending on the device and its settings, the G6 Pro will make a noise, or vibrate, or a combination of both. Glucose alarm and glucose alerts will override the app’s mute/silent feature.
- Page 58 If the sound is turned off, it only vibrates. Each alert has its own vibration pattern. For the list of sounds and vibration patterns, see Appendix I. G6 Pro User Guide Chapter 7: Alarm, Alerts, and Sounds...
- Page 59 High Glucose Alert Sensor glucose reading is above the set target range. On by default. Can turn off High Glucose alert. Discuss with your patient where to set their High Glucose alert. G6 Pro User Guide Chapter 7: Alarm, Alerts, and Sounds...
- Page 60 Won’t receive glucose readings or Alarm/Alerts. Tell patient: Use blood glucose (BG) meter to check glucose and make any treatment decisions. There are many more alerts that your patient can’t customize, see Appendix I. G6 Pro User Guide Chapter 7: Alarm, Alerts, and Sounds...
- Page 61 8.2 Events Overview An event is an action or situation that affects your patient’s glucose levels. With the G6 Pro, they can track daily events so they can reflect on their effect on their glucose trends. Once entered into the app, events show in Dexcom reports generated by Dexcom CLARITY.
- Page 62 8.3 Types of Events G6 Pro lets your patient keep track of insulin, carbs, exercise, and health-related events. After adding an event, it shows under the heading Events, in the app (landscape view), and in Dexcom CLARITY reports. The next section outlines how your patient enters a long-acting insulin event.
- Page 63 Finished! 8.4 Other Events Dosing insulin is not the only Event your patient can enter in to the G6 Pro. There are three other Event categories: 1. Carbs 2. Exercise 3. Health G6 Pro User Guide Chapter 8: Events...
- Page 64 When they have a moment, your patient can enter past events. Events are meant to be entered as individual occurrences: Don’t enter daily totals; each event is entered separately. G6 Pro User Guide Chapter 8: Events...
- Page 65 Android: Tap the pencil icon. After tapping the edit icon (differs based on the smart device), to delete an added event, use the red icon. Follow the smart device’s prompts to delete an event. G6 Pro User Guide Chapter 8: Events...
- Page 66 Android: Red icon is a trash can on the right. STEP Delete Event Confirm by tapping Delete Event. Finished! G6 Pro User Guide Chapter 8: Events...
- Page 67 Touch and hold a spot on the screen to see detailed information for that time. Tap labels along top to change time scale. Touch and hold on graph to see details for that time. G6 Pro User Guide Chapter 8: Events...
- Page 68 Page intentionally left blank...
- Page 69 However, there are times when they may want to use both their meter and the G6 Pro or need to use the meter instead of the G6 Pro. And sometimes, it’s best not to treat, just watch and wait.
- Page 70 When in doubt get their meter out. No number, no arrow, no treatment decision: Always use a meter if they don’t have a number and arrow. mg/dL mg/dL Treatment Decision: Meter or G6 Pro? Meter Only When Your Patient Sees Notice Number, no arrow...
- Page 71 • Use meter 9.3 When to Watch and Wait Whether your patient uses their meter, the G6 Pro, or both, there are times when they shouldn’t treat at all, just watch and wait. Stacking Insulin: Remind your patient not to stack insulin by taking doses too close together.
- Page 72 9.4 Using the Trend Arrows To make a treatment decision using the G6 Pro, your patient needs both a number and arrow. To get a trend arrow, your patient needs three back-to-back readings. No trend arrow? Their sensor reading might not be up-to-date, and your patient needs to use their meter to treat.
- Page 73 What: You dose to cover your meal. Why: You have a number and arrow, so no need for a fingerstick. mg/dL Because of the down arrow, you reduce your insulin amount. Less G6 Pro User Guide Chapter 9: Treatment Decisions...
- Page 74 Showing your patient how to make treatment decisions will help them get the most out of their G6 Pro experience. And of course, if there is something wrong with their smartphone, tell your patient to use their meter if they want to measure their glucose.
- Page 75 • Unblinded: Identify end of sensor session notifications • Unblinded/Blinded: Remove sensor and save transmitter. 10.2 Unblinded – End Your Sensor Session When the 10-day sensor session is almost over, G6 Pro sends notifications letting your unblinded patient know their sensor session is ending.
- Page 76 6 hours (shown above), 2 hours, and 30 minutes before. • Clock counts down until session ends. • Continue to get alarm/alerts and sensor readings until session is over. • Patient can end session early or wait. G6 Pro User Guide Chapter 10: Blinded/Unblinded End of Sensor Session...
- Page 77 Sensor Session Over Open app to confirm. App Notification What it means: • Sensor session is over • Your patient won’t get any more alarm/alerts or sensor readings. G6 Pro User Guide Chapter 10: Blinded/Unblinded End of Sensor Session...
- Page 78 Make sure you fill out Section C so they know when to remove the sensor. 10.4 Blinded and Unblinded – Remove G6 Pro Removing the sensor and applicator is the same for both blinded and unblinded patient. At the end of the sensor session, they simply peel off the G6 Pro.
- Page 79 STEP Remove Sensor Review the parts. Adhesive patch Transmitter Transmitter holder STEP Remove Sensor Grab edge of adhesive patch. Peel off like a Band-Aid ® G6 Pro User Guide Chapter 10: Blinded/Unblinded End of Sensor Session...
- Page 80 Once your patient has returned their transmitter, your next step is to download its data into the optional reader, then plug reader into your PC to upload the data to Dexcom CLARITY. Once the data has been uploaded into Dexcom CLARITY, you can generate reports to review with your patient.
- Page 81 Appendices • FAQs and Troubleshooting • Glossary • Technical Support • Maintenance of G6 Pro System • Going Through Security • Warranty • Technical Information • Label Symbols • Alerts and Notifications • Index...
- Page 82 Page intentionally left blank...
- Page 83 Troubleshooting Is there an error icon and no sensor reading? Or maybe the app beeped and vibrated? G6 Pro may have an issue; your patient probably won’t get sensor readings until it’s fixed. Read about the issues here or tap the error icon for more information.
- Page 84 If your patient can’t hear alarm/alerts on app, verify that the app, Bluetooth, volume, and notifications are on. If your patient restarts smart device, they must reopen the Dexcom app. G6 Pro User Guide Appendix A: FAQs and Troubleshooting...
- Page 85 Display device and transmitter not connecting. Action Use meter. No glucose alarm/alerts or G6 Pro readings until fixed. Turn Bluetooth on in phone settings. Wait up to 10 minutes for transmitter and app to communicate. High or Low Instead of a Sensor Reading...
- Page 86 No Readings Problem App isn’t getting sensor readings. No glucose alarm/alerts or G6 Pro readings until fixed. Use meter. Tap alert to get more information. Action Check transmitter: Is it flat and snug in its holder? Wait up to 3 hours while the system fixes itself.
- Page 87 Not getting G6 Pro readings for the last 20 minutes. Action No glucose alarm/alerts or G6 Pro readings until fixed. Use meter. In app, tap alert to get more information. Check transmitter: Is it snapped into the holder? Wait up to 3 hours while the system fixes itself. If not corrected after 3 hours, contact Technical Support at: •...
- Page 88 No G6 Pro Readings: Sensor Failed Alert Problem Not getting G6 Pro readings. Action No glucose alarm/alerts or G6 Pro readings. Use meter. Tap alert to get more information. If your sensor doesn’t work, contact Technical Support at: • General: 1.844.607.8398, 24/7 Toll Free USA •...
- Page 89 Transmitter and app aren’t communicating. Not getting G6 Pro readings. Action Use meter. No glucose alarm/alerts or G6 Pro readings until fixed. Move smartphone within 20 feet of the transmitter. Remove barriers (like walls or metal) between smartphone and transmitter. If patient is in water, they need to keep smartphone closer than 20 feet.
- Page 90 • General: 1.844.607.8398, 24/7 Toll Free USA • Healthcare Professionals: 1.844.436.2271, 6 am–6 pm (PST), Monday–Friday Follow steps on screen to: Remove this sensor and stop the sensor session in app. G6 Pro User Guide Appendix A: FAQs and Troubleshooting...
- Page 91 Check the transmitter: Is it flat and snug in its holder? Wait up to 3 hours while the system fixes itself. If not corrected after 3 hours, contact Customer Support for a replacement. G6 Pro User Guide Appendix A: FAQs and Troubleshooting...
- Page 92 Is the applicator stuck? Having trouble with the sensor? Review the solutions here to find a fix. Orange Button Stuck Problem Can’t push the applicator orange button in. Action Fold and break off safety guard before pushing orange button. G6 Pro User Guide Appendix A: FAQs and Troubleshooting...
- Page 93 Hold the front edge of patch and peel away from skin. Rock the applicator backwards, off your patient’s body. Make sure the sensor isn’t left on the skin. Don’t try to reuse the applicator. Call Technical Support. G6 Pro User Guide Appendix A: FAQs and Troubleshooting...
- Page 94 Prevent peeling before inserting the sensor by: Medical Tape • Using adhesive products (such as Mastisol , Skin Tac™, etc.) under ® the patch. • Thoroughly rubbing the patch onto skin. G6 Pro User Guide Appendix A: FAQs and Troubleshooting...
- Page 95 Adhesive Backing Won’t Come Off Problem Backing won’t come off the patch Action Lift the backing by the tab G6 Pro User Guide Appendix A: FAQs and Troubleshooting...
- Page 96 • Nothing is rubbing against transmitter holder, like a seatbelt or waistband • Insertion site is clean and dry before sensor insertion • Transmitter is snapped securely in transmitter holder • Transmitter holder isn’t dislodged and patch isn’t peeling G6 Pro User Guide Appendix A: FAQs and Troubleshooting...
- Page 97 Action Once snapped into place, the transmitter is water resistant. Swim, shower, or take a bath without worrying about the system. G6 Pro User Guide Appendix A: FAQs and Troubleshooting...
- Page 98 A.4 Accuracy G6 Pro Readings Do Not Match Symptoms Problem G6 Pro readings don’t match how you feel Action Wash your hands with soap and water. Dry them. Then take a fingerstick with your meter. If your meter value matches your symptoms, use it to make treatment decisions.
- Page 99 A.5 App Can’t Download App Problem Patient got a new smart device and can’t download the Dexcom app Action Check dexcom.com/compatibility for a list of smart devices that work with the G6 Pro app. If it’s a compatible device, stop sensor session on the current smart device.
- Page 100 Android Wear A type of smart watch. Software installed on a smart or mobile device. App or The G6 Pro app is a display for continuous Application glucose monitoring. App Store or Play Internet store for downloading applications to a Store smart device.
- Page 101 The removal poses a security risk and data may Jailbroken or become vulnerable. Rooted Don’t install the G6 Pro app on a jailbroken or rooted smart device. It may not work correctly. Milligrams per deciliter. The standard unit of mg/dL measure for BG readings in the United States.
- Page 102 A BG measurement taken by the G6. Typically Sensor Glucose referred to as “G6 Pro readings” in Reading these instructions. The 10-day monitoring period after inserting a new sensor. During this time frame, your glucose...
- Page 103 Dexcom Website: dexcom.com Dexcom Address: 6340 Sequence Drive San Diego, CA 92121 Technical Support For Dexcom product questions and troubleshooting issues, contact Technical Support at: • General: 1.844.607.8398, 24/7 Toll Free USA • Healthcare Professionals: 1.844.436.2271, 6 am–6 pm (PST), Monday–Friday...
- Page 104 Page intentionally left blank...
- Page 105 • Keep in sterile packaging until ready for use • Don’t start a sensor past the Use By Date: • May provide inaccurate G6 Pro sensor readings • May be unsterile • Use-by date is on package in year-month-day (YYYY-MM-DD) format •...
- Page 106 (sensor and applicator). Follow area’s local waste management requirements. D.5 Checking System Information Your patient can check their app for information about their CGM system any time. G6 Pro User Guide Appendix D: Maintenance of G6 Pro System...
- Page 107 To update and/or check: • CGM information: Insertion date and time, transmitter SN, when sensor expires • Transmitter software version • Support: Online help, account, and contact information Finished! G6 Pro User Guide Appendix D: Maintenance of G6 Pro System...
- Page 108 Page intentionally left blank...
- Page 109 Security Equipment to Use Hand-wanding, pat-downs, visual inspection, and walk- through metal detectors: If your patient is wearing a G6 Pro, use any of these screening methods. Security Equipment to Avoid The G6 Pro hasn’t been tested in advanced imaging technology (AIT) body scanners or X-ray baggage scanners.
- Page 110 For More Information Contact your airline for their policies. Visit the TSA’s website at tsa.gov. Email: TSA-ContactCenter@tsa.dhs.gov Phone: 1.866.289.9673 G6 Pro User Guide Appendix E: Going Through Security...
- Page 111 F.1 Dexcom Transmitter Limited Warranty This appendix covers our warranty information outlining what we cover and for how long. The G6 Pro System uses the Dexcom G6 transmitter and sensor applicator. What Is Covered and for How Long? Dexcom, Inc. (“Dexcom”) provides a limited warranty to the original purchaser ( “Purchaser”) that the Dexcom G6 transmitter (the...
- Page 112 (which may be subject to a separate limited warranty), whether provided by Dexcom or any other party; this includes cell phones or smart devices and connection to the internet. • A transmitter that has been taken apart physically or that has had any of its software accessed in any unauthorized manner.
- Page 113 Dexcom’s Obligations Under the Limited Warranty During the Warranty Period, Dexcom will replace, without charge to purchaser, any defective transmitter. To return, the transmitter must be sent to an authorized Dexcom Technical Support Department. Make sure to adequately package the transmitter for shipping.
- Page 114 Glucose Monitoring System. These limits on Dexcom’s warranty and liability obligations apply even if Dexcom, or its agent, has been advised of such damages and notwithstanding any failure of essential purpose of this Limited Warranty and the limited remedy provided by Dexcom.
- Page 115 The device performance described in this section are from studies conducted for the Dexcom G6 CGM System (G6). The performance of the G6 is relevant because the G6 Pro uses the same sensor and transmitter. NOTE: We recommend that you review the information in this chapter with your patient to understand how well the Dexcom G6 systems perform.
- Page 116 In Study 2, participants managed their glucose as they normally do; glucose was not deliberately manipulated. The data from these prospective clinical studies were further processed and analyzed at Dexcom to assess performance of factory calibration. G6 Pro User Guide...
- Page 117 For example, the total number of data pairs considered in the analysis was 25,101. Of these, 91.7% of the G6 Pro readings fall within ± 20 mg/ dL of the YSI blood glucose values < 70 mg/dL and within ± 20% of YSI blood glucose values ≥...
- Page 118 (6-17 YO) Pediatrics 92.7 (86.6) (2-5 YO)* * No YSI measurements were taken for this age group; results presented are from in-clinic CGM-SMBG matched paired measurements. CGM readings are within 40-400 mg/dL, inclusive. G6 Pro User Guide Appendix G: Technical Information...
- Page 119 -1.2 >250 89.3 95.9 99.9 * Includes pediatric subjects 6-17 years of age; no YSI measurements were taken for pediatric subjects 2-5 years of age. CGM readings are within 40-400 mg/dL, inclusive. G6 Pro User Guide Appendix G: Technical Information...
- Page 120 >250 89.5 94.7 100.0 11.1 * Includes pediatric subjects 6-17 years of age; no YSI measurements were taken for pediatric subjects 2-5 years of age. CGM readings are within 40-400 mg/dL, inclusive. G6 Pro User Guide Appendix G: Technical Information...
- Page 121 98.8 181-250 1,401 84.9 93.3 99.8 -0.8 >250 85.2 94.0 100.0 -3.3 * Includes pediatric subjects 6-17 years of age; no YSI measurements were taken for pediatric subjects 2-5 years of age. G6 Pro User Guide Appendix G: Technical Information...
- Page 122 92.0 99.2 181-250 84.8 91.4 100.0 -0.1 >250 84.7 90.4 100.0 -2.1 * Includes pediatric subjects 6-17 years of age; no YSI measurements were taken for pediatric subjects 2-5 years of age. G6 Pro User Guide Appendix G: Technical Information...
- Page 123 139) of the YSI values were less than 80 mg/dL. When the G6 displayed “HIGH” (54 occasions), 100% (54 out of 54) of the YSI values were greater than 280 mg/dL. G6 Pro User Guide Appendix G: Technical Information...
- Page 124 YSI values. For example, Table 3-D shows that for pediatrics, when YSI values are within 81 to 120 mg/dL, you can expect your CGM readings to be within 81 to 120 mg/dL 78% of time. G6 Pro User Guide Appendix G: Technical Information...
- Page 125 0.1% 13.7% 59.1% 25.3% 1.9% 2,268 301- 350 0.2% 22.3% 63.4% 13.7% 0.5% 1,212 351- 400 0.8% 43.9% 52.5% 2.9% >400 5.9% 76.5% 17.6% CGM readings are within 40 to 400 mg/dL, inclusive. G6 Pro User Guide Appendix G: Technical Information...
- Page 126 5.0% 55.0% 40.0% * Includes pediatric subjects 6-17 years of age; no YSI measurements were taken for pediatric subjects 2-5 years of age. CGM readings are within 40 to 400 mg/dL, inclusive. G6 Pro User Guide Appendix G: Technical Information...
- Page 127 0.1% 11.3% 48.0% 38.0% 26.1% 351- 400 0.1% 10.5% 46.0% 47.8% >400 0.1% 5.9% 26.1% Total 1,180 2,191 3,503 2,910 2,457 2,755 2,383 1,601 CGM readings are within 40 to 400 mg/dL, inclusive. G6 Pro User Guide Appendix G: Technical Information...
- Page 128 Total 1,254 1,081 * Includes pediatric subjects 6-17 years of age; no YSI measurements were taken for pediatric subjects 2-5 years of age. CGM readings are within 40 to 400 mg/dL, inclusive. G6 Pro User Guide Appendix G: Technical Information...
- Page 129 [-1,0) 0.4% 9.5% 76.9% 12.5% 0.6% 0.1% 7,986 [0,1] 0.1% 1.0% 26.2% 60.6% 10.6% 1.6% 5,199 (1,2] 0.0% 0.4% 3.1% 26.8% 52.9% 16.8% 1,734 >2 0.1% 0.1% 0.8% 5.6% 22.1% 71.3% 1,367 G6 Pro User Guide Appendix G: Technical Information...
- Page 130 G6 results to YSI results at low and high blood glucose levels and determining if the alert may have sounded. The G6 and YSI values were compared by pairing the G6 Pro reading and the YSI value within before or after 15 minutes of each other. We suggest that you ask your doctor what alert settings would be best for you.
- Page 131 The Missed Detection Rate is the % of time the device did not alarm when the blood glucose level was at or below the alert setting within 15 minutes before and after the hypoglycemic event. G6 Pro User Guide Appendix G: Technical Information...
- Page 132 74.1 25.9 5,079 85.5 14.5 2,365 86.0 14.0 8,187 89.1 10.9 3,372 92.7 11,147 89.4 10.6 4,287 94.6 All subjects were considered in the analysis; however, not all subjects experienced hypo event. G6 Pro User Guide Appendix G: Technical Information...
- Page 133 * Includes pediatric subjects 6-17 years of age; no YSI measurements were taken for pediatric subjects 2-5 years of age. All subjects were considered in the analysis; however, not all subjects experienced hypo event G6 Pro User Guide Appendix G: Technical Information...
- Page 134 (Table 5-D), if your blood sugar was at or above 240 mg/dL, you can expect your alarm to sound approximately 90.2% of the time within 15 minutes and an alarm not to sound approximately 9.8% of the time. G6 Pro User Guide Appendix G: Technical Information...
- Page 135 Rate (%) 37,061 97.5 12,664 97.6 32,148 97.2 11,175 96.8 23,424 96.6 8,455 95.2 19,586 96.0 7,265 93.6 15,689 95.6 6,143 91.2 12,279 94.6 5,007 88.7 11.3 4,211 85.9 14.1 2,095 74.8 25.2 G6 Pro User Guide Appendix G: Technical Information...
- Page 136 1,453 91.7 3,068 86.9 13.1 1,093 90.2 1,010 77.2 22.8 84.8 15.2 * Includes pediatric subjects 6-17 years of age; no YSI measurements were taken for pediatric subjects 2-5 years of age. G6 Pro User Guide Appendix G: Technical Information...
- Page 137 Sensor Stability Sensors can be worn for up to 10 days. Performance was estimated by calculating the percentage of G6 Pro readings within 15 mg/dL or 15% (15/15%), 20 mg/dL or 20% (20/20%), and 40 mg/dL or 40% (40/40%), of the YSI values at the beginning (Day 1, 2), middle (Day 4, 5) and end (Day 7, 10) of the G6 lifecycle.
- Page 138 (e.g., Day 10) (see Figure 1-B). Among the 210 sensors evaluated, 28 sensors (13.3%) had “early sensor shut-off” where the sensor algorithm would have detected sensors that did not function as intended and shut them off. G6 Pro User Guide Appendix G: Technical Information...
- Page 139 Wear Day Number of Sensors Survival Rate (%) 99.4% 98.8% 98.8% 98.8% 98.1% 98.1% 96.8% 96.2% 94.9% 139* 93.5% * Includes sensors that survived more than 9.5 days (228 hours) of wear. G6 Pro User Guide Appendix G: Technical Information...
- Page 140 Figure 1-A. Kaplan Meier Curve of Sensor Life (Adults; N = 164) Note: “# of Censored” refers to sensors excluded from the survival analysis due to reasons not related to the device (e.g., subject dropped out of study) G6 Pro User Guide Appendix G: Technical Information...
- Page 141 Wear Day Number of Sensors Survival Rate (%) 99.0% 99.0% 97.1% 95.6% 91.1% 88.6% 85.5% 83.4% 79.2% 142* 76.8% * Includes sensors that survived more than 9.5 days (228 hours) of wear. G6 Pro User Guide Appendix G: Technical Information...
- Page 142 Figure 1-B. Kaplan Meier Curve of Sensor Life (Pediatrics; N = 210) Note: “# of Censored” refers to sensors excluded from the survival analysis due to reasons not related to the device (e.g., subject dropped out of study) G6 Pro User Guide Appendix G: Technical Information...
- Page 143 Table 8 below describes the reading captured rate by each wear day over the sensor life. Table 8� Reading Capture Rate by Wear Day (n=374) Wear Day Number of Sensors Capture Rate (%) 97.6 98.6 98.7 98.6 98.5 98.5 98.2 97.8 97.0 96.4 G6 Pro User Guide Appendix G: Technical Information...
- Page 144 (6-17 YO) Upper Upper Abdomen Abdomen Buttocks Buttocks CGM-CGM Matched Pairs 23,019 1,255 12,230 2,638 Paired Absolute 14.0 14.5 16.4 Difference (mg/dL) Paired Absolute 10.7 Relative Difference (%) Coefficient of Variation (%) G6 Pro User Guide Appendix G: Technical Information...
- Page 145 • Pediatric subjects 13-17 years of age: one (1) 12-hour clinic session • Pediatric subjects 6-12 years of age: one (1) 6-hour clinic session. The data from Study 2 was also further processed at Dexcom to assess performance of factory calibration.
- Page 146 Eighty-four percent (84%) of subjects felt the automatic sensor applicator was painless. All reported subjects (100%) found that the automatic applicator was easy to use and the IFU was easy to understand. G6 Pro User Guide Appendix G: Technical Information...
- Page 147 13 of these AEs occurred due to either skin irritation, such as erythema (redness) or edema (swelling), at the sensor needle insertion area or around the adhesive area, or mild to moderate excoriation and infection. G6 Pro User Guide Appendix G: Technical Information...
- Page 148 Sensor Product Specifications Glucose Range 40–400 mg/dL Sensor Useful Life Up to 10 days Temperature: 36°F–86°F Storage and Transport Conditions Store sensors in a cool, dry place Sterilization Sterile by radiation G6 Pro User Guide Appendix G: Technical Information...
- Page 149 Type BF applied part Electrical Shock TX/RX Frequencies 2.402–2.480 GHz Bandwidth 1.07 MHz Maximum Output 1.0 mW EIRP Power Modulation Gaussian Frequency-Shift Keying Data Rate 1 Mbps Data Communication 20 feet Range G6 Pro User Guide Appendix G: Technical Information...
- Page 150 ± 15 kV Air IEC 61000-4-2 Magnetic Field (50Hz) 30 A/m IEC 61000-4-8 Electrical Fast Transient/Burst IEC 61000-4-4 Surge IEC 61000-4-5 Voltage Dips and Interruptions IEC 61000-4-11 IEC 60601-1-11 Conducted Fields Disturbance IEC 61000-4-6 G6 Pro User Guide Appendix G: Technical Information...
- Page 151 Pro readings or gross inaccuracies. The user is encouraged to try to mitigate these effects by one of the following measures: If the G6 Pro reading changes by 30% or more in 5 minutes and the change does not reflect symptoms or recent actions, take a meter reading.
- Page 152 1. This device may not cause harmful interference, and 2. This device must accept any interference received, including interference that may cause undesired operation G6 Transmitter FCC ID Transmitter Part 9445-20 Number FCC ID PH29688 G6 Pro User Guide Appendix G: Technical Information...
- Page 153 Appendix H: Label Symbols Symbols may be found on the sensor and transmitter package labels. These symbols tell you about the proper and safe use of the G6 Pro. For a listing of what they mean, see below. You may also reference the Symbols Glossary at dexcom.com/symbols.
- Page 154 Keep Away from Heat Keep Dry Manufacturer MR Unsafe Part Number Prescription Required Serial Number Sterile by Radiation STERILE R Temperature Limitation Type BF Applied Part Use By Date G6 Pro User Guide Appendix H: Labeling Symbols...
- Page 155 Appendix I: Alerts and Notifications I.1 App: System Alerts Default Default Default Change Override Screen Sound Vibration Settings Mute Fixed Alert Beep Fixed Alert Beep Silent Alert Silent Alert G6 Pro User Guide Appendix I: Alerts and Notifications...
- Page 156 Default Default Default Change Override Screen Sound Vibration Settings Mute Silent Alert Fixed Alert Beep Silent Alert G6 Pro User Guide Appendix I: Alerts and Notifications...
- Page 157 Default Default Default Change Override Screen Sound Vibration Settings Mute Silent Alert Fixed Alert Beep Fixed Alert Beep Fixed Alert Beep G6 Pro User Guide Appendix I: Alerts and Notifications...
- Page 158 Repeat (default is 30 minutes) Sound (default is Urgent Low) Enable/ Disable (default is enabled) Notify Below (default is 80 mg/dL) Alert Repeat (default is Never) Sound (default is Low Alert) G6 Pro User Guide Appendix I: Alerts and Notifications...
- Page 159 (default is High Alert) Enable/ Disable Android Signal Sound Loss (default is Apple Alert Signal Loss Alert) Enable/ Disable (default is Signal disabled) Loss Sound Alert (default is Signal Loss Alert) G6 Pro User Guide Appendix I: Alerts and Notifications...
- Page 160 Page intentionally left blank...
- Page 161 Appendix J: Extend Your App With your Dexcom G6 Continuous Glucose Monitoring System (G6) app, your patient sees notifications from their lock screen or smart watch. Not seeing any data? Open the app. On their Apple smart device, they can set up Siri to tell them their G6 Pro readings.
- Page 162 Tap Show More to show your patient’s graph. G6 Pro Reading Trend Arrow Shows Past 3 hours High Alert Level Current Reading Low Alert Level Trend Graph G6 Pro User Guide Appendix J: Extend Your App...
- Page 163 G6 Pro Reading Trend Graph High Alert Level Current Reading Low Alert Level Shown Past 3 hours Quick Glance is on by default. Turn it off in the app: Settings > Quick Glance. G6 Pro User Guide Appendix J: Extend Your App...
- Page 164 • Smart watch only communicates with the smart device, not the transmitter. • No alarm/alerts or G6 Pro readings on the smart watch unless it’s connected to a smart device. Make sure your patient understands how they get notifications when a watch is connected.
- Page 165 Android Wear Setup Using the Dexcom G6 watch face, check G6 information. See smart watch instructions for details. Android Wear Trend Arrow G6 Pro Reading Current Time Shown Past 3 hours Trend Graph High Alert Level Current Reading Low Alert Level...
- Page 166 J.4 Siri (Apple) Use app settings to set up a Siri shortcut. Ask Siri to announce G6 Pro readings and trend anytime your app is running! When Siri answers, graph shows on lock screen. G6 Pro User Guide...
- Page 167 Use Settings > Health Apps to start. Once you set up the health app, the last 30 days of glucose information (except the last 3 hours) is sent to the health app. Subsequently, new glucose information – delayed by 3 hours – is sent. G6 Pro User Guide Appendix J: Extend Your App...
- Page 168 Page intentionally left blank...
- Page 169 Unblinded, 29, 43 Ending 10-day, 73 Customer Service, 101 Ending early, 73 Error messages, 82, 153, 157 Inserting sensor, 36 Event Prepping for sensor insertion, Categories, 60, 61 Preventing sensor failures, 103 Definition, 59 Warmup, 47 G6 Pro User Guide Index...
- Page 170 Signal Loss Alert, 87 Treatment decisions When to use meter, 68 Troubleshooting Accuracy questions, 96 Error messages, 82 Sensor or applicator issues, 90 Warranty, 109 G6 Pro User Guide Index...
- Page 171 Covered by patents dexcom.com/patents. Dexcom and Dexcom G6 are either registered trademarks or trademarks of Dexcom, Inc. in the United States and/or other countries. Bluetooth is a registered trademark owned by Bluetooth SIG, Inc. All other product or company names that may be mentioned in this publication are trade names, trademarks, or registered trademarks of their respective owners.
- Page 172 Dexcom, Inc. 6340 Sequence Drive San Diego, CA 92121 USA Phone: 1.858.200.0200 Tech Support: • General: 1.844.607.8398, 24/7 Toll Free USA • Healthcare Professionals: 1.844.436.2271, 6 am–6 pm (PST), Monday–Friday Web: dexcom.com MT25847 / LBL017179 Rev 005, Rev Date: 02/2020...
Need help?
Do you have a question about the G6 Pro and is the answer not in the manual?
Questions and answers