Table of Contents

Related Manuals for Oricom CARE120


Summary of Contents for Oricom CARE120
-
Page 1: User Guide
CARE120 Amplified Phone with Caller ID User Guide Keep this user guide for future reference. Always retain your proof of purchase in case of warranty service and register your product on line at: AUSTRALIA: www.oricom.com.au... -
Page 2: General Information
Do not install in damp locations such as a bathroom or laundry, do not expose the unit to direct sunlight. Need Help? If you need assistance setting up or using your Oricom product now or in the future, call Oricom Product Support. Australia 1300 889 785 www.oricom.com.au... - Page 3 Notes for operation in New Zealand The grant of a Telepermit for any item of terminal equipment indicates only that Telecom has accepted that the item complies with the minimum conditions for connection to its network. It indicates no endorsement of the product by Telecom, nor does it provide any sort of warranty.
-
Page 4: Location Of Controls
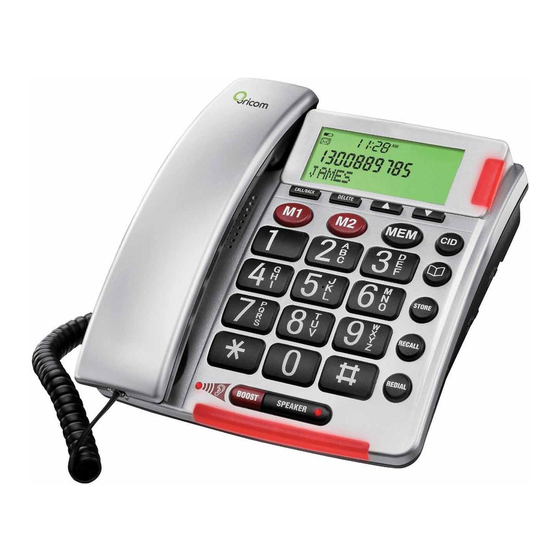
Location of Controls CALL/BACK DELETE STORE RECALL REDIAL BOOST 1. Power adapter socket 15. Ring Hi/Mid/Off switch 2. Telephone line socket 16. Up /Down keys 3. Hook switch 17. Memory button 4. Delete button 18. Caller ID button 5. Handset holder 19. -
Page 5: Installation
Installation Installing batteries in the phone Warnings You must install 4 AA batteries in the phone base. The battery back up system will then be able to power the unit for up to 12 hours if there is a mains power failure. If your mains power has been turned off for an extended period or the power supply to the phone has been unplugged from mains power you should replace the batteries with 4 new high... -
Page 6: Wall Mounting
Wall Mounting Method A. To fit to an existing telephone wall plate with modular connector simply, 1. Press and lift out the handset holder on base. Rotate it 180°, and snap it into place (see Fig A) so it will hold the handset in place when the phone is mounted on the wall. -
Page 7: Basic Settings
Basic settings 1. After installing the batteries, the display should flash the word “ENGLISH”. If not, press and hold for approximately 4 seconds. 2. Select the desired language using . Press DELETE button. 3. Select the desired contrast setting (2=Default) using Press DELETE button. -
Page 8: Pre Dialing A Call
Pre Dialing a Call 1. Dial the number you wish to call . To correct a number press the DELETE button for each incorrect digit. 2. Pick up the handset or press the SPEAKER button. Receiving a Call When you receive a call, the telephone rings, the Ringer LED flashes, and the display shows the CALL# and the caller telephone number (with caller ID service activated). -
Page 9: Take Two Different Calls At The Same Time
Recall and call waiting Press the Recall button followed by the extension number to transfer calls when connected to a PBX. Access to additional network services can be gained by using the Recall button * and # keys. Contact your network operator for more information. -
Page 10: Volume Control
To purchase a suitable shaker unit in Australia (Model no. VIB100PS) contact Oricom direct on (02) 4574 8888. Note: The SHAKER function can only be activated when the power adaptor is connected (power adaptor supplied with Shaker unit). -
Page 11: Hearing Aid Compatibility
Hearing Aid Compatibility This unit is compatible with most inductively coupled hearing aids on the market. However due to the wide range of hearing aids available we cannot guarantee that the unit will function error free with every model. The Phone Book The Phone Book will store 32 telephone numbers (22 digits max) and their associated names (16 characters max) with entries arranged alphabetically. -
Page 12: Storing Names/Numbers
Storing names/numbers 1. Press 2. Press STORE . 3. Press STORE again. 4. Enter the telephone number to be stored (up to 22 digits). Press STORE. 5. Enter the name (up to 16 characters). Press the corresponding number button one or more times for the first letter (see the table above). -
Page 13: Storing One-Touch Memories
Deleting phone book entry 1. Press 2. Scroll to the required memory location using 3. Press DELETE. “DELETE?” will be displayed, alternatively press and hold DELETE button until the display shows “DELETE ALL?”. 4. Press and hold DELETE until the displayed telephone number disappears. -
Page 14: Storing Two-Touch Memories
Storing Two-touch Memories 1. Press STORE button. 2. Enter the telephone number to be stored (up to 22 digits). Press STORE button. 3. Enter the name (up to 16 characters) . Press the corresponding number button one or more times for the first letter (see the above table). -
Page 15: Retrieving And Dialing Cid Numbers
Retrieving and dialing CID numbers 1. Press CID button to select caller-id mode. 2. Press either to review the numbers stored in the Caller ID memory. 3. To dial a displayed telephone number either press CALL BACK or SPEAKER, the displayed telephone number will now be dialed. -
Page 16: Cleaning And Care
Cleaning and care The surface of the case can be cleaned with a dry, soft, lint-free cloth. Never use cleaning agents, particularly aggressive solvents. Apart from occasional cleaning of the case, no other care is necessary. The rubber feet of the base station are not resistant to all cleaning agents. -
Page 17: Customer Support
Troubleshooting section of this user guide as well as “Frequently Asked Questions” on our website www.oricom.com.au. If you have further questions about using the product after reviewing the resources above or would like to purchase replacement parts or accessories please call our Customer Support Team. - Page 18 How to make a claim under Warranty in Australia Oricom has a simple warranty process for you to follow: details follow. shooting with you if your product qualifies under warranty. If not apply to your product. lia must include all of the following: you in returning any faulty product to us.
- Page 19 Important Information Repair Notice Please be aware that the repair of your goods may result in the loss of any user-generated data (such as stored telephone numbers, text messages and contact information). Please ensure that you have made a copy of any data saved on your goods before sending for repair.
-
Page 20: Warranty Information (Australia)
Warranty Period. Oricom warrants that the product is free from defects in materials or workmanship during the Warranty Period. This Warranty does not extend to any product from which the serial number has been removed or was purchased outside of Australia. - Page 21 No change to the conditions of this Warranty is valid unless it is made in writing and signed by an authorised representative of Oricom. Oricom will not be in breach of a warranty expressly set out in this User Guide or under the Competition and Consumer Act 2010 and...
- Page 22 Oricom will not be liable for any damages caused by the product or the failure of the product to perform, including any lost profits or savings or special, incidental or consequential damages. Oricom is not liable for any claim made by a third party or made by you on behalf of a third party. This...
Need help?
Do you have a question about the CARE120 and is the answer not in the manual?
Questions and answers