Furuno Felcom 15 Operator's Manual
Inmarsat-c mobile earth station
Hide thumbs
Also See for Felcom 15:
- Service manual (228 pages) ,
- Operator's manual (228 pages) ,
- Installation manual (51 pages)
Table of Contents
Advertisement
Quick Links
Advertisement
Table of Contents

Related Manuals for Furuno Felcom 15


Summary of Contents for Furuno Felcom 15
- Page 1 INMARSAT-C MOBILE EARTH STATION FELCOM 15 MODEL...
- Page 2 9-52 Ashihara-cho, 9-52 Ashihara-cho, Nishinomiya, Japan Nishinomiya, Japan Telephone : 0798-65-2111 Telephone : 0798-65-2111 Telefax : Telefax : 0798-65-4200 0798-65-4200 All rights reserved. All rights reserved. Printed in Japan Printed in Japan PUB.No. PUB.No. OME-56350 OME-56350 ( ( DAMI DAMI ) ) FELCOM15 FELCOM15 Your Local Agent/Dealer Your Local Agent/Dealer...
- Page 3 SAFETY INSTRUCTIONS WARNING Do not open the equipment. Hazardous voltage which can cause electrical shock, burn or serious injury exists inside the equipment. Only qualified personnel should work inside the equipment. Hazardous microwave. Do not approach within 60 cm of the antenna radome when it is transmitting.
-
Page 4: Table Of Contents
TABLE OF CONTENTS FOREWORD... vi SYSTEM CONFIGURATION ... viii INMARSAT C SYSTEM OVERVIEW ... ix 1. OPERATIONAL OVERVIEW ...1-1 1.1 Terminal Unit ... 1-1 1.1.1 Turning the power on/off... 1-1 1.1.2 DISTRESS button ... 1-1 1.1.3 Diagnostics ... 1-1 1.1.4 Floppy disk drive, floppy disks... 1-2 1.1.5 Audio alarm... - Page 5 2.7 Station List ...2-29 2.7.1 Adding stations to the station list...2-29 2.7.2 Editing the station list...2-32 2.7.3 Printing the station list...2-33 2.8 Entering Own Ship’s Position ...2-34 2.9 Creating a Directory ...2-35 2.9.1 Creating a directory where to store messages...2-35 2.9.2 Specifying directory where to store messages ...2-37 2.10 E-mail Service List ...2-38 2.11 E-mail Setup ...2-41...
- Page 6 4.2.4 Automatically printing received messages... 4-28 4.2.5 Saving received messages to a floppy disk ... 4-28 4.2.6 Automatically saving received messages to a floppy disk... 4-29 4.2.7 Deleting received messages ... 4-30 4.3 Log ... 4-31 4.3.1 Displaying and printing the display log ... 4-31 4.3.2 Automatic printing of display log...
- Page 7 8.4 System Status Monitor ...8-6 8.5 Replacing the Battery...8-8 8.6 Replacing the Fuse ...8-8 8.7 Error Messages...8-9 8.7.1 Equipment trouble messages ...8-9 8.7.2 Warning messages ...8-10 APPENDIX...AP-1 Menu Tree... AP-1 International Telex/Telephone Country Code List... AP-9 LES List... AP-17 International Telex Abbreviations ... AP-18 International Telegraphy Alphabet ...
-
Page 8: Foreword
Introduction FURUNO Electric Company thanks you for considering and purchasing the FELCOM 15 Inmarsat C Mobile Earth Station. We are confident you will discover why the FURUNO name has become synonymous with quality and reliability. Mainly consisting of an antenna unit and a terminal unit, the FELCOM 15... - Page 9 Features Conforms to the following standards: IMO A.807(19), MSC.68(68) Annex 4, MSC/Cir 682, IMO A.694(17), IEC 61097-4 (1994), IMO A.664(16), IEC 60945 (2002), IEC 61162-1 (2000). E-mail facility. (To transmit E-mail, register with an LES provider which provides e-mail services.) Built-in Enhanced Group Call (EGC) receiver permits operation as EGC-only receiver.
-
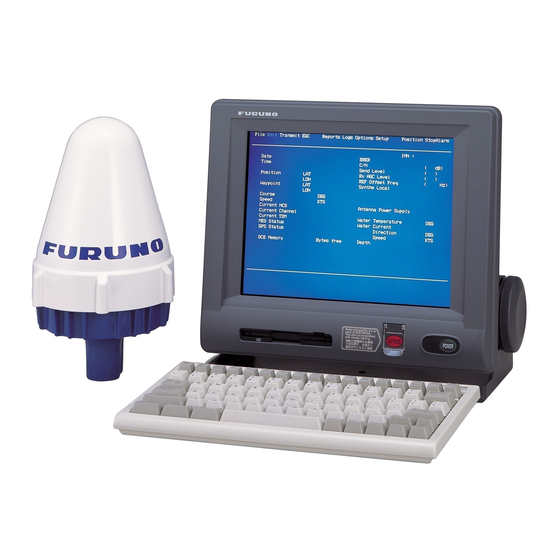
Page 10: System Configuration
SYSTEM CONFIGURATION SHIP'S MAINS 100/115/220/230 VAC 1 , 50/60 Hz AC-DC Power Supply PR-240-CE SHIP'S MAINS 12/24 VDC * For 12 VDC ship's mains, DC-DC converter is required to use PP-510. Distress Message Controller DMC-5 ** = Mandatory for EGC operation as required by IMO RES. A.664(16). CATEGORY OF UNITS Unit Category... -
Page 11: Inmarsat C System Overview
Communication mode is store-and-forward telex, which means all information sent are first stored at an LES and then delivered to designated party. An EGC (Enhanced Group Call) receiver is built in the FELCOM 15 to receive the following types of messages, broadcast by LESs: SafetyNET distribute maritime safety information to ships within selected areas. - Page 12 -/+: To set option -/+: To set option AOR-West OCC: Operation Control Center SCC: Satellite Control Center NCS: Network Coordination Station MES: Mobile Earth Station LES: Land Earth Station Same as left Same as left 0.0 m -/+: To set option...
- Page 13 The Inmarsat C system consists of the Operation Control Center (OCC), Satellite Control Centers (SCC), Network Coordination Stations (NCS), Land Earth Stations (LES) and Mobile Earth Stations (MES). The OCC, located at Inmarsat’s London headquarters, coordinates a wide range of activities in the Inmarsat system, including commissioning of mobile earth stations.
- Page 14 INMARSAT C SYSTEM...
- Page 15 Communications Network The illustration below shows the Inmarsat C communications network. NCS/LES Signaling Link Data Communications Network Land Earth Station Telex Network Terrestrial Communications Network NCS common channel NCS/LES signaling link LES TDM channel MES message channel MES signaling channel NCS/NCS signaling link MES interface Terrestrial network...
- Page 16 INMARSAT C SYSTEM Types of MES There are three types of MES: class 1, class 2 and class 3. This FELCOM 15 is a class 2 MES. 1) Transmits messages to LES Class 1: 2) Receives messages from LES 1) The functions of class 1 plus operation as an EGC receiver...
-
Page 17: Operational Overview
OPERATIONAL OVERVIEW Terminal Unit The terminal unit is the heart of the FELCOM 15 system, creating, transmitting and receiving messages. Floppy disk drive 1.1.1 Turning the power on/off Press the [POWER] switch to power or turn off the terminal unit, antenna unit, Distress Alert/Received Call Unit and Alarm Unit. -
Page 18: Floppy Disk Drive, Floppy Disks
1. OPERATIONAL OVERVIEW 1.1.4 Floppy disk drive, floppy disks The terminal unit provides a floppy disk drive for storing transmitted and received messages on floppy disks. The floppy disks used with the system are 2HD (1.44 MB) and 2DD (720 KB). 1.1.5 Audio alarm The audio alarm is released in the following instances. -
Page 19: Keyboard
Keyboard The FELCOM 15 is almost 100% keyboard controlled. Operation is carried out with the function keys, numbered F1-F10 at the top of the keyboard. The figure below shows keyboard layout. Transmit Function File Keys Edit Caps Lock Shift Ctrl 1.2.1... - Page 20 1. OPERATIONAL OVERVIEW Space Caps Lock Ctrl Num Lock Note 1: In telex, lower case, #, &, *, $, @, %, etc. are not used. A full list of characters useable in telex appears in the Appendix. For e-mail all characters and symbols may be used.
-
Page 21: Shortcut Keys
1.2.2 Shortcut keys The FELCOM 15 provides the keyboard shortcuts shown below for commonly used functions. Shortcut key [Alt]+[N] [Alt]+[O] [Alt]+[Q] [Alt]+[D] [Alt]+[S] [Alt]+[P] [Alt]+[X] [Delete] [Alt]+[C] [Insert] [Fn] + ← [Fn] + → [Alt]+[V] 1.2.3 Function key description Menu... -
Page 22: Distress Alert/Received Call Unit Ic-305, Alarm Unit Ic-306
1. OPERATIONAL OVERVIEW Distress Alert/Received Call Unit IC-305, Alarm Unit IC-306 Distress Alert/Received Call Unit IC-305 The [DISTRESS] button functions to transmit the distress alert. To transmit the distress alert, press the button until its lamp lights continuously. For further details on how to transmit the distress alert, see paragraph 6.1. -
Page 23: Printer Pp-510 (Option)
1. OPERATIONAL OVERVIEW Printer PP-510 (option) The PP-510 prints transmitted and received messages. The POWER switch is on the right side of the unit. The lamp on the switch lights when the power is on. If the paper is set correctly the ON LINE lamp also lights. When both those lamps are lit, the printer is ready to print information received from the terminal unit. -
Page 24: Standby Display
1. OPERATIONAL OVERVIEW Standby Display After the equipment is turned on and the diagnostic test has been conducted, the standby display appears, showing the system status monitor. The system status monitor provides various operating information. For a detailed description, see paragraph 8.4. -
Page 25: Display Indications
1.5.1 Display indications The display is divided in three sections: 1) The function menu area 2) The working area 3) The operating status area File Edit Transmit 2) WORKING AREA (4a) (4b) Below are the indications and meanings of the items in parentheses in the illustration above. - Page 26 1. OPERATIONAL OVERVIEW (3) Terminal unit status IDLE IDLE (PENDING) SENDING RECEIVING LOGIN LOGOUT DISTRESS ALERT Data Report TESTING TEST SETUP SCANNING EGC RECEIVER (Reverse video) Delivery Status Req. Forced Clearing (4a) Communication status CALLING WAITING FOR ACKNOWLEDGEMENT Waiting for acknowledgement from RECEIVING EGC MESSAGE WAITING FOR BACKOFF Successful Login.
- Page 27 PV TEST CALL is pending. TEST-RECEIVING MESSAGE TEST-SENDING MESSAGE TEST-DISTRESS ALERT WAITING FOR ACTIVATION WAITING FOR TEST RESULT CLEARING PV TEST is Completed. PV TEST Failure. (4b) RF CON/CPU’s program version number DCE F15 Ver. XX (XX = Version Number) Note: Error message is displayed when equipment abnormality is detected.
- Page 28 1. OPERATIONAL OVERVIEW (8) Other information No display REC. MESSAGE EXISTS Displayed when a routine message has (Reverse video) Data Report (Reverse video) Message Report (Reverse video) (9) Date and time display With connection of a navigator (internal GPS navigator or external navigator), date and time (received from satellite) are displayed.
-
Page 29: Menu Overview
Menu Overview Operation of the FELCOM 15 is carried out through a menu system which you access with the function keys at the top of the screen. The example below shows how to choose menu options from the Editor Setup menu. -
Page 30: Error Messages And Alerts
1. OPERATIONAL OVERVIEW 4. Press the [ ] or [ ] key to choose option desired and press the [Enter] key. 5. Press the [Esc] key several times to return to the standby display. Note: On some menus the update window appears after you press the [Esc] key. -
Page 31: Using A Pc (Local Supply)
3. Create a folder where to store the application files. 4. Copy the contents of the FD-ROM to the folder. Note: Create a shortcut of the FELCOM 15 icon to easily start up the FELCOM 15 from the desktop. 1. OPERATIONAL OVERVIEW... -
Page 32: Starting Up, Quitting The Application
1. Turn on the terminal unit. 2. Turn on the PC. 3. Double-click the FELCOM 15 icon to start the application. 4. To quit the application, press the [F12] key while pressing the [Alt] key. Then, the following window appears. -
Page 33: System Initialization
SYSTEM INITIALIZATION This chapter provides the information necessary for initializing the FELCOM 15. Once the equipment is initialized, you need do no more than press a few keys to get fully automatic transmission and reception. Inmarsat assigns an MES an Inmarsat Mobile Number (IMN) when it applies for Inmarsat registration. -
Page 34: System Setup
4. Enter the date with the numeric keys. (Entry of date is not necessary if a GPS navigator is connected to the FELCOM 15.) 5. Press the [Enter] key to close the window. (Note that the IMN is entered during installation. - Page 35 Choose this setting to use external navigator. If two or more navigators EXT: are connected, the FELCOM 15 automatically chooses ship’s position data in the order of GPS, Loran C, and DECCA. Use the GPS receiver (option) built in the terminal unit.
- Page 36 2. SYSTEM INITIALIZATION 15. Press the [Enter] key to open the active port options window. System setup menu, active port options window 16. Press the [ ] or [ ] key to choose active port (terminal unit); “INT” or “ALL” as appropriate.
- Page 37 23. Press the [Enter] key to open the EGC output port options window. Setup System Date & Time MES Operation Mode Nav Port Active Port Message Output Port EGC Output Port 9. Configuration Network Setup Command Window System setup menu, EGC output port options window 24.
-
Page 38: Network Setup
17. Attach is selected; press the [Enter] key. Network Setup Network Mail Gateway Network setup menu Network 000.000.000.000 FELCOM 15’s IP address Subnet mask of shipboard LAN Shipboard LAN DHCP server Host name Domain name Network settings Mail Gateway Attach... - Page 39 18. Press the [↑] or [ ] key to choose the encode format for attachments: BASE64, UUENCODE, or BINARY. For Inmarsat C use UUENCODE. If a subscriber’s mail software does not use UUENCODE, scrambled characters may result. If you cannot read a received message do the following: 1) Choose attachment from Message File on the Transmit message.
- Page 40 Delivery Keyword.” The string between the keyword and carriage return is delivered to shipboard mail address. For example, a message carries the string /Local Addr/ smith@ship.furuno.com. If the auto delivery keyword is “Local Addr” the mail is delivered to smith@ship.furuno.com.
-
Page 41: Terminal Setup
Terminal Setup The Terminal Setup menu provides for selection of date display format, currency unit, screen saver on/off and window colors. 1. Press the [F8] key to choose the Setup menu. 2. Press the [4] key to display the Terminal Setup screen. 3. - Page 42 2. SYSTEM INITIALIZATION 14. You may change the background and foreground colors for the various display screens on the terminal unit as follows: Choose Window Color Setup and press the [Enter] key. b) Window is selected; use the [→] or [←] key to choose the item to adjust and then press the [Enter] key.
-
Page 43: Login And Logout
Note that you cannot transmit the distress alert or receive EGC messages unless you are logged in. If you will not be using the FELCOM 15 for a prolonged period, you should logout from the Inmarsat C system, before turning off the terminal unit. The Inmarsat C system will then register you as inactive, notifying anyone trying to call you that you are currently unavailable. - Page 44 2. SYSTEM INITIALIZATION Note: The terminal unit must be “idle” to login. (“Current State: IDLE” appears at the bottom of the screen.) When it is not idle, “Ignored: MES is not idle.” appears. Press the [Esc] key to return to the standby display.
-
Page 45: Logout
File Edit Options Current State: LOGOUT CALLING DCE F16 Ver. ** 4. When logout is completed, “Successful Logout.” appears and “Current State” changes from LOGOUT to IDLE. Then, turn off the FELCOM 15. Transmit Reports Logs Options Logout Start SYNC ( NCS ) -
Page 46: Egc Settings
2. SYSTEM INITIALIZATION EGC Settings 2.4.1 What is the EGC (Enhanced Group Call) service? The EGC service enables EGC information providers to send SafetyNET FleetNET and System messages via an LES to a specific groups of ships, or to all ships within a defined geographical area. Each type of EGC service is sent as follows: 1) The information provider prepares the message, and then accesses the appropriate Country of the international telex network to send the message... - Page 47 2) FleetNET This service allows authorized information providers such as commercial subscription services, shipping companies and governments, which have registered with a LES that supports FleetNET selected group of MESs. Typical applications of FleetNET a) Fleet or company broadcasts b) News broadcasts c) Commercial weather services d) Market quotations e) Government broadcasts to all vessels on a country’s registration...
-
Page 48: Egc Setup
2. SYSTEM INITIALIZATION 2.4.2 EGC setup The FELCOM 15 receives EGC messages directed to its present position and Navarea without further programming. The EGC Setup screen lets you choose additional areas for which to receive messages and also the Navtex station and type of message for Coastal Warning (NAVTEX Re-broadcast). - Page 49 7. Press the [Enter] key to open the navarea entry window. Setup Receive EGC Area Additional Position Navarea Fixed Area Waypoint (from NAV Equipment) NAVTEX Station Code Type of Message (Can't reject other report) Ice reports Meteo. forecasts Pilot service DECCA messages LORAN messages EGC setup menu, Navarea entry window...
- Page 50 2. SYSTEM INITIALIZATION 11. Press the [Enter] key to open the waypoint options window. Receive EGC Area NAVTEX 12. Choose ON to receive broadcasts for the area which contains the destination waypoint set on the navigator. 13. Press the [Enter] key to close the waypoint options window. 14.
-
Page 51: Adding Egc Channels
19. Press the [Esc] key to open the update window. Receive EGC Area Additional Position Fixed Area Waypoint (from NAV Equipment) NAVTEX Station Code Type of Message (Can't reject other report) 20. Yes is selected; press the [Enter] key to update EGC settings. 21. - Page 52 2. SYSTEM INITIALIZATION 5. Press the [Enter] key to open the EGC channel list entry screen. 6. Enter EGC channel frequency code. The EGC channel frequency code range is 8000-14000. 7. Press the [Enter] key to close the text window. 8.
-
Page 53: Saving, Printing Egc Messages Automatically
2.4.4 Saving, printing EGC messages automatically You may save and print EGC messages automatically as below. Automatically saving EGC messages 1. Press the [F8] key to display the Setup menu. 2. Press the [6] key to display the Auto Mode Setup menu. 3. - Page 54 2. SYSTEM INITIALIZATION Automatically printing EGC messages You can turn on/off automatic printing of FleetNET SafetyNET (Safety) messages. Distress and emergency SafetyNET messages are automatically printed regardless of printing setting. 1. Press the [F8] key to display the Setup menu. 2.
-
Page 55: Adding Ncs Channels
Adding NCS Channels This section shows you how to add NCS channels to the NCS Channel List. 19 channels can be listed per each ocean region. Currently, there are four NCS channels, and they are marked with asterisks in the list. Add NCS channels to the list as below when they become operational. -
Page 56: Les List
2. SYSTEM INITIALIZATION Note: If the ID or frequency entered is invalid the message "Input Error: NCS ID" (for invalid ID) or "Input Error: Channel No." (for invalid frequency) appears. Clear the error message by pressing the [Esc] key. Place the cursor at the invalid ID or frequency code. Then, press the [Enter] key and enter correct ID or frequency. - Page 57 3. Press the [2] key to display the LES List. AOR (WEST) Name Telenor S.S.Inc Stratos M.N KDDI Telenor S.S.AS 4. Using the arrow keys, choose the LES for which you want to enter toll charges. For example, choose KDDI in IOR. 5.
-
Page 58: Registering Les To Les List
2. SYSTEM INITIALIZATION 2.6.2 Registering LES to LES list Follow the procedure below to register a newly constructed LES. For LES ID see the Appendix. 1. Press the [F8], [9] and [2] keys to show the LES list. 2. Use the arrow keys to place the cursor where desired. For example, choose 005 in the AOR(WEST) column. -
Page 59: Editing The Les List
4. Name is selected; press the [Enter] key to open the text entry window. 5. Enter LES name (maximum 15 characters). 6. Press the [Enter] key. 7. Press the [ ] key to choose Remarks. 8. Press the [Enter] key. 9. -
Page 60: Printing The Les List
2. SYSTEM INITIALIZATION 2.6.4 Printing the LES list 1. Press [F8], [9] and [2] to display the LES list. 2. To print the LES list, press the [P] key while pressing the [Ctrl] key. LES List ( Printed at 02-02-25 02:33 ) +++++ AOR (WEST) ++++ Name Telenor S.S.Inc... -
Page 61: Station List
Station List 2.7.1 Adding stations to the station list The FELCOM 15 provides an “address book” for storing 99 station IDs. Enter station IDs as below. 1. Press the [F8] key to display the Setup menu. 2. Press the [9] key to display the Configuration menu. - Page 62 2. SYSTEM INITIALIZATION 6. Press the [Enter] key to open the station group entry window. 7. Enter station group name, using up to five characters. 8. Press the [Enter] key to close the window. 9. Press the [↓] key to choose Station Name. 10.
- Page 63 6. Press the [Enter] key to open the station ID entry window. 7. Enter telex subscriber number (for ship-to-shore) or MES Inmarsat Mobile Number (for ship-to-ship). Up to 15 characters, including space, can be entered. 8. Press the [Enter] key to close the window. 9.
-
Page 64: Editing The Station List
2. Press the [ ] or [ ] key to choose a station and then press the [Enter] key. 2-32 Reports Logs Options Setup Station List Type Code ID / Address E-Mail abc@ furuno.co.jp E-Mail xyz@ furuno.co.jp TELEX 463609999 Ctrl+P: Print Station list Position StopAlarm... -
Page 65: Printing The Station List
Station List ( Printed at 02-02-25 02:38 ) Group Name 3. Press the [Esc] key three times to return to the standby display. Type Dest, ID, Modem / Address E-Mail abc@ furuno.co.jp E-Mail xyz@ furuno.co.jp Seagull TELEX 463609999 Station Name... -
Page 66: Entering Own Ship's Position
2. SYSTEM INITIALIZATION Entering Own Ship’s Position When there is no navigation data or Nav Port in the System Setup menu is set for OFF, enter ship’s position manually as follows: 1. Press the [F9] key to display the Position menu. File Edit Transmit... -
Page 67: Creating A Directory
Creating a Directory You can create and specify the directory where to save incoming and outgoing messages to a floppy disk. If no directory is made, the messages are saved to the root directory of the floppy disk. 2.9.1 Creating a directory where to store messages The procedure below shows how to create a directory on a floppy disk. - Page 68 2. SYSTEM INITIALIZATION 6. Enter directory name and press the [Enter] key. Entered name appears. Note 1: To create a directory within a directory (at step 6), repeat steps 5 and 6. Note 2: To return to the root directory, place the cursor on [. .] and press the [Enter] key.
-
Page 69: Specifying Directory Where To Store Messages
2.9.2 Specifying directory where to store messages You may specify the directory where to store messages on a floppy disk as follows: 1. Press the [F8] and [8] keys to show the Directories menu. 2. Press the [ ] key to choose Message Directory and press the [Enter] key. 3. -
Page 70: E-Mail Service List
E-mail Service List The E-mail service list provides for e-mail service provider set up. E-mail service providers are already registered in the FELCOM 15. To add new e-mail service providers follow the procedure below. 1. Press the [F8] key to display the Setup menu. - Page 71 4. Press the [ ] to choose a blank line in the Station Name column and then press the [Enter] key. Service LES Name Service ID LES ID(AORW) (AORE) (POR) (IOR) Subject: Separator Attach File(MIME) Enter data for LES which offers e-mail services. For details contact LES directly.
- Page 72 2. SYSTEM INITIALIZATION 19. Type appropriate “To” header (for example, TO:, to+, etc.). 20. Press the [Enter] key to close the “to” header entry window. 21. Press the [ ] key to choose “Cc:.” 22. Press the [Enter] key to open the “Cc” header entry window. 23.
-
Page 73: E-Mail Setup
2.11 E-mail Setup Choose the LES where to forward e-mail. Also, you may need to register with an LES which provides e-mail services. 1. Press the [F8] key to display the Setup menu. 2. Press the [7] key to choose E-mail Setup. 6. -
Page 74: Saving, Loading System Settings
2. SYSTEM INITIALIZATION 2.12 Saving, Loading System Settings You can save system settings to a floppy disk and load them into the terminal unit. This is useful for having a backup copy of system settings. 2.12.1 Saving system settings to a floppy disk 1. -
Page 75: File Operations
When you remove a file from a working area this is called “closing a file.” FLOPPY DISK MEMORY INTERNAL MEMORY TWO WORKING AREAS FILE 1 FILE 2 FELCOM 15’s FILE 3 memory Internal memory Display Can select one for display. -
Page 76: Preparing Files
3. FILE OPERATIONS Preparing Files There are two types of files: routine and confidential. Files can be assigned a file name and saved to a floppy disk for later use. A message may contain maximum 32 Kbytes of characters. 3.2.1 Preparing a routine file 1. -
Page 77: Preparing A Confidential File
“S???-addressee code(-password):” in the first line of the message text. You can also receive confidential messages containing this header from a land subscriber or any MES which uses the FELCOM 15. There are two types of confidential messages: message with addressee code and message with both addressee code and password. -
Page 78: Editor Menu Setup
3. FILE OPERATIONS 3.2.3 Editor menu setup The Editor menu sets the parameters of the text editor. 1. Press the [F8] key to display the Setup menu. 2. Press the [3] key to display the Editor Setup menu. File Edit Transmit Editor Setup Text Mode... -
Page 79: Working With Text
The figure below shows the appearance of highlighted text. 0001 WE ARE CONFIDENT THAT YOU WILL ENJOY MANY YEARS OF OPERATION WITH 0002 THIS INMARSAT STANDARD C MOBILE EARTH STATION CONGRATULATIONS 0003 CONGRATULATIONS ON YOUR CHOICE OF FURUNO FELCOM ---- * ---------+---------+---------+---------+---------+---------+---------< TELEX 173 Char. - Page 80 [F2] key and then the [3] (Paste) key. Copying and pasting text 1. Choose the text you want to copy. 0001 THE FURUNO FELCOM INMARSAT STANDARD C MOBILE EARTH STATION, A 0002 SATELLITE COMMUNICATIONS ---- * ---------+---------+---------+---------+---------+---------+---------<...
- Page 81 Insert (with Citation) When you reply to a received message, you can insert the received message. “>” is placed at the head of the received message to distinguish it from your message. Select All Chooses the entire current file for cut and copy. Search and Replace Searching text The Search feature lets you search for text in a forward or backward direction.
- Page 82 3. FILE OPERATIONS 8. Yes is selected; press the [Enter] key. When the unit finds the word, the cursor stops at the first character of the word. If the string could not be found, the message “Not Found (To Quit: ESC)”...
- Page 83 10. Press the [↓] or [↑] key to choose Query or All. Query: Stop at each occurrence of word to answer yes or no to replacement. Replace every occurrence of word without stopping to confirm. All: 11. Press the [Esc] key. 12.
-
Page 84: Saving Files
3. FILE OPERATIONS Saving Files After you have created a message you may wish to save it to a floppy disk, for future use. The types of floppy disk used with the system are 2HD and 2DD. Inserting a floppy disk Gently insert a floppy disk in the disk drive on the front panel of the terminal unit. -
Page 85: Formatting A Floppy Disk
3.3.1 Formatting a floppy disk To save a message to a floppy disk the disk must first be formatted. Formatting prepares the disk so that information can be written to its surface. 1. Insert a blank floppy disk into the disk drive. 2. -
Page 86: Saving Files
2. Press the [4] key. The screen should look something like the one below. File Edit Transmit File 0001|THE FURUNO FELCOM 12 INMARSAT STANDARD C MOBILE EARTH STATION, A [A:\ 0002|SATELLITE COMMUNICATIONS UNIT PACKAGE FOR VIRTUALLY EVERY VESSEL. Filename E0970715.001 E0970715.002... -
Page 87: File Menu
ALT-N NT THAT YOU WILL ENJOY MANY YEARS OF OPERATION WITH 2. Open ALT-O STANDARD C MOBILE EARTH STATION FELCOM 3. Close ALT-Q S ON YOUR CHOICE OF FURUNO FELCOM. 4. Save ALT-S 5. Delete ALT-D 6. Rename 7. Print ALT-P 8. -
Page 88: Opening Files
File 1. New ALT-N 2. Open ALT-O 3. Close ALT-Q THE FURUNO FELCOM INMARSAT STANDARD C MOBILE EARTH STATION, A 4. Save ALT-S SATELLITE COMMUNICATIONS UNIT PACKAGE FOR VIRTUALLY EVERY VESSEL. UNIT 5. Delete ALT-D 6. Rename 7. Print ALT-P 8. -
Page 89: Opening A File When Both Working Areas Are Occupied
ALT-N NT THAT YOU WILL ENJOY MANY YEARS OF OPERATION WITH ALT-O STANDARD C MOBILE EARTH STATION FELCOM Size Date & Time ALT-Q S ON YOUR CHOICE IF FURUNO FELCOM. 02-02-25 20:54 ALT-S 02-02-25 02:13 ALT-D 02-02-25 05:42 02-02-25 02:33... -
Page 90: Saving A File Under A New Name
Options <[1] A:\SEIZOUSE> ALT-N NT THAT YOU WILL ENJOY MANY YEARS OF OPERATION WITH ALT-O STANDARD C MOBILE EARTH STATION FELCOM ALT-Q S ON YOUR CHOICE OF FURUNO FELCOM. ALT-S ALT-D Save this message? ALT-P 178 Char. [ Line 3 Col. -
Page 91: Printing Files On Floppy Disks
Printing Files on Floppy Disks You can print out a hard copy of a file stored on a floppy disk. 1. Press the [F1] key to display the File menu. 2. Press the [7] key. A list of files stored on the disk appears. 3. -
Page 92: Deleting Files
3. FILE OPERATIONS Deleting Files 1. Press the [F1] key to display the File menu. 2. Press the [5] key. A list of files stored on the disk appears. 3. Press the [↑] or [↓] key to choose the file you want to delete. To verify the contents of that file, tap the space bar. -
Page 93: Renaming Files
Renaming Files Do the following to rename a file. 1. Press the [F1] key. 2. Press the [6] key. 3. Press the [↑] or [↓] key to choose the file you want to rename. 4. Press the [Enter] key. 5. Delete old file name, and then type new file name. 6. -
Page 94: Decoding E-Mail Attachment
3. FILE OPERATIONS 3.10 Decoding E-mail Attachment When you can't read an e-mail attachment because it has been coded by MIME (Multipurpose Internet Mail Extensions), you may decode it as below. 1. Save the MIME-coded file to a floppy disk. (See paragraph 4.2.5 for the procedure.) This step is not necessary if Auto Receive Message Save is turned on in the Auto Mode Setup menu. - Page 95 7. To change file name, press the [Backspace] key to erase the file name, new file name and then press the [Enter] key. After decoding the file the screen looks something like the one shown below. Checking 'E0970715.001' . . . Decode 'ABC.ini'? Now decoding .
- Page 96 3. FILE OPERATIONS (This page intentionally left blank.) 3-22...
-
Page 97: Inmarsat C Communications
INMARSAT C COMMUNICATIONS This chapter explains how to transmit and receive. Before conducting any communications, be sure to login with the NCS in your area, following the instructions in paragraph 2.3.1. To transmit e-mail, you may need to register for e-mail services with an LES which provides such services. -
Page 98: Transmitting Prepared Message
4. INMARSAT C COMMUNICATIONS Message language, subscriber, destination type and code Message Subscriber English Inmarsat C MES Telex E-mail Russian Inmarsat C MES Telex E-mail Japanese Inmarsat C MES Telex E-mail Data Inmarsat C MES Land Network 4.1.2 Transmitting prepared message This section explains how to transmit a message you have just prepared. - Page 99 Date 97-08-04 2. Cancel Time Priority 01:32 (UTC) Normal 3. Request Delivery Status Message F Position Station Na Group Station Name Destination TELEX FURUNO Waypoint Country FRNINMBTSTS Station 65-2111 Seagull Course Modem whale Speed Address Current NCS 344 (IOR) LOGOUT...
- Page 100 (2) Press the [Enter] key to open subject entry window. (3) Type subject. (4) Press the [Enter] key to close the window. (5) To attach a file, press the [ ] key to choose Attach File. Station List Type Code FURUNO TELEX FRNINMBTSTS TELEX Seagull E-Mail Seagull@furuno.co.jp...
- Page 101 (6) Press the [Enter] key to open the attach file window. Transmit 1. Transmit Message 2. Cancel Priority 3. Request Delivery Status Message File Station Name Destination Type Prefix Code Country/Ocean Code Station ID Modem Type Address ---- * ---------+---------+---------+---------+---------+---------+---------< Subject 25 Char.
- Page 102 The message is sent with only 32KB of data. Transmit Message 97-08-04 BBER 01:32 (UTC) Normal SEISETU.TXT Send level Size FURUNO RxIF AGC Level Cost ********.** (US$) TELEX REF Offset Freq Synthe 1st local 3rd local Synthesizer TX2nd Local...
- Page 103 Note 3: Messages sent to the message queue may contain up to 32 KB of data. If data is larger than 32 KB, the message “Cannot enter this message to sending Queue. Press any key.” appears. 30. Press the [Esc] key twice to return to the standby display. The message(s) will be transmitted according to the Send Delay setting.
- Page 104 4. INMARSAT C COMMUNICATIONS Display log printout example (“Confirmation” ON, delivery status not received) The terminal unit displays transmit message status as follows: Message Send failed. This appears if the message could not be transmitted because of technical reasons such as satellite malfunction, signal degradation, or no reply from LES.
- Page 105 4. Press the [ ] key three times to choose the Destination Type. 5. Press the [Enter] key to open the destination type options window. Transmit 1. Transmit Message 2. Cancel Priority 3. Request Delivery Status Message File Station Name Destination Type Prefix Code Country/Ocean Code...
- Page 106 4. INMARSAT C COMMUNICATIONS Communication type: TELEX (Prefixed) 1. Press the [ ] key to choose Country/Ocean Code. 2. Press the [Enter] key to open the country/ocean code entry window. 1. Transmit Message 2. Cancel Priority 3. Request Delivery Status Message File Station Name Destination Type...
- Page 107 7. Type either recipient’s telex subscriber number (ship-to-shore) or IMN (ship-to-ship). 8. Press the [Enter] key to close the window. 9. Press the [ ] key to choose LES ID. 10. Press the [Enter] key to open the LES ID entry window. Transmit 1.
- Page 108 4. INMARSAT C COMMUNICATIONS Communication type: FAX 1. Press the [ ] key to choose Country/Ocean Code. 2. Press the [Enter] key to open the country/ocean code entry window. 3. Enter country code of recipient, referring to the list in the Appendix. 4.
- Page 109 Communication type: E-mail 1. Press the [ ] key to choose Address. 2. Press the [Enter] key to open the address entry window. Transmit 1. Transmit Message 2. Cancel Priority 3. Request Delivery Status Message File Station Name Destination Type Prefix Code Country/Ocean Code Station ID...
- Page 110 4. INMARSAT C COMMUNICATIONS 10. Press the [Enter] key to open the select file window. 1. Transmit Message 2. Cancel Priority 3. Request Delivery Status Message File Station Name Destination Type Prefix Code Country/Ocean Code Station ID Modem Type Address ---- * ---------+---------+---------+---------+---------+---------+---------<...
-
Page 111: Transmitting A File Stored On A Floppy Disk
4.1.3 Transmitting a file stored on a floppy disk 1. Close any open files. 2. Insert floppy disk containing file to be sent. 3. Press the [F3] key to display the Transmit menu. File Edit Transmit Transmit 1. Transmit Message 2. -
Page 112: Canceling Transmission On A Message Awaiting Transmission
4. INMARSAT C COMMUNICATIONS Note: When an e-mail with attachment is sent, the file volume increases by 1.5 times because of MIME coding. In this case, you can do the following to lower toll charges: a) Select file to attach from Message File. b) Choose DATA from Code. -
Page 113: Requesting Delivery Status
2. Press the [3] key to display the Request Delivery Status list. If no messages exist, “No message.” appears. Message File edit msg.002 edit msg.001 Reports Logs Transmit <[1] UNTITLED1> Cancel Station FURUNO Telenor S.S.Inc FUSA Telenor S.S.Inc 25 Char. [ Line 2 Col. Cancel window Reports Logs Transmit menu... - Page 114 4. INMARSAT C COMMUNICATIONS Message status list description Message number No.: Message File: File name. For no file name, “edit msg. 00X” appears (X = number from 001-999). Name of remote party (recipient) Station: The LES which received the message. LES: Normal or distress Priority:...
- Page 115 1. Press the [F3] key to display the Transmit menu. 2. Press the [3] key to display the Request Delivery Status list. Message File Station FURUNO edit msg.002 FURUNO Request delivery status display 3. Press the [↑] or [ ] key to choose a file.
-
Page 116: Accessing The 2-Digit Code Services
4. INMARSAT C COMMUNICATIONS 4.1.6 Accessing the 2-digit code services A range of special safety and general maritime services, known as the 2-digit code services, may be transmitted. The list on the next page shows the 2-digit code services available. To access a 2-digit code service do the following: 1. - Page 117 Maritime safety service 2-digit code Code Content Maritime enquiries Medical advice Technical assistance Time and charges requested at end of call Medical assistance Maritime assistance Meteorological reports Navigational hazards and warnings Ship position reports 12. Press the [ ] key to choose LES ID. 13.
-
Page 118: Displaying The Send Message Log
4. Press the [Enter] key to show data. Up to 10 stations displayed in case of multiple addressees Destination Type: E-Mail Station abc@furuno.co.jp Subject Test LES ID: 203 (KDDI) 5. Press the [Esc] key three times to return to the standby display. -
Page 119: Receiving
4.2.1 When a message is received Each time the FELCOM 15 receives a telex or e-mail it displays the message “Successful Receiving message.” If Auto Receive Message Save and Auto Receive Message Print in the Auto Mode Setup are set for ON, the message is automatically saved and printed (except confidential and password affixed messages). -
Page 120: Setting The Receive Alarm
4. INMARSAT C COMMUNICATIONS 4.2.2 Setting the receive alarm An audio alarm may be set to sound when a routine or confidential telex message or e-mail is received. The factory setting is OFF. 1. Press the [F8] key to display the Setup menu. 2. -
Page 121: Displaying, Printing Received Messages
4.2.3 Displaying, printing received messages Received messages (except confidential or password affixed) are automatically printed when the Auto Receive Message Print in the Auto Mode Setup is turned on. To print confidential or password affixed messages follow the procedure below. If you cannot read an e-mail attachment, because it is MIME-coded, go to paragraph 3.10. - Page 122 4. INMARSAT C COMMUNICATIONS 4. Press the [Enter] key for routine messages and messages with addressee code (no password). FROM FURUNO TO FRONTIER THE QUICK BROWN FOX JUMPS OVER LAZY DOG. ABCDEFGHIJKLMNOPQRSTUVWXYZ. 1234567890 Ctrl+P: Print For messages with both addressee code and password, the password entry window appears.
- Page 123 About attachments The FELCOM 15 receives a file with an attachment over a landline two ways. (The method depends on LES.) Mail main text and text mail which includes information about the attachment. Attachment data Mail and attachment file data Attachment data Message No.
-
Page 124: Automatically Printing Received Messages
4. INMARSAT C COMMUNICATIONS 4.2.4 Automatically printing received messages You may automatically print received messages (except confidential or password affixed) as follows: 1. Press the [F8] key to display the Setup menu. 2. Press the [6] key to display the Auto Mode Setup menu. 3. -
Page 125: Automatically Saving Received Messages To A Floppy Disk
4.2.6 Automatically saving received messages to a floppy disk You may automatically save received messages to a floppy disk as follows: 1. Press the [F8] key. 2. Press the [6] key to display the Auto Mode Setup menu. 3. Press the [↑] or [↓] key to choose Auto Receive Message Save. 4. -
Page 126: Deleting Received Messages
4. INMARSAT C COMMUNICATIONS 4.2.7 Deleting received messages 1. Press the [F6] key to display the Logs menu. 2. Press the [2] key to choose Receive Message Log. Message No. R0971106.001 R0971105.002 R0971105.001 R0971101.001 R0971024.001 ENTER: Display S: Save D: Delete 3. -
Page 127: Log
Transmitting station name. Blank for unregistered station or received message. Size of message in bytes Transmission results. Blank if a received message. Success: Successful transmission Fail: Failed transmission Rejected: Message rejected by LES 4. INMARSAT C COMMUNICATIONS Station Size Cond FURUNO 12345 Success Success 4-31... -
Page 128: Automatic Printing Of Display Log
4. INMARSAT C COMMUNICATIONS 4.3.2 Automatic printing of display log The Display Log can be automatically printed every 24 hours as follows: 1. Press the [F8] key to display the Setup menu. 2. Press the [6] key to display the Auto Mode Setup menu. 3. -
Page 129: Egc Messages
EGC Messages When an EGC message is received, RECEIVING EGC MESSAGE appears at the bottom left corner of the display. If Auto Message Save in the Auto Mode Setup is ON, EGC messages are automatically printed. EGC messages are automatically received, printed and saved to the terminal unit selected with EGC Output Port on the System Setup menu. -
Page 130: Displaying Egc Closed Network Id (Enid)
ENID is inhibited. 5. Press the [Esc] key to return to the standby display. 4-34 service, an MES must be registered with an information Reports Logs Options EGC Network ID List 00001 FURUNO 00002 FURUNO 04001 FURUNO 04002 FURUNO 04003 FURUNO... -
Page 131: Receiving Egc Distress Or Urgent Message
4.4.3 Receiving EGC distress or urgent message When the FELCOM 15 receives an EGC distress or an urgent message, the audio alarm sounds from its terminal unit, the Distress Alert/Received Call Unit IC-305 and the Distress Message Controller DMC-5. To silence the alarm, do the... - Page 132 4. INMARSAT C COMMUNICATIONS (This page intentionally left blank.) 4-36...
-
Page 133: Data Reporting And Polling
LES, the LES delivers the data to your home office. Some LESs may deliver it without being accessed. Data reporting can be initiated by setting a data report on the FELCOM 15 or receiving a polling command from your home office. -
Page 134: Setting A Data Report
5. DATA REPORTING AND POLLING 5.1.1 Setting a data report 1. Press the [F5] key to display the Reports menu. 2. Press the [1] key to choose Data Report. 3. Press [1], [2], [3] or [4] as appropriate. 4. Status is selected; press the [Enter] key to open the status options window. 5. - Page 135 16. Press the [↓] or [↑] key to choose “Regular Interval” or “Daily” as appropriate. 17. Press the [Enter] key to close the window. 18. Do one of the following depending on the selection you made at step 16. “Regular Interval” selected at step 16 (1) Press the [ ] key to choose Interval Time.
-
Page 136: Setting A Message Report
5. DATA REPORTING AND POLLING 5.1.2 Setting a message report 1. Press the [F5] key to display the Reports menu. 2. Press the [2] key to display the Message Report menu. 3. Press [1], [2], [3] or [4] as appropriate PIN Code Message Report Programming PIN code is unrelated to data reporting, however it is necessary for polling... - Page 137 9. Press the [↓] or [↑] key to choose “ON” or “OFF” as appropriate. Message report on OFF: Message report off 10. Press the [Enter] key to close the window. 11. Press the [ ] key to choose Station Name. 12.
- Page 138 5. DATA REPORTING AND POLLING “Daily” is selected at step 22 (1) Press the [ (2) Press the [Enter] key to open the start time entry window. (3) Key in the start time. (4) Press the [Enter] key to close the window. (5) If necessary, key in the start time of Start Times 2-4.
-
Page 139: Automatic Printing Of Data Report, Polling Command
5.1.3 Automatic printing of data report, polling command Data reports and polling commands are automatically printed, in the default state. If you do not require automatic printing of data reports or polling commands do the following: 1. Press the [F8] key to open the Setup menu. 2. -
Page 140: Polling
Polling command on MES message channel To make the polling command, enter D???, hyphen, PIN code (max. 8 digits), hyphen, file name (stored in the floppy disk of the FELCOM 15), colon and text of message. To send file data, type a hyphen and file name. If no hyphen and file name is entered, MES automatically transmits nav data (own ship position, course, speed, etc). -
Page 141: Other Polling Commands
KDDI station (Pacific Ocean: 203) specifying telex number 720-5644325. Then, that MES transmits position, speed, bearing, water temperature, current and depth. P???/12345678/TELEX/203/720/5644325/: To have other MES transmit position, speed and bearing by e-mail to abc@furuno.co.jp, for example, use the following command. P???/12345678/EMAIL/203/abc@furuno.co.jp:... -
Page 142: Polling Reception
5. DATA REPORTING AND POLLING 5.2.3 Polling reception No operator intervention is required during polling reception. The printer (printer PP-510 optionally available) prints the status of polling reception and transmits data in response to polling request as shown below. TX start frame (time) POLLING Message - - - Program Unreserved Data Reporting - - - DNID : 0004... -
Page 143: Dnid (Data Network Identification)
When you make a contract with an information provider, DNIDs are downloaded from the information provider to your FELCOM 15, via the appropriate LES. Up to 64 DNIDs can be downloaded to the FELCOM 15. You can see which DNIDs are stored as below. -
Page 144: Enabling/Disabling Dnid
5. DATA REPORTING AND POLLING 5.3.2 Enabling/Disabling DNID DNID can be enabled or disabled as follows: 1. Press the [F5] key followed by the [3] key to show the Data Network ID list. 2. Press the [ ] or [ ] key to choose desired DNID from the data network ID list. 3. -
Page 145: Distress Operations
[DISTRESS] button flashes slowly and the audio alarm sounds intermittently. To silence the audio alarm, press the [F10] key on the keyboard. Note: The [DISTRESS] button on the FELCOM 15 or the Distress Alert/Receive Call Unit IC-305 cannot be used to silence the audio alarm for incoming distress or EGC urgency broadcast. -
Page 146: Transmitting The Distress Alert With Nature Of Distress Specified
6. DISTRESS OPERATIONS Transmitting the Distress Alert with Nature of Distress Specified When a life-endangering situation arises on your vessel and there is time to specify nature of distress and recipient (LES) of distress alert send own ship data (position, time, speed and course) as follows: 1. - Page 147 16.Press the [Esc] key to show the update window. Setup LES ID Update Time Position Protocol Nature Course Speed Distress alert setup, update window 17. Yes is selected; press the [Enter] key to register settings. Setup LES ID Update Time Position Protocol Nature...
-
Page 148: Distress Message
6. DISTRESS OPERATIONS Distress Message The distress alert provides the minimum distress information: own vessel’s ID, speed, course, L/L position and nature of distress. After receiving the distress alert acknowledgment from an LES and you are not pressed for time, you may send a distress message as below to provide more detailed information. -
Page 149: Testing The Distress Button
Unit IC-305 may be tested as below without transmitting the distress signal. Note that the distress alert cannot be transmitted while testing the [DISTRESS] button. 1. Press the [F7] key to display the Options menu. FELCOM 15 functions as Inmarsat MES Transmit <[1] UNTITLED1>... - Page 150 6. DISTRESS OPERATIONS 2. Press the [7] key ([6] key when the FELCOM 15 functions as an EGC receiver) to display the Test menu. 3. Press the [4] key. 4. Press the [Enter] key to start the test. The buzzer sounds repeatedly, signifying the start of the test mode.
-
Page 151: Other Functions
OTHER FUNCTIONS This chapter describes how to abort operation, scan NCS, choose EGC and NCS channels and display LES information. Aborting an Operation You can abort transmission, receiving or scanning (on the NCS common channel) as follows: 1. Press the [F7] key to display the Options menu. Options menu (when FELCOM functions as Inmarsat MES) 2. -
Page 152: Scanning Ncs Common Channel
7. OTHER FUNCTIONS Scanning NCS Common Channel Scanning is possible when the FELCOM 15 is in idle state and functions as an Inmarsat C receiver. If the FELCOM 15 is not in idle state the message “Ignored: MES is not idle.” appears. Wait until the equipment becomes idle. -
Page 153: Choosing Egc Receiving Channel
Choosing EGC Receiving Channel EGC channel can be selected when the terminal unit is set to operate as an EGC-only receiver. However, this procedure is shown for reference only; currently there is only one EGC channel per NCS. 1. Press the [F7] key to display the Options menu. Options menu (when FELCOM functions as EGC receiver) 2. -
Page 154: Choosing Ncs Channel
7. OTHER FUNCTIONS Choosing NCS Channel You may select NCS common channel as shown below. Currently, each satellite transmits one global beam. In the future, the satellites will transmit multiple spot beams, namely, the NCS will have multiple channels. 1. Press the [F7] key to display the Options menu. 2. -
Page 155: Les Information
LES Information Each time you log in LES data is automatically downloaded through the NCS common channel to the FELCOM 15, and saved to the LES Information display. You may view this display as follows: 1. Press the [F7] key to show the Option menu. - Page 156 7. OTHER FUNCTIONS Services: Alphabet shown only when Flag is “1” for a bit. Bit No. Flag TDM Ch.: TDM channel used by LES to transmit. Meaning Maritime distress alerting Maritime distress alerting SafetyNET traffic No SafetyNET traffic Inmarsat-C traffic No Inmarsat-C traffic Store and Forward No Store and Forward...
-
Page 157: Maintenance, Troubleshooting
MAINTENANCE, TROUBLESHOOTING This chapter provides the information necessary for the maintenance and checking of the FELCOM 15. Please review the safety information at the beginning of this manual before attempting any maintenance procedures. General Checking and Maintenance Turn off the power before conducting any maintenance procedures other than the cleaning of the terminal unit. -
Page 158: Diagnostics
8. MAINTENANCE, TROUBLESHOOTING Diagnostics The system is equipped with a diagnostic test which checks it for proper operation. 8.2.1 Self test at power on The terminal unit performs the ROM sum test and RAM read and write test when turned on. If the test results are normal the equipment goes into standby. If error is found you cannot transmit. -
Page 159: Performance Verification (Pv) Test
When the test is completed, the screen shows the test results as shown at the top of the next page. Options 1. Login 2. Logout 1. PV Test 3. Abort 2. PV Test Result TERM CPU 4. Select NCS 3. Self Test 5. -
Page 160: Pv Test Procedure
8. MAINTENANCE, TROUBLESHOOTING 10. When the distress alert test is finished, the LES sends the results of the PV test to the MES. 8.3.2 PV test procedure 1. Confirm that the terminal unit is in idle condition and logged in. 2. -
Page 161: Displaying Pv Test Results
8. The test results appear on the PV Test Result screen. See the next section for how to interpret the results. 8.3.3 Displaying PV test results 1. At the standby display, press the [F7] key to display the Options menu. 2. -
Page 162: System Status Monitor
8. MAINTENANCE, TROUBLESHOOTING System Status Monitor The system status monitor, which is always displayed, provides date, time, equipment status and navigation data. File Edit Transmit Date Time Position Waypoint Course Speed Current NCS Current Channel Current TDM MES Status GPS Status DCE Memory Current State: IDLE DCE F15 Ver. - Page 163 Memory remaining in communication unit DCE Memory: Bulletin Board Error Rate (%) BBER: Check of circuit status with LES, receiving circuit in C/N: antenna unit and RF CON/CPU Board in communication unit. OK appears for figure greater than 31. TX level check. At transmission, OK appears for Send Level: figure greater than 123.
-
Page 164: Replacing The Battery
8. MAINTENANCE, TROUBLESHOOTING Replacing the Battery The lithium battery in the terminal unit is used to backup system settings when the power is turned off. The life of this battery is about five years, however actual life depends on usage. When the battery is dead, the terminal unit automatically reverts to default system settings. -
Page 165: Error Messages
Check that the IC-305 is powered and connected to the FELCOM. Check that the DMC-5 is powered and connected to the FELCOM. Contact a FURUNO agent or dealer for advice. Check that the IC-306 is powered and connected to the FELCOM. Have a licensed radiocommunications technician check the set. -
Page 166: Warning Messages
8. MAINTENANCE, TROUBLESHOOTING 8.7.2 Warning messages Messages in this category are prefixed with “WARNING:” Error Message BBER over 80%. Scanning NCS start manually. Cannot enter new DNID. Memory full for DNIDs. Cannot enter new ENID. Memory full for ENIDs. Cannot find NCS CC in all region. -
Page 167: Appendix
APPENDIX Menu Tree F1: File 1. New 2. Open 3. Close 4. Save 5. Delete 6. Rename 7. Print 2HD (1.44MB), 2DD (720kB) 8. Format Disk 9. MIME (Decode) F2: Edit 1. Cut 2. Copy 3. Paste 4. Insert (With Citation) 5. - Page 168 APPENDIX F3: Transmit 1. Transmit Message Priority Message File Station Name Destination Type Prefix Code (Prefix selected) Country/Ocean Code Station ID Modem Type (FAX, FAX prefixed selected) Address (For e-mail) Subject (For e-mail) Attach File (For e-mail) LED ID Option Confirmation Send Delay Delivery Delay...
- Page 169 F5: Reports 1. Data Report 1. Data Report 1 2. Data Report 2 3. Data Report 3 4. Data Report 4 2. Message 1. Message Report 1 Report Status ON, OFF Report Length 1, 2, 3 Destination DNID selection Activation Regular Interval, Daily Interval Time 00:01-99:59;...
- Page 170 APPENDIX 2. Message Report 2 3. Message Report 3 4. Message Report 4 3. Data Network ID F6: Logs 1. Send Message Log 2. Receive Message Log 3. EGC Log 4. Log F7: Options (FELCOM functions as Inmarsat MES) 1. Login Yes, No 2.
- Page 171 F8: Setup 1. Distress Alert Setup 2. System Setup LES ID LES selection Update Time 00:00 - 23:59 Position Latitude and longitude input Protocol Maritime Nature Undesignated, Fire/Explosion, Flooding, Collision, Grounding, Listing, Sinking, Disabled & Adrift, Abandoning ship Further assistance required, Piracy or Armed attack Course 0 - 999;...
- Page 172 APPENDIX 3. Editor Setup Text Mode Edit Mode Word Wrap Line No. Tab Width Column Width Cursor Type Scroll 4. Terminal Setup Date Disp. Form Currency Unit Screen Saver Window Color 5. EGC Setup Additional Position Navarea Fixed Area Waypoint (Destination waypoint set on navigator) Station Code...
- Page 173 6. Auto Mode Auto Log Print Setup Receive Alarm Auto Receive Message Save Auto Receive Message Print Data Report & Polling Print Auto EGC Message Save Auto EGC Message Print 7. E-mail Setup LES setting 8. Directories Message Directory EGC Message Directory 9.
- Page 174 APPENDIX 2. LES List (44 per ocean region) 3. EGC Channel List (20 per ocean region) 4. NCS Channel List (20 per ocean region) 5. E-Mail Service List (Max. 16) 6. Save/Load F9: Position F10: Stop Alarm AP-8 Name Max. 15 characters Remarks Max.
-
Page 175: International Telex/Telephone Country Code List
International Telex/Telephone Country Code List Telephone Area and Country Country Code Afghanistan Alaska Albania Algeria American Samoa American Virgin Is. Andorra Angola Anguilla Antigua & Barbuda Argentina Armenia Aruba Ascension Australia Australian External Territories Austria Azerbaijani Azores Is. Bahamas Bahrain Bangladesh Barbados Belarus... - Page 176 APPENDIX Telephone Area and Country Country Code Cambodia Cameroon Canada Canary Is. Cape Verde Cayman Is. Central Africa Rep. Chad Chile China Christmas Is. (Aus) CIS (formerly USSR) Cocos-Keeling Is. Colombia Comoros Congo Cook Is. Costa Rica Cote d' lvoire Croatia Cuba Cyprus...
- Page 177 Telephone Area and Country Country Code Falkland Is. (Malvinas) Faroe Is. Fiji Finland France French Guiana French Polynesia Gabon Gambia Georgia Germany (Fed, Rep. of) Ghana Gibraltar Greece Greenland Grenada Guadeloupe Guam (RCA) Guatemala Guiana Guinea Conakry Guinea Bissau Guyana Haiti Hawaii Honduras...
- Page 178 APPENDIX Telephone Area and Country Country Code Jamaica Japan Jordan Kazakhstan Kenya Kiribati Korea (Demo, People's Rep. of) Korea (Rep. of) Kuwait Kyrgyzstan Latvia (formerly USSR) Lebanon Lesotho Liberia Libya Liechtenstein Lithunia (formerly USSR) Luxembourg Macao Macedonia Madagascar Madeira Is. Malawi Malaysia Maldives Is.
- Page 179 Telephone Area and Country Country Code Montserrat Morocco Mozambique Myanmar (formerly Burma) Namibia Nauru Nepal Netherlands Netherlands Antilles New Caledonia New Zealand Nicaragua Niger Nigeria Niue Is. Northern Mariana Is. Norfolk Is. Norway Oman Pakistan Palau Panama Papua New Guinea Paraguay Peru Philippines...
- Page 180 APPENDIX Telephone Area and Country Country Code Reunion Romania Russian Federation Rwanda Saipan San Marino Sao Tome & Principe Saudi Arabia Senegal Seychelles Sierra Leone Singapore Slovak Slovenia Solomon Is. Somalia South Africa Spain Spanish North Africa Sri Lanka St. Helena St.
- Page 181 Telephone Area and Country Country Code Turks & Caicos Is. Tuvalu U. A. E. Abu Dhabi Ajman Dubai Fujairah Ras Al Khaimah Sharjah Umm Al Qaiwain Uganda Ukraine United Kingdom United Arab Emirates Upper Volta Uruguay Uzbekistan U. S. A. U.
- Page 182 APPENDIX Telephone Area and Country Country Code Zaire Zambia Zanzibar Zimbabwe Telephone Ocean Area Ocean Region Access Code AOR-W AOR-E AP-16 Telex Country Remarks for Telex Code Code Telex calls to places other than Kinshasa Subscriber beginning with 2XXXX can be made as Semi-automatic calls.
-
Page 183: Les List
LES List April/2002 Land earth station operator Beijing Marine Bezeq CP Radio Marconi Embratel France Telecom France Telecom (Ex DeteSat) KDDI Korea Telecom Morviasputnik (Nudel Les) Polish Telecom Saudi Telecom Co Singapore Telecom Stratos Mobile Networks Telecom Company of Iran Telecom Italia Telenor Satellite Services Inc Telenor Satellite Services AS... -
Page 184: International Telex Abbreviations
APPENDIX International Telex Abbreviations AP-18 . f f r i f l l o a l i s t i s ’ e l l l l a t i s... -
Page 185: International Telegraphy Alphabet
International Telegraphy Alphabet FIGURES LETTERS BELL * = Cannot be entered. FIGURES CARRIAGE RETURN LINE FEED LETTERS FIGURES SPACE BLANK APPENDIX LETTERS AP-19... -
Page 186: Messages
APPENDIX Messages Below are the various operational messages and their meanings. Messages are arranged according to function key. [F1] File 1. "Overwrite?" You are asked if you are sure to overwrite file name entered. 2. "OK to save?" You are asked if you are sure to save a file. 3. - Page 187 22. "Decode failed. " File could not be decoded. 23. "This terminal not support this code." File could not be decoded because type of code not supported. 24. "Decoded 1 file(s)." Decode MIME coded file. 25. "This file is not encoding." Cannot encode file selected.
- Page 188 APPENDIX [F5]: Data report 1. "Input Error : Country/Ocean Code." Invalid country/ocean code entered. 2. "Input Error : Station ID." Invalid station ID entered. 3. "Input Error : LES ID." Invalid LES ID entered. 4. "Input Error : Interval Time" Invalid interval time entered.
-
Page 189: Digital Interface
Digital Interface (IEC 61162-1 2 Output sentences GGA, GLL, GSV, RMC, VTG, ZDA Input sentences BWC, BWR, DBT, GGA, GLL, MTW, RMA, RMB, RMC, VDR, VTG, WPL, ZDA Transmission interval GLL, GGA, VTG, RMC: 2 s ZDA: 1 s GSV: 10 s Data transmission Data is transmitted in serial asynchronous form in accordance with the standard referenced in 2.1 of IEC 61162-1. - Page 190 APPENDIX Data sentences Input sentences BWC - Bearing and distance to waypoint - great circle $--BWC, hhmmss.ss, llll.ll, a yyyyy.yy, a, x.x, T, x.x, M, x.x, N, c--c, a*hh<CR><LF> UTC of observation* NOTE 1: Positioning system Mode indicator: A = Autonomous D = Differential E = Estimated (dead reckoning) M = Manual input...
- Page 191 BWR - Bearing and distance to waypoint - rhumb line DBT - Depth below transducer $--DBT,x.x,f,x.x,M,x.x,F*hh<CR><LF> | | | | | | | | | | | +--------- 4 | | | | +--+----------- 3 | | +--+----------------- 2 +--+----------------------- 1 1.
- Page 192 APPENDIX GGA – Global positioning system(GPS) fix data $--GGA,hhmmss.ss,llll.lll,a,yyyyy.yyy,a,x,xx,x.x,x.x,M,x.x,M,x.x,xxxx*hh<CR><LF> +----+--------------------------------- 3 +---+--------------------------------------------- 2 +------------------------------------------------------------- 1 1. UTC of position 2. Latitude, N/S 3. Longitude, E/W 4. GPS quality indicator (see note) 5. Number of satllite in use,00-12, may be different from the number in view 6.
- Page 193 GLL - Geographic position - latitude/longitude $--GLL,llll.lll,a,yyyyy.yyy,a,hhmmss.ss,A,a*hh<CR><LF> +---------------- 3 +------+----------------------- 2 +---+----------------------------------- 1 1. Latitude, N/S 2. Longitude, E/W 3. UTC of position 4. Status: A=data valid, V=data invalid 5. Mode indicator(see note) 6. Checksum NOTE Positioning system Mode indicator: A = Autonomous D = Differential E = Estimated (dead reckoning)
- Page 194 APPENDIX RMA - Recommended minimum specific LORAN-C data $--RMA,A,llll.lll,a,yyyyy.yy,a,x.x,x.x,x.x,x.x,x.x,a,a*hh<CR><LF> +-------------------------- 5 | +------------------------------ 4 +----+--------------------------------- 3 +---+-------------------------------------------- 2 +------------------------------------------------------- 1 1. Status: A=data valid, V=blink, cycle or SNR warning 2. Latitude, degrees N/S 3. Longitude, degrees E/W 4. Time difference A, microseconds 5.
- Page 195 RMB - Recommended minimum navigation information $--RMB,A,x.x,a,c--c,c--c,llll.lll,a,yyyyy.yyy,a,x.x,x.x,x.x,A,a*hh<CR><LF> +----+--------------------------------- 6 +--------------------------------------------- 5 | | +-------------------------------------------------- 4 | +------------------------------------------------------ 3 | +--------------------------------------------------------- 2 +------------------------------------------------------------ 1 1. Data status: A=data valid, V=navigation receiver warning 2. Cross track error(see note 2) n.miles 3. Direction to steer L/R 4.
- Page 196 APPENDIX RMC - Recommended minimum specific GPS/TRANSIT data $--RMC,hhmmss.ss,A,llll.lll,a,yyyyy.yyy,a,x.x,x.x,xxxxxx,x.x,a,a*hh<CR><LF> +---+---------------------------- 4 +---+---------------------------------------- 3 +--------------------------------------------------- 2 +---------------------------------------------------------- 1 1. UTC of position fix 2. Status: A=data valid, V=navigation receiver warning 3. Latitude, N/S 4. Longitude, E/W 5. Speed over ground, knots 6.
- Page 197 VTG - Course over ground and ground speed $--VTG,x.x,T,x.x,M,x.x,N,x.x,K,a*hh<CR><LF> | | | | | | | +------- 6 | | +--------- 5 +--+----------- 4 | | +--+----------------- 3 | | +--+----------------------- 2 +--+----------------------------- 1 1. Course over ground, degrees true 2.
- Page 198 APPENDIX Output sentences GGA, GLL, RMC, VTG, ZDA – see Input sentences GSV - GNSS satellites in view $--GSV,x,x,xx,xx,xx,xxx,xx...,xx,xx,xxx,xx*hh<CR><LF | +-----+------------------------ 8 +--------------------------------- 7 | +------------------------------------- 6 +---------------------------------------- 5 | +------------------------------------------- 4 | | +---------------------------------------------- 3 | +------------------------------------------------- 2 +--------------------------------------------------- 1 1.
- Page 199 Serial interface I/O circuit 16P0209 JUNCTION < TD_A 6 FL27 EXC_CET102U < TD_B 7 FL28 EXC_CET102U < RD_A 8 FL29 EXC_CET102U < RD_B 9 FL23 EXC_CET102U < GND 10 APPENDIX 3.3 V R38 10 RE_N R40 10 R42 270 LTC1488CS8 PC400 ®...
-
Page 200: Parts List
This equipment contains complex modules in which fault diagnosis and repair down to component level are not practical (IMO A.694(17)/8.3.1. Only some discrete components are used. FURUNO Electric Co., Ltd. believes identifying these components is of no value for shipboard maintenance; therefore, they are not listed in the manual. Major modules can be located on the parts location photos on the next several pages. - Page 201 F U R U N O ELECTRICAL PARTS LIST Oct-02 Blk.No. SYMBOL TYPE PRINTED CIRCUIT BOARD 16P0206, ANT B 16P0207, ANT RF Model FELCOM 15 Unit ANTENNA UNIT IC-115 Ref.Dwg. C5635-K04-A CODE No. REMARKS 004-439-020 004-439-040 APPENDIX Page SHIPPABLE ASSEMBLY...
-
Page 202: Parts Location
APPENDIX Parts Location Terminal unit PWR Board (16P0211) PWR C Board (16P0214) SW Board (16P0212) AP-36 Terminal unit, inside view Terminal unit, inside view TERM CPU Board (16P0209) RF CON/CPU Board (16P0208A) MCN Board (16P02026) INT GPS Assy. (Option) (GN-79L5A-N) FDD Assy. -
Page 203: Antenna Unit
Antenna unit ANT RF Board (16P0207) Antenna unit, cover opened APPENDIX ANT B Board (16P0206) AP-37... - Page 204 APPENDIX (This page intentionally left blank.) AP-38...
-
Page 205: Specifications
Waterproof (IEC 60529) Antenna Unit Others Vibration COATING COLOR Antenna Unit Terminal Unit Others FELCOM 15 1626.5 to 1646.5 MHz 1530.0 to 1545.0 MHz Omnidirectional Better than -23 dB/K (elevation angle 5°) 12 to 16 dBW (elevation angle 5°) BPSK 1200 sps... - Page 206 This page is intentionally left blank.
-
Page 207: Index
INDEX Aborting... 7-1 Alarm Unit IC-306 ... 1-6 Audio alarm... 1-2 Background color... 2-10 Battery replacement... 8-8 Colors background ... 2-10 foreground... 2-9 Currency unit... 2-9 Data report preparing... 5-2 printing ... 5-7 Date format... 2-9 manual input ... 2-3 Delivery status automatic confirmation... - Page 208 INDEX Function key description... 1-5 Fuse replacement ... 8-8 Host name... 2-6 Inmarsat C system... ix International telegraphy alphabet ... AP-19 International telex abbreviations... AP-18 International telex/telephone country code list ... AP-9 IP address... 2-6 Keyboard... 1-3 editing stations ... 2-27 printing LES list...
- Page 209 saving received messages to floppy disk (automatically)... 4-29 Replacing text ... 3-8 Saving EGC messages (automatically) ... 2-21 file under new name ... 3-16 files... 3-12 received messages to floppy disk (automatically)... 4-29 received messages to floppy disk (manually) ... 4-28 Screensaver...