Table of Contents
Advertisement
Quick Links
Advertisement
Table of Contents

Related Manuals for Furuno FELCOM15


Summary of Contents for Furuno FELCOM15
- Page 1 INMARSAT-C MOBILE EARTH STATION FELCOM15 PRINTED IN JAPAN...
- Page 2 *00080935101* *00080935101* *00080935101* *00080935101* ( ( HIMA HIMA ) ) FELCOM15 FELCOM15 * 0 0 0 8 0 9 3 5 1 0 1 * * 0 0 0 8 0 9 3 5 1 0 1 * *IME56350B20* *IME56350B20*...
- Page 3 www.reelschematic.com www.reelschematic.com SAFETY INSTRUCTIONS CAUTION WARNING Do not open the equipment Confirm that the power supply voltage unless totally familiar with is compatible with the voltage rating electrical circuits and of the equipment. service manual. Connection to the wrong power supply Only qualified personnel ELECTRICAL can cause fire or equipment damage.
-
Page 4: Table Of Contents
www.reelschematic.com www.reelschematic.com TABLE OF CONTENTS EQUIPMENT LISTS ..................... iii SYSTEM CONFIGURATION ................iv 1. MOUNTING THE UNIT..................1 1.1 Antenna Unit ........................1 1.2 Terminal Unit........................7 1.3 Distress Alert/Received Call Unit IC-305/Alarm Unit IC-306 ..........9 1.4 Printer PP-510 (option)/EGC Printer PP-505 (option)............ 10 1.5 AC/DC Power Supply Unit PR-240-CE (option)............. -
Page 5: Equipment Lists
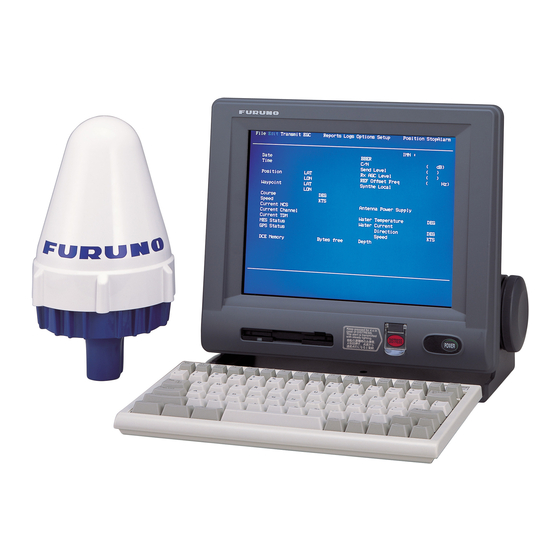
www.reelschematic.com www.reelschematic.com EQUIPMENT LISTS Standard Supply Name Type Code No. Remarks Antenna Unit IC-115 Terminal Unit IC-215 Distress Alert/ Received Call IC-305 Unit Alarm Unit IC-306 Junction Box IC-315 w/CP16-2501 CP16-02101 004-439-060 For 30 m cable, antenna unit CP16-02111 004-439-070 1 set For 50 m cable, antenna unit CP16-02121... -
Page 6: System Configuration
www.reelschematic.com www.reelschematic.com SYSTEM CONFIGURATION ANTENNA UNIT IC-115 DGPS SHIP'S MAINS 24 VDC SHIP'S MAINS EGC Printer* 100/115/220/230 VAC PP-505 1φ, 50/60 Hz TERMINAL UNIT IC-215 Personal AC/DC Power Supply Unit Computer PR-240-CE Printer (PC/AT compatibility) GPS receiver SHIP'S MAINS OP16-24 Shipboard LAN (Ethernet) 24 VDC Printer*... -
Page 7: Mounting The Unit
www.reelschematic.com www.reelschematic.com 1. MOUNTING THE UNIT Antenna Unit Mounting Location • Mount the omnidirectional antenna unit high atop a mast clear of stays and the turning diameter of a radar antenna. The ideal mounting location would be where no obstacle appears in the fore and aft directions down to -5º... - Page 8 www.reelschematic.com www.reelschematic.com 1. MOUNTING THE UNIT • The allowable vibration level as specified by Inmarsat is as shown in the table below. Allowable vibration level Frequency Level 2 to 10 Hz 2.54 mm Peak Amplitude 10 to 100 Hz 9.8 m/s² Peak Acceleration •...
- Page 9 www.reelschematic.com www.reelschematic.com 1. MOUNTING THE UNIT For 15 or 30 m cable 1. Apply silicone sealant (local supply) to the threads of the pipe. 2. Unscrew three screws to remove the antenna base from the antenna unit. 3. Pass the antenna cable through the pipe, antenna base in order. 4.
- Page 10 www.reelschematic.com www.reelschematic.com 1. MOUNTING THE UNIT 10. Remount the antenna unit (upper) on the antenna base. (Torque: 2.6 N·m ± 10%) 11. Wrap self-bonding tape around the connection of antenna base and pipe, and then wind vinyl tape over self-bonding tape. These tapes should be winded closely. 12.
- Page 11 www.reelschematic.com www.reelschematic.com 1. MOUNTING THE UNIT For 50 or 100 m cable 1. Apply silicone sealant (local supply) to the threads of the pipe. 2. Unscrew three screws to remove the antenna base from the antenna unit. 3. Pass the cable assy TPA5FB0.3NJ5FBA-5DFB (supplied, 300 mm) into the shrink tube (SCM2, supplied).
- Page 12 www.reelschematic.com www.reelschematic.com 1. MOUNTING THE UNIT 13. Connect the antenna cable (50 or 100 m) and cable assy (attached at step 5). 14. Wrap the connector with self-bonding tape and then vinyl tape. Bind the cable end with a cable tie (local supply). 15.
-
Page 13: Terminal Unit
www.reelschematic.com www.reelschematic.com 1. MOUNTING THE UNIT 1.2 Terminal Unit Select the following place to install the terminal unit. • The temperature and humidity should be moderate and stable. • For maintenance and checking purposes, leave sufficient space at the sides and rear of the unit and leave slack in cables. - Page 14 www.reelschematic.com www.reelschematic.com 1. MOUNTING THE UNIT M4x20 230±0.5 4-R2.25 273±1 Dimensions for Flush mounting Keyboard 1. Attach the labels for INMAR-C and the compass safe distance to the appropriate locations shown below. Label for key operation for FUNCTION KEYS (supplied) Label for COMPASS SAFE DISTANCE (supplied) 2.
-
Page 15: Distress Alert/Received Call Unit Ic-305/Alarm Unit Ic-306
www.reelschematic.com www.reelschematic.com 1. MOUNTING THE UNIT 1.3 Distress Alert/Received Call Unit IC-305/ Alarm Unit IC-306 Mounting 1. Remove four screws from the unit to separate the bottom chassis from the top cover. 2. Fix the bottom chassis to the mounting location with four tapping screws (supplied). 3. -
Page 16: Printer Pp-510 (Option)/Egc Printer Pp-505 (Option)
www.reelschematic.com www.reelschematic.com 1. MOUNTING THE UNIT 1.4 Printer PP-510 (option)/ EGC Printer PP-505 (option) PP-510 (option) Lay the printer on a table and fix it with printer fixtures 1 and 2. Attach labels appropriately; right side of printer for the compass safety distance label and front of printer for INMAR C label. -
Page 17: Junction Box Ic-315
www.reelschematic.com www.reelschematic.com 1. MOUNTING THE UNIT Junction Box IC-315 The junction box IC-315 is connected to the terminal unit by using the cable assy 16S0344 (2 m, attached to the junction box). Install the junction box within 2 m from the terminal unit. 1. -
Page 18: Wiring
www.reelschematic.com www.reelschematic.com WIRING 24 VDC VCTF-0.75x3C (5 m) Printer When using 50 or 100m PP-510 antenna cable. 0.34 m Ground wire 16S0184, TP5FBAW-5DFBB, 8D-FB-CV, 50 m 30 m 12D-SFA-CV, 100 m Mini keyboard TNCP-NJ BTC-5100C PS/2 DGPS connector (Supplied) LAN cable Connector N-P-12DSFA (10BaseT, local supply) -
Page 19: Antenna Cable Connector At The Terminal Unit
www.reelschematic.com www.reelschematic.com 2. WIRING Antenna Cable Connector at the Terminal Unit 8D-FB-CV (50 m) Outer Sheath Dimensions in millimeters. Shield Remove outer sheath and armor by the Armor Inner Sheath dimensions shown left. Expose inner sheath and shield by the dimensions shown left. - Page 20 www.reelschematic.com www.reelschematic.com 2. WIRING 12D-SFA-CV (100 m) Dimensions in millimeters. Outer Sheath Armor Shield Inner Sheath Remove outer sheath and armor by the dimensions shown left. Expose inner sheath and shield by the dimensions shown left. Twist shield end. Slip on clamp nut, gasket and clamp as shown left. Clamp Gasket Washer...
-
Page 21: Distress Alert/Received Call Unit Ic-305
www.reelschematic.com www.reelschematic.com 2. WIRING Distress Alert/Received Call Unit IC-305 Use the installation material CP16-02201 to connect the distress alert IC-305. The optional CO-SPEVV-SB-C 0.2x5P cable or JIS cable (Japan Industrial Standards) TTYCS-4 or equivalent are available to connect with the junction box IC-305. -
Page 22: Alarm Unit Ic-306
www.reelschematic.com www.reelschematic.com 2. WIRING Alarm Unit IC-306 Maximum two alarm units can be connected to the junction box IC-315 in parallel. To distinguish the incoming indictors, set jumper wires for the second alarm unit as below. For connection, refer to the “2.2 Distress Alert/Received Call Unit IC-305.”... -
Page 23: Junction Box Ic-315
www.reelschematic.com www.reelschematic.com 2. WIRING Junction Box IC-315 Use the junction box IC-315 to connect the distress alert/received call unit IC-305 and other unit (max. four units) to the terminal unit. Unfasten four screws to remove the box cover to connect cables. For connection, use the optional 5 pair cable CO-SPEVV-SB-C 0.2x5P, JIS cable (Japan Industrial Standards) TTYCS-4 or equivalent. -
Page 24: Initial Settings
www.reelschematic.com www.reelschematic.com 3. INITIAL SETTINGS Setting the IMN (INMARSAT MOBILE NO.) After the wiring, set your IMN (Inmarsat Mobile No.) as below. 1. Turn the power on. 2. Press the function key [F8] to show the Setup menu. File Edit Transmit Reports Logs... -
Page 25: Setting For External Equipment
www.reelschematic.com www.reelschematic.com Setting for External Equipment The FELCOM 15 system had been set to accommodate to distress alert/received call unit IC-305, alarm unit IC-306 and distress message controller DMC-5 at factory. If less than three units are connected, change the setting to OFF as below. 1. -
Page 26: Installation Of Gps Receiver (Option)
www.reelschematic.com www.reelschematic.com 4. INSTALLATION OF GPS RECEIVER (OPTION) A GPS receiver board can be installed in the terminal unit IC-215. Name: GPS receiver Type: OP16-24 Code No.: 004-438-940 Name Type Code No. Remarks Connector assy. 51065-0700-PHR7-L040 000-146-174 w/PH-7P GPS receiver board GN-79L5A-N 000-146-179 Connector assy. - Page 27 www.reelschematic.com www.reelschematic.com 4. INSTALLATION OF GPS RECEIVER (OPTION) Terminal unit, cover removed (1) 3. Remove the coaxial cable from J5 on RF CON/CPU Board (16P0208A). Terminal unit, cover removed (2) 4. Unfasten the screw shown in above to remove the chassis from RF CON /CPU Board.
- Page 28 www.reelschematic.com www.reelschematic.com 4. INSTALLATION OF GPS RECEIVER (OPTION) 5. Fasten two pan head screws (M2x4, supplied with option kit) to fix GPS receiver board to the chassis removed at step 4. Connect to J8 on RF CON/CPU Board. Connect to J4 on RF CON/CPU Board. Torque 0.14 + 0.01N m (1.42 + 0.14kgf cm)
- Page 29 www.reelschematic.com www.reelschematic.com 4. INSTALLATION OF GPS RECEIVER (OPTION) 7. Reattach the coaxial cable (removed at step 3) to J5. 8. Attach the connector 51065-0700-PHR7-L040 to J8 on RF CON/CPU Board. Fix this connector cable with two clamps. H.FL-2LP-FHSB-(A) 51065-0700-PHR7-L040 16P0209 16P0208A Terminal unit, cover removed (3) 9.
-
Page 30: Changing Ship's Mains Specifications
www.reelschematic.com www.reelschematic.com 5. CHANGING SHIP’S MAINS SPECIFICATIONS The power supply PR-240-CE (option) is shipped with 220 VAC (200-230 VAC) setting. If the ship’s mains is 100 VAC – 115 VAC, change the top connection and terminal connection as follows. Terminal board Ship’s mains Tap connection Power supply label... - Page 31 www.reelschematic.com www.reelschematic.com A - 1...
- Page 32 www.reelschematic.com www.reelschematic.com A - 2 16AK‑X‑9404 ‑1 CODE NO. CODE NO. CODE NO. CODE NO. TYPE TYPE TYPE TYPE IC‑115 工事材料表 工事材料表 工事材料表 工事材料表 INSTALLATION MATERIALS 数量 番 号 名 称 略 図 型名/規格 用途/備考 Q'TY NO. NAME OUTLINE DESCRIPTIONS REMARKS ケーブル組品 選択 12D‑SFA‑CV *100M* TO BE SELECTED CABLE ASSY. CODE NO. 000‑138‑866 アンテナケーブル組品...
- Page 33 www.reelschematic.com www.reelschematic.com A - 3 004‑439‑060 16AK‑X‑9401 ‑2 CODE NO. CODE NO. CODE NO. CODE NO. TYPE TYPE TYPE TYPE CP16‑02101 工事材料表 工事材料表 工事材料表 工事材料表 INSTALLATION MATERIALS 番 号 名 称 型名/規格 数量 略 図 用途/備考 Q'TY OUTLINE NO. NAME DESCRIPTIONS REMARKS イラックススリーブ SCM2 07‑1220 クロ *40MM* SHRINK TUBING CODE NO. 000‑147‑037 スリーボンド 1211 50G SEALANT CODE NO.
- Page 34 www.reelschematic.com www.reelschematic.com A - 4 004‑439‑070 16AK‑X‑9402 ‑2 CODE NO. CODE NO. CODE NO. CODE NO. TYPE TYPE CP16‑02111 TYPE TYPE 工事材料表 工事材料表 工事材料表 工事材料表 INSTALLATION MATERIALS 数量 番 号 名 称 型名/規格 略 図 用途/備考 Q'TY OUTLINE NO. NAME DESCRIPTIONS REMARKS イラックススリーブ SCM2 07‑1220 クロ *40MM* SHRINK TUBING CODE NO. 000‑147‑037 スリーボンド 1211 50G SEALANT CODE NO.
- Page 35 www.reelschematic.com www.reelschematic.com A - 5 004‑439‑080 16AK‑X‑9403 ‑2 CODE NO. CODE NO. CODE NO. CODE NO. TYPE TYPE CP16‑02121 TYPE TYPE 工事材料表 工事材料表 工事材料表 工事材料表 INSTALLATION MATERIALS 数量 番 号 名 称 略 図 型名/規格 用途/備考 Q'TY NO. NAME OUTLINE DESCRIPTIONS REMARKS イラックススリーブ SCM2 07‑1220 クロ *40MM* SHRINK TUBING CODE NO. 000‑147‑037 スリーボンド 1211 50G SEALANT CODE NO.
- Page 36 www.reelschematic.com www.reelschematic.com A - 6 004‑438‑890 16AK‑X‑9406 ‑0 CODE NO. CODE NO. CODE NO. CODE NO. TYPE TYPE CP16‑02201 TYPE TYPE 工事材料表 工事材料表 工事材料表 工事材料表 INSTALLATION MATERIALS 数量 番 号 名 称 型名/規格 略 図 用途/備考 Q'TY OUTLINE NO. NAME DESCRIPTIONS REMARKS +トラスタッピンネジ 3X10 SUS304 TAPPING SCREW CODE NO. 000‑802‑079 圧着端子 FV1.25‑3 アカ...
- Page 37 www.reelschematic.com www.reelschematic.com A - 7...
- Page 38 www.reelschematic.com www.reelschematic.com A - 8 004‑438‑930 16AK‑X‑9407 ‑1 CODE NO. CODE NO. CODE NO. CODE NO. TYPE TYPE CP16‑02501 TYPE TYPE 工事材料表 工事材料表 工事材料表 工事材料表 INSTALLATION MATERIALS 数量 番 号 名 称 型名/規格 略 図 用途/備考 Q'TY OUTLINE NO. NAME DESCRIPTIONS REMARKS ケーブル押え(1‑3) 16‑018‑6008‑1 CABLE CLAMP CODE NO. 100‑301‑101 +トラスタッピンネジ 4X16 SUS304 1シュ...
-
Page 39: Packing Lists
www.reelschematic.com www.reelschematic.com A - 9 PACKING LIST PACKING LIST PACKING LIST PACKING LIST 24AA-X-9852 -5 PR-240-CE PR-240-CE PR-240-CE PR-240-CE N A M E DESCRIPTION/CODE № O U T L I N E Q'TY ユニット ユニット ユニット ユニット UNIT UNIT UNIT UNIT AC-DC電源 PR-240-CE POWER SUPPLY UNIT 000-053-879 工事材料... - Page 40 www.reelschematic.com www.reelschematic.com D - 1 Jan. 7, '03...
- Page 41 www.reelschematic.com www.reelschematic.com...
- Page 42 www.reelschematic.com www.reelschematic.com...
- Page 43 www.reelschematic.com www.reelschematic.com...
- Page 44 www.reelschematic.com www.reelschematic.com D - 5 July 14'03...
- Page 45 www.reelschematic.com www.reelschematic.com D - 6 Dec. 20, '02...
- Page 46 www.reelschematic.com www.reelschematic.com D - 7 Dec. 20, '02...
- Page 47 www.reelschematic.com www.reelschematic.com...
- Page 48 www.reelschematic.com www.reelschematic.com...
- Page 49 D - 10 www.reelschematic.com www.reelschematic.com...
- Page 50 *3. OPTION. APPROVED 相互結線図 *4. GROUND THRU CONNECTOR CLAMP. Apr. 14 '03 *5. USER SUPPLY. CO‑0.2x2P: CO‑SPEVV‑SB‑C 0.2x5P,φ10.5 '03'03 SCALE MASS NAME INMARSAT‑C MES *6. TB BOARD (16P0116) REQUIRED. CO‑0.2x5P: CO‑SPEVV‑SB‑C 0.2x5P,φ13.5 DWG No. INTERCONNECTION DIAGRAM C5635‑C01‑ D FURUNO ELECTRIC CO., LTD.