Konica Minolta Bizhub 4700P Service Manual
Hide thumbs
Also See for Bizhub 4700P:
- Quick reference (2 pages) ,
- User manual (212 pages) ,
- Quick reference manual (31 pages)
Table of Contents
Advertisement
Quick Links
Advertisement
Table of Contents

Related Manuals for Konica Minolta Bizhub 4700P


Summary of Contents for Konica Minolta Bizhub 4700P
- Page 1 SERVICE MANUAL SERVICE MANUAL 2015.11 Ver. 1.2...
-
Page 2: Trademarks
Trademarks KONICA MINOLTA and KONICA MINOLTA logo are trademarks or resisted trademarks of KONICA MINOLTA, INC. bizhub is trademarks or resisted trademarks of KONICA MINOLTA, INC. Mac and the Mac logo are trademarks of Apple Inc., registered in the U.S. and other countries. -
Page 3: Table Of Contents
4700P/bizhub 4000P Service Manual Contents Trademarks..............................1 Notices and safety information ....................... 10 Laser notices ..........................10 Safety ............................13 Preface ............................17 Service manual conventions ....................17 Change History ......................... 18 General information ........................19 Media guidelines ........................19 3.1.1... - Page 4 4700P/bizhub 4000P Service Manual 4.3.2 Understanding jam messages and locations ..............42 4.3.3 200 paper jams ......................43 4.3.4 201 paper jams ......................53 4.3.5 202 paper jams ......................54 4.3.6 23y paper jams ......................58 4.3.7 241 paper jams ......................61 4.3.8...
- Page 5 4700P/bizhub 4000P Service Manual 4.7.3 Controller board service check ..................130 4.7.4 Control panel button service check ................132 4.7.5 Control panel service check..................133 4.7.6 Toner starvation service check ..................133 4.7.7 USB print service check ....................134 4.7.8...
- Page 6 4700P/bizhub 4000P Service Manual 5.4.1 Entering the Configuration menu ................. 160 5.4.2 Maintenance Counter Value ..................160 5.4.3 Reset Maintenance Counter ..................160 5.4.4 Print Quality Pages ...................... 160 5.4.5 Reports ........................161 5.4.6 Panel Menus ........................ 161 5.4.7 Tray Linking .........................
- Page 7 4700P/bizhub 4000P Service Manual 5.9.1 Confirming the firmware version .................. 169 5.9.2 Procedures for updating the firmware via USB flash/thumb drive ....... 169 5.9.3 Procedures for updating the firmware via USB connection ......... 171 5.9.4 Procedures for updating the firmware via network connection ........173 5.9.5...
- Page 8 Nameplate removals ....................210 6.5.7 Control panel assembly removals ................211 6.5.8 UICC removals ......................213 6.5.9 Control panel USB port removal (bizhub 4700P only) ..........214 6.5.10 MPF assembly removal ....................215 6.5.11 MPF pick roller cover removal ..................217 6.5.12 MPF pick roller removal ....................
- Page 9 ACM assembly removal ....................251 Component locations ........................255 Exterior locations ........................255 7.1.1 Front view (bizhub 4000P) ................... 255 7.1.2 Front view (bizhub 4700P) ................... 256 7.1.3 Rear view ........................257 Maintenance ..........................258 Inspection guide ........................258 8.1.1 Scheduled maintenance ....................
- Page 10 4700P/bizhub 4000P Service Manual 12.3.2 Multipurpose feeder (MPF) ..................268 12.3.3 Simplex printing ......................269 12.3.4 Duplex printing ......................270 12.4 Media handling components ....................270 12.4.1 Main drive gearbox ...................... 270 12.4.2 Autocompensator mechanism (ACM) ................270 12.5 Key components ........................
-
Page 11: Notices And Safety Information
4700P/bizhub 4000P Service Manual 1. Notices and safety information 1.1 Laser notices Laser notice The printer is certified in the U.S. to conform to the requirements of DHHS 21 CFR, Chapter I, Subchapter J for Class I (1) laser products, and elsewhere is certified as a Class I laser product conforming to the requirements of IEC 60825-1. - Page 12 4700P/bizhub 4000P Service Manual Aviso de láser Esta impresora se ha certificado en EE. UU. de conformidad con los requisitos de DHHS 21 CFR, capítulo I, subcapítulo J, para los productos láser de Clase I (1), y en otros países está certificada como un producto láser de Clase I de acuerdo con los requisitos de IEC 60825-1.
- Page 13 4700P/bizhub 4000P Service Manual Lasermeddelande Skrivaren är certifierad i USA enligt kraven i DHHS 21 CFR, avsnitt I, underavsnitt J för laserprodukter av klass I (1) och i andra länder är den certifierad som en laserprodukt av klass I som uppfyller kraven i IEC 60825-1.
-
Page 14: Safety
4700P/bizhub 4000P Service Manual 激光注意事项 本打印机在美国认证合乎 DHHS 21 CFR Chapter I,Subchapter J 对分类 I(1)激光产品的标准,而 在其他地区则被认证是合乎 IEC 60825-1 的分类 I 激光产品。 一般认为分类 I 激光产品不具有危险性。本打印机内部含有分类 IIIb(3b)的激光,在操作过程中会产 生额定 12 毫瓦的砷化镓激光,其波长范围在 650-670nm 之间。本激光系统及打印机的设计,在一般 操作、使用者维护或规定内的维修情况下,不会使人体接触分类 I 以上等级的辐射。 雷射聲明 本印表機係經過美國核可,符合 DHHS 21 CFR,Chapter I,Subchapter J 規定的 I (1) 級雷射產品激... - Page 15 4700P/bizhub 4000P Service Manual Le démontage et l'entretien de ce produit pouvant présenter certains risques électriques, le personnel d'entretien qualifié devra prendre toutes les précautions nécessaires. AVERTISSEMENT—RISQUE DE BLESSURE La batterie lithium de ce produit n'est pas destinée à être remplacée. Il existe un risque d'explosion si une batterie lithium est placée de façon incorrecte.
- Page 16 4700P/bizhub 4000P Service Manual Pautas de Seguridad La seguridad de este producto se basa en pruebas y aprobaciones del diseño original y componentes específicos. El fabricante no es responsable de la seguridad en caso de uso de piezas de repuesto no autorizadas.
- Page 17 4700P/bizhub 4000P Service Manual El risc de xoc elèctric i de danys personals pot augmentar durant el procés de desmuntatge i de servei d’aquest producte. El personal professional ha d’estar-ne assabentat i prendre les mesures convenients. ATENCIÓ La bateria de liti d'aquest producte no ha estat dissenyada perquè es substitueixi. Hi ha perill d’explosió...
-
Page 18: Preface
4700P/bizhub 4000P Service Manual 2. Preface This manual contains maintenance procedures for service personnel. It is divided into the following chapters: General information contains a general description of the printer. Special tools and test equipment are discussed. ... -
Page 19: Change History
4700P/bizhub 4000P Service Manual 2.2 Change History Ver 1.1 Added Updating the printer firmware. Added installation note to LSU removal. Updated the ACM assembly removal procedure. Added Media present sensor flag removal procedure. Updated the Sensor (input) early/late arriving service check to include checking the media present sensor flag. -
Page 20: General Information
4700P/bizhub 4000P Service Manual 3. General information The KONICA MINOLTA bizhub 4700P and 4000P are network-capable, multi-function laser printers that print monochrome print jobs. All information in this service manual pertains to all models unless explicitly noted. The printers are available in the following models:... -
Page 21: Moisture Content
4700P/bizhub 4000P Service Manual Smoothness Paper smoothness directly affects print quality. If paper is too rough, then toner cannot fuse to it properly. If paper is too smooth, then it can cause paper feeding or print quality issues. Always use paper between 100 and 300 Sheffield points;... -
Page 22: Using Recycled Paper And Other Office Papers
4700P/bizhub 4000P Service Manual Selecting paper Using the appropriate paper prevents jams and helps ensure trouble-free printing. To help avoid paper jams and poor print quality: Always use new, undamaged paper. Before loading paper, know the recommended printable side of the paper. This information is usually indicated on the paper package. -
Page 23: Using Specialty Media
4700P/bizhub 4000P Service Manual engineered to work very well in laser printers, despite surface texture. Before using these types of paper, consult your paper supplier. Suitable sheet-to-sheet coefficient of friction (0.4–0.6) Sufficient bending resistance in the direction of feed Recycled paper, paper of lower weight (<60 g/m... -
Page 24: Tips On Using Labels
4700P/bizhub 4000P Service Manual Have metal clasps, string ties, or folding bars Have an interlocking design Have postage stamps attached Have any exposed adhesive when the flap is in the sealed or closed position Have bent corners Have rough, cockle, or laid finishes ... -
Page 25: Supported Paper Sizes, Types, And Weights
4700P/bizhub 4000P Service Manual Use transparencies designed specifically for laser printers. Transparencies must be able to withstand temperatures up to 185°C (365°F) without melting, discoloring, offsetting, or releasing hazardous emissions. Note: If the transparency weight is set to Heavy and the transparency texture is set to Rough in the Paper menu, then transparencies can be printed at a temperature up to 195°C (383°F). - Page 26 4700P/bizhub 4000P Service Manual Paper size Standard tray Optional 250- or Multipurpose Duplex mode 550-sheet tray feeder Folio 216 x 330 mm (8.5 x 13 in.) Statement 140 x 216 mm (5.5 x 8.5 in.) Universal 76.2 x 127 mm (3 x 5 in.) up to 216 x 356 mm (8.5 x 14 in.)
-
Page 27: Supported Paper Types And Weights
4700P/bizhub 4000P Service Manual Supported paper types and weights The standard tray supports 60–90-g/m (16–24-lb) paper weights. The optional tray supports 60–120- (16–32-lb) paper weights. The multipurpose feeder supports 60–163-g/m (16–43-lb) paper weights. Paper type 250- or 550-sheet tray... -
Page 28: Data Security Notice
4700P/bizhub 4000P Service Manual 3.2 Data security notice This printer contains various types of memory that are capable of storing device and network settings, information from embedded solutions, and user data. The types of memory, along with the types of data stored by each, are described below. -
Page 29: Diagnostic Information
4700P/bizhub 4000P Service Manual 4. Diagnostic information CAUTION—SHOCK HAZARD: Remove the power cord from the electrical outlet before you connect or disconnect any cable or electronic card or assembly for personal safety and to prevent damage to the printer. Disconnect any connections between the printer and PCs/peripherals. -
Page 30: Fixing Print Quality Issues
4700P/bizhub 4000P Service Manual 9. Ready appears on the display. If no error code is displayed, but a symptom is present, go to Base printer symptoms. 4.2 Fixing print quality issues The symptoms described in this chapter might require replacement of one or more CRUs (Customer Replaceable Units) designated as supplies or maintenance items, which are the responsibility of the customer. -
Page 31: Gray Background Or Toner Fog On Prints
4700P/bizhub 4000P Service Manual 4.2.2 Gray background or toner fog on prints Actions Step 1 Go to step 2. Replace the cartridge plunger. Cartridge plunger Check the cartridge plunger. removal. Is the cartridge plunger properly attached to the front door and is the spring functioning... -
Page 32: Printer Is Printing Blank
4700P/bizhub 4000P Service Manual 4.2.3 Printer is printing blank pages Actions Step 1 Replace the toner cartridge. Go to step 2. Check the toner cartridge level. Is the toner level low? Step 2 Go to step 3. Replace the cartridge plunger. -
Page 33: Printer Is Printing Solid Black
4700P/bizhub 4000P Service Manual 4.2.4 Printer is printing solid black pages Actions Step 1 Go to step 2. Replace the imaging unit. Check the imaging unit for damage. Is it free of damage? Step 2 Go to step 3. -
Page 34: Repeating Defects
4700P/bizhub 4000P Service Manual 4.2.5 Repeating defects Actions Step 1 Replace the imaging unit. Go to step 2. Measure the distance between defects. Is the distance between defects equal to any of the following? 3.82 in. (97 mm) ... -
Page 35: Shadow Images Appear On Prints
4700P/bizhub 4000P Service Manual 4.2.6 Shadow images appear on prints Actions Step 1 Go to step 2. Go to step 3. Does the shadow image appear every two pages? Step 2 Go to step 3. Replace the redrive assembly. -
Page 36: Skewed Print
4700P/bizhub 4000P Service Manual Actions Step 5 The problem is solved. Replace the fuser. See Fuser removal. Turn off the printer. Remove the rear door and cover. Disconnect the fuser cable connected to PCN5 of the power supply. Check for approximate correct resistance on the fuser cable: 220V fuser—43 ohms... - Page 37 4700P/bizhub 4000P Service Manual Actions Step 4 Go to step 5. Replace the pick tires. Make sure the pick tires are free of debris. Check for wear or damage. Are they free of wear or damage? Step 5 Go to step 11.
-
Page 38: Streaked Horizontal Or Vertical Lines Appear On Prints
4700P/bizhub 4000P Service Manual Actions Step 11 Contact the next level of support. Replace the printer. Make sure the input roller/deskew assembly is free of debris. Check for wear or damage. Are they free of wear or damage? 4.2.8... -
Page 39: Toner Rubs Off
4700P/bizhub 4000P Service Manual Actions Step 4 Go to step 5. Replace the fuser. See Fuser removal. Remove the fuser and check for damage or debris on the rollers and belts. Is it free of damage and debris? Step 5 Replace the LSU. -
Page 40: Toner Specks Appear On Prints
4700P/bizhub 4000P Service Manual Actions Step 3 Replace the power supply. See Replace the fuser. See Fuser Power supply removal. removal. Check the following fuser components for wear or damage: Gears Exit rollers Belt fuser Are they free of damage? 4.2.10 Toner specks appear on prints... -
Page 41: Paper Jams
4700P/bizhub 4000P Service Manual Actions Step 5 Replace the LSU. See Laser The problem is solved. scanning unit (LSU) removal. Reseat the cables JVIDEO1 and JGLV on the controller board. Does the problem remain? 4.3 Paper jams 4.3.1 Avoiding jams Load paper properly ... - Page 42 4700P/bizhub 4000P Service Manual Do not slide the paper into the tray. Load paper as shown in the illustration. Make sure the guides in the tray or the multipurpose feeder are properly positioned and are not pressing tightly against the paper or envelopes.
-
Page 43: Understanding Jam Messages And Locations
4700P/bizhub 4000P Service Manual 4.3.2 Understanding jam messages and locations When a jam occurs, a message indicating the jam location and information to clear the jam appears on the printer display. Open the doors, covers, and trays indicated on the display to remove the jam. -
Page 44: Paper Jams
4700P/bizhub 4000P Service Manual 4.3.3 200 paper jams [x]-page jam, open front door. [20y.xx] CAUTION—HOT SURFACE: The inside of the printer might be hot. To reduce the risk of injury from a hot component, allow the surface to cool before touching it. - Page 45 4700P/bizhub 4000P Service Manual Warning—Potential Damage: Do not touch the shiny blue photoconductor drum under the imaging unit. Doing so may affect the quality of future print jobs. 4. Lift the green flap in front of the printer. 5. Place the imaging unit aside on a flat, smooth surface.
- Page 46 4700P/bizhub 4000P Service Manual 7. Insert the imaging unit by aligning the arrows on the side rails of the unit with the arrows on the side rails inside the printer, and then insert the imaging unit into the printer.
- Page 47 4700P/bizhub 4000P Service Manual 200 paper jam messages Error code Description Action 200.01 Input sensor covered during warm-up Go to Sensor (input) static jam service check. sequence. 200.02 Input sensor covered too quickly. Go to Sensor (input) early/late arriving service check.
- Page 48 4700P/bizhub 4000P Service Manual Error code Description Action 200.24 Measured gap at input sensor too small to Go to Sensor (input) image jam service check meet video delivery requirements. (Not enough time since prior image finished to start new image).
- Page 49 4700P/bizhub 4000P Service Manual Sensor (input) static jam service check Action Step 1 Go to step 2. Clear the paper path of any media fragments. Check the input sensor area for jammed media fragments. Is the paper path free of partially fed or jammed...
- Page 50 4700P/bizhub 4000P Service Manual Action Step 2 Go to step 3. Replace the MPF pick roller and separator pad. Check the MPF pick roller and separator pad for MPF pick roller damage and contamination. removal Separator removal. Are they free of damage and contamination? Step 3 Go to step 4.
- Page 51 4700P/bizhub 4000P Service Manual Action Step 7 Replace the jam access Go to step 8. cover. See Jam access Check the jam access cover if it is blocking the input cover removal sensor. Is it blocking the input sensor? Step 8 Go to step 9.
- Page 52 4700P/bizhub 4000P Service Manual Action Step 3 Go to step 4. Reseat the cable. Check the input sensor cable for proper connection. Is it properly connected? Step 4 Go to step 5. Replace the LSU. See Laser scanning unit...
-
Page 53: Main Drive Motor Control Jam Service Check
4700P/bizhub 4000P Service Manual Main drive motor control jam service check Action Step 1 Go to step 2. Reseat the cable. Remove the main drive gearbox. Check the main drive gearbox cable for proper connection. Is it properly connected? Step 2 Go to step 3. -
Page 54: Paper Jams
4700P/bizhub 4000P Service Manual 4.3.4 201 paper jams [x]-page jam, clear standard bin. [20y.xx] 1. Firmly grasp the jammed paper on each side, and then gently pull it out. Note: Make sure all paper fragments are removed. 2. From the printer control panel, press [OK] to clear the message and continue printing. -
Page 55: Paper Jams
4700P/bizhub 4000P Service Manual Action Step 2 Go to step 3. Replace the Narrow media/bin full sensor. See POR into the Diagnostics menu and perform a sensor Narrow media/bin full test: sensor removal. Diagnostics Menu >Base Sensor Test >Narrow Media... - Page 56 4700P/bizhub 4000P Service Manual 3. Firmly grasp the jammed paper on each side, and then gently pull it out. Note: Make sure all paper fragments are removed. 4. Close the rear and front doors. 5. From the printer control panel, press [OK] to clear the message and continue printing.
- Page 57 4700P/bizhub 4000P Service Manual 202 paper jam messages Error code Description Action 202.01 Exit sensor is covered during warm up. Go to Sensor (fuser exit) jam service check. 202.03 Media did not reach the fuser exit sensor. Go to Sensor (fuser exit) jam service check.
- Page 58 4700P/bizhub 4000P Service Manual Sensor (fuser exit) jam service check Action Step 1 Go to step 2. Clear the paper path of any media fragments. Check the input sensor area for jammed media fragments. Is the paper path free of partially fed or jammed...
-
Page 59: 23Y Paper Jams
4700P/bizhub 4000P Service Manual 4.3.6 23y paper jams [x]-page jam, remove tray 1 to clear duplex. [23y.xx] CAUTION—HOT SURFACE: The inside of the printer might be hot. To reduce the risk of injury from a hot component, allow the surface to cool before touching it. - Page 60 4700P/bizhub 4000P Service Manual 3. Firmly grasp the jammed paper on each side, and then gently pull it out. Note: Make sure all paper fragments are removed. 4. Insert the tray. 5. From the printer control panel, select Next > [OK] >Clear the jam, press [OK] > [OK].
-
Page 61: Duplex Service Check
4700P/bizhub 4000P Service Manual Duplex service check Action Step 1 Go to step 2. Replace the redrive assembly. See Redrive Remove the rear cover. See Rear door and cover assembly removal. removal. Check the redrive rollers for wear or damage. -
Page 62: Paper Jams
4700P/bizhub 4000P Service Manual Action Step 5 Go to step 6. Replace the duplex sensor. See Duplex Remove the input tray. sensor and input sensor removal. POR into the Diagnostics menu and perform a duplex sensor test: Diagnostics Menu >Duplex Tests >Sensor Test Lower the duplex jam door, and toggle the duplex sensor. - Page 63 4700P/bizhub 4000P Service Manual 3. Insert the tray. 4. From the printer control panel, select Next > [OK] >Clear the jam, press [OK] > [OK]. - 62 -...
- Page 64 4700P/bizhub 4000P Service Manual 241 paper jam messages Error code Description Action 241.01 Paper over tray 1 trailing edge sensor on Go to Tray 1 jam service check. warmup. 241.02 Sensor (input) early arriving jam. Go to Tray 1 jam service check.
- Page 65 4700P/bizhub 4000P Service Manual Error code Description Action 241.41 Media feed stall in tray 1. Go to Tray 1 jam service check. 241.42 Media feed under-speed in tray 1. Go to Tray 1 jam service check. 241.43 Media feed stalled on the last Pick attempt in...
- Page 66 4700P/bizhub 4000P Service Manual Action Step 3 Go to step 4. Replace the separator roll assembly. See Separator Check the separator roll assembly. roll assembly removal. Is it free of wear or damage? Step 4 Go to step 5.
- Page 67 4700P/bizhub 4000P Service Manual Action Step 9 Go to step 10. Replace the MPF gearbox. See Check the MPF gearbox gearbox removal. Is it free of wear or damage? Step 10 Go to step 11. Replace the main drive gearbox.
-
Page 68: Paper Jams
4700P/bizhub 4000P Service Manual 4.3.8 242-244 paper jams [x]-page jam, open tray [x]. [24y.xx] 3. Pull the tray completely out of the printer. Note: The message on the printer display indicates the tray where the jammed paper is located. - Page 69 4700P/bizhub 4000P Service Manual 242 paper jam messages Error code Description Action 242.01 Paper over tray 2 pass-through sensor on Go to Option tray jam service check. warmup. 242.02 Input sensor detected late feed during a pick Go to Option tray jam service check.
- Page 70 4700P/bizhub 4000P Service Manual Error code Description Action 242.24 DC Feed autocompensator stalled on the last Go to Option tray jam service check. pick attempt in tray 2. 242.32 Tray not ready. Go to Option tray jam service check.
- Page 71 4700P/bizhub 4000P Service Manual 243 paper jam messages Error code Description Action 243.01 Paper over tray 3 pass-through sensor on Go to Option tray jam service check. warmup. 243.02 Input sensor detected late feed during a pick Go to Option tray jam service check.
- Page 72 4700P/bizhub 4000P Service Manual Error code Description Action 243.22 Tray 3 ACM motor underspeed. Go to Option tray jam service check. 243.24 DC Feed autocompensator stalled on the last Go to Option tray jam service check. pick attempt in tray 3.
- Page 73 4700P/bizhub 4000P Service Manual 244 paper jam messages Error code Description Action 244.01 Paper over tray 4 pass-through sensor on Go to Option tray jam service check. warmup. 244.02 Input sensor detected late feed during a pick Go to Option tray jam service check.
- Page 74 4700P/bizhub 4000P Service Manual Error code Description Action 244.24 DC Feed autocompensator stalled on the last Go to Option tray jam service check. pick attempt in tray 4. 244.32 Tray not ready. Go to Option tray jam service check.
- Page 75 4700P/bizhub 4000P Service Manual Action Step 2 The problem is solved. Go to step 3. POR into the Diagnostics menu and perform a feed test: Diagnostics Menu >Input Tray Tests >Feed Test > Select an option tray >Continuous Cancel the test after five pages.
-
Page 76: Paper Jams
4700P/bizhub 4000P Service Manual Action Step 8 Go to step 9. Replace the option tray. POR into the Diagnostics menu and perform a feed test: Diagnostics Menu >Input Tray Tests >Feed Test > Select an option tray Does the ACM motor gearbox pass the test? -
Page 77: Mpf Service Check
4700P/bizhub 4000P Service Manual 3. Reload paper into the multipurpose feeder. Note: Make sure the paper guide lightly rests against the edge of the paper. 4. From the printer control panel, select Next > [OK] >Clear the jam, press [OK] > [OK]. - Page 78 4700P/bizhub 4000P Service Manual Action Step 3 Go to step 4. Replace the MPF pick roller and separator pad. Make sure the MPF pick roller and separator pad are MPF pick roller free of debris. Check both for wear or damage.
-
Page 79: Understanding The Printer Messages
4700P/bizhub 4000P Service Manual 4.4 Understanding the printer messages Cartridge, imaging unit mismatch [41.xy] 1. Check if the toner cartridge and imaging unit are both MICR (Magnetic Imaging Content Recording) or non-MICR supplies. Note: For a list of supported supplies, see the “Ordering supplies” section of the User's Guide. -
Page 80: Close Front Door
4700P/bizhub 4000P Service Manual Cancel the print job. Change [paper source] to [paper type] [paper size] load [orientation] Try one or more of the following: Load the correct paper size and type in the tray, verify the paper size and type settings are specified in the Paper menu on the printer control panel, and then select Finished changing paper. - Page 81 4700P/bizhub 4000P Service Manual Imaging unit low [84.xy] You may need to order an imaging unit. If necessary, select Continue on the printer control panel to clear the message and continue printing. Press [OK] to confirm. Imaging unit nearly low [84.xy] If necessary, select Continue on the printer control panel to clear the message and continue printing.
- Page 82 4700P/bizhub 4000P Service Manual Insufficient memory for Flash Memory Defragment operation [37] Try one or more of the following: From the printer control panel, select Continue to stop the defragmentation and continue printing. Press [OK] to confirm. ...
- Page 83 4700P/bizhub 4000P Service Manual Load [paper source] with [paper size] [paper orientation] Try one or more of the following: Load the tray or feeder with the correct size of paper. To use the tray or feeder that has the correct size of paper, select Finished loading paper on the printer control panel.
- Page 84 4700P/bizhub 4000P Service Manual Load manual feeder with [paper size] [paper orientation] Try one or more of the following: Load the multipurpose feeder with the correct size of paper. Depending on your printer model, press [OK] to clear the message and continue printing.
- Page 85 Use of third-party supplies or parts may affect the performance, reliability, or life of the printer and its imaging components. All life indicators are designed to function with KONICA MINOLTA supplies and parts and may deliver unpredictable results if third-party supplies or parts are used. Imaging component usage beyond the intended life may damage your KONICA MINOLTA printer or associated components.
-
Page 86: Remove Paper From Standard Output Bin
4700P/bizhub 4000P Service Manual Reinstall missing or unresponsive imaging unit [31.xy] Try one or more of the following: Check if the imaging unit is missing. If missing, install the imaging unit. For information on installing the imaging unit, see the “Replacing supplies” section of the User’s Guide. - Page 87 4700P/bizhub 4000P Service Manual Replace cartridge, printer region mismatch [42.xy] Install a toner cartridge that matches the region number of the printer. x indicates the value of the printer region. y indicates the value of the cartridge region. x and y can have the following values:...
- Page 88 4700P/bizhub 4000P Service Manual Replace unsupported imaging unit [32.xy] Remove the imaging unit, and then install a supported one to clear the message and continue printing. For more information, see the instruction sheet that came with the supply or see the “Replacing supplies”...
- Page 89 4700P/bizhub 4000P Service Manual Too many flash options installed [58] 1. Turn off the printer. 2. Unplug the power cord from the electrical outlet. 3. Remove the extra flash memory. 4. Connect the power cord to a properly grounded electrical outlet.
-
Page 90: User Attendance Messages (0-99.99)
4700P/bizhub 4000P Service Manual 4.5 User attendance messages (0–99.99) 4.5.1 User attendance messages (0-99.99) User attendance messages Error code Description Action 31.21 Capacitive Toner Level Sensing (CTLS) Go to CTLS service check. reading out of range. 31.22 Excessive CTLS noise. - Page 91 4700P/bizhub 4000P Service Manual Error code Description Action 32.01 Capacity Class/ Model compatibility mismatch. Go to Toner cartridge smart chip contact service The supplies CC/MC is not compatible with check. the printer's CC/MC setting. 32.05 OEM Mismatch. The supplies OEM ID is not compatible with the printer's machine class.
-
Page 92: Toner Cartridge Smart Chip Contact Service Check
4700P/bizhub 4000P Service Manual Toner cartridge smart chip contact service check Action Step 1 Go to step 2. The problem is solved. Make sure that the toner cartridge is properly installed. Check the toner cartridge, toner cartridge button, and cartridge plunger for damage. Replace if necessary. -
Page 93: Imaging Chip Compatibility Service Check
4700P/bizhub 4000P Service Manual Action Step 2 Go to step 3. Reseat the cables. Check the cable JARW2 for proper connection to the controller board. Is it properly connected? Step 3 Replace the controller Replace the printer. board. See... -
Page 94: Media Size Mismatch Service Check
4700P/bizhub 4000P Service Manual Action Step 2 Go to step 3. The problem is solved. Insert a supported imaging unit. Does the error remain? Step 3 Contact the next level of The problem is solved. support. Update the firmware. -
Page 95: Insufficient Memory Service Check
4700P/bizhub 4000P Service Manual Action Step 5 Go to step 6. Replace the input sensor. Duplex sensor and Make sure the input sensor is free of debris. input sensor removal. POR into the Diagnostics menu and perform a sensor test: Diagnostics Menu >Base Sensor Test >Input... - Page 96 4700P/bizhub 4000P Service Manual Action Step 3 Replace the controller Replace the memory board. See Controller card. Print the Menu settings page: board removals. Settings >Reports >Menu Settings Page POR into the Configuration menu and reset the printer’s settings to factory default: Configuration Menu >Factory...
-
Page 97: Imaging Unit Low Service Check
4700P/bizhub 4000P Service Manual Flash full service check Action Step 1 Go to step 2. The problem is solved. Format the flash memory. Navigate to Settings > Print Settings > Utilities, then select Format Flash. Does the error remain? Step 2 Go to step 3. - Page 98 4700P/bizhub 4000P Service Manual Action Step 3 Contact the next level of Replace the printer. support. Check the contacts for damaged pins. Are they free of damage? Toner cartridge low service check Action Step 1 Go to step 2.
-
Page 99: Printer Hardware Errors
4700P/bizhub 4000P Service Manual 4.6 Printer hardware errors 4.6.1 111 errors 111 error messages Error code Description Action 111.00 Pel clock check failed. Go to Laser scanning unit (LSU) service check. 111.01 Downlevel ASIC detected. 111.31 Printhead never delivered HSYNCs. - Page 100 4700P/bizhub 4000P Service Manual Error code Description Action 111.62 Closed-loop printhead error, off-resonant PI Go to Laser scanning unit (LSU) service check. effort state. 111.63 Timed out on POR sweep. 111.64 Attempted to exceed open loop drive limits. 111.65 111.66...
-
Page 101: Errors
4700P/bizhub 4000P Service Manual 4.6.2 121 errors 121 error messages Error code Description Action 121.07 Fuser has been on for more than allowed after Go to Fuser service check. a gap blowout, and the temperature is still too cold. -
Page 102: Fuser Service Check
4700P/bizhub 4000P Service Manual Fuser service check Action Step 1 Go to step 2. Reseat the cables. Check the fuser cables JTHERM1 and JEXIT for proper connection to the controller board. Check the cable PCN5 for proper connection to the power supply. -
Page 103: Errors
4700P/bizhub 4000P Service Manual 4.6.3 126 errors 126 error messages Error code Description Action 126.01 Line frequency outside operating range of Go to LVPS service check. device. 126.02 No line frequency detected. LVPS service check Action Step 1 Go to step 2. -
Page 104: Errors
4700P/bizhub 4000P Service Manual 4.6.4 132 errors 132 error messages Error code Description Action 132.01 TDS baseline too low. Go to Toner density sensor service check. 132.02 TDS baseline too high. 132.03 TDS baseline excessive range. 132.16 TDS calibration at maximum. -
Page 105: Errors
4700P/bizhub 4000P Service Manual Action Step 3 Go to step 4. Reseat the cable. Check the toner density sensor cable for proper connection to the controller board. Is it properly connected? Step 4 Replace the controller Replace the toner density board. -
Page 106: Errors
4700P/bizhub 4000P Service Manual Action Step 2 Go to step 3. Reseat the cables. Check the cable PCN3 for proper connection to the power supply. Check the CTLS cable for proper connection to the controller board. Are they properly connected? -
Page 107: Errors
4700P/bizhub 4000P Service Manual Main drive gearbox service check Action Step 1 Go to step 2. Remove the debris. Remove the main drive gearbox and check for any debris. Is it free of debris? Step 2 Go to step 3. -
Page 108: Errors
4700P/bizhub 4000P Service Manual Tray 1 pick/lift motor gearbox service check Action Step 1 Go to step 2. Replace the tray insert. Remove Tray 1. Check the lift plate and gears for proper operation by moving the metal plate. -
Page 109: Cartridge Gearbox Service Check
4700P/bizhub 4000P Service Manual Cartridge gearbox service check Action Step 1 Go to step 2. Go to step 3. Is the button aligned with the front of the toner cartridge? Step 2 Go to step 5. The problem is solved. - Page 110 4700P/bizhub 4000P Service Manual Action Step 6 Go to step 7. Replace the cartridge gearbox. See Cartridge Check the gears on the cartridge gearbox for proper gearbox removal. rotation and for wear or damage. Does it rotate properly and is it free of wear or damage? Step 7 Go to step 8.
-
Page 111: Errors
4700P/bizhub 4000P Service Manual 4.6.9 171 errors 171 error messages Error code Description Action 171.03 Fuser fan error. Go to Cooling fan service check. 171.04 Fuser fan error. 171.05 Fuser fan error. 171.06 Fuser fan error. 171.07 Fuser fan error. -
Page 112: Acm Service Check
4700P/bizhub 4000P Service Manual ACM service check Action Step 1 Go to step 2. Replace the pick/lift motor gearbox. See Pick/Lift Check the pick/lift motor gearbox for proper operation. motor gearbox removal. POR into the Diagnostics menu and perform a feed test: Diagnostics Menu >Input Tray... - Page 113 4700P/bizhub 4000P Service Manual 3. E-mail the text file to your next level of support. B. Collecting the firmware logs (Fwdebug and logs.tar.gz) from the SE menu Notes: Make sure your printer is connected to a network or to a print server.
-
Page 114: Errors
4700P/bizhub 4000P Service Manual Other information on what was happening when the 9yy error occurred. 4.6.10 900 errors 900 error messages Error code Description Action 900.xx RIP firmware errors Go to System software error service check. System software error service check There are different types of 900.xx errors that can occur. - Page 115 4700P/bizhub 4000P Service Manual Action Step 3 Go to step 5. Go to step 4. Check all the cables connected to the controller board for proper connectivity. Are the cables properly connected? Step 4 Go to step 5. Go to step 6.
- Page 116 4700P/bizhub 4000P Service Manual Action Step 7 Go to step 8. Go to step 10. Note: Before performing this step, write down the following information about the file being sent to the printer: Application used Operating system ...
- Page 117 4700P/bizhub 4000P Service Manual Action Step 10 Go to step 11. The problem is solved. Upgrade the firmware if it was not upgraded in a previous step. Note: Contact your next level of support for the correct firmware level to use.
- Page 118 4700P/bizhub 4000P Service Manual Action Step 15 Go to step 21. Go to step 16. Replace the faulty internal option. POR the printer. Does the error remain? Step 16 Go to step 17. The problem is solved. Are there any more internal options to install? Step 17 Go to step 19.
-
Page 119: Errors
4700P/bizhub 4000P Service Manual Action Step 21 Contact your next level of support. You will need the following information: Exact 900.xx error digits and complete error message Printed menu settings page Printed network settings page ... -
Page 120: 94Y Errors
4700P/bizhub 4000P Service Manual 4.6.12 94y errors 94y error messages Error Description Action code 940.xx RIP to engine communication failure—the zero crossing signal used Go to LVPS service check. for fuser control in the low voltage (LV) power supply has failed, or the wrong low voltage power supply has been installed. -
Page 121: Errors
4700P/bizhub 4000P Service Manual 4.6.13 950–958 errors 950–958 error messages Error Description Action code 950.xx NVRAM mismatch failure—mismatch between controller board Go to NVRAM mismatch EEPROM and control panel mirror. failure service check. ".xx" codes: 00-29— mismatch between system and mirror ... -
Page 122: Nvram Mismatch Failure Service Check
4700P/bizhub 4000P Service Manual NVRAM mismatch failure service check Warning—Potential Damage: When replacing any of the following components: Control panel assembly Controller board assembly Replace only one component at a time. Replace the required component and perform a POR before replacing a second component listed above. - Page 123 4700P/bizhub 4000P Service Manual Action Step 5 Contact the next The problem is level of support. solved. Replace the original control panel assembly with a new and not previously installed control panel assembly. Does the error continue? Step 6...
-
Page 124: Errors
4700P/bizhub 4000P Service Manual 4.6.14 959 errors 959 error messages Error code Description Action 959.01 Controller verification failure of pensive boot code Go to Invalid firmware/controller board service check. 959.02 Failure to authenticate Signature Verification Code 959.03 Signature Verification Code failed to authenticate a code partition 959.04... -
Page 125: 96Y Errors
4700P/bizhub 4000P Service Manual Error code Description Action 959.37 Pensive command is invalid due to locked device Go to Invalid firmware/controller board status service check. 959.38 Incremental counter id(s) are invalid 959.39 Invalid NV address 959.40 Invalid Pensive command... - Page 126 4700P/bizhub 4000P Service Manual RAM memory error service check Action Replace the bad memory card. Contact the next The problem is level of support. solved. Does the error remain? Download emulation cyclic redundancy service check Action Step 1 Go to step 2.
-
Page 127: 97Y Errors
4700P/bizhub 4000P Service Manual 4.6.16 97y errors 97y error messages Error Description Action code 975.xx Network Error—unrecognizable network port Go to Network port error service check. Call the next level of support. 976.xx Network Error—unrecoverable software error in network port Call the next level of support. -
Page 128: 98Y Errors
4700P/bizhub 4000P Service Manual 4.6.17 98y errors 98y error messages Error code Description Action 980.xx Engine experiencing unreliable communication with the specified device Go to Option communication error service check. Call the next level of support. 981.xx Engine protocol violation detected by the specified device Call the next level of support. - Page 129 4700P/bizhub 4000P Service Manual Action Step 3 Go to step 4. The problem is solved. Update the firmware. Does the problem remain? Step 4 Go to step 5. The problem is solved. Make sure that the interconnect cables are properly seated.
-
Page 130: 99Y Errors
4700P/bizhub 4000P Service Manual 4.6.18 99y errors 99y error messages Error Description Action code 990.xx An equipment check condition has occurred in the specified device, Go to Option communication but the device is unable to identify the exact component failure—... -
Page 131: Dead Machine Service Check
4700P/bizhub 4000P Service Manual Symptom Action Print job not printing on network Go to Network service check. attached printer Network attached printer offline 4.7.2 Dead machine service check Action Step 1 Go to step 2. Reseat the cables. Check if the power supply cable is properly connected to the controller board. - Page 132 4700P/bizhub 4000P Service Manual Action Step 2 Go to step 3. The problem is solved. Run some print jobs. Does the error remain? Step 3 Go to step 5. Go to step 4. Check all cables on the controller board.
-
Page 133: Control Panel Button Service Check
4700P/bizhub 4000P Service Manual Action Step 9 Go to step 6. Replace the controller board. Go to Controller Is the LED on the bottom of the controller board board removals. illuminating? 4.7.4 Control panel button service check Action Step 1 Go to step 2. -
Page 134: Control Panel Service Check
4700P/bizhub 4000P Service Manual 4.7.5 Control panel service check Warning—Potential Damage: Do not replace the control panel and controller board at the same time. Each card contains the printer settings. When either of these cards is new, it obtains some of the settings from the other card. -
Page 135: Usb Print Service Check
4700P/bizhub 4000P Service Manual Action Step 4 The problem is solved. Go to step 5. Try a different toner cartridge. Did this fix the problem? Step 5 Go to step 7. Go to step 6. Check the connections between the cartridge gearbox and the controller board. - Page 136 4700P/bizhub 4000P Service Manual Action Step 2 Go to step 4. Go to step 3. Verify if the user's applications are setup correctly. Are they setup correctly? Step 3 This is not a printer issue. Go to step 4.
-
Page 137: Network Service Check
4700P/bizhub 4000P Service Manual 4.7.8 Network service check Note: Before starting this service check, print out the network setup page. This page is found under Menu >Reports >Network Settings. Consult the network administrator to verify that the physical and wireless network settings displayed on the network settings page for the device are properly configured. - Page 138 4700P/bizhub 4000P Service Manual Actions Step 7 Go to step 8. Go to step 9. Are the first two segments of the IP address 169.254 Step 8 The problem is solved. Go to step 10. POR the printer. Did this resolve the issue? Step 9 The problem is solved.
- Page 139 4700P/bizhub 4000P Service Manual Actions Step 14 Replace the controller board. Contact the network Controller board administrator. Have the network administrator check the network drop removals. for activity. Is the network drop functioning properly? Step 15 Go to step 17.
-
Page 140: Input Option Hardware Errors
4700P/bizhub 4000P Service Manual 4.8 Input option hardware errors 4.8.1 3xx error messages Error code Description Action 321.51 ACM motor no first encoder Go to Option tray pick/lift section service check. 321.52 ACM motor stop error 321.53 ACM motor PWM underflow (motor overspeed) 322.54... - Page 141 4700P/bizhub 4000P Service Manual Error code Description Action 334.58 ACM motor stop error 334.59 ACM motor PWM underflow (motor overspeed) 335.60 Hardware error—Board ID unknown Go to Option tray controller card service check. 335.61 Hardware error—Option type unknown 335.62 Hardware error—Product ID unknown...
-
Page 142: Option Tray Pick/Lift Section Service Check
4700P/bizhub 4000P Service Manual 4.8.2 Option tray pick/lift section service check Action Step 1 Go to step 2. Replace the tray insert. Remove the option tray insert. Check the lift plate and gears for proper operation by moving the metal plate. -
Page 143: Option Tray Acm Motor Service Check
4700P/bizhub 4000P Service Manual Action Step 2 Go to step 3. Replace the tray. Check the cable J10 on the option tray controller card. Is it properly connected and free of damage? Step 3 Contact the next level of Replace the separator roll support. -
Page 144: Option Tray Controller Card Service Check
4700P/bizhub 4000P Service Manual 4.8.5 Option tray controller card service check Action Step 1 Go to step 2. Reseat the cables. Check all connections to the option tray controller card. Are the properly connected? Step 2 Go to step 3. -
Page 145: Service Menus
4700P/bizhub 4000P Service Manual 5. Service menus 5.1 Understanding the control panel and menus 5.1.1 Using the printer control panel Use the Display View the printer status and messages. Set up and operate the printer. Left arrow button Scroll to the left. -
Page 146: Understanding The Colors Of The Indicator And Sleep Button Lights
Connect a flash drive to the printer. Notes: Only the front USB port supports flash drives. This feature is available only in bizhub 4700P. Stop or cancel button Stop all printer activities. Back button Return to the previous screen. -
Page 147: Menus List
4700P/bizhub 4000P Service Manual 5.2 Menus list Paper Menu Reports Network/Ports Default Source Menu Settings Page Active NIC Paper Size/Type Device Statistics Standard Network Configure MP Network Setup Page Standard USB Substitute Size Print Fonts SMTP Setup Paper Texture... -
Page 148: Diagnostics Menu
4700P/bizhub 4000P Service Manual 5.3 Diagnostics menu The Diagnostics menu group contains the settings and operations used while manufacturing and servicing the printer. 5.3.1 Entering the Diagnostics menu 1. Turn off the printer. 2. Press and hold 3 and 6. -
Page 149: Print Tests
4700P/bizhub 4000P Service Manual 5.3.3 Print Tests These tests determine if the printer can print on media from any of the paper input sources. Each of the installed sources is available within the Print tests menu. The content of the test page varies depending on the media in the selected input source: ... -
Page 150: Button Test
4700P/bizhub 4000P Service Manual 2. Press to exit the test. Button Test This test verifies the control panel button function except for the Sleep button. 1. From the Diagnostics menu, navigate to: Hardware Tests >Button Test 2. The panel displays Press and an icon matching one of the control panel buttons. Press the physical button that is represented by the icon, and the printer tests the function of that button. -
Page 151: Duplex Tests
4700P/bizhub 4000P Service Manual 2. Choose the desired port, and then choose the desired test. Ports Tests Port 0 Test J Port 1 Test K Port 2 Test SEO NAK Port 3 Test Packet Test Force Enable Single Step Get Device Single Step Set Feature 3. -
Page 152: Top Margin
4700P/bizhub 4000P Service Manual 4. If adjustment is necessary, the top margin in the Registration menu must be adjusted first. The duplex top margin offset may be adjusted next. A positive offset moves the text down the page and widens the top margin, while a negative offset moves the text up the page and narrows the top margin. -
Page 153: Input Tray Tests
4700P/bizhub 4000P Service Manual Duplex Feed 1 This test feeds a blank sheet of paper from Tray 1 to the duplex paper stop position 1. This test can be run using any of the supported paper sizes. To run this test: 1. -
Page 154: Output Bin Tests
4700P/bizhub 4000P Service Manual Input source Tray empty sensor Pass through sensor Multipurpose feeder 3. Manually actuate each sensor. The tray empty sensor can be actuated by hand; however, a sheet of paper can be used to cover the pass through sensor. -
Page 155: Device Tests
4700P/bizhub 4000P Service Manual Narrow Media Front Door CAUTION—SHOCK HAZARD: The sensor may be electrically energized. To avoid the risk of injury use a non-conductive implement to toggle the sensors. To run the Base sensor test: 1. From the Diagnostics menu, navigate to Base Sensor Test. -
Page 156: Printer Setup
4700P/bizhub 4000P Service Manual 5. Reformat the flash device using the Flash format setting in the Utilities menu. 5.3.10 Printer Setup Defaults Warning—Potential Damage: Modification of the printer setting Defaults causes the NVRAM space to be restored to the printer factory settings. -
Page 157: Ep Setup
4700P/bizhub 4000P Service Manual Note: The Permanent Page Count value cannot be reset. Processor ID This is a 16-digit hexadecimal value representing the ID of the processor on the controller card. Engine Setting [x] These settings are used by Engine code ECs to fix field problems. The value of [x] is any value from 1 to 16. -
Page 158: Warm Up Time
4700P/bizhub 4000P Service Manual Warm up time This setting controls the Warm up time. To adjust this setting: 1. From the Diagnostics menu, navigate to: EP Setup >Warm up time 2. Press [OK] to save any changes. Print Contrast This setting controls the developer voltage offset. -
Page 159: Reports
4700P/bizhub 4000P Service Manual Prints patches on the drum and measures the reflectivity of the drum through the patches Cleans the transfer roll Calculates reflectivity ratios and operating points to attain the darkness target of each operating point ... -
Page 160: Exit Diags
4700P/bizhub 4000P Service Manual NV mirror entries 9xx and 1xx (print engine) service error entries Programming error entries Maintenance count reset entries Clear log entries Paper jam entries Firmware update entries ... -
Page 161: Configuration Menu
4700P/bizhub 4000P Service Manual 5.4 Configuration menu The Configuration menu group consists of menus, settings, and operations that are used to configure a printer for operation. 5.4.1 Entering the Configuration menu The Configuration Menu group contains a set of menus, settings, and operations which are infrequently required by a user. -
Page 162: Reports
4700P/bizhub 4000P Service Manual 2. Press [OK] to print the pages, or press to exit without printing the pages. Printing Quality Test Pages appears on the display. Once started, the printing cannot be canceled and no buttons are active until the printing completes. -
Page 163: Ppds Emulation
4700P/bizhub 4000P Service Manual Available options: 5.4.8 PPDS Emulation The value of this option determines if a printer can recognize and use the PPDS data stream. Available options: Deactivate Activate 5.4.9 Download Emuls This appears only if at least one download emulator (DLE) is installed. The default setting is Disable. All download emulators (DLEs) are reenabled automatically after two PORs. -
Page 164: Paper Prompts
4700P/bizhub 4000P Service Manual 2. Select On or Off. If On (default), then the Sleep Mode cannot be turned off. If Off, then Disabled appears on the Sleep Mode menu, and it can be turned off. 5.4.13 Paper Prompts This controls which tray a change prompt is directed to when paper is sensed to be the wrong size. -
Page 165: Action For Prompts
4700P/bizhub 4000P Service Manual 5.4.15 Action for Prompts This setting enables a user to determine which input source would receive paper-related or envelope- related change prompts when they occur. Regardless of the target source, the printer always requires some type of user assistance to resolve the change prompt (examples: pushing a button to ignore the prompt and changing the source’s installed media). -
Page 166: Reduced Curl
4700P/bizhub 4000P Service Manual 5.4.19 Reduced Curl When on, this setting significantly reduces throughput and should be activated only as a last resort to solve paper curl problems. The printer uses this mode only when the media type is set to Paper. -
Page 167: Clear Custom Status
4700P/bizhub 4000P Service Manual To clear the supply usage history: 1. From the Configuration menu, navigate to Clear Supply Usage History. 2. Press [OK] to proceed. 5.4.23 Clear Custom Status Executing this operation erases any strings that have been defined by the user for the default or alternate custom messages. -
Page 168: Exit Config Menu
4700P/bizhub 4000P Service Manual 5.4.27 Exit Config menu Select this to exit the Configuration menu. The printer performs a POR and restarts in normal mode. 5.5 Entering Invalid engine mode This mode is used if the machine has invalid code and needs the correct code loaded. After entering this mode, the firmware code can be updated. -
Page 169: Accessing The Network Se Menu
4700P/bizhub 4000P Service Manual 5.7 Accessing the Network SE menu This menu contains settings for fine tuning the communication settings for the network interfaces and protocols. 1. Navigate to: Networks/Ports >Standard Network > STD NET SETUP. 2. Press and hold 6, 7, and 9 simultaneously. -
Page 170: Updating The Printer Firmware
The following procedure explains the firmware update by using USB flash/thumb drive. This procedure is applied for bizhub 4700P only. Note: USB drive must be formatted for the FAT32 and not NTFS. 1. Store the firmware file (xxxx.fls) which are compatible with the product to the USB flash/thumb drive. - Page 171 4700P/bizhub 4000P Service Manual 3. Press key until the appropriate *****.fls file is selected on the LCD. 4. Press the [OK] button. 5. [Update Code] or [Delete file] appears on the LCD. 6. Press and select [Update Code]. 7. Press the [OK] button.
-
Page 172: Procedures For Updating The Firmware Via Usb Connection
4700P/bizhub 4000P Service Manual 5.9.3 Procedures for updating the firmware via USB connection The following procedure explains the firmware update when the printer is connected to PC by using USB cable. NOTE: Before updating the firmware, install the printer drivers on the PC used for the firmware update. - Page 173 4700P/bizhub 4000P Service Manual 12. Observe the progress bar to completion. 13. Close the update tool. 14. Observe the printer LEDs for flash status. Note: Do not turn off the power during the firmware update. 15. After the update completes, the printer restarts automatically.
-
Page 174: Procedures For Updating The Firmware Via Network Connection
4700P/bizhub 4000P Service Manual 5.9.4 Procedures for updating the firmware via network connection The following procedure explains the firmware update when the printer is connected to the network. 1. Store the firmware file (xxxx.fls) which is compatible with the printer in an arbitrary directory of the 2. -
Page 175: Procedures For Rewriting The Firmware In Recovery Mode
4700P/bizhub 4000P Service Manual 5.9.5 Procedures for rewriting the firmware in recovery mode The following procedure explains the firmware rewriting in Recovery Mode. Recovery Mode will allow the printer to boot from a secondary set of instructions to allow firmware to the printer. -
Page 176: Repair Information
4700P/bizhub 4000P Service Manual 6. Repair information 6.1 Removal precautions CAUTION—SHOCK HAZARD: For personal safety and to prevent damage to the printer, remove the power cord from the electrical outlet before you connect or disconnect any cable, electronic board, or assembly. -
Page 177: Controller Board/Control Panel Replacement
4700P/bizhub 4000P Service Manual Be extra careful while working with ESD-sensitive parts when cold-weather heating is used, because low humidity increases static electricity. 6.1.3 Controller board/control panel replacement This procedure should be followed only if both the controller board and the control panel fail. If you need to replace only one of the FRUs, follow the startup procedure described in the FRU’s removal... -
Page 178: Horizontal Top Contact Connector
4700P/bizhub 4000P Service Manual Warning—Potential Damage: Avoid pressing against the cable when opening the locking mechanism. This can also damage the cable. These are the types of ZIF connectors used in this printer: Horizontal top contact connector ... - Page 179 4700P/bizhub 4000P Service Manual Inserting a cable into the horizontal top contact connector 1. When installing the cable, check the locking actuator to ensure it is in the unlocked position. The tabs on the ends of the actuator are vertical when the actuator is unlocked.
-
Page 180: Horizontal Bottom Contact Connector
4700P/bizhub 4000P Service Manual 3. Rotate the locking actuator to the locked position. The cable should not move while this step is performed. If the cable moves, open the actuator, reposition the cable, and then close the actuator to the down position. - Page 181 4700P/bizhub 4000P Service Manual Removing a cable from the horizontal bottom contact connector 1. Place two fingers towards each end of the locking actuator, and then gently lift the actuator to the unlocked position. 2. Slide the cable out of the connector.
-
Page 182: Vertical Mount Contact Connector
4700P/bizhub 4000P Service Manual 3. Place your finger in the middle of the actuator, and then rotate the locking actuator to the locked position. Vertical mount contact connector This FRU contains a vertical mount contact connector. Read the instructions before proceeding. - Page 183 4700P/bizhub 4000P Service Manual Removing a cable from the vertical mount contact connector 1. Gently rotate the locking actuator from the center of the actuator to the unlocked position. 2. Slide the cable out of the connector. Inserting a cable into the vertical mount contact connector 1.
-
Page 184: Horizontal Sliding Contact Connector
4700P/bizhub 4000P Service Manual 3. Rotate the locking actuator to the locked position by pressing down on both ends of the actuator. The cable should not move when this step is performed. If the cable moves, open the actuator, reposition the cable, and then close the actuator to the down position. - Page 185 4700P/bizhub 4000P Service Manual Removing a cable from the horizontal sliding contact connector 1. Simultaneously slide the two tabs located on the ends of the locking actuator away from the connector. 2. Slide the cable out of the connector.
- Page 186 4700P/bizhub 4000P Service Manual 2. Insert the cable with the contacts on the cable facing away from the locking actuator. Insert the cable on top of the actuator. 3. Slide the locking actuator towards the connector, locking the cable into place. The cable should not move when this step is performed.
- Page 187 4700P/bizhub 4000P Service Manual looking at the board, take note that the contacts from the board to the connector are located on the side of the connector with the contacts. 2. Insert the cable squarely into the connector. Note: Verify that the cable is installed straight into the connector. If the cable is not installed properly, then intermittent failures could occur.
-
Page 188: Printhead Assembly Adjustments
4700P/bizhub 4000P Service Manual 6.1.5 Printhead assembly adjustments Printhead assembly mechanical adjustment A printhead needs to be correctly positioned after it has been removed. Use a sharp pencil or a small, flat-blade screwdriver to mark the location of the old printhead on the printer frame. Align the new printhead relative to the location of the old printhead. -
Page 189: Printhead Assembly Electronic Adjustment
4700P/bizhub 4000P Service Manual 4. If the grid lines of the right flap align below the corresponding lines on the left flap, then adjust the printhead clockwise relative to the printer, and recheck. If the grid lines of the left flap align below the corresponding lines of the right side, then adjust the printhead counterclockwise. - Page 190 4700P/bizhub 4000P Service Manual 2. From the Registration menu, select the Right margin setting: Diagnostics Menu >Registration >Right Margin 3. To determine the Right margin setting: a. Choose the value of the darkest bar on the right side of the Quick test page.
-
Page 191: Removal Procedures
4700P/bizhub 4000P Service Manual 6.2 Removal procedures Keep the following tips in mind as you replace parts: Some removal procedures require removing cable ties. You must replace cable ties during reassembly to avoid pinching wires, obstructing the paper path, or restricting mechanical movement. -
Page 192: Main Drive Gearbox Removal
4700P/bizhub 4000P Service Manual 6.3.2 Main drive gearbox removal 1. Remove the left cover. See Left cover removal. 2. Squeeze the latch, and then detach the link from the front door. 3. Remove the 4 screws (A), and then remove the main drive gearbox. - Page 193 4700P/bizhub 4000P Service Manual 4. Disconnect the cable from the main drive gearbox. 5. Remove the spring (B) and the fuser gear (C). - 192 -...
-
Page 194: Mpf Gearbox Removal
4700P/bizhub 4000P Service Manual 6.3.3 MPF gearbox removal 1. Remove the left cover. See Left cover removal. 2. Remove the main drive gearbox. See Main drive gearbox removal. 3. Remove the front door. See Front door removal. 4. Disconnect the spring from the printer (A). - Page 195 4700P/bizhub 4000P Service Manual 5. Remove the three screws (B), and then remove the left front mount. 6. Remove the three screws (C), and then remove the MPF gearbox. - 194 -...
- Page 196 4700P/bizhub 4000P Service Manual 7. Release the two latches (D), and then remove the main input drive gears. 8. Remove the E-clip (E), and then remove the MPF sector gear (F). - 195 -...
-
Page 197: Reverse Solenoid Removal
4700P/bizhub 4000P Service Manual 6.3.4 Reverse solenoid removal 1. Remove the right cover. See Right cover removal. 2. Remove the left cover. See Left cover removal. 3. Remove the rear door and cover. See Rear door and cover removal. -
Page 198: Duplex Gear Assembly Removal
4700P/bizhub 4000P Service Manual 6.3.6 Duplex gear assembly removal 1. Remove the left cover. See Left cover removal. 2. Remove the rear door and cover. See Rear door and cover removal. 3. Remove the power supply. See Power supply removal. - Page 199 4700P/bizhub 4000P Service Manual 11. From behind the three gears, remove the duplex coupling (D). 12. Remove the duplex link (E) from the duplex. - 198 -...
-
Page 200: Right Side Removals
4700P/bizhub 4000P Service Manual 6.4 Right side removals 6.4.1 Right cover removal 1. Open the front door. 2. Position the printer so that it sits on its left side. 3. Remove the two screws (A) securing the right cover. -
Page 201: Cooling Fan Duct Removal
4700P/bizhub 4000P Service Manual 6.4.3 Cooling fan duct removal Note: This is not a FRU. 1. Remove the right cover. See Right cover removal. 2. Remove the screw (A), and then remove the cooling fan duct. 6.4.4 Cooling fan removals 1. -
Page 202: Controller Board Removals
4700P/bizhub 4000P Service Manual 5. Remove the two screws (B) securing the fan to the fan mount. 6.4.5 Controller board removals 1. Remove the right cover. See Right cover removal. 2. Disconnect all cables from the controller board. 3. Remove the screw (A) from the rear side of the printer. -
Page 203: Toner Cartridge Smart Chip Contact Removal
4700P/bizhub 4000P Service Manual 4. Remove the five screws (B) securing the controller board. 6.4.6 Toner cartridge smart chip contact removal 1. Remove the right cover. See Right cover removal. 2. Disconnect the cable JARW1 from the controller board. - Page 204 4700P/bizhub 4000P Service Manual 4. Remove the two screws (B), and then detach the right cartridge guide. Warning—Potential Damage: Do not cut or disconnect the cable at the rear of the right cartridge guide. Leave the right cartridge guide dangling while performing the rest of the steps.
- Page 205 4700P/bizhub 4000P Service Manual Installation notes: 1. Test for proper installation of the spring and the actuators. 2. Press the cartridge actuator. The cartridge lock should move up. 3. Release the cartridge actuator. The cartridge lock should move back to its original position.
-
Page 206: Front Removals
4700P/bizhub 4000P Service Manual 6.5 Front removals 6.5.1 Left front mount removal 1. Remove the left cover. See Left cover removal. 2. Remove the front door. See Front door removal. 3. Disconnect the spring (A) from the printer. 4. Remove the three screws (B), and then remove the left front mount. -
Page 207: Right Front Mount Removal
4700P/bizhub 4000P Service Manual 6.5.2 Right front mount removal 1. Remove the right cover. See Right cover removal. 2. Disconnect all control panel cables from the controller board. 3. Disconnect the cable JCVR1 from the controller board. 4. Remove the screw (A) to disconnect the ground wire. -
Page 208: Transfer Roll Removal
4700P/bizhub 4000P Service Manual 6.5.3 Transfer roll removal Warning—Potential Damage: Do not touch the transfer roll with bare hands. Oil from the skin can damage it. 1. Squeeze the latches at each end of the transfer roll. 2. Lift to remove the transfer roll. -
Page 209: Cartridge Plunger Removal
4700P/bizhub 4000P Service Manual 6.5.4 Cartridge plunger removal 1. Open the front door. 2. Tilt the cartridge plunger. 3. Twist and then remove the cartridge plunger. - 208 -... - Page 210 4700P/bizhub 4000P Service Manual Installation notes: 1. Use a spring hook to hold the spring, and then reinstall the cartridge plunger. 2. Set the spring over the plunger. - 209 -...
-
Page 211: Bezel Removals
4700P/bizhub 4000P Service Manual 6.5.5 Bezel removals 1. Open the front door. 2. Push the latches (A), and then remove the bezel. 6.5.6 Nameplate removals 1. Open the front door. 2. Remove five screws (A) securing the nameplate. - 210 -... -
Page 212: Control Panel Assembly Removals
3. Remove the bezel. See Bezel removals. 4. Remove the screw (A) securing the ground connector to the controller board. 5. Disconnect the cables JUSBF1 (for bizhub 4700P only) and JUICC1 and from the controller board. - 211 -... - Page 213 4700P/bizhub 4000P Service Manual 6. Remove the screw (B) from the right front mount, and route the cables through the slot. 7. Remove the two screws (C) securing the control panel assembly. 8. Route all cables off the printer to completely remove the control panel assembly.
-
Page 214: Uicc Removals
4700P/bizhub 4000P Service Manual 6.5.8 UICC removals 1. Remove the right cover. See Right cover removal. 2. Remove the nameplate. See Nameplate removals. 3. Remove the bezel. See Bezel removals. 4. Remove the control panel assembly. See Control panel assembly removals. -
Page 215: Control Panel Usb Port Removal (Bizhub 4700P Only)
4700P/bizhub 4000P Service Manual 6.5.9 Control panel USB port removal (bizhub 4700P only) 1. Remove the right cover. See Right cover removal. 2. Remove the nameplate. See Nameplate removals. 3. Remove the bezel. See Bezel removals. 4. Remove the control panel assembly. See Control panel assembly removals. -
Page 216: Mpf Assembly Removal
4700P/bizhub 4000P Service Manual 6.5.10 MPF assembly removal Remove the nameplate. See Nameplate removals. Remove the two springs (A). Squeeze the latches (B) to release the left and right links. - 215 -... - Page 217 4700P/bizhub 4000P Service Manual Release the lock (C) remove the MPF link. Do the same on the other MPF link. Release the right tab (D) of the MPF. Slide the MPF assembly to remove. - 216 -...
-
Page 218: Mpf Pick Roller Cover Removal
4700P/bizhub 4000P Service Manual 6.5.11 MPF pick roller cover removal Open the front door. Remove the two screws (A), and then remove the MPF pick roller cover. 6.5.12 MPF pick roller removal 1. Remove the MPF pick roller cover. See MPF pick roller cover removal. -
Page 219: Bail Removal
4700P/bizhub 4000P Service Manual 3. Pull the MPF pick roller outward to remove. Warning—Potential Damage: Do not touch the pick tire with bare hands, as this can damage the pick roller. 6.5.13 Bail removal 1. Remove the MPF pick roller cover. See MPF pick roller cover removal. -
Page 220: Front Door Removal
4700P/bizhub 4000P Service Manual 3. Remove the four screws (A), and then remove the jam access cover. 6.5.15 Front door removal Note: This is not a FRU. 1. Remove the right cover. See Right cover removal. 2. Disconnect the following cables from the controller board:... - Page 221 4700P/bizhub 4000P Service Manual 4. Remove the screw (A) to disconnect the ground wire. 5. Remove the four screws (B). - 220 -...
-
Page 222: Front Access Cover Removal
4700P/bizhub 4000P Service Manual 6. Remove the right front mount, and then remove front door. Below are the front door and the right front mount. Installation notes: 1. Mount the left side of the front door to the printer. -
Page 223: Front Door Sensor Removal
4700P/bizhub 4000P Service Manual 7. The front access cover remains. 6.5.17 Front door sensor removal 1. Remove the front door. See Front door removal. 2. From under the right front mount, remove the screw (A). Note: Use a #0 Phillips screwdriver. - Page 224 4700P/bizhub 4000P Service Manual 4. Remove the MPF pick roller. See MPF pick roller removal. 5. Remove the jam access cover. See Jam access cover removal. 6. Disconnect cable JMPF1 from the controller board. 7. Remove the four screws (A).
-
Page 225: Separator Pad Removal
4700P/bizhub 4000P Service Manual 10. Release the front guide from the guides at each end. Installation note: The cams at each end of the MPF shaft must point down. 6.5.19 Separator pad removal 1. Remove the right cover. See Right cover removal. - Page 226 4700P/bizhub 4000P Service Manual 7. While pressing down the MPF sensor flag (B) and separator pad (C), move the restraint roller (D) and MPF pick roller hub (E) to the right. 8. Remove the pin (F). 9. While pressing down the MPF sensor flag and separator pad, move the restraint roller (G) to the right.
- Page 227 4700P/bizhub 4000P Service Manual 10. Remove the E-clip (H), and then move the shaft (I) to the right. 11. Remove the separator pad and the spring underneath. - 226 -...
-
Page 228: Bottom Removals
4700P/bizhub 4000P Service Manual 6.6 Bottom removals 6.6.1 Power supply removals 1. Remove the left cover. See Left cover removal. 2. Remove the rear door and cover. See Rear door and cover removal. 3. Disconnect the cable (A) from the rear, and disconnect the cable (B) from the left side. -
Page 229: Power Supply Shield Removal
4700P/bizhub 4000P Service Manual 6. Remove the five metal screws (D) and the plastic screw (E) securing the power supply. 7. Remove the power supply, and then disconnect all cables from the power supply. 6.6.2 Power supply shield removal 1. -
Page 230: Duplex Removal
4700P/bizhub 4000P Service Manual 5. Remove the three screws (A), and then remove the power supply shield. 6.6.3 Duplex removal 1. Remove the left cover. See Left cover removal. 2. Remove the rear door and cover. See Rear door and cover removal. - Page 231 4700P/bizhub 4000P Service Manual 6. Remove the four screws (A) securing the duplex. Note: The duplex link (B) is part of the FRU. - 230 -...
-
Page 232: Duplex Sensor And Input Sensor Removal
4700P/bizhub 4000P Service Manual 6.6.4 Duplex sensor and input sensor removal 1. Remove the left cover. See Left cover removal. 2. Remove the right cover. See Right cover removal. 3. Remove the rear door and cover. See Rear door and cover removal. - Page 233 4700P/bizhub 4000P Service Manual Installation notes: 1. Install the duplex sensor, followed by the input sensor. 2. Route the cable using the new path. 3. Secure the cable at the pick/lift motor gearbox using cable ties. Cut off any excess cable tie.
-
Page 234: Index Sensor Removal
4700P/bizhub 4000P Service Manual 6.6.5 Index sensor removal 1. Remove the left cover. See Left cover removal. 2. Remove the right cover. See Right cover removal. 3. Remove the rear door and cover. See Rear door and cover removal. -
Page 235: Media Present Sensor Removal
4700P/bizhub 4000P Service Manual 7. Disconnect the spring (A) from the printer. 8. Remove the two screws (B), and then remove the sensor. 9. Disconnect the cable from the sensor. 6.6.7 Media present sensor removal 1. Remove the left cover. See Left cover removal. - Page 236 4700P/bizhub 4000P Service Manual 7. Disconnect the cable from the media present sensor (A). 8. From inside the printer, release the three latches (B). - 235 -...
-
Page 237: Trailing Edge Sensor Removal
4700P/bizhub 4000P Service Manual 6.6.8 Trailing edge sensor removal 1. Remove the left cover. See Left cover removal. 2. Remove the right cover. See Right cover removal. 3. Remove the rear door and cover. See Rear door and cover removal. - Page 238 4700P/bizhub 4000P Service Manual 5. Remove the duplex. See Duplex removal. 6. Remove the retainer spring (A). 7. Remove the two springs (B). 8. Remove the two screws (C). Below are the cam release and bracket. - 237 -...
- Page 239 4700P/bizhub 4000P Service Manual 9. Remove the screw (D) securing the ACM lift cam to the ACM housing. 10. Remove the ACM lift cam by sliding it off the shaft. 11. Remove the screw (E), and then remove the media present sensor flag.
- Page 240 4700P/bizhub 4000P Service Manual Installation note: Do the to ensure proper installation of the sensor flag: following Lift the ACM. 2. The protrusion on the ACM must align with the notch on the sensor flag. 3. The sensor flag must align with the media present sensor (A).
-
Page 241: Acm Assembly Removal
4700P/bizhub 4000P Service Manual 6.6.10 ACM assembly removal 1. Remove the left cover. See Left cover removal. 2. Remove the rear door and cover. See Rear door and cover removal. 3. Remove the power supply. See Power supply removal. -
Page 242: Pick/Lift Motor Gearbox Removal
4700P/bizhub 4000P Service Manual 9. Remove the ACM assembly along with its shaft. Below is the ACM assembly. 6.6.11 Pick/Lift motor gearbox removal 1. Remove the left cover. See Left cover removal. 2. Remove the rear door and cover. See Rear door and cover removal. - Page 243 4700P/bizhub 4000P Service Manual 8. Remove the three screws (A). 9. Disconnect the cable from the pick/lift motor gearbox. - 242 -...
-
Page 244: Rear Side Removals
4700P/bizhub 4000P Service Manual 6.7 Rear side removals 6.7.1 Dust cover removal 1. Press the latches on each side of the dust cover. 2. Remove the dust cover. 6.7.2 Rear door and cover removal 1. Position the printer so that it sits on either its left or right side. -
Page 245: Narrow Media/Bin Full Sensor Removal
4700P/bizhub 4000P Service Manual 4. Remove the two screws (A) securing the rear cover. 5. Press the two latches to release the rear cover. 6.7.3 Narrow media/bin full sensor removal 1. Remove the right cover. See Right cover removal. -
Page 246: Redrive Assembly Removal
4700P/bizhub 4000P Service Manual 7. Remove the ground (B), sensor (C), and sensor flag (D). 6.7.4 Redrive assembly removal 1. Remove the right cover. See Right cover removal. 2. Remove the left cover. See Left cover removal. 3. Remove the rear door and cover. See Rear door and cover removal. -
Page 247: Fuser Removal
4700P/bizhub 4000P Service Manual 7. Remove the six screws (B) securing the redrive assembly. 6.7.5 Fuser removal 1. Remove the right cover. See Right cover removal. 2. Remove the rear door and cover. See Rear door and cover removal. -
Page 248: Top Side Removals
4700P/bizhub 4000P Service Manual 6.8 Top side removals 6.8.1 Top cover removal 1. Remove the right cover. See Right cover removal. 2. Remove the left cover. See Left cover removal. 3. Remove the rear door and cover. See Rear door and cover removal. -
Page 249: Laser Scanning Unit (Lsu) Removal
4700P/bizhub 4000P Service Manual 6.8.2 Laser scanning unit (LSU) removal 1. Remove the right cover. See Right cover removal. 2. Remove the left cover. See Left cover removal. 3. Remove the rear door and cover. See Rear door and cover removal. -
Page 250: 250/550-Sheet Tray Removals
4700P/bizhub 4000P Service Manual 6.9 250/550-sheet tray removals 6.9.1 Pick roller removal Press the latches, and then remove the pick roller. 6.9.2 Separator roll assembly removal 1. Remove the screw (A) from under the tray insert. - 249 -... - Page 251 4700P/bizhub 4000P Service Manual 2. Remove the E-clip, and then remove the gear. 3. Remove the four screws (B). - 250 -...
-
Page 252: Acm Assembly Removal
4700P/bizhub 4000P Service Manual 4. Push out the top part of the drawer cover, and then remove the separator roll assembly. 6.9.3 ACM assembly removal 1. Remove the seven screws (A), and release the two latches (B) from the top of the drawer. - Page 253 4700P/bizhub 4000P Service Manual 2. Remove the two screws (C), and then release the two latches under the screws. 3. Swing the right cover backward to remove. - 252 -...
- Page 254 4700P/bizhub 4000P Service Manual 4. Remove the screw (D). 5. Disconnect the spring (E). - 253 -...
- Page 255 4700P/bizhub 4000P Service Manual 6. Remove the two screws (F), and then remove the controller card cover. 7. Disconnect the cable J11 from the controller card. 8. Unroute the cable, and then remove the ACM assembly. - 254 -...
-
Page 256: Component Locations
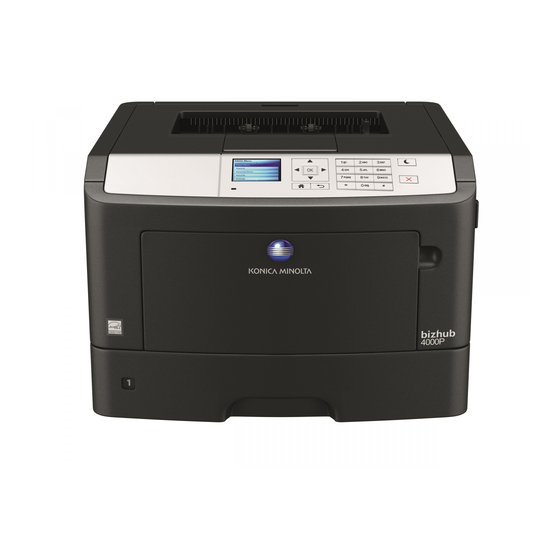
4700P/bizhub 4000P Service Manual 7. Component locations 7.1 Exterior locations 7.1.1 Front view (bizhub 4000P) Part name Control panel Paper stop Standard bin Front door release button Controller board access door 100-sheet multipurpose feeder Standard tray (250 sheet) Optional 250- or 550-sheet tray... -
Page 257: Front View (Bizhub 4700P)
4700P/bizhub 4000P Service Manual 7.1.2 Front view (bizhub 4700P) Part name Control panel Paper stop Standard bin Front door release button Controller board access door 100-sheet multipurpose feeder Standard tray (550 sheet) Optional 250- or 550-sheet tray - 256 -... -
Page 258: Rear View
4700P/bizhub 4000P Service Manual 7.1.3 Rear view Part name USB port (for wireless option) USB printer port Ethernet port Power switch Printer power cord socket Security slot - 257 -... -
Page 259: Maintenance
Damaged, missing, or altered covers, especially in the area of the top cover and the power supply cover Possible safety exposure from any non-KONICA MINOLTA attachments Use the following table to determine when specified parts should be inspected: EVERY... -
Page 260: Scheduled Maintenance
4700P/bizhub 4000P Service Manual EVERY EVERY EVERY NOTES SERVICE 100K 200K CALL Fuser assembly Inspect Inspect Replace Sensor (fuser exit) Clean Clean Blower brush REDRIVE ASSEMBLY Redrive assembly Inspect Replace 8.1.1 Scheduled maintenance The control panel displays an 80.xy error when it reaches 200K page counts. It is necessary to install the appropriate maintenance kit to maintain the print quality and reliability of the printer. -
Page 261: Cleaning The Printer
4700P/bizhub 4000P Service Manual 8.3 Cleaning the printer Note: You may need to perform this task after every few months. Warning—Potential Damage: Damage to the printer caused by improper handling is not covered by the printer warranty. 1. Make sure that the printer is turned off and unplugged from the electrical outlet. -
Page 262: Electrical Parts Layout
4700P/bizhub 4000P Service Manual 9. Electrical parts layout FUSER ASSEMBLY LASER SCANNING UNIT CONTROLLER BOARD POWER SUPPLY CONTROL PANEL - 261 -... - Page 263 4700P/bizhub 4000P Service Manual [1] NARROW MEDIA/BIN FULL SENSOR [2] COOLING FAN [3] FRONT DOOR SENSOR [4] INPUT SENSOR [5] PICK/LIFT MOTOR [6] TRAY PRESENT SENSOR [7] DUPLEX SENSOR [8] MPF SENSOR [9] INDEX SENSOR [10] TRAILING EDGE SENSOR...
-
Page 264: Printer Specifications
4700P/bizhub 4000P Service Manual 10. Printer specifications 10.1 Product power consumption The following table documents the power consumption characteristics of the product. Note: Some modes may not apply to your product. Mode Description Power consumption (Watts) Printing The product is generating hard-copy output from electronic inputs. -
Page 265: Operating Clearances
4700P/bizhub 4000P Service Manual 10.3 Operating clearances Right 30 cm (12 in.) Front 51 cm (20 in.) Left 20 cm (8 in.) Rear 20 cm (8 in.) 30 cm (12 in.) Allow additional clearance around the printer for adding the optional input trays. -
Page 266: Acoustics
4700P/bizhub 4000P Service Manual 10.4 Acoustics All measurements are made in accordance with ISO 7779 and conform with ISO 9296. bizhub 4000P Status 1 meter average sound Declared sound power level pressure dBA (Bels) Idle (Standby) 15 dBA 3.3 dBA... -
Page 267: Operating Environment
4700P/bizhub 4000P Service Manual 10.5 Operating environment Environment Specification Temperature 60 to 90 °F (16 to 32 °C) Printer operating Relative humidity 8 to 80% Maximum wet bulb temperature 73 °F (23 °C) Temperature 50 to 110 °F (10 to 43 °C) -
Page 268: Options And Features
4700P/bizhub 4000P Service Manual 11. Options and features 11.1 Available internal options DDR3 DIMM (512MB, 1GB) Flash Card (256MB User Flash, Forms and Barcode, IPDS) Font Card (Japanese, Korean, Simplified Chinese, Traditional Chinese) Wireless 11.2 Media handling options Standard output bin ... -
Page 269: Theory Of Operation
4700P/bizhub 4000P Service Manual 12. Theory of operation 12.1 POR sequence At power on, the engine code goes through a series of tests to verify hardware integrity. If a hardware failure is detected, it will be reported to the printer. If the POR sequence cannot be completed successfully, the printer may post an error message identifying service may be needed. -
Page 270: Simplex Printing
4700P/bizhub 4000P Service Manual The MPF can be accessed by opening the MPF tray on the front door. In an MPF paper feed, the MPF paper present sensor detects the media. The instant the MPF pick roll shaft rotates, the cams on each end of the shaft disengage the MPF tray. -
Page 271: Duplex Printing
4700P/bizhub 4000P Service Manual 12.3.4 Duplex printing After the first side of the media has been printed on and is partially fed out to the output bin, the duplex solenoid activates. This causes the exit roller to reverse its rotation and feed the media, with its trailing edge first, back into the redrive assembly and then to the duplex paper path. -
Page 272: Key Components
4700P/bizhub 4000P Service Manual 12.5 Key components 12.5.1 Sensors bizhub 4700P/4000P Trailing edge sensor Detects the media’s trailing edge as it passes the pick tires. Among other capabilities, this sensor can be used to determine the paper size sensor and the media stack height. -
Page 273: Other Key Components
4700P/bizhub 4000P Service Manual the timing the patch image passes the sensor. Therefore, observing changes of intervals at which pulses are output leads to toner density detection. Pass through sensor (option tray) Detects when the media from the option tray passes. This will trigger the pick roller to pick the next media. -
Page 274: Electrophotographic Process (Ep Process)
4700P/bizhub 4000P Service Manual bizhub 4700P/4000P 12.6 Electrophotographic process (EP process) 12.6.1 Printhead The printhead scans the photo conductor drum surface with a laser beam. It consists of the following components: Laser diode (LD) card assembly Oscillator ... -
Page 275: Step 1: Charge
4700P/bizhub 4000P Service Manual 12.6.2 Step 1: Charge During the charge step, voltage is sent from the HVPS to the charge roll beside the photoconductor. The charge roll applies a uniform negative charge over the entire surface of the photoconductor to prepare it for the laser beam. -
Page 276: Step 3: Develop
4700P/bizhub 4000P Service Manual 12.6.4 Step 3: Develop Once the laser exposes the photoconductor, the HVPS sends charge to the developer roll. Because of the charge difference between the toner on the developer roller and the electrostatic image created by the laser, the toner is attracted to areas of the photoconductor surface exposed by the laser. -
Page 277: Step 5: Clean
4700P/bizhub 4000P Service Manual 12.6.6 Step 5: Clean The cleaning blade removes any toner that remains on the photoconductor after the transfer process. The toner removed is collected inside the imaging unit. - 276 -... -
Page 278: Acronyms
4700P/bizhub 4000P Service Manual 13. Acronyms 13.1 Acronyms Auto compensator Mechanism ASIC Application-Specific Integrated Circuit BLDC Brushless DC Motor Black Only Retract Cyan Charge Coupled Device Carbonless Copy Paper Cyclic Redundancy Check Customer Setup CTLS Capacitance Toner Level Sensing... - Page 279 4700P/bizhub 4000P Service Manual Liquid Crystal Display LDAP Lightweight Directory Access Protocol Light-Emitting Diode Laser Scanning Unit LVPS Low Voltage Power Supply Magenta Megabyte Multi-Function Printer Multipurpose Feeder MROM Masked Read Only Memory Microswitch Nonvolatile Memory NVRAM Nonvolatile Random Access Memory...
- Page 280 4700P/bizhub 4000P Service Manual Used Parts Return V ac Volts alternating current V dc Volts direct current Vacuum Transport Belt Yellow - 279 -...
- Page 281 25-Y - ZIF CONNECT OR 26-Y 27-Y 28-Y ZI F - CONNECT OR FOR bizhub 3300P/3301P COMPONENTS PINS - CONNECT OR FOR bizhub 4700P/4000P COMPONENTS PINS - USB CONNECT OR FOR bizhub 4700P US B 15-Z 16-Z 17-Z 18-Z 19-Z...
- Page 282 © 2015 KONICA MINOLTA, INC. © 2015 KONICA MINOLTA, INC. Use of this manual should be strictly supervised to avoid Use of this manual should be strictly supervised to avoid disclosure of confidential information. disclosure of confidential information.