Sign In
Upload
Manuals
Brands
Waters Manuals
Measuring Instruments
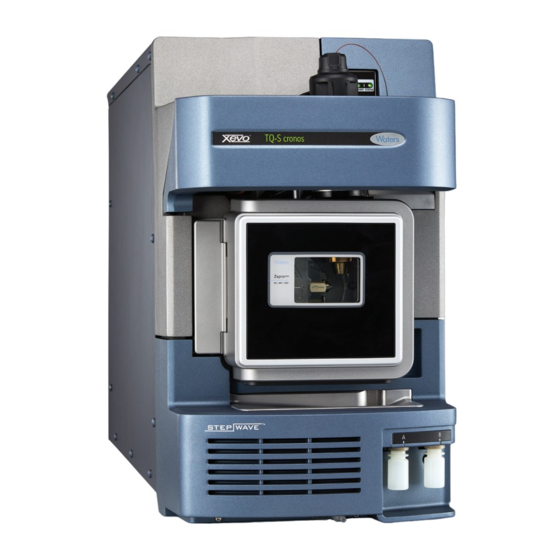
Xevo TQ-S cronos
Waters Xevo TQ-S cronos Manuals
Manuals and User Guides for Waters Xevo TQ-S cronos. We have
1
Waters Xevo TQ-S cronos manual available for free PDF download: Overview And Maintenance Manual
Waters Xevo TQ-S cronos Overview And Maintenance Manual (175 pages)
Brand:
Waters
| Category:
Measuring Instruments
| Size: 6 MB
Table of Contents
General Information
2
Copyright Notice
2
Trademarks
2
Customer Comments
3
Contacting Waters
3
Additional Resources
4
Intended Use of the Xevo TQ-S Cronos
5
Calibrating
5
Quality Control
6
EMC Considerations
6
FCC Radiation Emissions Notice
6
ISM Classification: ISM Group 1 Class a
6
EMC Emissions
7
EMC Grounding Requirements
7
Legal Manufacturer
7
Safety Considerations
7
Applicable Symbols
7
Safety Hazard Symbol Notice
9
Electrical Power Safety Notice
9
Equipment Misuse Notice
9
Considerations Specific to the Device
10
Safe Disposal
13
Safety Advisories
14
Table of Contents
15
Waters Xevo TQ-S Cronos Overview
21
Automation and Fluidics
22
ACQUITY UPLC-MS Xevo TQ-S Cronos Systems
23
Compatible Systems - Xevo TQ-S Cronos
23
ACQUITY System Core Components
23
Waters ACQUITY Xevo TQ-S Cronos UPLC-MS System
26
Software and Data System
26
Ionization Techniques and Source Probes
27
Electrospray Ionization
27
Esci
28
Apci
28
Unispray Source
28
Atmospheric Solids Analysis Probe (ASAP)
28
Fluidics System
29
Overview
29
System Components
30
System Operation
30
Ion Optics
30
MS Operating Modes
31
MS/MS Operating Modes
32
Product (Daughter) Ion Spectrum
33
Precursor (Parent) Ion Spectrum
33
MRM Mode
34
PICS Mode
34
RADAR Mode
34
Constant Neutral Loss Mode
35
Sample Inlet
36
Leak Sensors
36
Vacuum System
36
Rear Panel
36
Preparing the Mass Spectrometer for Operation
38
Preparing to Start the Mass Spectrometer
38
Starting the Mass Spectrometer Using Masslynx Software
39
Starting the Mass Spectrometer Using Waters_Connect Software
40
Verifying the Instrument's State of Readiness
42
Monitoring the Mass Spectrometer Leds
42
Power LED
42
Operate LED
42
Tuning and Calibration Information
42
Running the Mass Spectrometer at Higher Flow Rates
42
Preparing the Fluidics System
43
Installing the Reservoir Bottles
43
Installing the Low-Volume Vials
44
Purging the Fluidics
44
Rebooting the Mass Spectrometer
45
Leaving the Mass Spectrometer Ready for Operation
45
Emergency Shutdown of the Mass Spectrometer
46
Changing the Mode of Operation
47
ESI, Esci, and APCI Modes
47
ESI Mode
47
Esci Mode
47
APCI Mode
48
Configuring for Esi/Esci/Apci Modes
48
Installing the Probe Adapter
51
Installing the Probe Assembly
54
Removing and Refitting the Probe Inlet Fitting
60
Connecting the Probe Assembly to a UPC² System
62
Removing the Probe Adapter
64
Installing and Removing the Corona Pin
65
Unispray Standard Source
67
Installing the Unispray Source
69
Removing the Unispray Source
72
Maintenance Procedures
74
Maintenance Schedule for Xevo TQ-S Cronos
74
Spare Parts
75
Safety and Handling
76
Preparing the Instrument for Working on the Source
76
Using Masslynx Software to Prepare the Instrument for Operations on or Inside Its Source
77
Using Waters_Connect Software to Prepare the Instrument for Operations on or Inside Its Source
77
Removing and Refitting the Source Enclosure
78
Removing the Source Enclosure from the Instrument
78
Fitting the Source Enclosure to the Instrument
79
Operating the Source Isolation Valve
80
Closing the Source Isolation Valve
80
Opening the Source Isolation Valve
81
Removing O-Rings and Seals
82
O-Ring Removal Kit
82
Cleaning the Instrument Case
83
Emptying the Nitrogen Exhaust Trap Bottle
83
Maintaining the Rotary Backing Pump's Oil
85
Cleaning the Source Components
88
Cleaning the Sampling Cone Assembly
88
Removing the Sampling Cone Assembly from the Source
88
Disassembling the Sampling Cone Assembly
90
Cleaning the Sample Cone and Cone Gas Nozzle
92
Assembling the Sampling Cone Assembly
94
Fitting the Sampling Cone Assembly to the Source
95
Cleaning the Ion Block Assembly
96
Removing the Ion Block Assembly from the Source Assembly
96
Disassembling the Source Ion Block Assembly
98
Cleaning the Ion Block Components
103
Assembling the Source Ion Block Assembly
104
Fitting the Ion Block Assembly to the Source Assembly
105
Cleaning the Ion Guide Assembly
106
Removing the Pumping Block Assembly and Ion Guide Assembly from the Instrument
106
Removing the Ion Guide Assembly and Differential Aperture from the Pumping Block Assembly
108
Removing the Differential Aperture Support and the Differential Aperture from the Ion Guide Assembly
109
Cleaning the Differential Aperture
110
Cleaning the Ion Guide Assembly
111
Fitting the Differential Aperture and the Differential Aperture Support Onto the Ion Guide Assembly
113
Fitting the Ion Guide Assembly and Differential Aperture Onto the Pumping Block Assembly
114
Fitting the Pumping Block Assembly and Ion Guide Assembly Onto the Instrument
115
Replacing the Ion Block Source Heater
116
Replacing the Probe Assembly
120
Removing the Probe Assembly
120
Replacing the ESI Probe Tip and Gasket
122
Removing the ESI Probe Tip and Gasket
122
Fitting the ESI Probe Tip and Gasket
124
Cleaning the APCI Probe Tip
125
Replacing the APCI Probe Heater
126
Removing the APCI Probe Heater
126
Fitting the New APCI Probe Heater
127
Cleaning or Replacing the Corona Pin
129
Replacing the Source Assembly Seals
130
Removing the Probe Adjuster Assembly Probe and Source Enclosure Seals
130
Fitting the New Source Enclosure and Probe Adjuster Assembly Probe Seals
132
Replacing the Air Filter
133
Replacing the Unispray Probe Assembly
135
Removing the Unispray Probe Assembly
135
Installing the Unispray Probe Assembly
136
Maintaining the Unispray Impactor Pin
138
Removing and Installing the Unispray Impactor Pin
138
Cleaning or Replacing the Unispray Impactor Pin
139
Replacing the Instrument's Fuses
140
A Safety Advisories
141
Warning Symbols
141
Specific Warnings
142
Notices
144
Bottles Prohibited Symbol
144
Required Protection
144
Warnings that Apply to All Waters Instruments and Devices
145
Warnings that Address the Replacement of Fuses
149
Electrical Symbols
150
Handling Symbols
151
B External Connections
153
External Wiring, Vacuum, and Gas Connections
153
Connecting the Edwards Oil-Filled Backing Pump
155
Making the Electrical Connections to the Rotary Backing Pump
158
Connecting to the Nitrogen Gas Supply
158
Connecting to the Collision Cell Gas Supply
160
Connecting the Nitrogen Exhaust Line
160
Connecting Liquid Waste Lines
163
Connecting to the Workstation
164
Connecting the Workstation to the Power Source
165
Connecting Ethernet Cables (Systems with ACQUITY LC)
165
I/O Signal Connectors
166
Making I/O Signal Connections
167
Connecting to the Power Supply
170
C Materials of Construction and Compatible Solvents
171
Preventing Contamination
171
Items Exposed to Solvents
171
Solvents Used to Prepare Mobile Phases
172
D Plumbing the Fluidics System
173
Preventing Contamination
173
The Selector Valve
173
Plumbing Schematic
174
Tubing and Connection Specifications
174
Advertisement
Advertisement
Related Products
Waters Xevo TQ-S micro
Waters Xevo TQ-XS Mass
Waters Xevo TQ-XS IVD
Waters Xevo TQ-S
Waters Xevo TQ MS
Waters Xevo TQD
Waters Xevo TQD IVD
Waters Xevo TQ-GC
Waters Xevo TQ-S micro IVD
Waters 2410
Waters Categories
Laboratory Equipment
Security Sensors
Measuring Instruments
Control Unit
Water Pump
More Waters Manuals
Login
Sign In
OR
Sign in with Facebook
Sign in with Google
Upload manual
Upload from disk
Upload from URL