Safety Vision OBSERVER 4120 User Manual
Hide thumbs
Also See for OBSERVER 4120:
- Hardware user's manual (14 pages) ,
- Hardware user's manual (14 pages)
Table of Contents
Advertisement
Advertisement
Table of Contents

Related Manuals for Safety Vision OBSERVER 4120


Summary of Contents for Safety Vision OBSERVER 4120
- Page 1 OBSERVER™ 4120 USER GUIDE...
-
Page 2: Important Notices
Safety Vision. Safety Vision® is a registered trademark of Safety Vision, LLC. All other products or name brands mentioned in this document are trademarks of their respective owners. For more information about Safety Vision and its products, go to www. -
Page 3: Table Of Contents
OBSERVER 4120 USER GUIDE Table of Contents Main Wiring Diagram Installation Hard Drive Removal SD Card Removal/Insertion Components SV-CP4-HYB Touch Screen Monitor Remote Control Log In and Home Screen Recording Search System Version Info Modules Server Status Environment Storage Log Search... -
Page 4: Main Wiring Diagram
OBSERVER 4120 USER GUIDE Main Wiring Diagram Wiring Harness Connections Recommended Sensor Connections (12V) Sensor 8 Stop Arm Lights (school bus) Sensor 7 Amber Warning Lights (school bus) Sensor 6 Door (or wheel chair lift) Sensor 5 Head Lights Event Button... - Page 5 OBSERVER 4120 USER GUIDE [this page intentionally left blank]...
-
Page 6: Installation
OBSERVER 4120 USER GUIDE Installation The Observer 4120 is shipped with a base containing an integrated cooling fan. Ensure the cooling fan power cable is connected to the cooling fan power port. Remove the Security Cover and open the faceplate as described on the following page. -
Page 7: Hard Drive Removal
OBSERVER 4120 USER GUIDE Hard Drive Removal To remove the hard drive from the HVR: Ensure the HVR is powered off. Insert the key into the faceplate lock and turn it clockwise. Open the faceplate latch on the right side of the HVR. -
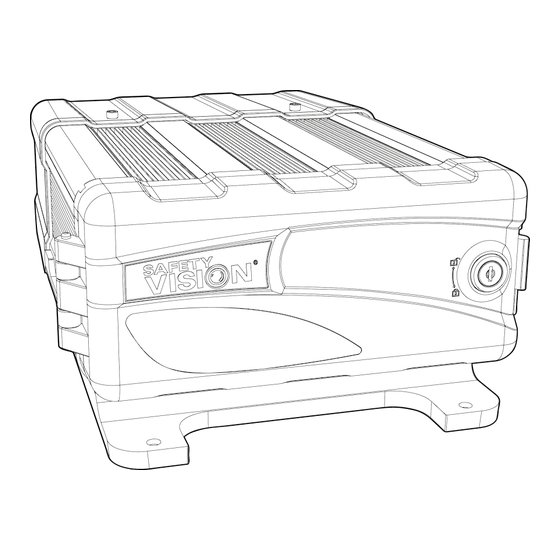
Page 8: Components
OBSERVER 4120 USER GUIDE Components 1 - Removable Hard Drive - The hard disk drive (HDD) provides the main storage for recorded data. 2 - Status LEDs - The Status LEDs illuminate to display the current status of the HVR. See chart at right. - Page 9 OBSERVER 4120 USER GUIDE 1 - Power Port - Connection for the UPS and main power harness. 2 - Serial Port - Connection for the I/O hub and ALM extender harness. 3 - Panel Port - Connection for the SV-CP4-HYB monitor.
-
Page 10: Sv-Cp4-Hyb Touch Screen Monitor
OBSERVER 4120 USER GUIDE SV-CP4-HYB Touch Screen Monitor To make selections using the SV-CP4-HYB monitor, simply tap on the touch screen. Do not exert excessive force on the screen. Tap the screen once to display the shortcut bar. Use the shortcut bar to display a single screen or a quad-view. -
Page 11: Remote Control
OBSERVER 4120 USER GUIDE Brightness, Contrast, and Color - Press this key repeatedly to toggle between brightness, contrast, and color options for each individual channel. Use the (+) and (-) keys to adjust each value. Setup - Quickly access the configuration menu. Login may be required. -
Page 12: Log In And Home Screen
OBSERVER 4120 USER GUIDE Log In and Home Screen Log In Tap the screen once to display the shortcut bar. Tap the large Log In icon on the right to display the log in prompt. The log in prompt also appears if you are logged out and attempt to access Playback or other functions that require logging in. -
Page 13: Recording Search
OBSERVER 4120 USER GUIDE Recording Search On the Home Screen, tap the Recording Search icon to search for previously recorded video, review it, and export it. Calendar The calendar screen appears. Scroll through the months and year using the controls on the left. On the right, select to search for Main record, Sub record, or Mirror record video. - Page 14 OBSERVER 4120 USER GUIDE Playback Tapping the Playback button on the results screen begins video playback immediately. You can slide your finger along the timeline at the top of the screen to quickly advance to specific video. Addition- ally, a specific time can be entered in the field in the upper right.
- Page 15 OBSERVER 4120 USER GUIDE Export Tapping the Export button on the results screen begins the export process. Selected video can be downloaded to a USB flash drive: Insert a USB flash drive into the USB port on the front panel of the HVR.
-
Page 16: System
OBSERVER 4120 USER GUIDE System Tap the System icon on the Home Page to view the System menus. System menus mainly provide detailed information regarding the current status of the HVR and the accessories connected to it. This information can be useful when troubleshooting certain issues. -
Page 17: Modules
OBSERVER 4120 USER GUIDE Modules The Modules menus provide information about the internal wireless and GPS modules inside the HVR. WIFI • Built-in WIFI status: displays if the internal Wi-Fi module is currently connected to a wireless network • Signal: if the internal Wi-Fi module is connected to a... -
Page 18: Server Status
OBSERVER 4120 USER GUIDE Server Status The Server Status menu displays the status of an Observer Management System (OMS) server to which the HVR is con- nected. • Server status: connection status • Network type: type of network used to communicate with the OMS server •... -
Page 19: Environment
OBSERVER 4120 USER GUIDE Environment The Environment menu displays current voltage and device temperature readings. • Voltage: voltage (displayed in volts) the HVR is currently receiving • Device temperature: displays the internal temperature of the HVR displayed in degrees Celsius •... -
Page 20: Storage
OBSERVER 4120 USER GUIDE Storage The Storage menu displays the status, capacity, and record- ing time for each data storage device connected to the HVR. • Storage type: type of storage device • Status: displays if the device is currently Recording, is Normal, or a problem has occured •... -
Page 21: Log Search
OBSERVER 4120 USER GUIDE Log Search On the Home Screen, tap the Log Search icon to search for different types of logs that document events in the history of the HVR. Calendar The calendar screen appears. Scroll through the months and year using the controls on the left. - Page 22 OBSERVER 4120 USER GUIDE Results After tapping the Search button, the results of the log search are displayed. Use the up and down arrow buttons on the right side of the screen to scroll through log entries, or tap the page num- ber field to display a keypad and enter a specific page to display.
-
Page 23: Setup
OBSERVER 4120 USER GUIDE Setup Tap the Setup icon on the Home Page to view the Setup menus. Setup menus allow configuration of the many HVR options and features. Navigate the Setup menus by tapping on the icons at the top of the screen. -
Page 24: Time Setup
OBSERVER 4120 USER GUIDE Time Setup General • Date format: select from MONTH-DAY-YEAR (MM/DD/ YYYY), DAY-MONTH-YEAR (DD/MM/YYYY), or YEAR- MONTH-DAY (YYYY-MM-DD) date format • Time format: select 12 or 24 hour time format • Time Zone: select how many hours the local time zone is deviated from GMT. -
Page 25: Startup
OBSERVER 4120 USER GUIDE Startup ON/OFF • ON/OFF mode: select Timer to power the HVR on and off at set specific times; select Ignition to power the HVR on and off with the vehicle’s ignition; select Ignition or Timer to power the HVR on during both conditions •... -
Page 26: User Setup
OBSERVER 4120 USER GUIDE User Setup The User Setup menu allows you to set up different users who must log in to operate the HVR. Each user is assigned a name, group, and password. To add a user: Tap the Add button. -
Page 27: Network
OBSERVER 4120 USER GUIDE Network Local • DHCP mode: select this option to have the HVR automatically receive an IP address and associated information from the network it is attempting to communicate with • Static IP: enter the IP address, etc, of the OMS network manually •... - Page 28 OBSERVER 4120 USER GUIDE Network (cont.) WIFI Select Enable to enable the internal Wi-Fi module. Enter the following information for the Wi-Fi network you want to connect to: • ESSID • Encryption • Password • Static IP • IP address •...
-
Page 29: Application
OBSERVER 4120 USER GUIDE Application After making any entries, tap Save at the bottom of the screen. FTP Client Select FTP Enable to enable the FTP client option, which allows you to log into the HVR as an FTP server with an exter- nal PC. -
Page 30: Live View
OBSERVER 4120 USER GUIDE Surveillance The Surveillance menus configure how video is displayed and recorded by the HVR. Live View Preview • Preview audio: select this option to enable audio while viewing the Live View • Image setup: tap the Setup button to display the Image Setup screen;... - Page 31 OBSERVER 4120 USER GUIDE Live View (cont.) Sub-stream • Bandwidth: enter the bandwidth (in kilobytes per second) data is substreamed to an OMS server • Transmit Mode: select Best fluency, Normal fluency, Recommended, Normal clean, or Best clean to adjust the...
-
Page 32: Record
OBSERVER 4120 USER GUIDE Record General • Video type: select the NTSC or PAL analog video system • Overwrite: when the primary storage device reaches capacity, select this option to allow recording to continue, overwriting the oldest data • Lock Duration: enter the time, between 1 and 31 days,... - Page 33 OBSERVER 4120 USER GUIDE Record (cont.) Dual Stream The Dual Stream page configures a dual stream recording setup, when the HVR records one video stream to one stor- age device, and a secondary stream can be configured to stream to another storage device or viewed live in OMS.
-
Page 34: Ipc Setup
OBSERVER 4120 USER GUIDE IPC Setup The IPC Setup tab allows you to configure a number of IPC networks. Select Enable for the channel you would like to use. Tap the Search icon (magnifying glass) to search for available IP cameras. -
Page 35: General
OBSERVER 4120 USER GUIDE IO Identifier The IO Indentifier menus configure how the HVR communicates with external devices. General Sensor Select a sensor in the Sensor number field, then enter the following for each: • Sensor name: enter an alphanumeric name for this sensor •... - Page 36 OBSERVER 4120 USER GUIDE Snap Setting The Snap Setting menu configures the snapshot feature. Still image snapshots can be taken at set intervals, instead of full motion video, in order to conserve storage space in certain applications. Use the Time Snap menu to configure snapshots to be taken during specific time periods.
-
Page 37: General
OBSERVER 4120 USER GUIDE Alarm The Alarm menus configure the various alarms and their triggers. General • Alarm type: for each alarm, select Alarm or General • Linkage: tap the Setup button under Linkage for each alarm type to display to configure additional options (see the next page). - Page 38 OBSERVER 4120 USER GUIDE Alarm (cont.) Linkage Setup • Channel: select the channels that are recorded for the duration of this alarm • Post Recording: enter the amount of time (between 1 and 30 minutes) the alarm records video after it is triggered •...
-
Page 39: Config
OBSERVER 4120 USER GUIDE Maintenance The Maintenance menus provide access to useful tasks, such as configuration file import/export, data export, and storage device formatting. Config Insert a USB flash drive into the USB port on the front of the HVR and tap Export to download a configuration file for the HVR. -
Page 40: Data Export
OBSERVER 4120 USER GUIDE Data Export The Data Export menu allows you to export certain data from the HVR for analysis. Select All to export all of the selected data available, or select Export time to request only data in a specific time range. -
Page 41: Upgrade
The Upgrade menu allows you to update the HVR’s firm- ware. Obtain the firmware upgrade file from Safety Vision techni- cal support and save it to the root directory of a USB flash drive. Ensure it is the only file on the flash drive. Insert the flash drive into the USB port on the front of the HVR and tap Update. -
Page 42: Storage
OBSERVER 4120 USER GUIDE Storage The Storage menu is used to format storage devices con- nected to the HVR and displays the ratio of free to total space available for each. To format a device, tap Format. Formatting a device erases all data, including recorded video. -
Page 43: Reset
OBSERVER 4120 USER GUIDE Reset The Reset menu allows you to reset the HVR’s entire config- uration to the factory default settings. To reset all settings, tap the Default button. Resetting an HVR erases all settings. Use with caution. -
Page 44: Web Configuration
OBSERVER 4120 USER GUIDE Web Configuration The Observer 4120 includes a web-based configuration menu that can be accessed with a Windows based PC and browser. It provides much of the same functionality as an external monitor and remote control when these accessories are not available or practical. - Page 45 OBSERVER 4120 USER GUIDE Playback The Playback tab allows you to search for and playback recorded video similar to the Recording Search function when using an external monitor. Use the calendar on the left to find days with recorded video (highlighted in green) and alarms (highlighted in red).
- Page 46 OBSERVER 4120 USER GUIDE Maintenance The Maintenance tab provides the same display-only information as the System menu viewed on an external monitor. Additionally, the Storage tab allows you to format a storage device. Simply click the Format icon next to the desired device.
- Page 47 OBSERVER 4120 USER GUIDE Configuration The Config (Configuration) duplicates the Setup menus accessed with an external monitor. Navigate through the different menus using the tabs on the left of the screen. Remember to click Save after changing any parameters.
-
Page 48: Appendix A: Specifications
OBSERVER 4120 USER GUIDE Appendix A: Specifications SPECIFICATIONS Part No. 4120-HYB Embedded Real Time Linux Operating System NTSC / PAL (selectable) Video Standard Audio/Video Inputs Audio: 20 channels (SV threaded connector) Video: 16 channels + 4 IP channels (SV threaded connector) -
Page 49: Appendix B: Dimensions
OBSERVER 4120 USER GUIDE Appendix B: Dimensions... - Page 50 OBSERVER 4120 USER GUIDE [this page intentionally left blank]...
- Page 51 OBSERVER 4120 USER GUIDE Limited 3-Year New Product Warranty Important Packing and Shipping Instructions Safety Vision, LLC (“SV”) makes the following limited When a product requires service, only the affected warranty, which is effective at the time of the original end- component must be returned.
- Page 52 CORPORATE HEADQUARTERS 6100 W. Sam Houston Pkwy. N. Houston, TX 77041-5113 Main: 713.896.6600 Toll Free: 800.880.8855 Fax: 713.896.6640 www.safetyvision.com...
Need help?
Do you have a question about the OBSERVER 4120 and is the answer not in the manual?
Questions and answers