
Related Manuals for Eaglemaster E5 G7


Summary of Contents for Eaglemaster E5 G7
- Page 1 E5 G7 2-WAY Remote Car Alarm System With 868 Mhz Frequency - FSK Solution No.TR-44...
-
Page 2: About Your System
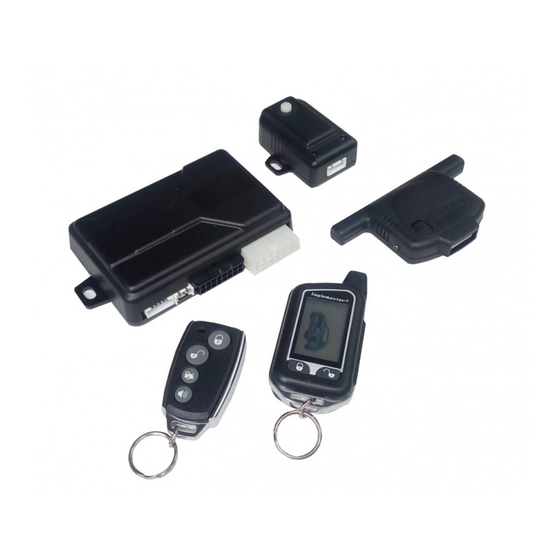
About Your System Congratulations on your purchase of this state-of-the-art vehicle security system. With proper installation this system will provide superior protection and performance for many years to come. What is included: A control module A FSK 868Mhz Antenna module One 5-button 2-way LCD remote transmitter One 4-button 2-way LED remote transmitter Dual stage shock sensor... - Page 3 Functions of remote transmitters The remote transmitters integrated with the security system use the most perfect and reliable radio frequency transfer as opposed to all car security systems being sold at the moment. Some of modern skilled car hijackers use the devices known as code grabbers allowing to accept and keep a signal transferred by the remote control of the car security system.
- Page 4 Standard 2way LCD icon instructions Remote transmitting a signal. Check-in range turn ON status. 2way battery level indication. System Disarmed. SilentArmed. SystemArmed. Passive arming & Zone1 Zone1 Auto re-arming mode. 1st-stage sensor bypass. 2nd-stage sensor bypass. Zone2 Zone2 1st-stage sensor bypass. 2nd-stage sensor bypass.
- Page 5 Hood open when armed. Door open when armed. Trunk open when armed. Zone1 Zone1 Zone2 1st stage sensor triggered. 2nd stage sensor triggered. 1st stage sensor triggered. Zone2 1st stage sensor triggered. Door switch triggered. Trunk switch triggered. Hood switch triggered. Ignition switch triggered.
- Page 6 Safety mode/ Safe status Anti car-jacking mode. Valet mode. Engine running mode. Alarm Clock . Countdown timer Temperature check. Call / page mode. Turbo mode. (Optional features) Battery conservemode. Remote button lock Vibrate mode.
- Page 7 Remote Function Table: Functions Step Condition Arm and door lock Press once Disarmed & ACC off Arm without siren chirp Disarmed & ACC off Press over 2sec. until 1 beep given. Zone1- 1st-stage bypass Press once within 5sec. of arming. Arming within 5sec.
- Page 8 Functions Step Condition Silent armed ACC OFF Press over 2sec. Until 1 beep given. Valet mode Press over 2sec. until 1 beep given. ACC ON Remote button lock (on/off) Press over 2sec. until 1 beep given. Vibrate mode on/off Press over 2sec.
- Page 9 2WAY simple remote function with dual color Led indicator: Arming the system: Press arm button once Response Red flashing 1 green flash to indicate arming status when pressing 0.5sec. Red flashing to indicate failed receiving 0.5sec. Disarming the system: Press disarm button once Response 2 green flashes to indicate disarming...
- Page 10 Standby Anti Hi-Jack : Ignition ON, press arm button over 2sec. Response Red flashing 1 siren chirp to indicate in standby mode when pressing Remote Anti Hi-jack : Ignition ON, press both buttons over 2sec. Response Red flashing 1 green flash to indicate arming status when pressing 0.5sec.
- Page 11 Porgramme 2WAY LCD Remote Battery conserve mode The mode can be turned on/off 2-way receiving in the Disarmed mode if you simultaneously press down the buttons until the zzz icon turn on. Being in the Disarmed mode the remote pager turns off its receiver in 30sec. To exit the mode, simply press the buttons until zzzz icon turn off.
-
Page 12: Check-In Range Notification (On/Off )
Check-in range notification (on/off ) Arming the system within 2 seconds, press button once on the 2way remote , the system will enable this Check- in range function. This Icon will turn on and give 1 beep The 2way remote sound to indicate the function has been will respond: turned ON. -
Page 13: Alarm Clock Setting
Alarm Clock Setting This function useful to warn the user by pre-setting alarm clock time, if pre-setted time's up, the 2way remote will give warning beep for 1 minutes. (Press any button once to stop warning beep) Instructions: 1. Press and hold Button for 4sec. -
Page 14: Vehicle Status Checking
Vehicle status checking The 2-Way remote offer the feature to check the current status of the car, simply press the button once within proper operation range. The main unit will send the signals to the 2-Way remote about the vehicle current status. 2WAY signal paging features A page is the signal the control module sends to the remote controls confirmation of receipt of a command or alarm system status. -
Page 15: Alarm Page
Alarm Page If the alarm system is triggered while armed, an Alarm Page will be sent to the remote control. When the remote receives an Alarm Page, the LCD icons will display the alarm system status information and the remote control will generate beeps. Dis play Beeps Vibrations... -
Page 16: Standard Features
Standard features: To ARM the system: To arm your system within proper operation range, simply press button once (while system in disarmed or Acc off position) . The system will respond one siren chirp, one lights flash, doors lock, disable engine starter, LED will begin flashing quickly until all sensor inputs are active - LED will start blinking slowly (flash once per second) to indicate the system is in full armed. -
Page 17: To Disarm The System
- To DISARM the system : To disarm your system within proper operating range, simply press button once (while system in arm position). The system will respond two siren chirp, two light flash, doors unlock, Enable your engine starter, LED off. 2-way LCD display : + Two beep sound - Intrusion Alert:... -
Page 18: Disar M Without Siren Chirp
- Disar m without siren chirp : To disarm your system without siren chirp , simply press and hold the button for over 2sec. Note: this features is only activated under the system is in armed position,. - Silent ar m mode : The system provide a feature to turn OFF the siren, simply press 2-way button of press(while system in disarmed or Acc off position) . -
Page 19: Panic Mode
- Panic mode: If you are threatened in or near your vehicle, you can attract attention by press button for 2sec. system will triggering for 30sec. To stop Panic mode at any time, simply press any button once. Note: To stop panic mode, simply press any button on the remote and the system will be armed. - Page 20 - Remote Zone1 sensor by pass : This system offer 2stage sensor optional. Within 8sec. after set arming, to press button once , the system will give 2 short chirps and 2 lights flash, thus the 1st stage shock sensor has been turn off. Press button once again, within 8sec.
-
Page 21: Ignition Controlled Door Lock/Unlock(Programmable)
- Car search mode: The system provide a feature to easy find your car position, simply press button once when in armed after 8sec. The system will respond by 5 chirps and 5 lights flash. - Valet mode: To enter valet mode: Disarm the system and turn Ignition switch to ON position then press button for over 2 seconds, or press Valet/over-ride switch for over 5 seconds, until siren give 1 long with 1 short chirp and LED light ON to confirm the system is in valet mode. -
Page 22: Ar Ming Without Remote Control: (Programmable)
- Ar ming without Remote control: (programmable) This function gives you a possibility to Arm and Disarm the system use original key and Valet switch, If you use (-)negative door switch input , you can to set the (+) positive door switch input to use in this mode. -
Page 23: Siren Chir Ps On/Off (Programmable)
- Siren chir ps ON/OFF (programmable): This programme feature controls the chirps that confirm the arming , disarming and intrusion alert of the system. Note: Set siren chirp off, if door, hood or trunk not closed, siren will activated. - Power disconnecting memor y : Alarm is built in memory on main unit. - Page 24 Control Channel (-) features: - Comfor t /window close : If programmed with the feature, this channel will constant output for 30sec. when arming the system. - 2nd stage door unlock: If programmed with the feature , to operate it by press button at 2nd times , to control the other doors unlock (passenger's side).
-
Page 25: Turbo Mode
- Turbo mode: If programmed with the feature , this channel will constant output when ignition turn on for over 1 minutes. It will keeps the engine running after arriving at your destination by ignition off , the turbo will turn on and give a warning beep. This turbo time can be programme time for 1, 3, 5, or 10 minutes. - Page 26 - CH-7 (-) programme time output: This channel-6 is a negative (-500mA) output features, this channel can be programmed (1)- Arming output from 1~120sec. (2)- Press button , output from 1~120sec. (1)- Arming output 1~120sec. if programmed, this channel will activate when arming, the output timing can be programmed from 1 to 120seconds.
-
Page 27: Emergency Disarm (Valet Sw & Pin Code)
Emergency disarm (Valet SW & PIN code): If the remote control has been lost or damaged, you can manually disarm your system by programmed " Valet SW or PIN code": Emergency disarm by Valet Switch : (1) Turning the Ignition switch from OFF to ON position. (2) Simply pressing and holding the Valet switch for over 3 seconds, the system will disarmed immediately. - Page 28 - Door switch activates: If programmed with the feature , to operate it when driving the car, if a door is forced been open and close, the system will activate Anti-car jack mode immediately. The parking lights will flash once and the LED will fast flash to show the system is enter anti car-jack mode. Activate with door switch, LCD will 2-way LCD display : display Anti car-jack icon for identify.
- Page 29 FSK/868Mhz Antenna Call page : The R.F antenna module provide a switch which can FSK/868Mhz be send a signal to the 2-way remote. Antenna module Call button In disarmed or ACC on position, if press Call switch for 2 seconds, lights will flashing 5 times and the 2-way remote will give pre-warn beep sound .
- Page 30 2WAY Remote learning : This system can expand 4 different transmitters, and comes from factory with two transmitters already programmed into the system memory. Whenever you want to add or delete transmitter code of the system, the procedures are as following : 1.
- Page 31 PROGRAMME FEATURES TABLE Pr ess button Press button Press button Press button Item NO : FEATURES LE D 1 -chirp 2- chirp 3- chirp 4- chirp flash Ignition controlled doors lock *W/O Ignition controlled doors unlock *W/O Automatic re-arm *W/O Siren &...
- Page 32 PROGRAMME FEATURES TABLE Press button Press button Press button Press button Item NO : FE ATURES 1-chirp 2-chirp 3-chirp 4-chirp flash Door switch arming delay *8sec. 15sec. 60sec . 1-way remote reminder arm/disarm *W/I status to 2-way remote *Arm ing Remote CO/NO Turbo...
- Page 33 PROGRAMME FEATURES TABLE Press button Press button Press button Press button Item NO : FE ATURES 2-chirp 3-chirp 1-chirp 4-chirp flash Parking lights pulse output (A/B pulse) *A pulse B pulse A pulse (normal car) / B pulse (Hazard switch) 1-chirp 4-chirp 2-chirp...
-
Page 34: System Installation
System Installation: 1. Thoroughly read and become familiar with the installation instructions before beginning the installation. 2. Review system contents: (1). A control module. (2).FSK/868Mhz Antenna module (3). One 5-button 2-way LCD remote control (4).One 2-button 2-way LED remote control (5).Dual stage shock sensor (6).High output 6-tone siren (optional ) (7).Status dual color LED indicator (8).Valet over-ride switch... -
Page 35: Wiring Diagram
WIRING DIAGRAM Main control unit H1 12-PIN CONNECTOR H2 16-PIN CONNECTOR Plug-in dual stage shock sensor Dual-stage Shock Sensor External Ultra sonic & micro-wave sensor port Green 2 nd stage (-) trigger Blue 1 st stage(-) trigger Black - Ground +12V DC output Call switch R.F A ntenna... - Page 36 H1 12-PIN CONNECTOR WIRING: Central door lock wiring RY-1 No board relay (40A ) Programme output + 12V DC Orange/white 87-N/O Blue/red Orange/white 30-COM Green/red Unlock Blue Green Lock Blue/black Green/black Left parking light of direction indicator (-) Ground White (+/-) Output to the (+) Siren 15 A Lights(+)or (-)
- Page 37 H2 16-PIN CONNECTOR WIRING: Connect to Chassis Ground (-) Connect to (-) Hood Black(-) pin switch (-) Pink Re d (+) 10A fuse Co nnect to (+) 12Volts Battery (-)Brown/black CH-7 (-) Negative pulsed Immobilizer-1 Programme output (-) Orange (-) Negative pulsed when Armed output Connect to (-) trunk pin switch...
-
Page 38: Central Door Lock Wiring
Central door lock wiring: 1.) For Factory installed central door lock system MOTOR CONTROL MOTOR CONTROL ORIGINAL DOWN BUILT-IN DOOR MOTOR LOCK CONTRO LLER (Inside of the front door) MAIN LINE Central door lock wiring Green/black Green Green/red Blue/black Blue Blue/red 2.) Directly connect to 2 wire Actuator + 12V...
Need help?
Do you have a question about the E5 G7 and is the answer not in the manual?
Questions and answers