Sartorius PMA35001-Y Installation Instructions Manual
Electronic paint-mixing scale for use in zone 2 hazardous areas
Hide thumbs
Also See for PMA35001-Y:
- Operating instructions manual (32 pages) ,
- Operating instructions manual (34 pages)

Related Manuals for Sartorius PMA35001-Y


Summary of Contents for Sartorius PMA35001-Y
- Page 1 Installation Instructions Sartorius PMA.Power Model PMA35001-Y Electronic Paint-mixing Scale for Use in Zone 2 Hazardous Areas 98648-016-86...
-
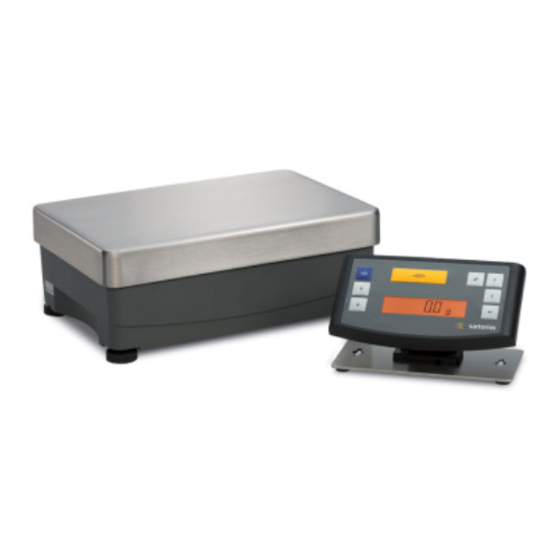
Page 2: General View Of The Equipment
17 Power supply and data cable for the display 4 I Toggle key depending on the menu setting: and control unit You can configure the PMA35001-Y menu to 18 R ‘Up’ key enable toggling between grams (g) and parts 19 Q On/Off (standby) key... -
Page 3: Table Of Contents
General Provisions for Installing the on a connected PC� PMA35001-Y PMA35001-Y models meet the requirements If you wish to create your own applica- defined in EC Directive 94/9/EG for Class II, tion software, Sartorius can supply the... - Page 4 (refer to the chapter on – Do not expose the weighing instrument CE Marking)� to harsh chemical vapors or to extreme The area of use for the PMA35001-Y is temperatures, moisture, shocks, or vibra- defined in the included documentation� tion�...
- Page 5 AC power and prevent use of the excessive heat� equipment for the time being� – Only use original Sartorius spare parts� – Chemicals (e�g� gases or liquids) that can – Never use a hammer to close a paint can...
-
Page 6: Getting Started
Getting Started § Unpack the scale carefully� § After unpacking the equipment, inspect the device immediately for any visible damage that may have been caused by rough handling during shipment� Package Contents – Scale – Load plate – Adapter cable Setting up the Scale Choose a suitable location where your scale will not be exposed to drafts, heat radiation, moisture or... - Page 7 If the stated supply voltage or the plug design of the power cord does not comply with the standard you use, please inform your nearest Sartorius representa- tive or your supplier� Installation...
-
Page 8: Operation
Operation Once the scale has been If a different value is Press the Q key (19) to turn on the scale� turned on, it will run an displayed: Tare the scale automatic self-test� This is using the U key (Zero/ concluded with the readout tare) (3)�... -
Page 9: Applications
Applications Formulation Mode (Calculation by a Factor) This mode enables you to weigh in amounts that are smaller or larger than that of your basic formula for a specific paint color (e�g� 250 ml of a 1 l formula)� You can select various factors (amounts) by pressing the K factor key (6): 0�5 1�0 1�5 2�0 2�5 3�0 3�5 4�0 4�5 5�0 10�0 15�0 20�0 25�0�... - Page 10 3� »3.0« appears next to the weight readout� 4� Slowly pour in the first component until the display shows »250 g«� 5� Pour in the second component until »500 g« is displayed� 6� Pour in the last component until »1000 g« is displayed�...
- Page 11 Example (Cumulative Weighing) 1. Center an empty paint can 3. Add first component Press the U key (zero/ on the load plate (15)� tare; 3)� + 50�0 g + 118�0 g 0�0 g 4. Press the L key [MEM] (8) 5.
-
Page 12: Calibration/Adjustment
Calibration/Adjustment You can calibrate/adjust the scale by pressing the U key (Zero/tare) (3)� Calibration weights: 10,000 g; resolution: ± 0�016 g� Always allow approximately 30 minutes for the scale to warm up after connecting it to AC power and before performing calibration/adjustment� Press the U key (Zero/tare) (3) for 2 seconds;... -
Page 13: Menu Settings
This concludes the example� § Press the L key [ENTER]; o is displayed, indicating that this item is set� § Press c key (Clear) repeatedly to exit the menu� Note: Contact your local Sartorius office for a detailed list of the menu codes�... - Page 14 Configuring the Main Menu Settings § Hold down the L key [ENTER] for approximately 2 seconds; “SETUP” is displayed� Level 1 SETUP Language Setting Level 1 Level 2 § Press the R key to select LANGUAGE LANGUAGE § Press the L key [ENTER] § Press the RS keys to select a language o GERMAN §...
- Page 15 I Configuring the Toggle-key Function Pressing the toggle key I (4) toggles the scale between the default unit (defined under SETUP > SCALE > UNIT; see page 13) and the unit defined as follows under SETUP > APPLICATION > UNIT� Level 1 Level 2 Level 3...
- Page 16 Configuring Password Protection In addition to the LOCK function, you can configure password protection for additional security� With this feature, the LOCK function can be deactivated only by entering the password you configure� The password is numeric and can have up to 6 digits� Use the RS keys to select the digits (0 through 9) for your password�...
- Page 17 GERMAN § Press the L key [ENTER]; o indicates etc� o CODES the active setting § Press the c key (Clear) repeatedly to exit the menu Note: Contact your local Sartorius office for a detailed list of the menu codes�...
-
Page 18: Troubleshooting Guide
Troubleshooting Guide Problem Cause Solution No segments appear – No AC power is available – Check the AC power supply on the display The weight readout – No load plate on the scale – Position the load plate shows “Low” The weight readout –... -
Page 19: Care And Maintenance
It is a good idea to save the box and all In this case, notify your nearest Sartorius parts of the packaging for future storage Service Center or the International Tech- or shipment of the equipment�... -
Page 20: Information And Instructions
EU: 1) Go to http://www�sartorius�com� 2) Select the summary under “Service�” 3) Then select “Information on Disposal�” 4) Addresses for local Sartorius disposal contacts can be found in the PDF files given on this webpage�... -
Page 21: Pin Assignments
The adapter cable is required for operation of the scale with a PC� If you wish to create your own application software, Sartorius can supply the required drivers for DOS or Windows operating systems� Make sure to observe the safety instructions�... -
Page 22: Specifications
Specifications Type PMA 35001-Y Weighing range 35000 Readability 0�1 Tare range (subtractive) -35000 Max� linearity <±0�2 Stabilization time, configured via menu digit 0�25 to 4 Humidity class non-condensing Ambient operating temperature range °C 0���+40 Storage temperature °C -20���+70 Highest rel� humidity 80, for temperatures up to 31°C, decreasing linearly up to 50% relative humidity for 40 °C�... -
Page 23: C Marking
Note: Modifications to the device, along with the connection of cables or equipment not supplied by Sartorius, are the respon- sibility of the operator and are to be inspected (and rectified if necessary) by the operator accordingly�... -
Page 24: Documents
Secure plug (standard equipment supplied) so that it can not become accidently disconnec ted. Ensure that an emergency of f switch is available. DC power supply Equipotential bonding conductor PMA35001-Y Data output port (RS-232) Power printer, etc. Power Zone 2... -
Page 25: Safety Instructions
Be sure to follow the installation, operating, maintenance and servicing instructions given in the manuals supplied� The PMA35001-Y must be installed so that the IP protection rating (IP4x) is maintained� Reduce the risk of mechanical damage to a minimum� Take measures to ensure that neither foreign objects (particles) nor direct or indirect water spray can penetrate into the equipment�... - Page 30 Sartorius Lab Instruments GmbH & Co� KG Weender Landstrasse 94–108 37075 Goettingen, Germany Phone +49�551�308�0 +49�551�308�32 89 www�sartorius�com Copyright by Sartorius Lab Instruments GmbH & Co� KG, Goettingen, Germany� All rights reserved� No part of this publication may be reprinted or translated in any form or by any means without the prior written permission of Sartorius�...
Need help?
Do you have a question about the PMA35001-Y and is the answer not in the manual?
Questions and answers