Welch Allyn Spot Vital Signs LXi Service Manual
Hide thumbs
Also See for Spot Vital Signs LXi:
- Service manual (130 pages) ,
- Directions for use manual (90 pages) ,
- Configuration (24 pages)
Table of Contents
Advertisement
Welch Allyn Spot Vital Signs LXi
BP
1
2
7
SYS
mmHg
73
DIA
mmHg
TEMP
9
8
5
SpO2
%
Patient ID 0123456789
Weight
Pain
Height
Clear
Respiration
Send/Next Reading
Service Manual
4 WEST
AM
Reading
01
F
PULSE /min
62
Enter
BP
1
2
7
4 WEST
SYS
mmHg
AM
73
Reading
DIA
01
mmHg
TEMP
9
8
5
F
SpO2
PULSE /min
%
62
Patient ID 0123456789
Weight
Pain
Height
Clear
Respiration
Send/Next Reading
Enter
BR
A
Un
Advertisement
Table of Contents

Related Manuals for Welch Allyn Spot Vital Signs LXi


Summary of Contents for Welch Allyn Spot Vital Signs LXi
- Page 1 Welch Allyn Spot Vital Signs LXi 4 WEST 4 WEST mmHg mmHg Reading Reading mmHg mmHg TEMP TEMP SpO2 PULSE /min SpO2 PULSE /min Patient ID 0123456789 Patient ID 0123456789 Weight Pain Weight Pain Height Clear Height Clear Respiration Send/Next Reading...
- Page 3 Welch Allyn Spot Vital Signs LXi Service Manual...
- Page 4 Welch Allyn. Welch Allyn assumes no responsibility for any injury to anyone, or for any illegal or improper use of the product, that may result from failure to use this product in accordance with the instructions, cautions, warnings, or statement of intended use published in this manual.
-
Page 5: Table Of Contents
Spot Vital Signs LXi Configurations........14... - Page 6 Contents Welch Allyn Spot Vital Signs LXi Functional Verification ..........28 Blood Pressure Functional Check .
- Page 7 Directions for Use Contents Technical Overview ........61 System Description.
- Page 8 Printer............89 Spot Vital Signs LXi Firmware Upgrade CD ......90 Spot Vital Signs LXi Wireless Radio Configuration CD .
- Page 9 Spot Vital Signs LXi........
- Page 10 Contents Welch Allyn Spot Vital Signs LXi...
-
Page 11: Safety Summary
Safety Summary Introduction All users of the Spot Vital Signs LXi must read and understand the safety summary, and all additional specific warnings and cautions located throughout the documentation. Warnings and Cautions Familiarize all operating personnel with the general safety information in this summary. - Page 12 Spot Vital Signs LXi that is dropped or damaged for proper operation prior to further use. Do not use the Spot Vital Signs LXi if you notice any signs of damage. Contact the Welch Allyn Customer Service Department for assistance.
-
Page 13: Blood Pressure Warnings
WARNING Patients who are experiencing moderate to severe arrhythmias may give inaccurate blood pressure measurements. WARNING Spot Vital Signs LXi does not operate effectively on patients who are experiencing convulsions or tremors. WARNING Use only Welch Allyn blood pressure cuffs and/or hoses. Using other manufacturers’... -
Page 14: Temperature Warnings
Safety Summary Welch Allyn Spot Vital Signs LXi Temperature Warnings These warnings pertain to the Spot Vital Signs LXi temperature feature. SureTemp Plus ® These warnings are specific to the SureTemp Plus thermometer option. WARNING Use only Welch Allyn probe covers. Using other manufacturers’... -
Page 15: Spo Warnings
Warnings These warnings pertain to the Spot Vital Signs LXi SpO feature. WARNING Only use Spot Vital Signs LXi with Masimo or Nellcor SpO option with Masimo or Nellcor brand sensors and accessories, respectively. Using the wrong or unapproved sensors or cables may cause improper performance. -
Page 16: General Cautions
These cautions pertain to the entire Spot Vital Signs LXi device. Caution If the accuracy of any measurement is in question, check the patient’s vital sign(s) with an alternate method and then check to verify the device is functioning properly. -
Page 17: Blood Pressure Cautions
Safety Summary Blood Pressure Cautions These cautions pertain to the Spot Vital Signs LXi blood pressure feature. Caution Minimize extremity and cuff motion during blood pressure readings. Caution If the blood pressure cuff is not at heart level, note the difference in reading due to the hydrostatic effect. -
Page 18: Electrostatic Discharge (Esd)
Safety Summary Welch Allyn Spot Vital Signs LXi Electrostatic Discharge (ESD) Electrostatic discharge is a sudden current flowing from a charged object to another object or to ground. Electrostatic charges can accomulate on common items such as foam drinking cups, cellophane tape, synthetic clothing, untreated foam packaging material, and untreated plastic bags and work folders, to name only a few. -
Page 19: Symbols
Service Manual Safety Summary Symbols The following symbols are associated with the Spot Vital Signs LXi. Safety Symbols Identifies information within the Identifies information within the manual to avoid injury. manual to avoid equipment failure. Caution: consult accompanying Internally Powered, Lead Acid... -
Page 20: Agency Symbols
Safety Summary Welch Allyn Spot Vital Signs LXi Agency Symbols CERTIFIED TO: CAN/CSA STD C22.2 NO. 601.1 CONFORMS TO: UL STD 60601-1 166292 IEC 60601-1 The CE mark on this product indicates that it has been tested to and conforms with the provisions noted within the 93/42/EEC Medical Device Directive. -
Page 21: Overview
Overview Purpose and Scope The Spot Vital Signs LXi Service Manual is intended as a reference for maintenance and repair to the field replaceable unit (FRU) level and are listed on page 71. This manual provides the technical qualified service person with troubleshooting information, repair procedures, and calibration and performance verification instructions. -
Page 22: Contents Checklist
Directions for Use Manual. Read this manual thoroughly before using Spot Vital Signs LXi. Save this manual for reference. Warranty Card. This card validates the Spot Vital Signs LXi warranty. Fill out the warranty card and mail it today. Blood Pressure Cuff. One cuff with connectors. Other size cuffs are available separately. -
Page 23: Service
Center nearest you for assistance. Technical service telephone support is available on normal business days. If you are advised to return a product to Welch Allyn for repair or routine maintenance, schedule the repair with the service center nearest you. -
Page 24: Spot Vital Signs Lxi Configurations
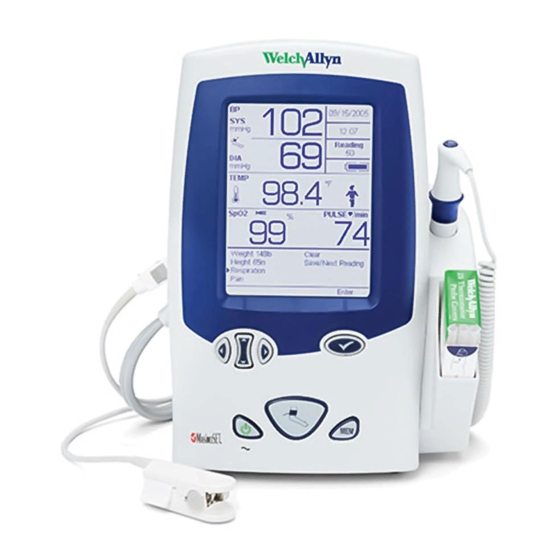
SureTemp Plus Thermometer 45NE0 SureBP with Nellcor SpO and Braun ThermoScan PRO 4000 Thermometer Controls Figure 1. Spot Vital Signs LXi Front Panel with SureTemp Plus Thermometer SureTemp Plus thermometer: remove the probe to take a temperature. 4 WEST... - Page 25 Service Manual Overview Figure 2. Spot Vital Signs LXi Front Panel with Braun ThermoScan PRO 4000 Thermometer Braun ThermoScan PRO 4000 thermometer: store the probe covers toward the back of the thermometer housing; remove the thermometer to access the covers.
-
Page 26: Display Window
Overview Welch Allyn Spot Vital Signs LXi Display Window Before using Spot Vital Signs LXi for the first time, you must program an initial Note configuration screen. Press the Power button. The display window shows the initial configuration screen. Figure 3. Initial Configuration Screen Change Local Defaults Menu Model No.: 45NTO... - Page 27 Reading number indicator: display: if MAP is turned on, mmHg shows what reading the device is the screen toggles between on. Spot Vital Signs LXi retains the systolic and diastolic up to 50 readings in memory. values, and the word “MAP” Reading and the MAP value.
-
Page 28: Connections
Connections Use the following instructions to connect the blood pressure hose, thermometer probe, and optional attachments to the Spot Vital Signs LXi. Figure 5. Spot Vital Signs LXi Side and Rear Panel Connections Icon ID label SureTemp Plus thermometer cable connection port... -
Page 29: Braun Thermoscan Pro 4000 Lock
Lock tab Lock release hole Blood Pressure Hose and Cuff Identify and have available the Spot Vital Signs LXi, blood pressure cuff, and the blood pressure hose. Inspect the blood pressure hose; notice that one end has a single, gray connector fitting and the other end has two white fittings. -
Page 30: Thermometer
Align the probe well with the tabs facing up and down into the round opening of the SureTemp Plus housing on the right side of Spot Vital Signs LXi. Push it into place. 2. Align the temperature probe connector with the SureTemp Plus thermometer... -
Page 31: Spo 2 Sensor
Wireless Radio in the internal configuration mode. Only use Welch Allyn Wireless Radio Quick Reference Card Attach the Quick Reference Card to the Spot Vital Signs LXi handle, mobile stand, or wall mount using the supplied plastic cable tie. -
Page 32: Ac Power Transformer
To assure proper electrical isolation, replace the AC power transformer/charger using only the Welch Allyn specified part. The operator can use the Spot Vital Signs LXi with AC or battery power (after charging the battery). Insert the round transformer connector into the AC power connection port on the... -
Page 33: Functional Overview
Power button to turn the device on or off. Upon each power up, the display lights up, a beep sounds, and the Spot Vital Signs LXi displays the model and serial numbers. If the internal self-check is successful, the display shows its normal functions (see Figure 4 page 17) with all values blank, and the device is ready for operation. -
Page 34: Internal Configuration Mode
To Enter the Internal Configuration Mode: Turn the Spot Vital Signs LXi off. 2. Press and hold the Select and Power buttons for 5 seconds. The device enters the Internal Configuration Mode and the Configuration Menu screen appears on the display. - Page 35 Table 2. Configuration Menu Options Setting Description Version Numbers* Displays the software and hardware version numbers in the Spot Vital Signs LXi device. Battery* Displays the battery level. Location Identifier Allows the entry of the device’s location (e.g., the department name). Follow the display prompts and use the Navigation and Select buttons to enter up to 10 characters.
- Page 36 Table 4. Blood Pressure Menu Options Setting Description BP Calibration Check Prepares the Spot Vital Signs LXi for calibration. Only qualified personnel should verify the Spot Vital Signs LXi blood pressure calibration. For more details, see “Blood Pressure Calibration” on page 34. Blood Pressure Units mmHg or kPa.
- Page 37 Yes or No. You must enable this option to clear the Clinician ID after powering the Spot Vital Signs LXi off. Weight Scale On or off. Spot Vital Signs LXi connects to a scale and the weight shows on the display window (see “Technical Overview” on page 61 for scale details). Wireless Module None or DPAC.
-
Page 38: Functional Verification
The calibration check is a simple, yet valuable test to determine that the unit is sensing pressure accurately. Verify the pressure measurement accuracy of the Welch Allyn Spot Vital Signs LXi with an accurate, calibrated pressure meter or sphygmomanometer. -
Page 39: Temperature Functional Check
11. Drop the pressure to 200 mmHg, wait 15 seconds for stabilization, and take a reading. 12. Repeat for 150 mmHg, 50 mmHg, and 0 mmHg (all measuring downscale). If the calibration at any point is outside of ±3 mmHg, call Welch Allyn Technical Service for assistance. Temperature Functional Check The 9600 Plus Calibration Tester takes approximately 20 minutes to heat to the lowest setting. - Page 40 Manual. 3. Insert the probe into the Thermistor Device Port. Figure 10. 9600 Plus Calibration Tester with the Welch Allyn SureTemp Plus Thermometer 4. Wait for approximately one minute or until temperature on the thermometer is stable for ten seconds. Compare the thermometer's temperature reading to the 9600 Plus Calibration Set Point Temperature.
- Page 41 Service Manual Functional Overview Braun ThermoScan Pro 4000 Caution Store thermometers for testing in the same room as the 9600 Plus Calibration Tester for approximately 30 minutes prior to testing to allow for thermal accommodation. To begin functional verification of the Braun ThermoScan PRO 4000 thermometer: Clean the probe tip with a cotton swab slightly moistened with isopropyl alcohol, remove excess alcohol with a clean cotton swab, and let air dry for 5 minutes.Do not use any chemical other than alcohol to clean the probe window.
-
Page 42: Masimo Spo 2 Functional Check
Orient the Masimo Tester such that the mini-D connector mates with the SpO connector on Spot Vital Signs LXi. 2. Power on Spot Vital Signs LXi and confirm the SpO reading in the Display Window is 81%± 3% and the pulse reading is 61 bpm ± 1 bpm. -
Page 43: Calibration
47 to have available during the procedures. Connections Connect the blood pressure pneumatic tubing to the Spot Vital Signs LXi and to the test station. 2. Connect the USB cable to the Spot Vital Signs LXi and the computer. -
Page 44: Voltage Calibration
24. Use the Navigation and Select buttons to select Blood Pressure > BP Calibration Check. 4. Set the test station volume to 500 cc and use the Spot Vital Signs LXi Navigation and Select buttons to close valve (the Window Display shows “Open Valve”). - Page 45 If any of the settings are incorrect click the correct button to change the settings. If you update the Spot Vital Signs LXi clock in this menu, the device clock resets itself to match the PC clock. You may manually set the time in the “Internal Configuration...
- Page 46 Calibration Welch Allyn Spot Vital Signs LXi...
-
Page 47: Troubleshooting
Troubleshooting This chapter provides helpful information in troubleshooting the Spot Vital Signs LXi. Error Codes The following tables of error codes provide a quick reference of the descriptions and probable causes of error codes. Table 10. General Error Codes Code... -
Page 48: Blood Pressure Error Codes
Troubleshooting Welch Allyn Spot Vital Signs LXi Table 11. Blood Pressure Error Codes Code Description Corrective Action Internal NIBP error. Device will power down. Table 12. SureTemp Plus Temperature Error Codes Code Description Corrective Action Temperature time limit exceeded. Remove probe from patient. -
Page 49: Battery Voltage Check
Service Manual Troubleshooting Table 13. SpO Error Codes Code Description Corrective Action Faulty SpO sensor. Replace sensor. time limit exceeded. Remove sensor from patient. Internal SpO error. Retake reading. Table 14. SpO Error Codes Code Description Corrective Action Faulty SpO sensor. -
Page 50: Window Display Check
3. Use a DMM to check the battery voltage. If the voltage is less than 6.0 Vdc, charge the battery. To charge the battery, place the battery back into the Spot Vital Signs LXi and connect the charger for 8 hours. Let the device sit idle for one day and recheck the battery voltage. -
Page 51: Masimo Spo Functional Check
Subtract the rated accuracy of the pressure measurement standard from the ±3 mmHg rated accuracy of Spot Vital Signs LXi. This is the pass/fail criteria to determine if the device is within calibration. If the differences between Spot Vital Signs LXi and the pressure measurement standard are within the pass/fail criteria at all specified pressures then the device is within calibration. -
Page 52: Noise Levels
Follow the steps in “Connections” on page 2. Select Test > Display > all on in the Spot Vital Signs LXi Repair Software to confirm the Window Display shows all of the segments. 3. Select all off in the Spot Vital Signs LXi Repair Software to confirm the Window Display clears all of the segments. -
Page 53: Pneumatic Tests
Scroll right to see the pressure value listed in the row that had “Yes” to determine the value that triggered the E10 error. Verify Spot Vital Signs LXi displays an E10 error condition when the pressure is between 296 mmHg and 329 mmHg. -
Page 54: Wireless Radio Test
Welch Allyn Spot Vital Signs LXi Wireless Radio Test Connect a null modem to Spot Vital Signs LXi Port 1. Connect a serial cable to the PC and the null modem. 2. Connect the other null modem to Spot Vital Signs LXi Port 2. Connect the Wireless Radio to the null modem. - Page 55 Approximate round trip time in mili-seconds: Minimum = 4ms. Maximum = 5ms. Average = 4 ms C:\Documents and Setings\temp> If you get an error, verify that Spot Vital Signs LXi power is on. Also verify the updates to the External Devices Menu (Step 3).
-
Page 56: Service Work Checklist
Troubleshooting Welch Allyn Spot Vital Signs LXi Service Work Checklist Spot Vital Signs Model Number Serial Number BP Cycle Count Technician Date Test Test Data Pass/Fail Test Specification Unit SW Version SPO2 SW Version Thermometry SW Version Unit Pressure @ 0 mmHg... -
Page 57: Disassembly And Repair
88). An operator may only perform maintenance procedures specifically described in this manual. For service, refer the device to an Authorized Service Center. Note Always disconnect the sealed lead-acid battery in the Spot Vital Signs LXi before performing any repair function. Tool list Description... - Page 58 2. Remove the four screws holding the battery door using a phillips-head screwdriver. Remove the battery door to expose the battery. Top, back housing screws (2 places) Battery Door Screws (4 places) 3. Tip the Spot Vital Signs LXi backward and slide the battery out. Disconnect the one- way connector.
- Page 59 Service Manual Disassembly and Repair 4. Remove the two screws inside the battery housing that are identified with arrows molded into the housing and the two screws at the top of the back upper housing. 5. Hold the device together, lay the back housing on the bench, and carefully lift the top housing off.
- Page 60 Disassembly and Repair Welch Allyn Spot Vital Signs LXi 8. Disconnect the red electrical connector and the gold ribbon connector. This is located on the main board. Lift up the tab on the white cable retainer so cable can slide out after it is unplugged.
-
Page 61: Key Pad Disassembly
Service Manual Disassembly and Repair Key Pad Disassembly Gently pull the button switch array out of the cover. 2. Align and push the new button switch array into place. -
Page 62: Spo 2 Circuit Board Disassembly
Disassembly and Repair Welch Allyn Spot Vital Signs LXi Circuit Board Disassembly Note To assure proper SpO operation, replace the SpO board using only the Welch Allyn specified part. To assure patient electrical isolation, after the main board is nearly back in... -
Page 63: Nellcor
Service Manual Disassembly and Repair 4. Slightly rock the circuit board back and forth while lifting straight up. 5. Replace with a new circuit board. Nellcor Lay the LCD flat on an ESD mat. 2. Remove the three screws on the circuit board located behind the LCD. 3. -
Page 64: Blood Pressure Circuit Board Disassembly
Disassembly and Repair Welch Allyn Spot Vital Signs LXi Blood Pressure Circuit Board Disassembly Note When replacing the NIBP board see “To initialize the NIBP board” on page 34 for instructions. Remove the four screws and carefully lift the circuit board straight up. There is one... -
Page 65: Lcd Inverter Ballast Board Disassembly
Service Manual Disassembly and Repair LCD Inverter Ballast Board Disassembly This is a small board held in place with two-sided tape. It is located towards the bottom of the main board. Remove the connector at each end and pull straight up while taking care not to damage the board because the adhesive tape has considerable sticking strength. -
Page 66: Pump Disassembly
Welch Allyn Spot Vital Signs LXi Pump Disassembly Note For proper blood pressure operation, replace the pump using only the Welch Allyn specifed part. To assure patient electrical isolation, route the pump wires through the rear housing clip feature (near the pump terminals) and held in place with a tiewrap to the holes in the rear housing at the back of the battery compartment. -
Page 67: Fan And Power Circuit Board Disassembly
Disassembly and Repair Fan and Power Circuit Board Disassembly Note To prevent buildup of hydrogen gas, replace the fan using only the Welch Allyn specified part. This is a small board held in place with two-sided tape and one connector. Remove the screw before disconnecting the connector. - Page 68 Disassembly and Repair Welch Allyn Spot Vital Signs LXi 3. Remove the four screws from the mounting plate and save the fish paper. This exposes the circuit board. 4. Remove the three Torx screws (T10) on the board (one on bottom and one on either side of the probe well cover) and lift the board out of the housing and orient the part as shown.
-
Page 69: Braun Thermoscan Pro 4000
Service Manual Disassembly and Repair Braun ThermoScan PRO 4000 Remove the two screws located at the thermometer housing with a T-10 torx wrench. Save the fish paper. 2. Locate the path of the notched tabs on the housing. Slide the housing up and out following this path and set the case aside. - Page 70 Disassembly and Repair Welch Allyn Spot Vital Signs LXi...
-
Page 71: Technical Overview
Refer to the Spot Vital Signs LXi Directions for Use manual for complete information. Battery System Spot Vital Signs LXi includes a 6 Volt, 6 amp-hour sealed lead-acid battery that supplies all power to the device. An external power supply charges the battery. The battery is always on-line (floated) rather than switching out when attached to the external power supply. -
Page 72: Cpu Core Power Supply
Technical Overview Welch Allyn Spot Vital Signs LXi CPU Core Power Supply Powers the MPU core only and operates at the recommended Dragonball voltage range of 1.8 +/- 0.1 Volts; 2.0 Volts absolute max. The +3.15 Volt supply powers the +1.8 Volt supply for efficiency and, more importantly, for power sequencing. -
Page 73: External Load (Rs-232) Power
CCFL with adequate voltage. External Load (RS-232) Power There are two power outlet means on the Spot Vital Signs LXi – RS-232 port power and the Braun PRO 4000 charger. Two isolated power supplies provide power to each of the external RS-232 ports. This power is available to external devices on pin 9 of each serial connector whenever the software enables the corresponding RS-232 port. -
Page 74: Wireless Radio Description
Welch Allyn Spot Vital Signs LXi Wireless Radio Description The Spot Vital Signs LXi Wireless Radio (ABDB-SE-WA107) is a fully integrated 802.11 wireless LAN device designed to provide wireless LAN connectivity from the Welch Allyn Spot Vital Signs LXi to the Connex Data Management System. - Page 75 A wireless TCP session is established, a physical serial connection is detected, but there is n o active data movement across the wired serial port. The Wireless Radio interfaces to the Spot Vital signs LXi through an RS-232 female connector with a 9-pin male/female null modem connection.
-
Page 76: Bar Code Scanner Description
Welch Allyn Spot Vital Signs LXi Bar Code Scanner Description The Spot Vital Signs LXi has two types of bar code scanners available: a 1D scanner (IMAGETEAM™ 3800) and a 2D scanner (IMAGETEAM™ 4600). These scanners are programmed specifically for Welch Allyn. Scanners not purchased through Welch Allyn will not work with the Spot Vital Signs LXi. -
Page 77: Output Format
0 to 20 characters. Carriage return character, 0x0D. Line feed character, 0x0A. Spot Vital Signs LXi issues a single beep for valid bar codes and displays the Note message scanned in on the units display. If a bar code is invalid, Spot Vital Signs displays nothing. -
Page 78: Printer Description
Technical Overview Welch Allyn Spot Vital Signs LXi Printer Description All models of the Ap1300 printer use an industry standard RS-232 interface. The default parameters are 9600 baud, 8 data bits, 1 stop bit, and no parity. Serial data is expected in standard RS-232C format with -12 Volt meaning ‘mark’ or ‘1’ and +12 Volt a logical ‘0’, with reference to the common ground. -
Page 79: Interconnectdiagram
Service Manual Technical Overview The Spot Vital Signs LXi provides two levels of power to fast-charge or to float the battery at fixed voltages using software control. The fast-charge level rapidly brings the battery up to near-full capacity (7 Volts) using software to not overcharge the battery. The float level, set per the manufacturer’s recommendation, slowly tops-off the battery and can... - Page 80 Technical Overview Welch Allyn Spot Vital Signs LXi...
-
Page 81: Field Replaceable Units
Field Replaceable Units The following list identifies the available FRUs for Spot Vital Signs LXi. To order an FRU, contact Welch Allyn Technical Support. Table 17. Spot Vital Signs LXi Base Components Component Number Object Description 400163 ASSY, POWER HARNESS, Spot Vital Signs LXi... - Page 82 Field Replaceable Units Welch Allyn Spot Vital Signs LXi Table 17. Spot Vital Signs LXi Base Components 401427 LABEL, ICON ID, Spot Vital Signs LXi 700863 CBL,FLX, 1/2mm,15POS,1.0" 704375 CBL,FLX, 1/2mm,30POS,6.0" 703956 LABEL, BATTERY 701040 FITTING, PLASTIC L, 1/16 X 1/16...
- Page 83 Object Description 008-0648-00 MASIMO - ADULT RESU. SENSOR 008-0692-01 MASIMO - 8' INTERFACE CABLE 400192 PCA, MASIMO OEM, Spot Vital Signs LXi 400205 MASIMO SPO2 COMPONENTS, Spot Vital Signs LXi 400555 PCA, MASIMO ADAPTOR, Spot Vital Signs LXi 400610 ASSY, CABLE, FLAT FLEX, SPO2...
- Page 84 10 Feet 9-Pin Serial Cable 4500-920 Kit, Wireless Radio 4500-921 Wireless Radio Directions for Use 4500-905 Repair Tool CD, Spot Vital Signs LXi 4500-906 Spot Vital Signs LXi Configuration CD 4500-907 Spot Vital Signs LXi Firmware Loader CD 4500-925 Cable for wired connectivity...
-
Page 85: Specifications
Specifications Performance This section describes normal ranges for Spot Vital Signs LXi. Blood Pressure Accuracy Blood pressure accuracy meets or exceeds AAMI SP10:2002 standards for non-invasive blood pressure accuracy (± 5 mmHg mean error, 8 mmHg standard deviation). Blood pressure accuracy is validated for pressure measurement using the upper arm only. -
Page 86: Temperature Specifications
Specifications Welch Allyn Spot Vital Signs LXi Temperature Specifications Temperature Range SureTemp Plus 80° to 110° F (26.7° to 43.3° C) Braun ThermoScan PRO 4000 68° to 108° F (20° to 42.2° C) Calibration Accuracy SureTemp Plus ±0.2° F (0.1° C) (Monitor Mode) Braun ThermoScan PRO 4000 for displayed ±... -
Page 87: Spo 2 Specifications
Service Manual Specifications Specifications Masimo Sensor Accuracy Guide Accuracy specified when used with Masimo SET pulse oximetry monitors or with licensed Masimo SET pulse oximetry modules using PC series patient cables, during no motion. Numbers present ± 1 standard deviation. Plus or minus one standard deviation represents 68% of the population. -
Page 88: Nellcor Sensor Accuracy Guide
Specifications Welch Allyn Spot Vital Signs LXi Nellcor Sensor Accuracy Guide Accuracy specifications are based on controlled hypoxia studies with healthy, non-smoking adult volunteers over the specified saturation SpO range. Pulse oximeter readings were compared to SaO values of drawn blood samples measured by hemoximetry. -
Page 89: Mechanical
Battery Sealed lead acid, with external charger. The Spot Vital Signs LXi battery is 90 to 100% charged after 6 hours of charging. The rechargeable batteries in the Braun ThermoScan PRO 4000 thermometer requires an additional 1 hour to charge and the rechargeable batteries in the external printer require an additional 4 hours to charge. -
Page 90: Wireless Radio
Data Transfer Protocols TCP/IP Network The Spot Vital Signs LXi Wireless Radio communicates to a software component which must be on the same sub-net as the radio APs. Data is deleted from device only after an acknowledgement is received from Connex. -
Page 91: Guidance And Manufacturer's Declaration
Emissions and Immunity Information Electromagnetic Emissions The Spot Vital Signs LXi is intended for use in the electromagnetic environment specified below. The customer or user of the Spot Vital Signs LXi should assure that it is used in such an environment. - Page 92 IEC 61000-4-8 Electromagnetic Immunity The Spot Vital Signs LXi is intended for use in the electromagnetic environment specified below. The customer or user of the Spot Vital Signs LXi should assure that it is used in such an environment. Immunity Test...
- Page 93 Recommended Separation Distances Between Portable and Mobile RF Communications Equipment and the Spot Vital Signs LXi The Spot Vital Signs LXi is intended for use in an electromagnetic environment in which radiated RF disturbances are controlled. The customer or user of the Spot Vital Signs LXi can help prevent electromagnetic interference by maintaining a minimum distance between portable and mobile RF communications equipment (transmitters) and the Spot Vital Signs LXi as recommended below, according to the maximum output power of the communications equipment.
- Page 94 Specifications Welch Allyn Spot Vital Signs LXi...
-
Page 95: Maintenance And Service
Caution Prevent water or other fluids from entering any connectors. If the connectors get wet, dry them with warm air. Check all measurement functions. Caution Do not sterilize or autoclave the Spot Vital Signs LXi device. As necessary, clean the device with a cloth slightly dampened with either 70% isopropyl alcohol, 10% chlorine bleach solution, or mild detergent in water, or use PDI Sani-System Cloths. -
Page 96: Suretemp Plus Thermometer
Caution DO NOT use steam, heat, or gas sterilization on the probe well. Caution DO NOT autoclave the probe well. Remove the temperature probe from Spot Vital Signs LXi (see “Temperature Probe” on page 86). 2. Grasp the well under the probe opening and pull up gently to remove it from the device. -
Page 97: Spo 2 Sensors
Service Manual Maintenance and Service Sensors WARNING Do not immerse the sensor in water, solvents, or cleaning solutions (the sensors and connections are not waterproof). Do not use irradiation, steam, or ethylene oxide for sterilization. Clean the reusable SpO sensor with a 70% isopropyl alcohol solution. Do not immerse the sensor. -
Page 98: Battery Replacement
You can use the Spot Vital Signs LXi during this charging period via the AC power cord. If Spot Vital Signs LXi displays the E38 error code after power up, set the date (see “Date/Time Menu Options” on page 25). -
Page 99: Braun Thermoscan Pro 4000
Braun ThermoScan PRO 4000 Caution Do not use alkaline batteries in the Braun ThermoScan PRO 4000 thermometer. Welch Allyn supplies a rechargeable battery pack with the Braun ThermoScan PRO 4000 thermometer. Open the battery compartment. 2. Remove the battery pack and replace with a new battery pack, verify the poles are in the right direction. -
Page 100: Spot Vital Signs Lxi Firmware Upgrade Cd
CD. Spot Vital Signs LXi Wireless Radio Configuration CD This CD configures the Spot Vital Signs LXi Wireless Radio to a local network. This feature requires Welch Allyn Connex Version 2.0 or higher (not available in all countries). For more information about Connex, see www.welchallyn.com. -
Page 101: Repair Test Specifications
250 cc cylinder from 5 mmHg to 210 mHg. The limit is 7 seconds, maximum. Dump Test The Dump Test is defined as the amount of time it takes Spot Vital Signs LXi to deflate a 500 cc cylinder from 260 mmHg to less than 15 mmHg. The limit is 10 seconds. -
Page 102: Valve Control Test
Verify the accuracy of the temperature module is within ±0.2° F for readings with a nomal temperature of 97 .3° F (36.3° C) using a Cal Key (5200-25). Verify Spot Vital Signs LXi can read a temperatures of 96.4° F (35.8° C) and 106° F (41.1° C) within ±0.3° F/±0.2° C using... -
Page 103: Temperature Probe Test
Spot Vital Signs LXi displays “ORL ” after you remove the blue thermometer probe from the blue probe well. Option Requirements These tests are only valid on Spot Vital Signs LXi models with the Masimo or Nellcor option. Functional Test “Masimo SpO2 Functional Check”... - Page 104 Repair Test Specifications Welch Allyn Spot Vital Signs LXi...
-
Page 105: Supplies And Accessories
Supplies and Accessories Blood Pressure Table 1. Reusable Two-Piece Blood Pressure Cuffs (1 per pack) Size Size 4500-01 Child 4500-03 Large Adult 4500-02 Adult 4500-04 Thigh Table 2. Reusable One-Piece Blood Pressure Cuffs (1 per pack) Size Size REUSE-07-2MQ Infant REUSE-11-2MQ Adult REUSE-08-2MQ... -
Page 106: Temperature
Supplies and Accessories Welch Allyn Spot Vital Signs LXi Temperature Table 5. SureTemp Plus Description 02895-000 SureTemp Plus Oral Probe and Well (9 feet/2.7M) 02895-100 SureTemp Plus Rectal Probe and Well (9 feet/2.7M) 02894-0000 SureTemp Plus Oral Well 02894-1000 SureTemp Plus Rectal Well... -
Page 107: Pulse Oximetry
Service Manual Supplies and Accessories Pulse Oximetry Masimo Accessories Table 7. Adhesive Sensors: Single-Patient Use Catalog # Description Weight Range Quantity LNCS-ADTX Adhesive Finger Sensor - Adult (20 per case) >30 kg LNCS-ADTX LNCS-PDTX Adhesive Finger Sensor - Pediatric (20 per case) 10 to 50 kg LNCS-PDTX LNCS INF-L... -
Page 108: Nellcor Accessories
Supplies and Accessories Welch Allyn Spot Vital Signs LXi Nellcor Accessories Table 10. OxiMax Adhesive Sensors: Single-Patient Use Catalog # Description Weight Range Quantity MAX-AI MAX-A Adhesive Sensor, adult >66 lbs (30 kg) Case of 24 MAX-PI MAX-P Adhesive Sensor, pediatric... -
Page 109: Miscellaneous
4500-905 Repair Tool Software CD Kit 4500-906 Spot Vital Signs LXi Configuration CD 4500-907 Spot Vital Signs LXi Firmware Loader CD 4500-910 Image Team 3800/3900 1D Bar Code Scanner Kit 4500-915 Image Team 4600 2D Bar Code Scanner Kit 4500-920... -
Page 110: Service Contracts
Supplies and Accessories Welch Allyn Spot Vital Signs LXi Service Contracts Description 4500-BT0 Blood Pressure with Thermometry 4500-BTS Blood Pressure with Thermometry and SpO... -
Page 111: Miscellaneous Mounting Accessories
Miscellaneous Mounting Accessories Wall Mount Kit Welch Allyn is NOT responsible for the integrity of any wall mounting interface. Welch Allyn recommends that the customer contact their Biomedical Engineering Department or maintenance service to ensure professional installation, safety, and reliability of any mounting accessory. - Page 112 Miscellaneous Mounting Accessories Welch Allyn Spot Vital Signs LXi...
-
Page 113: Mobile Stand Kit
Service Manual Miscellaneous Mounting Accessories Mobile Stand Kit... - Page 114 Miscellaneous Mounting Accessories Welch Allyn Spot Vital Signs LXi...
-
Page 115: Wireless Mounting Accessory
Service Manual Miscellaneous Mounting Accessories Wireless Mounting Accessory... -
Page 116: Printer Mounting Accessory
Miscellaneous Mounting Accessories Welch Allyn Spot Vital Signs LXi Printer Mounting Accessory... -
Page 117: Scanner Mounting Accessory
Service Manual Miscellaneous Mounting Accessories Scanner Mounting Accessory... - Page 118 Miscellaneous Mounting Accessories Welch Allyn Spot Vital Signs LXi...
-
Page 119: Warranty
2) the date specified in the warranty registration card that we ask you to send to us, or 3) the date of purchase of product from the authorized Welch Allyn distributor as documented from a receipt from said distributor. - Page 120 Warranty Welch Allyn Spot Vital Signs LXi The Braun ThermoScan PRO 4000 is covered by a three-year warranty against original defects in material or workmanship. The printer is covered by a one-year warranty against original defects in material or workmanship.
- Page 122 Reorder No. 4500-89 Material No.704432 Rev. C...
Need help?
Do you have a question about the Spot Vital Signs LXi and is the answer not in the manual?
Questions and answers