Advertisement
Quick Links
Spot
Vision Screener
TM
To get started, go to
www.welchallyn.com/getstarted
for information about using and
servicing your product. >>
Turn on the vision screener
To turn the vision screener on, press and release the Power button
located next to the AC power connector. The start-up process
takes approximately 30 seconds, and then the device displays the
Home screen.
Charge the vision screener
Note: The device needs to be charged for 4 hours before use.
1. Connect the provided DC cord set and power supply/
charger together.
2. Locate the DC power connector on
the vision screener and connect the
power supply/charger. The DC power
connector easily inserts into the
vision screener.
CAUTION Using force to connect the power charger
can damage the device and voids the warranty.
3. Plug the DC power cord into an available wall outlet and turn on
the device to charge the vision screener.
Controls, display window, and
connections
1
2
3
4
5
6
1. Ambient light sensor
2. LCD screen
3. Neck strap mount
4. USB port
5. Battery charge green
LED indicator (Flashing)
or charged (Continuous)
6. Tripod mount
10
3
11
7
12
8
9
7. AC power connector
8. Power button
9. Wrist strap mount
10. Range finder
11. Front glass
12. Speaker
Quick Reference
• How To Videos
• Directions For Use
• Service and Support
• Warranty Registration
Home screen
1
2
3
1. Queue – View, select or search for queued subjects from a list to
begin the screening process.
2. History – View already screened subjects (completed records).
3. Tools – A variety of options to customize the vision screener.
4. The Start button allows you to:
• Enter subject information such as ID, First and Last
Name, Gender and Date of Birth (DOB)/Age (Required)
• Find queued subjects (exact match on the ID screen)
• Begin the screening process (Binocular and
Monocular available)
• Review and print screening results
5. Battery status –
• Battery Charging
• Battery charge status
6. Age Range – Lets you begin screening with no subject
information except the age. You can add more subject
information after the screening.
Welch Allyn Technical Support
www.welchallyn.com/support
Mat. 728906, 80024004 Ver. D
Revision date: 2019-03
© 2019, Welch Allyn, Inc.
All rights reserved
5
6
4
Advertisement

Subscribe to Our Youtube Channel
Related Manuals for Welch Allyn Spot Vision Screener


Summary of Contents for Welch Allyn Spot Vision Screener
- Page 1 4. USB port 10. Range finder www.welchallyn.com/support 5. Battery charge green 11. Front glass Mat. 728906, 80024004 Ver. D LED indicator (Flashing) Revision date: 2019-03 12. Speaker © 2019, Welch Allyn, Inc. or charged (Continuous) All rights reserved 6. Tripod mount...
- Page 2 Connect to a wireless network Screen a subject Note: Your system administrator can supply you with the case- 1. If possible, dim the lights. sensitive information needed to access the network. 2. Turn on the vision screener. The Home screen appears. 1.
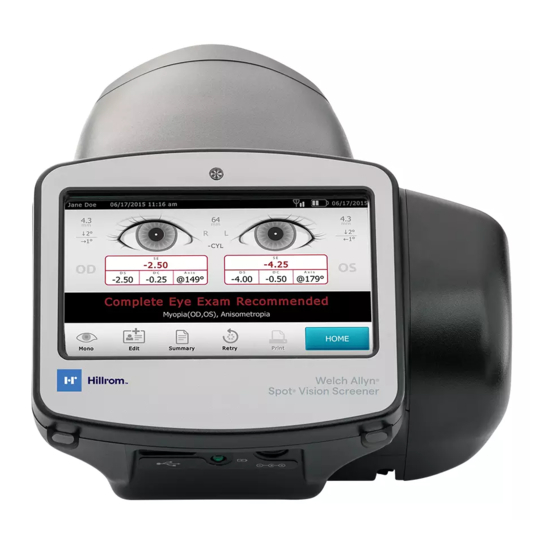
- Page 3 Understand the results 3. Insert the USB drive into a computer. 16 GB 4. Locate the screening results in the pdf subfolder. 1. Pupillary distance 5. Screening result 2. Pupil size indicator 6. Home 3. Right eye (OD), Left eye (OS) 7.
- Page 4 This product may contain software known as “free” or “open source” software (FOSS). Welch Allyn uses and supports the use of FOSS. We believe that FOSS makes our products more robust and secure, and gives us and our customers greater flexibility.
Need help?
Do you have a question about the Spot Vision Screener and is the answer not in the manual?
Questions and answers