Table of Contents
Advertisement
Quick Links
Advertisement
Table of Contents

Related Manuals for Aaeon ECM-5716 Series


Summary of Contents for Aaeon ECM-5716 Series
- Page 1 User’ s Manual ECM-5716 Series All-in-One Pentium-M Single Board with LVDS, TMDS, AC97 Audio, IEEE-1394A, PCMCIA, Dual 10/100Base-Tx Ethernet Interfaces, 4USB 2.0, 2COMs & Intel Gigabit Ethernet Interface (optional) Ed. – 16 November 2004 Part No. 2047571600...
- Page 2 ECM-5716 Series FCC STATEMENT THIS DEVICE COMPLIES WITH PART 15 FCC RULES. OPERATION IS SUBJECT TO THE FOLLOWING TWO CONDITIONS: (1) THIS DEVICE MAY NOT CAUSE HARMFUL INTERFERENCE. (2) THIS DEVICE MUST ACCEPT ANY INTERFERENCE RECEIVED INCLUDING INTERFERENCE THAT CAUSE UNDESIRED OPERATION.
- Page 3 User’ s Manual Copyright Notice Copyright © 2004 Evalue Technology Inc., ALL RIGHTS RESERVED. No part of this document may be reproduced, copied, translated, or transmitted in any form or by any means, electronic or mechanical, for any purpose, without the prior written permission of the original manufacturer.
- Page 4 ECM-5716 Series A Message to the Customer Evalue Customer Services Each and every Evalue’ s product is built to the most exacting specifications to ensure reliable performance in the harsh and demanding conditions typical of industrial environments. Whether your new Evalue device is destined for the laboratory or the factory floor, you can be assured that your product will provide the reliability and ease of operation for which the name Evalue has come to be known.
- Page 5 User’ s Manual Technical Support We want you to get the maximum performance from your products. So if you run into technical difficulties, we are here to help. For the most frequently asked questions, you can easily find answers in your product documentation. These answers are normally a lot more detailed than the ones we can give over the phone.
- Page 6 ECM-5716 Series Product Warranty Evalue warrants to you, the original purchaser, that each of its products will be free from defects in materials and workmanship for two years from the date of purchase. This warranty does not apply to any products which have been repaired or altered by persons other than repair personnel authorized by Evalue, or which have been subject to misuse, abuse, accident or improper installation.
- Page 7 Packing List Before you begin installing your single board, please make sure that the following materials have been shipped: 1 ECM-5716 series All-in-One Pentium-M Computing Module 1 Quick Installation Guide 1 CD-ROM contains the followings: — User’ s Manual (this manual in PDF file) —...
-
Page 8: Table Of Contents
ECM-5716 Series MANUAL OBJECTIVES .................... 1 INTRODUCTION......................2 System Overview....................2 System Specifications ..................3 Architecture Overview ..................6 2.3.1 855GME and 82801DB ....................7 2.3.2 DRAM Interface......................9 2.3.3 Chrontel CH7301 DVI Transmitter................9 2.3.4 PCI Interface ....................... 9 2.3.5... - Page 9 User’ s Manual 3.7.6 Floppy Connector (FLP).................... 24 3.7.7 Signal Description – Floppy Disk Connector (FLP) ........... 25 3.7.8 Primary IDE Connector (IDE_1) ................26 3.7.9 Secondary IDE Connector (IDE_2) ................27 3.7.10 Signal Description – IDE Device Connector (IDE_1 / IDE_2) ........28 3.7.11 Audio Connector (JAUDIO) ..................
- Page 10 ECM-5716 Series In Case of Problems.................... 44 Main Menu......................44 4.5.1 Setup Items ....................... 44 4.5.2 Standard CMOS Setup ..................... 46 4.5.3 Advanced BIOS Features ..................49 4.5.4 Advanced Chipset Features..................52 4.5.5 Integrated Peripherals....................54 4.5.6 Power Management Setup..................57 4.5.7...
- Page 11 User’ s Manual 6.2.18 OFFENDING ADDRESS NOT FOUND ..............95 6.2.19 OFFENDING SEGMENT:..................95 6.2.20 PRESS A KEY TO REBOOT ..................96 6.2.21 PRESS F1 TO DISABLE NMI, F2 TO REBOOT ............96 6.2.22 RAM PARITY ERROR - CHECKING FOR SEGMENT ..........96 6.2.23 Should Be Empty But EISA Board Found PLEASE RUN EISA CONFIGURATION UTILITY..........................
- Page 12 ECM-5716 Series Memory Address Error at ....................108 Memory parity Error at ......................108 MEMORY SIZE HAS CHANGED SINCE LAST BOOT ............108 Memory Verify Error at ......................108 OFFENDING ADDRESS NOT FOUND................108 OFFENDING SEGMENT:..................... 108 PRESS A KEY TO REBOOT ....................109 PRESS F1 TO DISABLE NMI, F2 TO REBOOT ..............
- Page 13 User’ s Manual Document Amendment History Revision Date Comment Feb. 2004. Stephen Tsao Initial Release June, 2004 Stephen Tsao Modify 1. JCOM2 RS422/485 pin definition 2. JTMDS pin 19, 20 Nov. 2004 Leo Chen Modify 1. TMDS Connector pin signal 2.
-
Page 14: Manual Objectives
ECM-5716 Series 1. Manual Objectives This manual describes in detail the Evalue Technology ECM-5716 series Single Board. We have tried to include as much information as possible but we have not duplicated information that is provided in the standard IBM Technical References, unless it proved to be necessary to aid in the understanding of this board. -
Page 15: Introduction
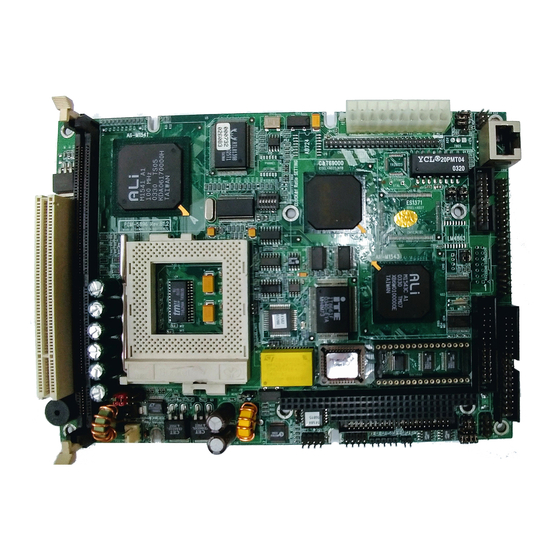
User’ s Manual 2. Introduction System Overview The ECM-5716 series is a compact 5.25” CD-ROM size Single Board Computer that equips with Intel Banias Chipset, LCD Interfaces, AC97 Audio, dual 10/100Base-Tx Ethernet, four USB2.0 interfaces, dual IEEE1394 interfaces, PCMCIA, and Compact Flash. -
Page 16: System Specifications
(1 sec. ~ 255 min., 1 sec. or 1 min. /step) • Power Management: Supports ATX power supply. Supports PC97, LAN wake up and modem ring-in functions. I/O peripheral devices support power saving and doze/standby/suspend modes. ACPI 2.0 & APM 1.2 compliant. ECM-5716 Series User’ s Manual 3... - Page 17 25 MHz to 112 MHz per channel. Audio Interface • Chipset: Intel ICH4 integrated Audio controller with AC97 interface • AC97 Codec: VIA VT1616 • Audio Controller: AC97 ver. 2.3 compliant interface. Supports Audio Out (5.1channel playback) 4 ECM-5716 Series User’ s Manual...
- Page 18 Mechanical and Environmental • Power Supply Voltage: ATX type, +5V and +12V • Operating Temperature: 32 to 140°F (0 to 60°C) • Board Size: 8"(L) x 5.75"(W) (203mm x 146mm) • Weight: 0.5 Kg ECM-5716 Series User’ s Manual 5...
-
Page 19: Architecture Overview
User’ s Manual Architecture Overview The following block diagram shows the architecture and main components of ECM-5716 series. The following sections provide detail information about the functions provided onboard. 6 ECM-5716 Series User’ s Manual... -
Page 20: 855Gme And 82801Db
LVDS LCD panel, and two DVO devices. Each port can transmit data according to one or more protocols. The data that is sent out the display port is selected from one of the two possible sources, Pipe A or Pipe B. ECM-5716 Series User’ s Manual 7... - Page 21 AC ’ 97 2.3 compliant link for audio and telephony codecs; up to 6 channels Low Pin Count (LPC) interface FWH Interface (FWH Flash BIOS support) Alert on LAN* (AOL and AOL2) 8 ECM-5716 Series User’ s Manual...
-
Page 22: Dram Interface
They can be configured to the standard primary and secondary channels (four devices). There are integrated series resistors on the data and control lines. Access to these controllers is provided by two standard IDC 40-pin connectors. ECM-5716 Series User’ s Manual 9... -
Page 23: Usb 2.0
The ICH4 supports 6 USB 2.0 ports. All six USB ports are high-speed, full-speed, and low-speed capable. ICH4’ s port-routing logic determines whether a USB port is controlled by one of the UHCI controllers or by the EHCI controller. 10 ECM-5716 Series User’ s Manual... -
Page 24: Ethernet
Support for remote power-up using Wake on LAN (WOL) technology Deep power-down node support Support of Wired for management (WfM) Rev 2.0 Backward compatible software with 82447, 82558 and 82559 TCP/UDP checksum of f load capabilities Support for Intel’ s Adaptive Technology ECM-5716 Series User’ s Manual 11... - Page 25 TCP/UDP/IP checksum calculations and TCP segmentation. The 82540EM is packed in a 15mm2 196-ball grid array and is pin compatible with the Intel 82551QM 10/100 Mbps Fast Ethernet Multifunction PCI/CardBus Controller. 12 ECM-5716 Series User’ s Manual...
-
Page 26: Winbond W83627Hf
The R5C551 is compliant with the latest PCI Bus Power Management Specification, and provides several low-power modes that enable the host power system to further reduce power consumption. ECM-5716 Series User’ s Manual 13... -
Page 27: Compact Flash Interface
The Compact Flash storage card is O/S independent, thus offering an optimal solution for embedded systems operating in non-standard computing environments. The Compact Flash storage card is IDE compatible and offers various capacities. 14 ECM-5716 Series User’ s Manual... -
Page 28: Hardware Configuration
Modern electronic devices are very sensitive to static electric charges. As a safety precaution, use a grounding wrist strap at all times. Place all electronic components in a static-dissipative surface or static- shielded bag when they are not in the chassis. ECM-5716 Series User’ s Manual 15... -
Page 29: Socket 479 Processor
DIMM socket. Before locking the DIMM module, make sure that the memory module has been completely inserted into the DIMM socket. Note: Please do not change any DDR SDRAM parameter in BIOS setup to increase your system’ s performance without acquiring technical information in advance. 16 ECM-5716 Series User’ s Manual... -
Page 30: Jumper & Connector
ECM-5716 Series Jumper & Connector 3.5.1 Jumper & Connector Layout ECM-5716 Series User’ s Manual 17... -
Page 31: Jumper & Connector List
3 x 1 header, pitch 2.54mm JP1, JP2 COM2 RS-232/422/485 select 3 x 2 header, pitch 2.54mm 4 x 3 header, pitch 2.54mm (JP1) COM1 pin 9 signal select 3 x 2 header, pitch 2.54mm 18 ECM-5716 Series User’ s Manual... -
Page 32: Connectors
System fan connector 1 3 x 1 wafer, pitch 2.54mm S_FAN2 System fan connector 2 3 x 1 wafer, pitch 2.54mm USB connector VGA connector 15-pin female D-sub connector IEEE1394 port 1 connector 1394 ECM-5716 Series User’ s Manual 19... -
Page 33: Setting Jumpers
A pair of needle-nose pliers may be helpful when working with jumpers. If you have any doubts about the best hardware configuration for your application, contact your local distributor or sales representative before you make any changes. 20 ECM-5716 Series User’ s Manual... -
Page 34: Clear Cmos (Jbat)
12 9 6 3 * default 3.6.3 COM1 Pin 9 Signal Select (JP3) The ECM-5716 COM1 pin 9 signal can be selected as +12V, +5V, or Ring by setting JP3. COM1 Select (JP3) Ring* +12V * default ECM-5716 Series User’ s Manual 21... -
Page 35: Connector Definitions
User’ s Manual Connector Definitions 3.7.1 ATX Power Connector (ATX) Signal Signal 3.3V 3.3V -12V 3.3V PS-ON PWROK 5V SB +12V 3.7.2 Serial Port 1 Connector (COM1) Signal Signal 22 ECM-5716 Series User’ s Manual... -
Page 36: Signal Description - Serial Port 1 Connector (Com1)
Data Carrier Detect. This signal indicates that the modem or data set has detected the data carrier. Ring Indicator. This signal indicates that the modem has received a telephone ringing signal. 3.7.4 CPU Fan Connector (FAN1) SIGNAL +12V 3.7.5 Signal Description – CPU Fan Connector Fan speed monitor ECM-5716 Series User’ s Manual 23... -
Page 37: Floppy Connector (Flp)
User’ s Manual 3.7.6 Floppy Connector (FLP) Signal Signal DSKCHG# SIDE1# RDATA# WPT# TRAK0# STEP# DIR# MOB# DSA# DSB# MOA# INDEX# DRVDEN0# 24 ECM-5716 Series User’ s Manual... -
Page 38: Signal Description - Floppy Disk Connector (Flp)
Write protected. This active low Schmitt input from the disk drive indicates that the diskette is write-protected. DSKCHG# Diskette change. This signal is active low at power on and whenever the diskette is removed. ECM-5716 Series User’ s Manual 25... -
Page 39: Primary Ide Connector (Ide_1)
Primary IDE Connector (IDE_1) Signal Signal RESET# PDD7 PDD8 PDD6 PDD9 PDD5 PDD10 PDD4 PDD11 PDD3 PDD12 PDD2 PDD13 PDD1 PDD14 PDD0 PDD15 PDREQ PDIOW# PDIOR# PIORDY PDDACK# IRQ14 PDA1 PDA0 PDA2 PDCS1# PDCS3# IDEACTP# 26 ECM-5716 Series User’ s Manual... -
Page 40: Secondary Ide Connector (Ide_2)
Secondary IDE Connector (IDE_2) Signal Signal RESET# SDD7 SDD8 SDD6 SDD9 SDD5 SDD10 SDD4 SDD11 SDD3 SDD12 SDD2 SDD13 SDD1 SDD14 SDD0 SDD15 SDREQ SDIOW# SDIOR# SIORDY SDDACK# IRQ15 SDA1 SDA0 SDA2 SDCS1# SDCS3# IDEACTS# ECM-5716 Series User’ s Manual 27... -
Page 41: Signal Description - Ide Device Connector (Ide_1 / Ide_2)
DMA Acknowledge. The DACK# acknowledges the DREQ request to initiate DMA transfers. DACT# Signal from hard disk indicating hard disk activity. The signal level depends on the hard disk type, normally active low. The signal is routed directly to the LED1. 28 ECM-5716 Series User’ s Manual... -
Page 42: Audio Connector (Jaudio)
Left and right line out signals. Both signals are capacitor coupled and should have GND as return. 3.7.13 LCD Inverter Connector (JBKL) Signal +12V ENBKL Bright 3.7.14 Signal Description – LCD Inverter Connector (JBKL) Bright Bright Adjust ENBKL LCD backlight ON/OFF control signal. ECM-5716 Series User’ s Manual 29... -
Page 43: Serial Port 2 Connector (Jcom2)
Serial Port 2 is set to LOW. Rx +/- Serial input. This differential signal pair receives serial data from the communication link. Received data is available in Serial Port 2 Receiver Buffer Register. 30 ECM-5716 Series User’ s Manual... -
Page 44: Pin Header Serial Port 2 Connector In Rs-485 Mode (Jcom2)
Front Panel Connector (JFP) Signal Signal HWRST# VCC5SBY VCC5 VCC5 HDLED VCC5SBY VCC5SBY PWRBT SUSLED EXTSM# VCC5 SPKIN 1, 3 Reset SW 9, 11 Power SW 10, 12 Suspend LED 13, 15 Suspend SW ECM-5716 Series User’ s Manual 31... -
Page 45: Irda Connector (Jir)
Bi-directional serial data line used to transfer data from or commands to the PC-AT keyboard. MCLK Bi-directional clock signal used to strobe data/commands from/to the PS/2 mouse. MDAT Bi-directional serial data line used to transfer data from or commands to the PS/2 mouse. 32 ECM-5716 Series User’ s Manual... -
Page 46: Miscellaneous Setting Connector (Jmisc)
THRMDN VCC5 VCC5 BRIGHT #MASTER 3.7.27 Signal Description – JMISC Connector 1, 3 Case open detection 5, 7, 9 LCD brightness setting Thermal detection 6, 8, 10 CF Master/Slave setting 8-10 short (default: Master) ECM-5716 Series User’ s Manual 33... -
Page 47: Lvds Connector (Jlvds)
Channel A differential clock pair output (compliment): 245- 800 MHz. CLKAM LVDS Channel B differential clock pair output (true): 245-800 MHz CLKAP LVDS CLKAM Channel B differential clock pair output (compliment): 245- 800 MHz. LVDS 34 ECM-5716 Series User’ s Manual... -
Page 48: Tmds Connector (Jtmds)
(i.e. primary digital monitor). This signal is tri-stated during a hard reset. DVI Clock Outputs: These pins provide the differential clock outputs for the DVI TLC, TLC# interface corresponding to data on TDC (0:2) outputs. ECM-5716 Series User’ s Manual 35... -
Page 49: Usb Connector (Jusb)
Bi-directional serial data line used to transfer data from or commands to the PC-AT keyboard. MCLK Bi-directional clock signal used to strobe data/commands from/to the PS/2 mouse. MDAT Bi-directional serial data line used to transfer data from or commands to the PS/2 mouse. 36 ECM-5716 Series User’ s Manual... -
Page 50: 10/100 Base-Tx Ethernet Connector (Lan1/Lan2)
Signal Description – 10/100Base-Tx Ethernet Connector TXD+ / TXD- Ethernet 10/100Base-Tx differential transmitter outputs. RXD+ / RXD- Ethernet 10/100Base-Tx differential receiver inputs. 3.7.38 10/100/1000 BASE-Tx Ethernet Connector (LAN2: 82540EM Optional) Signal MDI0+ MDI0- MDI1+ MDI2+ MDI2- MDI1- MDI3+ MDI3- ECM-5716 Series User’ s Manual 37... -
Page 51: Signal Description - 10/100/1000Base-Tx Ethernet Connector
1000BASE-T: In MDI configuration, MDI (3) +/- corresponds to BI_DD+/-, and MDI-X configuration, MDI (3) +/- corresponds to BI_DC+/-. 100BASE-TX: Unused. 10BASE-T: Unused. 3.7.40 Parallel Port Connector (LPT) Signal Signal SLCT BUSY ACK# SLIN# INIT# ERR# AFD# STB# 38 ECM-5716 Series User’ s Manual... -
Page 52: Db25 Parallel Port Connector (Lpt)
ECM-5716 Series 3.7.41 DB25 Parallel Port Connector (LPT) Signal Signal STB# AFD# ERR# INIT# SLIN# ACK# BUSY SLCT ECM-5716 Series User’ s Manual 39... -
Page 53: Signal Description - Parallel Port (Lpt)
An active high input on this pin indicates that the printer has detected the end of the paper. This pin is pulled high internally. 3.7.43 System Fan Connector 1 (S_FAN1) SIGNAL +12V 3.7.44 System Fan Connector 2 (S_FAN2) SIGNAL +12V 3.7.45 Signal Description – System Fan Connector Fan speed monitor 40 ECM-5716 Series User’ s Manual... -
Page 54: Vga Connector (Vga)
Signal Description – IEEE1394 Port Connector (J1394/1394) Port 1 Twisted Pair A Positive. XTPA0P Port 1 Twisted Pair A Negative. XTPA0M XTPB0P Port 1 Twisted Pair B Positive. Port 1 Twisted Pair B Negative. XTPB0M ECM-5716 Series User’ s Manual 41... -
Page 55: Award Bios Setup
<Delete> keys. If you do not press the keys at the correct time and the system does not boot, an error message will be displayed and you will again be asked to. Press F1 To Continue, DEL to enter SETUP 42 ECM-5716 Series User’ s Manual... -
Page 56: Using Setup
Use the left and right arrow keys to choose the menu you want to be in. 4.2.2 To Display a Sub Menu Use the arrow keys to move the cursor to the sub menu you want. Then press <Enter>. A “Ø” pointer marks all sub menus. ECM-5716 Series User’ s Manual 43... -
Page 57: Getting Help
Note that a brief description of each highlighted selection appears at the bottom of the screen. 4.5.1 Setup Items The main menu includes the following main setup categories. Recall that some systems may not include all entries. 44 ECM-5716 Series User’ s Manual... - Page 58 Use this menu to specify your settings for power management. 4.5.1.6 PNP / PCI Configuration This entry appears if your system supports PnP / PCI. 4.5.1.7 PC Health Status This entry appears your system Hardware Monitor Status ECM-5716 Series User’ s Manual 45...
-
Page 59: Standard Cmos Setup
Use the arrow keys to highlight the item and then use the <PgUp> or <PgDn> keys to select the value you want in each item. 46 ECM-5716 Series User’ s Manual... - Page 60 Displays the amount of conventional memory detected during boot up Extended Memory Displays the amount of extended memory detected during boot up Total Memory Displays the total memory available in the system Table 2 : Main Menu Selections ECM-5716 Series User’ s Manual 47...
- Page 61 Max = 65535 65535 means no hard disk Min = 0 **** Landing zone Max = 65535 Min = 0 Number of sectors per track Sector Max = 255 Table 3 : Hard disk selections 48 ECM-5716 Series User’ s Manual...
-
Page 62: Advanced Bios Features
This category speeds up Power On Self Test (POST) after you power up the computer. If it is set to Enable, BIOS will shorten or skip some check items during POST. Enabled Enable quick POST Disabled Normal POST ECM-5716 Series User’ s Manual 49... - Page 63 Fast Lets chipset control GateA20 4.5.3.9 Typematic Rate Setting Key strokes repeat at a rate determined by the keyboard controller. When enabled, the typematic rate and typematic delay can be selected. The choice: Enabled/Disabled. 50 ECM-5716 Series User’ s Manual...
- Page 64 The original Windows95 requires the presence of a floppy. Unless the BIOS tells it to disregard the absence of the drive, it will generate an error message. For other operating systems as Win98 etc this field is without relevance. Don’ t generate error message Generate error message ECM-5716 Series User’ s Manual 51...
-
Page 65: Advanced Chipset Features
BIOS. However, this does not translate into better system performance because the OS bypasses the BIOS using the graphics driver to access the video card's hardware directly. The Choice: Enabled, Disabled. 52 ECM-5716 Series User’ s Manual... - Page 66 Select the size of Accelerated Graphics Port (AGP) aperture. The aperture is a portion of the PCI memory address range dedicated for graphics memory address space. Host cycles that hit the aperture range are forwarded to the AGP without any translation. The Choice: 4MB,8MB,16MB.32MB, 64MB,128MB,256MB ECM-5716 Series User’ s Manual 53...
-
Page 67: Integrated Peripherals
This item allows you to set the system’ s USB keyboard to Enabled/Disabled. The choice: Enabled , Disabled. 4.5.5.7 Init Display First This item allows you to decide to active whether PCI Slot or AGP first. The choice: PCI Slot, AGP/Onboard 54 ECM-5716 Series User’ s Manual... - Page 68 The Choice: Half, Full. 4.5.5.14 Onboard Parallel Port Select a logical LPT port name and matching address for the physical parallel (printer) port. The choice: 378H/IRQ7, 278H/IRQ5, 3BCH/IRQ7, Disabled. ECM-5716 Series User’ s Manual 55...
- Page 69 Parallel Port EPP Type Select EPP port type 1.7 or 1.9. The choice: EPP1.7, EPP1.9. 4.5.5.18 Watch Dog Timer Select This option will determine watch dog timer. The choice: Disabled,10 ,20 ,30 ,40 Sec,1,2,4 Min 56 ECM-5716 Series User’ s Manual...
-
Page 70: Power Management Setup
This selection will cause the system to turn off the vertical and horizontal synchronization ports and write blanks to the video buffer. Blank Screen This option only writes blanks to the video buffer. DPMS Initial display power management signaling. ECM-5716 Series User’ s Manual 57... - Page 71 This will enable the system to wake up through PCI Card peripheral. The Choice. Enable, Disabled. 4.5.6.12 Power On By Ring This determines whether the system boot up if there’ s an incoming call from the Modem. The Choice. Enable, Disabled. 58 ECM-5716 Series User’ s Manual...
- Page 72 In effect ,the system remain alert for anything which occurs to a device which is configured as Enabled ,even when the system is in a power down mode. ECM-5716 Series User’ s Manual 59...
-
Page 73: Pnp/Pci Configuration Setup
Plug and Play operating system such as Windows®95. If you set this field to “manual” choose specific resources by going into each of the sub menu that follows this field (a sub menu is preceded by a “Ø”). The choice: Auto, Manual. 60 ECM-5716 Series User’ s Manual... - Page 74 PCI/ISA PnP for devices compliant with the Plug and Play standard whether designed for PCI or ISA bus architecture. The Choice: Legacy ISA and PCI/ISA PnP. 4.5.7.5 PCI / VGA Palette Snoop Leave this field at Disabled. Choices are Enabled, Disabled. ECM-5716 Series User’ s Manual 61...
-
Page 75: Pc Health Status
This item allows you to enable/disable auto detect PCI Clock. The choice: Enable, Disable. 4.5.9.2 CPU Host /PCI Clock, Spread Spectrum These option allows you to set Host clock/Spread Spectrum into various types of frequencies. 62 ECM-5716 Series User’ s Manual... -
Page 76: Load Fail-Safe Defaults
When you press <Enter> on this item you get a confirmation dialog box with a message similar to: Pressing ‘ Y’ loads the default values that are factory settings for optimal performance system operations. ECM-5716 Series User’ s Manual 63... -
Page 77: Supervisor / User Password Setting
<Enter> when you are prompted to enter the password. A message will confirm the password will be disabled. Once the password is disabled, the system will boot and you can enter Setup freely. PASSWORD DISABLED. 64 ECM-5716 Series User’ s Manual... -
Page 78: Exit Selecting
The next time you boot your computer, the BIOS configures your system according to the Setup selections stored in CMOS. After saving the values the system is restarted again. ECM-5716 Series User’ s Manual 65... - Page 79 Pressing <Enter> on this item asks for confirmation: This allows you to exit Setup without storing in CMOS any change. The previous selections remain in effect. This exits the Setup utility and restarts your computer. 66 ECM-5716 Series User’ s Manual...
-
Page 80: Driver Installation
Start the control panel by clicking the ‘ Start’ button, click‘ Settings’ and ‘ Control Panel’ from the sub-menu. Double click the ‘ System’ icon in the control panel as shown below. • Double click the ‘ System’ icon (highlighted above). • Select the ‘ Device Manager’ tab. ECM-5716 Series User’ s Manual 67... - Page 81 User’ s Manual Double click ‘ PCI Ethernet Controller’ . This will show the following window. Click the ‘ Reinstall Driver’ button. 68 ECM-5716 Series User’ s Manual...
- Page 82 ECM-5716 Series Click the ‘ Next’ button to run Add New Hardware wizard to install device driver. ECM-5716 Series User’ s Manual 69...
- Page 83 User’ s Manual Specify the location of network adapter and click ‘ Next’ (see below). Another PCI Ethernet Controller is Intel-82551ER, the driver location are show as below: 70 ECM-5716 Series User’ s Manual...
- Page 84 ECM-5716 Series Click the ‘ Next’ button. ECM-5716 Series User’ s Manual 71...
- Page 85 User’ s Manual Click the ‘ Finish’ button. 72 ECM-5716 Series User’ s Manual...
- Page 86 Further configuration of the adapter may be made in the ‘ Advanced’ section of the driver properties. These options may be accessed through the ‘ Network’ icon in the control panel (Select the network adapter, click the ‘ Properties’ button and select the ‘ Advanced’ tab). ECM-5716 Series User’ s Manual 73...
-
Page 87: Windows 2000 , Xp Ethernet Installation
Ethernet Adapter’ and ‘ Intel Pro/100 VE Ethernet Adapter’ . 1. Start the control panel by clicking the ‘ Start’ button, click‘ Settings’ and ‘ Control Panel’ from the sub-menu. Double click the ‘ System’ icon in the control panel as shown below. 74 ECM-5716 Series User’ s Manual... - Page 88 ECM-5716 Series 2. On the System properties window, click the ‘ Hardware’ tab as shown below. 3. Click the ‘ Device Manager… ’ button to show the Device Manager. ECM-5716 Series User’ s Manual 75...
- Page 89 User’ s Manual 4. Double click ‘ Ethernet Controller’ . This will show the following window. Click the ‘ Reinstall Driver’ button. 5. Click the ‘ Next’ button to run Update Device Driver Wizard. 76 ECM-5716 Series User’ s Manual...
- Page 90 ECM-5716 Series 6. Click the ‘ Next’ button to continue run upgrade device driver wizard. 7. Select the ‘ Specify a location’ check item, click the ‘ Next’ button to continue. ECM-5716 Series User’ s Manual 77...
- Page 91 User’ s Manual 8. The directory for the drivers may now be entered or click the ‘ Browse… ’ button to select the directory. Click the ‘ OK’ button to continue. 78 ECM-5716 Series User’ s Manual...
- Page 92 ECM-5716 Series 9. After system search the driver, click the ‘ Next’ button to continue upgrade driver. ECM-5716 Series User’ s Manual 79...
- Page 93 User’ s Manual 10. If the system show the Digital Signature not Found message, Click ‘ Yes’ to continue the driver installation 80 ECM-5716 Series User’ s Manual...
- Page 94 ECM-5716 Series 11. After system install to drivers, the follow windows should appear, click the ‘ Finish’ button to finish the driver installation. ECM-5716 Series User’ s Manual 81...
- Page 95 User’ s Manual 12. After finish the driver installation, system will return to Properties windows as shown below. Click the ‘ OK’ button to return the Device Manager. 82 ECM-5716 Series User’ s Manual...
-
Page 96: Driver Installation For Display Adapter
1. Click the ‘ Start’ button on the task bar, select ‘ Run’ and specify the location of Intel 855GM Video driver setup program. This should start the driver setup program as shown below: 2. Click the ‘ Next’ as shown below. ECM-5716 Series User’ s Manual 83... - Page 97 User’ s Manual 3. Click the ‘ Next’ as shown below. 4. Click the ‘ Next’ as shown below. 84 ECM-5716 Series User’ s Manual...
- Page 98 ECM-5716 Series 5. Click the ‘ Yes’ as shown below. 6. Click the ‘ Finish’ button to complete the driver setup. ECM-5716 Series User’ s Manual 85...
-
Page 99: Windows 2000 Or Windows Xp Display Installation
Click the ‘ Start’ button on the task bar, select ‘ Run’ and specify the location of Intel 855GM Video driver setup program. This should start the driver setup program as shown below: Click the ‘ Next’ as shown below. 86 ECM-5716 Series User’ s Manual... - Page 100 ECM-5716 Series Click the ‘ Next’ as shown below. Click the ‘ Yes’ as shown below. ECM-5716 Series User’ s Manual 87...
- Page 101 User’ s Manual Click the ‘ Finish’ button to complete the driver setup. 88 ECM-5716 Series User’ s Manual...
-
Page 102: Driver Installation For Audio Adapter
Click the ‘ Start’ button on the task bar, select ‘ Run’ and specify the location of Intel AC97 Audio driver setup program. This should start the Audio driver setup program as shown below: Select ‘ Next >’ as shown below. ECM-5716 Series User’ s Manual 89... - Page 103 User’ s Manual Select ‘ Next >’ as shown below. Click the ‘ Finish’ button to complete the driver setup. 90 ECM-5716 Series User’ s Manual...
-
Page 104: Driver Installation For Intel 855 Chipset
1. Click the ‘ Start’ button on the task bar, select ‘ Run’ and specify the location of Intel 855 chipset driver setup program. This should start the Intel Chipset driver setup program as shown below: 2. Press ‘ Next’ to continue installation. ECM-5716 Series User’ s Manual 91... - Page 105 User’ s Manual 3. Press ‘ Next’ to continue installation. 4. Click the ‘ Finish’ button to complete the driver setup. 92 ECM-5716 Series User’ s Manual...
-
Page 106: Post Messages
Then reboot the system. 6.2.4 DISKETTE DRIVES OR TYPES MISMATCH ERROR - RUN SETUP Type of diskette drive installed in the system is different from the CMOS definition. Run Setup to reconfigure the drive type correctly. ECM-5716 Series User’ s Manual 93... -
Page 107: Display Switch Is Set Incorrectly
Cannot find or initialize the floppy drive controller. make sure the controller is installed correctly and firmly. If there are no floppy drives installed, be sure the Diskette Drive selection in Setup is set to NONE. 94 ECM-5716 Series User’ s Manual... - Page 108 ERROR messages when the segment that has caused the problem cannot be isolated. 6.2.19 OFFENDING SEGMENT: This message is used in conjunction with the I/O CHANNEL CHECK and RAM PARITY ERROR messages when the segment that has caused the problem has been isolated. ECM-5716 Series User’ s Manual 95...
-
Page 109: Press A Key To Reboot
Configuration Utility. 6.2.26 SYSTEM HALTED, (CTRL-ALT-DEL) TO REBOOT ... Indicates the present boot attempt has been aborted and the system must be rebooted. Press and hold down the CTRL and ALT keys and press DEL. 96 ECM-5716 Series User’ s Manual... -
Page 110: Wrong Board In Slot Please Run Eisa Configuration Utility
This is also used for M/B burn in test. 6.2.38 BIOS ROM checksum error - System halted. The checksum of ROM address F0000H-FFFFFH is bad. 6.2.39 Memory test fail. BIOS reports the memory test fail if the onboard memory is tested error. ECM-5716 Series User’ s Manual 97... - Page 111 User’ s Manual 6. Measurement Drawing 98 ECM-5716 Series User’ s Manual...
- Page 112 ECM-5716 Series ECM-5716 Series User’ s Manual 99...
- Page 113 User’ s Manual Appendix A: BIOS Revisions BIOS Rev. New Features Bugs/Problems Solved Known Problems 100 ECM-5716 Series User’ s Manual...
-
Page 114: Memory Map
ECM-5716 Series Appendix B: System Resources Memory Map The following table indicates memory map of ECM-5716 series. The address ranges specify the runtime code length. Address Range Description Note 00000000 - 0009FFFF System board 000A0000 - 000BFFFF PCI bus 000A0000 - 000BFFFF... - Page 115 000003F8 - 000003FF Communications Port (COM1) 00000400 - 000004BF Motherboard resources 000004D0 - 000004D1 Motherboard resources 00000500 - 0000051F Intel(R) 82801DB/DBM SMBus Controller - 24C3 00000778 - 0000077B Printer Port (LPT1) 00000A78 - 00000A7B Motherboard resources 102 ECM-5716 Series User’ s Manual...
- Page 116 Controller Note: The usage of these I/O addresses depends on the choices made in the Evalue setup screen. The I/O addresses are fully usable for PCI interface if the corresponding on-board unit is removed. ECM-5716 Series User’ s Manual 103...
-
Page 117: Interrupt Usage
2. These interrupt lines are managed by the PnP handler and are subject to change during system initialisation. Disabling the hard disk controller in the Evalue setup screen may not release the interrupt line. 104 ECM-5716 Series User’ s Manual... -
Page 118: Dma-Channel Usage
The usage of these DMA-channels depends on the choices made in the Evalue setup screen. The DMA-channels are fully usable for PCI interface if the corresponding on- board unit is disabled in the setup screen. ECM-5716 Series User’ s Manual 105... -
Page 119: Post Beep
Then reboot the system. DISKETTE DRIVES OR TYPES MISMATCH ERROR - RUN SETUP Type of diskette drive installed in the system is different from the CMOS definition. Run Setup to reconfigure the drive type correctly. 106 ECM-5716 Series User’ s Manual... -
Page 120: Display Switch Is Set Incorrectly
Cannot find or initialize the floppy drive controller. make sure the controller is installed correctly and firmly. If there are no floppy drives installed, be sure the Diskette Drive selection in Setup is set to NONE. ECM-5716 Series User’ s Manual 107... -
Page 121: Invalid Eisa Configuration Please Run Eisa Configuration Utility
ERROR messages when the segment that has caused the problem cannot be isolated. OFFENDING SEGMENT: This message is used in conjunction with the I/O CHANNEL CHECK and RAM PARITY ERROR messages when the segment that has caused the problem has been isolated. 108 ECM-5716 Series User’ s Manual... -
Page 122: Press A Key To Reboot
Configuration Utility. SYSTEM HALTED, (CTRL-ALT-DEL) TO REBOOT ... Indicates the present boot attempt has been aborted and the system must be rebooted. Press and hold down the CTRL and ALT keys and press DEL. ECM-5716 Series User’ s Manual 109... -
Page 123: Wrong Board In Slot Please Run Eisa Configuration Utility
This is also used for M/B burn in test. BIOS ROM checksum error - System halted. The checksum of ROM address F0000H-FFFFFH is bad. Memory test fail. BIOS reports the memory test fail if the onboard memory is tested error. 110 ECM-5716 Series User’ s Manual... -
Page 124: Post Codes
Use walking 1’ s algorithm to check out interface in CMOS circuitry. Also set real-time clock power status, and then check for override. Reserved Program chipset default values into chipset. Chipset default values are MODBINable by OEM customers. Reserved ECM-5716 Series User’ s Manual 111... - Page 125 1. Program CPU internal MTRR (P6 & PII) for 0-640K memory address. 2. Initialize the APIC for Pentium class CPU. 3. Program early chipset according to CMOS setup. Example: onboard IDE controller. 4. Measure CPU speed. 5. Invoke video BIOS. Reserved Reserved Reserved 112 ECM-5716 Series User’ s Manual...
- Page 126 3. Initialize the APIC for P6 class CPU. 4. On MP platform, adjust the cacheable range to smaller one in case the cacheable ranges between each CPU are not identical. Reserved Initialize USB ECM-5716 Series User’ s Manual 113...
- Page 127 2. Auto assign ports to onboard COM ports if the corresponding item in Setup is set to “AUTO”. Reserved 1. Initialize floppy controller 2. Set up floppy related fields in 40:hardware. Reserved Reserved Reserved 114 ECM-5716 Series User’ s Manual...
- Page 128 5. Invoke ISA adapter ROMs 6. Assign IRQs to PCI devices 7. Initialize APM 8. Clear noise of IRQs. Reserved Reserved Reserved Reserved Reserved Reserved Reserved Read HDD boot sector information for Trend Anti-Virus code ECM-5716 Series User’ s Manual 115...
- Page 129 1. Build MP table 2. Build & update ESCD 3. Set CMOS century to 20h or 19h 4. Load CMOS time into DOS timer tick 5. Build MSIRQ routing table. Boot attempt (INT 19h) 116 ECM-5716 Series User’ s Manual...
- Page 130 5 x 2 header, pitch 2.0mm 2.0mm USB connector 1-3, 2-4 Speaker out Line out / Speaker out select 3-5, 4-6 Line out (Default) 8 x 2 header, pitch 2.54mm TV / Audio connector ECM-5716 Series User’ s Manual 117...
- Page 131 2.0mm USB Connector (JP5) USBGND VCC1 Signal VCC2 USBGND Signal TV / Audio Connector (JP7) TVGND TVGND Line-In L SPK L Line-Out L Signal COMP Cout Yout Line-In R SPK R Line-Out Mic Bais Signal 118 ECM-5716 Series User’ s Manual...
Need help?
Do you have a question about the ECM-5716 Series and is the answer not in the manual?
Questions and answers