Table of Contents
Advertisement
Quick Links
Advertisement
Table of Contents

Related Manuals for CTC Union atu-r130


Summary of Contents for CTC Union atu-r130
-
Page 1: User Manual
USER MANUAL ATU-R130 ADSL Ethernet Bridge/Router... - Page 3 ATU-R130 User’ s Guide Copyright This manual may not be copied, photocopied, transmitted, or translated into language or computer language, in any form, or by any means, in whole or in part, without the prior written consent by the manufacturer.
- Page 4 ATU-R130 ADSL Ethernet Router User’ s Guide Federal Communications Commission (FCC) NOTICE This equipment has been tested and found to comply with the limits for a Class B digital device, pursuant to Part 15 of FCC Rules. These limits are designed to provide reasonable protection against harmful interference in a residential installation.
-
Page 5: Important Safety Instructions
ATU-R130 User’ s Guide IMPORTANT SAFETY INSTRUCTIONS When using your telephone equipment, basic safety precautions should always be followed to reduce the risk of fire, electric shock and injury to persons, including the following; 1. Do not use this product near water, for example near a bath tub, wash bowl, kitchen sink or laundry tub, in a wet basement or near a swimming pool. -
Page 6: Table Of Contents
ATU-R130 ADSL Ethernet Router User’ s Guide Table of Contents INTRODUCTION .....................1 Features................................1 System Requirements ........................... 1 GETTING TO KNOW THE ATU-R130 ..............2 Parts Check..............................2 Front Panel..............................3 Rear Panel..............................4 HARDWARE CONNECTION AND PC CONFIGURATION.........5 Connecting Your ATU-R130........................5 Configuring Your Computers........................ - Page 7 ATU-R130 ADSL Ethernet Router User’ s Guide CONFIGURING DYNAMIC HOST CONFIGURATION PROTOCOL ......23 Configuring DHCP Server ......................... 23 Configuring DHCP Relay........................... 27 Setting the DHCP Mode ..........................28 CONFIGURING NETWORK ADDRESS TRANSLATION......... 29 Your Default NAT Setup..........................29 Viewing NAT Global Settings and Statistics.................... 29 Viewing NAT Rules and Rule Statistics ....................
- Page 8 ATU-R130 ADSL Ethernet Router User’ s Guide CONFIGURING EOA INTERFACES..............53 Viewing Your EOA Setup .......................... 53 Adding EOA Interfaces..........................54 CONFIGURING IPOA INTERFACES............... 56 Viewing Your IPoA Interface Setup......................56 Adding IPoA Interfaces ..........................57 CONFIGURING BRIDGING................59 Using the Bridging Feature ........................59 Defining Bridge Interfaces..........................
-
Page 9: Introduction
(local area network) will now be able to access the Internet using your high-speed ADSL connection. This User Guide will show you how to install and set up the ATU-R130 ADSL Bridge/Router, and how to customize its configuration to get the most out of your new product. -
Page 10: Getting To Know The Atu-R130
ATU-R130 ADSL Ethernet Router User’ s Guide Getting to Know the ATU-R130 Parts Check In addition to this document, y{ XE "Parts:checking for" }our ATU-R130 should arrive with the following: ? One ATU-R130 ADSL Ethernet Bridge/Router ? One Power adapter and power cord ? One USB cable ? One Ethernet cable (“... -
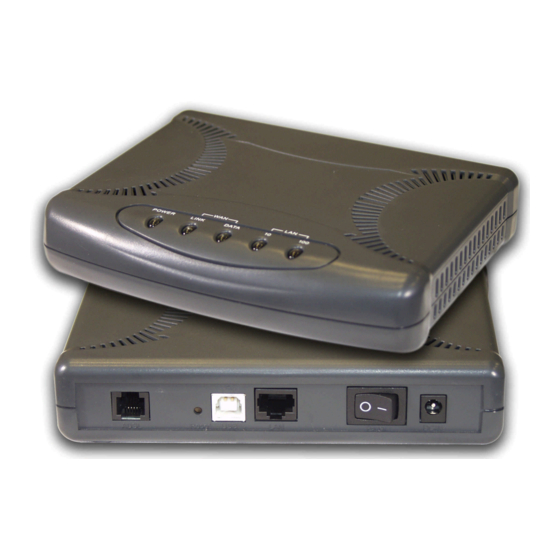
Page 11: Front Panel
ATU-R130 ADSL Ethernet Router User’ s Guide Front Panel { XE "Front panel" }The front panel contains lights called LEDs that indicate the status of the unit.{ XE "LEDs" } Figure 1. Front Panel and LEDs Status Description Glowing Power on... -
Page 12: Rear Panel
ATU-R130 ADSL Ethernet Router User’ s Guide Rear Panel { XE "Connectors:rear panel" }{ XE "Rear Panel" }The rear panel contains the ports for the unit's data and power connections. Figure 2. Rear Panel Connections ADSL Connects the device to the wall jack for Internet connection RESET Resets the device to default configuration values. -
Page 13: Hardware Connection And Pc Configuration
ATU-R130 ADSL Ethernet Router User’ s Guide Hardware Connection and PC configuration Connecting Your ATU-R130 In this part, you connect the device to the phone jack, the power outlet, and your computer or network. Figure 4 illustrates the hardware connections. Refer to the steps that follow for specific instructions. -
Page 14: Configuring Your Computers
Ethernet cable to a regular hub port and the other to the Ethernet port on the ATU-R130. If you are using the ATU-R130 with a single computer and no hub, you must use a “ crossover” Ethernet cable{ XE "Ethernet cable" } (not provided) to attach the PC directly to the device. - Page 15 ATU-R130 ADSL Ethernet Router User’ s Guide ? If you have connected your PC of LAN via Ethernet to the ATU-R130, follow the instructions that correspond to the operating system installed on your PC. Windows? 95, 98 PCs: XE "IP configuration:Windows 95/98"...
- Page 16 Next, configure the PCs to accept IP information assigned by the ATU-R130: Open the Control Panel window, and then double-click the Network icon. In the Network dialog box, click the Protocols tab.
- Page 17 ATU-R130 ADSL Ethernet Router User’ s Guide Next, configure the PCs to accept IP information assigned by the ATU-R130: In the Control Panel, double-click the Network and Dial-up Connections icon. In Network and Dial-up Connections window, right-click the Local Area Connection icon, and then select Properties.
- Page 18 Chapter 5 to change the LAN port IP address accordingly. Configuring a computer connected to the USB port { XE "USB:Configuring PC" }If the ATU-R130 includes a USB port for connecting to a PC, you must install the provided USB driver software on the PC. The driver enables Ethernet- over-USB communication with the ATU-R130.
- Page 19 Part 1. Installing the USB Driver:{ XE "USB:installing driver" } Ensure that the USB cable is not connected to the USB port on the PC or to the USB port on the ATU-R130. The installation program will prompt you when to connect the cable.
- Page 20 USB cable, as shown in Figure . Figure 7. USB Driver Installation: DSL Installer Attach the USB cable to the ATU-R130 and to your PC. The USB cable provided has a flat connector on one end (called Type A) and a square connector on the other (Type B).
- Page 21 ATU-R130’ s USB port. There are two ways to do this: ? The ATU-R130 is configured to assign an appropriate IP address to the USB PC. If you want to use this automatic assignment feature, called “ DHCP server,” you must configure the USB PC to accept dynamically assigned IP information.
- Page 22 Ethernet NIC). When you display the properties for the icon, the following text should display in the Connect Using text box: GlobeSpan USB IAD LAN Modem #n The USB port on the ATU-R130 is preconfigured with these properties (you cannot change these values): USB port IP address: 198.168.1.2...
-
Page 23: Getting Started With The Configuration Manager
"Configuration Manager:overview" } provides an interface to the software installed on the device. It enables you to configure the device settings to meet the needs of your network. You access it through your web browser from any PC connected to the ATU-R130 via the LAN port. -
Page 24: Functional Layout
ATU-R130 ADSL Ethernet Router User’ s Guide Enter your user name and password, and then click The first time you log into the program, use these defaults: Default User Name: root Default Password:{ XE root "Password:default" }{ XE "Username:default" You can change the password at any time (see Changing Your Login Password on page 17). -
Page 25: Changing Your Login Password
ATU-R130 ADSL Ethernet Router User’ s Guide Changing Your Login Password { XE "Password:changing" }The first time you log into the Configuration Manager, you use the default user ID and password (root and root). The system allows only one user ID and password. - Page 26 ISP or the manufacturer. Choosing this option erases any custom settings. Do not reboot the device using the Reset button{ XE "Reset button" } on the back panel of the ATU-R130 to activate new changes. This button resets the device settings to the WARNING...
-
Page 27: Setting The Lan Ip Address
LAN. { XE "Node on network:defined" }A network node can be thought of as any interface where a device connects to the network, such as the ATU-R130’ s LAN port and the network interface cards on Definition your PCs. - Page 28 LAN IP information assigned dynamically from another DHCP server already configured on your network. The ATU-R130 cannot act as a DHCP server for its own LAN port. { XE "LAN Configuration page" }{ XE "Pages:LAN Configuration"...
-
Page 29: Configuring The Usb Port Ip Address
ATU-R130 ADSL Ethernet Router User’ s Guide The IP address you assign must be on the same subnet as your LAN computers that connect to this port (that is, the network ID portion of their IP addresses and their subnet masks must be the same). - Page 30 ATU-R130 ADSL Ethernet Router User’ s Guide In the USB Configuration table, enter the IP Address and Network Mask for the USB port. The IP address must place the USB port in the same subnet as the USB computer; If...
-
Page 31: Configuring Dynamic Host Configuration Protocol
ATU-R130 ADSL Ethernet Router User’ s Guide Configuring Dynamic Host Configuration Protocol You can configure your network and ATU-R130 to use the Dynamic Host Configuration Protocol (DHCP). This chapter provides DHCP instructions for implementing it on your network. { XE "DHCP:device modes" }The device can be configured as a DHCP server, DHCP relay agent, or, in some cases, a DHCP client. - Page 32 ATU-R130 ADSL Ethernet Router User’ s Guide computer, which must be in a different subnet than the LAN computers.{ XE "DHCP Configuration page" }{ XE "Pages:DHCP Configuration" } To add an IP address pool, click The DHCP Server Pool – Add page displays, as shown in Figure 16.
- Page 33 ATU-R130 ADSL Ethernet Router User’ s Guide Field Description Specifies which portion of each IP address Net Mask in this range refers to the network and which portion refers to the host (computer). You can use the network mask to distinguish which pool of...
- Page 34 17. Viewing current DHCP address assignments { XE "DHCP server:viewing assigned addresses" }When the ATU-R130 functions as a DHCP server for your LAN, it keeps a record of any addresses it has leased to your computers.
-
Page 35: Configuring Dhcp Relay
In this case, you can configure the device as a DHCP relay agent. When a computer on your network requests Internet access, the ATU-R130 contacts your ISP to obtain an IP address (and other information), and then forwards that information to the computer. -
Page 36: Setting The Dhcp Mode
The eth-0 interface specifies that your default Ethernet (LAN) interface{ XE "LAN interface" } is running DHCP relay for your LAN. Typically, this is the only interface you need to specify here. If the ATU-R130 has additional interfaces that you want to perform DHCP relay, you can select and add them. -
Page 37: Configuring Network Address Translation
ATU-R130 ADSL Ethernet Router User’ s Guide Configuring Network Address Translation This chapter provides Network Address Translation (NAT) instructions for modifying the default configuration on your device. Your Default NAT Setup By default, NAT is enabled, with a napt rule configured to perform the following translation:{ XE "NAT:default configuration"... - Page 38 ATU-R130 ADSL Ethernet Router User’ s Guide The NAT Configuration page contains the following elements: ? The NAT Options drop-down list, which provides access to the Global Information page (shown by default), the NAT Rule Configuration page, and the NAT Translations page, which shows current translations.
-
Page 39: Viewing Nat Rules And Rule Statistics
ATU-R130 ADSL Ethernet Router User’ s Guide Figure 20. NAT Rule Global Statistics Page{ XE "NAT Rule Global Statistics page" }{ XE "Pages:NAT Rule Global Statistics" } The table provides basic information for each NAT rule you have set up. You can click to restart the accumulation of the statistics at their initial values. -
Page 40: Viewing Current Nat Translations
ATU-R130 ADSL Ethernet Router User’ s Guide Figure 22. NAT Rule Statistics Page { XE "NAT Rule Statistics page" }{ XE "Pages:NAT Rule Statistics" } The statistics show how many times this rule has been invoked and how many currently active sessions are using this rule. -
Page 41: Adding Nat Rules
ATU-R130 ADSL Ethernet Router User’ s Guide You can click in the Action(s) column to view additional details about a NAT translation session, as shown in Figure . Figure 24. NAT Translation – Details Page{ XE "NAT Translation – Details page" }{ XE "Pages:NAT Translations - Details"... - Page 42 ATU-R130 ADSL Ethernet Router User’ s Guide default configuration. The napt flavor translates private source IP addresses to a single public IP address. The napt rule also translates the source port numbers to port numbers that are defined on the NAT Global Configuration page (see page 29).
- Page 43 IP address for that computer. The computer’ s private IP address is translated to your public IP address in all incoming and outgoing data packets. Without an rdr rule (or bimap rule described on page 39), the ATU-R130 blocks attempts by external computers to access your Note LAN computers.
- Page 44 ATU-R130 ADSL Ethernet Router User’ s Guide Display the NAT Rule – Add Page, select RDR as the Rule Flavor, and enter a Rule Select the interface on which this rule will be effective. Select a protocol to which this rule applies, or choose ALL.
- Page 45 ATU-R130 ADSL Ethernet Router User’ s Guide through untranslated. Therefore, the basic rule does not provide the same level of security as the napt rule. Figure shows the fields used for adding a basic rule. Figure 27. NAT Rule – Add Page (basic Flavor) { XE "NAT Rule— Add page - basic"...
- Page 46 ATU-R130 ADSL Ethernet Router User’ s Guide Figure 28. NAT Rule? Add Page (filter Flavor) { XE "NAT Rule— Add page - filter" }{ XE "Pages:NAT Rule Add - filter" } Follow these instructions to add a filter rule (see steps 1-4 under "The napt rule" on page 33 for specific instructions corresponding to steps 1 and 2 below): Display the NAT Rule –...
- Page 47 ATU-R130 ADSL Ethernet Router User’ s Guide 25— SMTP (simple mail transfer protocol) server 80— HTTP (World Wide Web) server ? Specify both a destination address (or range) and a destination port (or range) if you want this translation rule to apply to accesses to the specified server type at the specified IP address or network.
- Page 48 ATU-R130 ADSL Ethernet Router User’ s Guide Figure 30. NAT Rule – Add Page (pass Flavor) { XE "NAT Rule— Add page - pass" }{ XE "Pages:NAT Rule Add - pass" } The pass rule must be assigned a rule ID that is a lower number than the ID assigned to the rule it is intended to pass.
-
Page 49: Configuring Ip Routes
Most users do not need to define IP routes. On a typical small home or office LAN, the existing routes that set up the default gateways for your LAN computers and for the ATU-R130 provide the most appropriate path for all your Internet traffic. -
Page 50: Adding Ip Routes
ATU-R130 ADSL Ethernet Router User’ s Guide Field Description Destination Specifies the IP address of the destination computer. The destination can specified as the IP address of a specific computer or an entire network. It can also be specified as all zeros to indicate that this route should be used for all destinations for which no other route is defined (this is the route that creates the default gateway). - Page 51 ATU-R130 ADSL Ethernet Router User’ s Guide Click On the confirmation page, click to return to the IP Route table page. The IP Routing Table will now display the new route. Commit & Reboot Click the Admin tab, and then click in the task bar.
-
Page 52: Configuring The Atm Vcc
ATU-R130 ADSL Ethernet Router User’ s Guide Configuring the ATM VCC As your LAN computers access the Internet via the ATU-R130, data is exchanged with your ISP through a complex network of telephone switches, Internet routers, servers, and other specialized hardware. -
Page 53: Adding Atm Vccs
ATU-R130 ADSL Ethernet Router User’ s Guide Adding ATM VCCs You may need to create a VCC if none has been predefined on your system or if you use multiple services with your ISP. Each service may require its own VCC. Follow these instructions to add a VCC: 1. -
Page 54: Modifying Atm Vccs
ATU-R130 ADSL Ethernet Router User’ s Guide Modifying ATM VCCs Your device may already be preconfigured with the necessary ATM VCC properties, or the table may contain placeholder values that you must change before using the device. Contact your ISP to determine your ATM VCC values. -
Page 55: Configuring Ppp Interfaces
PPP is configured as a group of software settings associated with the ADSL port. Although the device has only one physical ADSL port, the ATU-R130 can be defined with more than one group of PPP settings. Each group of settings is called a PPP interface and is given a name, such as ppp-0, ppp-1, etc. - Page 56 ATU-R130 ADSL Ethernet Router User’ s Guide The PPP{ XE "PPP:settings" } Configuration Table displays the following fields: Field Description Interface The predefined name of the PPP interface. The Virtual Channel Connection over which this PPP data is sent. The VCC identifies the physical path the data takes to reach your ISP.
-
Page 57: Viewing Ppp Interface Details
ATU-R130 ADSL Ethernet Router User’ s Guide Viewing PPP Interface Details When you click to view additional details, the PPP Interface - Detail page displays, as shown in Figure 38 Figure 37. PPP – Detail Page{ XE "PPP – Detail page" }{ XE "Pages:PPP - Detail" }... - Page 58 ATU-R130 ADSL Ethernet Router User’ s Guide Field Description{ XE "PPP:settings" } Last Fail Cause Indicates the action that ended the previous PPP session: No Valid PADO Recvd: The unit initiated a PPoE handshake but did not receive a packet in reply from the ISP.
-
Page 59: Adding A Ppp Interface Definition
ATU-R130 ADSL Ethernet Router User’ s Guide Adding a PPP Interface Definition If you intend to use more than one type of service from your ISP, the device may be configured with multiple PPP interfaces, each with unique logon and other properties. Follow this procedure... -
Page 60: Modifying And Deleting Ppp Interfaces
ATU-R130 ADSL Ethernet Router User’ s Guide Modifying and Deleting PPP Interfaces To modify a PPP interface, display the PPP Configuration page and click in the Action(s) column for the interface you want to modify. The PPP Interface – Modify page displays, as shown in Figure 40. -
Page 61: Configuring Eoa Interfaces
ATU-R130 ADSL Ethernet Router User’ s Guide Configuring EOA Interfaces This chapter describes how to configure an Ethernet-over-ATM interface on the ATU-R130, if one is needed to communicate with your ISP. Viewing Your EOA Setup { XE "EOA:settings" }To view your current EOA configuration, log into Configuration Manager,... -
Page 62: Adding Eoa Interfaces
ISP and you will not be using the Net Mask ATU-R130 as a router on your LAN, then you do not need to specify IP information. If you enable DHCP for this interface, then the Configured IP address will serve only as a request to the DHCP server. - Page 63 If you are using the ATU-R130 as a bridge only, skip to step 7. If you are using the ATU-R130 as a router on your LAN, enter the IP address and network mask you want to assign to the interface. This address serves as the public IP address for your entire LAN and is usually assigned by your ISP.
-
Page 64: Configuring Ipoa Interfaces
ATU-R130 ADSL Ethernet Router User’ s Guide Configuring IPoA Interfaces { XE "IPOA:defined" }This chapter describes how to configure an IPoA (Internet Protocol-over- ATM) interface on the ATU-R130. Viewing Your IPoA Interface Setup To configure an IPoA interface, log into Configuration Manager, click the WAN tab, and then click IPoA in the task bar. -
Page 65: Adding Ipoa Interfaces
ATU-R130 ADSL Ethernet Router User’ s Guide Field Description IPF Type The type of IP Firewall protections that are in effect on the interface (public, private, or DMZ): A public interface connects to the Internet (IPoA interfaces are typically public). Packets... - Page 66 ATU-R130 ADSL Ethernet Router User’ s Guide 4. Select the level of firewall security to apply to the interface by selecting the IPF Type as Public, Private, or DMZ. 5. In the Lower Interface dialog box, select the lower-level interface name over which this protocol is being configured and click .
-
Page 67: Configuring Bridging
ATU-R130 ADSL Ethernet Router User’ s Guide Configuring Bridging The ATU-R130 can be configured to act as a bridging device between your LAN and your ISP. Bridges are devices that enable two or more networks to communicate as if they are two segments of the same physical LAN. -
Page 68: Deleting A Bridge Interface
ATU-R130 ADSL Ethernet Router User’ s Guide You have to create an entry for usb-0 inferface via RS-232 cable. Please refer the procedure on page 10 and type “ create bridge port intf ifname usb-0” on step 7. If you do not have an eoa-0 interface, but instead have an... -
Page 69: Troubleshooting
Troubleshooting { XE "Troubleshooting" }This appendix suggests solutions for problems you may encounter in installing or using the ATU-R130, and provides instructions for using several IP utilities to diagnose problems. Contact Customer Support if these suggestions do not resolve the problem. - Page 70 Configuration Manager section, to check whether your PC can communicate program from your with the ATU-R130’ s LAN IP address (by default browser. 192.168.1.1). If it cannot, check the Ethernet cabling. Verify that you are using Internet Explorer v5.0 or later, or Netscape Navigator v4.7 or later.
-
Page 71: Diagnosing Problem Using Ip Utilities
If the target computer cannot be located, you will receive the message “Request timed out.” Using the ping command, you can test whether the path to the ATU-R130 is working (using the preconfigured default LAN IP address 192.168.1.1) or another address you assigned. - Page 72 Index ATU-R130 ADSL Ethernet Router User’ s Guide Figure 1. Using the nslookup Utility There may be several addresses associated with an Internet name. This is common for web sites that receive heavy traffic; they use multiple, redundant servers to carry the same information .
- Page 74 Transmission Series CTC Union Technologies Co., Ltd. Far Eastern Vienna Technology Center (Neihu Technology Park) 8F, No.60, Zhouzi Street Neihu, Taipei, Taiwan Phone:(886) 2.2659.1021 Fax:(886) 2.2799.1355 E-mail: info@ctcu.com http://www.ctcu.com...
Need help?
Do you have a question about the atu-r130 and is the answer not in the manual?
Questions and answers