
Related Manuals for Matrox Extio F2208


Summary of Contents for Matrox Extio F2208
- Page 1 ENGLISH ® ™ Matrox Extio Series Extio F2208 • Extio F2408 • Extio F2408E Expander User Guide 20117-301-0220 2012.04.24...
-
Page 2: Table Of Contents
Step-by-step installation ..........................9 Connecting your Extio unit ...................11 Before you begin ............................11 Connection overview ..........................11 Front – Extio F2208 and F2408 .................... 11 Back – Extio F2208 ........................ 12 Back – Extio F2408 ........................ 12 Step-by-step connection setup ......................12 Validating your connection setup ......................16 Connecting your Expander unit ................18... - Page 3 Troubleshooting checklist ........................31 Common problems and solutions ......................32 Sound ..............................43 Product information ....................49 Specifications ............................49 Extio unit ..........................49 Interface card .......................... 50 Environmental ........................50 Power consumption and supply voltage ................51 Matrox Extio Series – User Guide...
- Page 4 Customer support ....................56 Matrox Web ............................56 Technical support ...........................56 Information we need ......................56 Program specific problems ....................56 Driver and software download ......................57 View your warranty information ......................57 Register your Matrox product .......................57 Index ........................58 Matrox Extio Series – User Guide...
-
Page 5: About This User Guide
About this user guide Your Matrox user guide provides information on installing and using your Matrox hardware. For information on Matrox PowerDesk software features and options, see the help file included with your PowerDesk software. Note: This guide has references specific to version 2.09.04 or later of the Matrox display driver. -
Page 6: Overview
Matrox PowerDesk – to use your Matrox graphics hardware. Matrox provides 32-bit and 64-bit versions of the display driver. * The hardware supplied with your Matrox product may vary depending on the SKU or part number of your product. For more information, contact your Matrox representative. -
Page 7: Installation Overview
Install your interface card – see page Connect your Extio unit, monitors, and other peripherals – see page Extio F2408 – Connect your Expander unit and additional monitors (optional) – page Install the software – see page Matrox Extio Series – User Guide... -
Page 8: Installing Your Interface Card
This section describes how to install your Matrox interface card. For information specific to your computer, like how to remove its cover, see your system manual. Before you begin To avoid personal injury and to prevent damage to your computer or Matrox hardware, read the following guidelines before installing your Matrox graphics hardware. Note:... -
Page 9: Step-By-Step Installation
To ensure maximum system (×8) compatibility, we recommend you use a (×4) (×1) PCIe ×16 slot. Your system manual should (32-bit) identify the location of each type of (64-bit) expansion slot in your computer. Matrox Extio Series – User Guide... - Page 10 Secure the bracket of your Matrox card to the computer frame. Your Matrox card is now installed. Before restarting your computer, connect your your interface card and your monitors to your Extio unit (see “Connecting your Extio unit”, page 11).
-
Page 11: Connecting Your Extio Unit
Matrox online store (shopmatrox.com). Before you begin To avoid possible problems that could damage your monitors or prevent you from using your Matrox product, read the following guidelines before connecting your Matrox graphics hardware. Whenever you change your connection setup, make sure you’re using the correct connectors and that all connectors are properly fastened. -
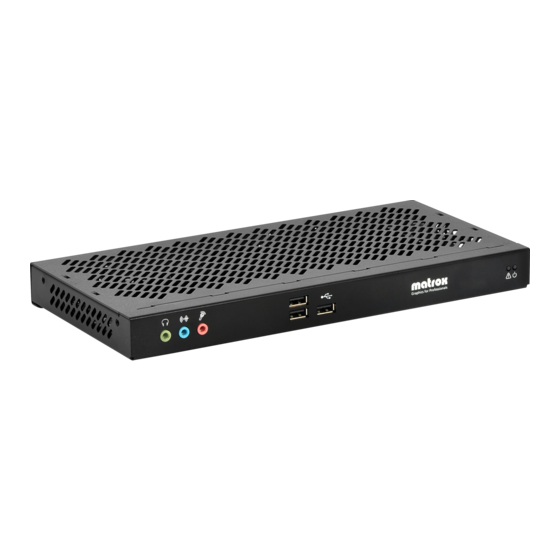
Page 12: Back - Extio F2208
To use a keyboard with your unit before your operating system starts, the USB cable must be connected from your interface card to your computer. Also, to use the audio hardware of your unit after your operating system has started, this cable must be connected. 12 Matrox Extio Series – User Guide... - Page 13 Note: Color coding and labeling on the fiber optic cable and on the transceivers are for clarity. program, and your unit to stop Labeling on your cable and transceivers may responding. differ. Matrox Extio Series – User Guide 13...
-
Page 14: Connect Your Monitors
(DVI-D) WARNING: To avoid damaging the DisplayPort connector on your DisplayPort monitor cable or on your Matrox product, carefully remove the DisplayPort cable by pressing the latch on the top of the DisplayPort connector while removing the connector. Connect your power supply... - Page 15 Note: Audio output is enabled on the ) connector even while a device is Line out connected to the ) connector. Headphones Matrox Extio Series – User Guide 15...
-
Page 16: Validating Your Connection Setup
If your keyboard is properly connected, it may not be supported by your Extio unit. Only basic USB keyboards are supported by your Extio unit before Windows starts (for example, USB keyboards that have no USB hubs or media controls). 16 Matrox Extio Series – User Guide... - Page 17 If any of your HID devices aren’t working properly, Windows may not have detected your HID device. For more information, see “USB keyboard or mouse doesn’t work”, page Your Matrox product is now installed. If you want to connect an Expander unit, see “Connecting your Expander unit”, page 18.
-
Page 18: Connecting Your Expander Unit
Connecting an Expander unit to your Extio unit enables you to support four additional monitors. Note: When changing your hardware configuration by adding or removing an Expander unit, you need to uninstall and reinstall your Matrox software. Connection overview Back – Extio F2408E Expander... -
Page 19: Connect Your Monitors
Plug the power supply cord into an electrical outlet. Your Matrox Expander unit is now connected. Restart your computer and install your Matrox software (see “Installing your Matrox software”, page 20). Matrox Extio Series – User Guide 19... -
Page 20: Installing Your Matrox Software
Installing your Matrox software This section describes how to install Matrox software for Windows® 7, Windows® Server® 2008 R2, Windows® Server® 2008, Windows® Vista®, Windows® XP, and Windows® Server® 2003. The installation of the display driver is the same for the 32-bit and 64-bit versions. -
Page 21: Installing Your Display Driver
After your display driver is installed, the status LED ( ) on your unit should turn from orange to green. If audio doesn’t work on your Extio unit, see “Sound”, page 43 for more information. Matrox Extio Series – User Guide 21... -
Page 22: Matrox Powerdesk Software
Right-click your Windows desktop and select Launch Matrox PowerDesk Accessing Matrox PowerDesk help For information on Matrox PowerDesk software features and options, see the help file included with your PowerDesk software. While using Matrox PowerDesk software, you can access the help file in several ways:... -
Page 23: Description Of Leds
Description of LEDs The LEDs on your Matrox interface card, Extio unit, and Expander unit (if present) provide status information on your connection setup. The following describes the different LEDs: Red LED Orange LED Green LED No LED (black) Optical cable... -
Page 24: Configuring Your Extio Unit
If more than one Extio unit is connected to your system, select the unit you want to configure (you can only configure one unit at a time). Units are listed by serial number. While a unit is selected, its status and power LEDs are blinking orange. 24 Matrox Extio Series – User Guide... -
Page 25: Extio Setup Utility Options
| Interface card |==| Extio unit |==| Expander unit |. Versions for current unit Shows the version of the software package (containing the virtual bus, firmware, and configuration software) of the current unit and the interface card in the same connection link. Matrox Extio Series – User Guide 25... -
Page 26: Info
Temperatures Shows the temperatures for the selected Extio unit. The current temperatures and the minimum and maximum temperatures recorded while the utility was opened are listed for each component of your device. 26 Matrox Extio Series – User Guide... -
Page 27: Links
Port 2 - Extio unit Port 3 - Expander unit Optical connectors are identified by the device they’re installed in (Card or Unit), by the ID number of that device, and by the connector number. Matrox Extio Series – User Guide 27... -
Page 28: Components
USB device connected to your unit. Diagnostics This screen lists information on the PCI devices and lanes used by your system and Extio product. Select tool Select the device for which you want information. 28 Matrox Extio Series – User Guide... -
Page 29: Options
Cancel and discard all changes made to your Extio unit and its associated interface card, and exit the setup utility. Note: If you lose your password, contact your vendor for information on resetting your password. Matrox Extio Series – User Guide 29... -
Page 30: Error Codes
Chksum Bad EEPROM Your Exto products have incompatible versions of their firmware. Version If any of these errors occur, contact your vendor to know which firmware version to use with your Extio products. 30 Matrox Extio Series – User Guide... -
Page 31: Troubleshooting
If your problem persists, contact Matrox. For more information, see “Customer support”, page Troubleshooting checklist Here are some steps to take to troubleshoot the more common issues encountered with your Matrox product. Before installing and connecting your Extio product Make sure your system meets the requirements to support your Extio product. For more information, see “Specifications”, page... -
Page 32: Common Problems And Solutions
BIOS settings to make sure your Extio unit is set as the primary graphics hardware. Configuring your Extio product Make sure the latest Matrox display driver package is installed. Matrox makes display drivers available on the Matrox Technical Support Web site (www.matrox.com/graphics/support/drivers.) Note: You may need administrator rights to install certain software. - Page 33 Device Manager dialog box. Shut down and unplug your computer. Disconnect all other peripherals from your computer for at least 1 minute, then restart your computer. Matrox Extio Series – User Guide 33...
- Page 34 (blank screen, rolling or overlapping screen images) Cause Analog monitors only – The Matrox display driver may be trying to use settings your monitor doesn’t support. This can happen if the display resolution was changed to one your monitor doesn’t support or if the monitor connected to your computer was changed without changing the display or monitor settings in the software.
- Page 35 The installation of a card may have caused your computer to reallocate system resources. Solution Try reinstalling your network drivers. Solution Try moving your Matrox card to another PCIe slot in your computer. For instructions on how to safely install your Matrox card, see “Installing your interface card”, page Cause You may be using Windows XP Service Pack 2.
- Page 36 Device Manager dialog box. Solution Make sure your device is enabled in Windows Device Manager. Windows 7/Vista – Click Start Settings Control Panel Hardware and Sound Device Manager Continue 36 Matrox Extio Series – User Guide...
- Page 37 Make sure any graphics hardware is disabled in your system BIOS. For more information on how to access your system BIOS, see your system manual. Cause The installation of a program using a mirror driver may have modified your Matrox software files. Solution Reinstall the programs in the proper sequence.
- Page 38 Using multiple displays under Windows 7/Vista/XP, program doesn’t work with your Matrox product Cause Your Matrox card may not be controlling your primary display. The graphics hardware that controls your primary display is the one that first displays information when you restart your computer.
- Page 39 (Software doesn’t work with a certain graphics hardware, or another graphics hardware doesn’t work at all) Cause If you have different models of graphics hardware in your computer, your Matrox display driver may not support all the graphics hardware in your computer. Solution Under Windows 7/XP, you can use different XDDM display drivers for different products.
- Page 40 Disable one or more features. Click Solution If possible, update your Matrox display driver. Matrox makes new display drivers available on the Matrox Technical Support Web site (www.matrox.com/graphics/en/support/drivers). Note: If you identify a program that doesn’t work well with Matrox acceleration, please...
- Page 41 You may be using a display driver designed for Windows XP (XDDM). Solution Windows Aero® is supported only with a display driver designed for Windows 7/Vista (WDDM). For more information, see “Selecting the proper display driver”, page Matrox Extio Series – User Guide 41...
- Page 42 (* Depending on your version and configuration of Windows, this part of the step may not be necessary.) Click the tab. Pointers In the box, select (or reselect) “ ”, then click Scheme (None) 42 Matrox Extio Series – User Guide...
-
Page 43: Sound
When prompted to restart, select Continue working Note: If you restart your computer at this step, you need to reinstall your Matrox software and restart the procedure from Step 1. From the control panel, click System and Security System Device Manager (double-click*). - Page 44 When prompted to restart, select Continue working Note: If you restart your computer at this step, you need to reinstall your Matrox software and restart the procedure from Step 1. From the control panel, click System and Maintenance System Device Manager (double-click*).
- Page 45 When prompted to restart your system, click Note: Don’t restart your computer now. If you restart your computer at this step, you need to reinstall your Matrox software and restart the procedure from Step 1. From the control panel, click Performance and Maintenance...
- Page 46 To see all your devices, right-click anywhere on the property sheet and make sure are enabled. Show disabled devices Show Disconnected Devices For each device you want to use, double-click the device icon and select . Make sure the Levels 46 Matrox Extio Series – User Guide...
- Page 47 For the , and/or controls, make sure the sliders are at Master Line Wave Volume one-quarter to one-half levels (if you’re not sure, try half level), and the check boxes Mute are cleared. Matrox Extio Series – User Guide 47...
- Page 48 Sound, video and game controllers select . For more information on the audio hardware in your system, see your Disable system manual. Click . For changes to take effect, your computer must be restarted. 48 Matrox Extio Series – User Guide...
-
Page 49: Product Information
Class A: ACMA, CE, FCC, VCCI, Korean notice Safety Certifications (I.T.E.) * Provided with an OM2 multi-mode 50/125 µm optical cable – 5 meters / 16 feet. † DisplayPort to HD-15 adapter sold separately. Matrox Extio Series – User Guide 49... -
Page 50: Interface Card
192hPa (12,000 meters / 39,370 feet) non-operational and transportation to 1020hPa (-50 meters / -164 feet) Interface card: 70.81 years @ 40 ºC Extio F2208 unit: 26.87 years @ 40 ºC (excluding power supply) Estimated MTBF Extio F2408 unit: 23.20 years @ 40 ºC... -
Page 51: Power Consumption And Supply Voltage
IEC 60320-C14 Output voltage 12 V DC Output connector DIN 4 male (4-pin) with lock Maximum power output 60 W Pin usage for DIN 4 male connector Signal Signal Negative Positive Negative Positive Matrox Extio Series – User Guide 51... -
Page 52: Audio
Extio product. To get the most of your Matrox product, we recommend using the highest color palette setting (a 32-bit color palette) for all your displays. -
Page 53: Digital Flat Panel Information
Isochronous USB devices (for example, USB audio and video devices such as a microphone or Web cam) aren’t supported with an Extio unit. An Extio F2208 or F2408 unit can only be connected to an interface card. An F2408E Expander unit can only be connected to an Extio F2408 unit. -
Page 54: Appendix A - Providing Adequate Airflow
(for example, by operating your unit inside a desk cabinet). Monitor your ambient temperatures – Make sure the ambient temperature doesn’t exceed the maximum recommended temperatures. For more information on supported operating temperatures, see “Environmental”, page 54 Matrox Extio Series – User Guide... -
Page 55: Appendix B - Mounting Your Units
If installing your unit in a rack, fasten it to the rack as per your rack’s instructions. Mounting guidelines To prevent damage to your Matrox hardware, read the following guidelines before mounting your Matrox hardware: Make sure not to block the ventilation holes on your unit. -
Page 56: Customer Support
Matrox values your business and offers professional support for your Matrox product. If your product was purchased through a Matrox dealer, contact your dealer for product support. This is the quickest and most effective method of technical assistance. Your dealer is familiar with your complete system. -
Page 57: Driver And Software Download
Driver and software download A more recent display driver may support more features and may offer increased capabilities (such as higher display resolutions). Matrox makes the latest display drivers, software, and system utilities available on the Matrox Technical Support Web site (www.matrox.com/graphics/en/support/drivers). -
Page 58: Index
Multiple interface cards Troubleshooting Checklist Environtmental – Sound Specifications Notes Expansion slots Extio unit User Guide About Software configuration Power supply Specifications Specifications PowerDesk VESA Accessing Help Hardware Software Acceleration Video – Installation 58 Matrox Extio Series – User Guide... - Page 59 Warranty WDDM driver Warning XDDM driver Web, Matrox Matrox Extio Series – User Guide 59...
- Page 60 FCC Compliance Statement Remark for the Matrox hardware products supported by this guide This equipment has been tested and found to comply with the limits for a Class A digital device, pursuant to Part 15 of the FCC Rules. These limits are designed to provide reasonable protection against harmful interference when the equipment is operated in a commercial environment.
- Page 61 A. (Español) Información para usuarios europeos – Declaración de conformidad Observación referente a los productos de hardware de Matrox apoyados por este manual Estos dispositivos cumplen con la directiva de la CE 2004/108/EC para dispositivos digitales de Clase A. Dichos dispositivos han sido sometidos a prueba y se ha comprobado que cumplen con las normas EN55022/CISPR22 y EN55024/CISPR24.
- Page 62 Bitte wenden Sie sich an der Matrox-Website (www.matrox.com/environment/en/weee) für Recycling-Informationen. (Italiano) Informazioni per gli utenti europei – Direttiva sui rifiuti di apparecchiature elettriche ed elettroniche (RAEE) Si prega di riferirsi al sito Web Matrox (www.matrox.com/environment/en/weee) per le informazioni di riciclaggio. FRANCE Avertissement sur l’épilepsie À...
- Page 63 Copyright © 2012 Matrox Graphics Inc. • (English) All rights reserved. • (Français) Tous droits réservés. • (Deutsch) Alle Rechte vorbehalten. • (Italiano) Tutti i diritti riservati. • (Español) Reservados todos los derechos. Trademarks • Marques déposées • Warenzeichen • Marchi registrati •...
- Page 64 However, no responsibility is assumed by Matrox Graphics Inc. for its use, for its reproduction and/or distribution, in whole or in part;...
- Page 65 Matrox Graphics Inc. 1055 Saint Regis Boulevard Web site: www.matrox.com/graphics Dorval, Quebec, Canada H9P 2T4 Technical support: North America: 1-800-361-1408 www.matrox.com/graphics/support International: (514) 822-6000 To locate the sales office nearest you, visit Email: graphics@matrox.com www.matrox.com/graphics/contact...
Need help?
Do you have a question about the Extio F2208 and is the answer not in the manual?
Questions and answers