Table of Contents
Advertisement
Series
Owner's Manual
Read this manual for complete instructions
Français (page 25) / Español (página 49)
Contents
2 Important Safety Information
•
Form No. 0523893D
0911
100
Questions?
Call Titan Technical Service at:
1-866-848-2698
200
Register your product online at:
www.titantool.com
Proper registration will serve as proof
of purchase in the event your original
receipt becomes misplaced or lost.
Español
Français
English
Advertisement
Table of Contents

Related Manuals for Titan 100


Summary of Contents for Titan 100
-
Page 1: Table Of Contents
20 Long-Term Storage Questions? 9 Getting Material to Flow 21 Cleaning the Sureflo™ Valve 10 Practice Spraying 22 Troubleshooting Call Titan Technical Service at: Register your product online at: 12 Clear the Spray Tip 72 Parts List www.titantool.com 1-866-848-2698 13 Clean the Spray Gun Filter... - Page 2 This product is for use on a nominal 120 volt circuit and 9. Do not operate light switches, engines, or similar Important Safety has a grounding plug that looks like the plug illustrated spark producing products in the spray area. Safety Safety below.
- Page 3 TO PHYSICIan: Injection into the skin is a traumatic injury. It is Do not use more than 100 feet of spray hose. If you important to treat the injury as soon as possible. DO need to spray further than 100 feet from your power NOT delay treatment to research toxicity. Toxicity is a...
-
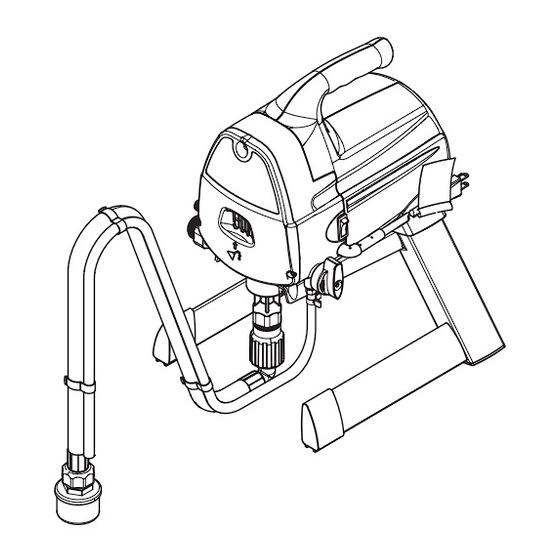
Page 4: What's In The Box
Notice: lX-50 Spray hose port ON/OFF switch (reverse side) This pump is available in a stand model Spray tip assembly (100) and cart model (200 shown right). Pump cleaning PRIME/SPRAY all information given for the stand model adapter knob applies to the cart model except where indicated. -
Page 5: Proper Use And Functions
1450. Certified to CAN/CSAC 22.2 NO 68-92 pumped. Specifications: Capacity: 100..... Up to .29 gallon (1.1 liter) / min 200..... Up to .33 gallon (1.25 liter) / min AutoOiler (200 only): Power source: The AutoOiler is designed to Suction tube (a): 100..... -
Page 6: Assembly
1. Assembly Start You will need: • Two adjustable wrenches ImPORTanT: Do not plug in the power cord until assembly is complete. note: It will be much easier to attach the 1. Remove the plug from inside 2. Thread one end of the high 3. -
Page 7: Pressure Relief Procedure
Important Safety Warning Pressure Relief Safety Be careful when handling the spray gun so you don’t accidently spray yourself. The high pressure paint stream could pierce your skin causing serious injury. If Procedure* an accident happens see detail procedures in the Safety Information section on pages 2-3. -
Page 8: Load Material
2. Load Cart MODEl ONlY StaND MODEl ONlY Material Start You will need: • The material you plan to spray • Flat blade screwdriver (cart models only) • Piston Lube™ • Extension cord • Waste bucket 1. Remove AutoOiler cap with a 2. -
Page 9: Getting Material To Flow
3. Getting Material to Flow Start You will need: SPRAY • Waste bucket • Scrap material / cardboard • Drop cloths to protect floors and furnishings from overspray note: Motor will cycle ON and OFF while 1. Point the spray gun into a 2. -
Page 10: Practice Spraying
4. Practice tip: Spraying Trigger gun after starting the stroke. Release the trigger before ending the stroke. The spray gun should be moving when the trigger is pulled and released. Overlap each stroke by about 50%. This will ensure an even coating. Start You will need: •... - Page 11 Spray technique tip: CORRECT Flex your wrist as you move in order to CORRECT keep gun parallel to the surface INCORRECT Start Pull Move Release stroke trigger steadily trigger stroke Spray Pattern Overlap Your Strokes GOOD SPRAY PATTERN BAD SPRAY PATTERN: TAILING CORRECT 50% Overlap 8”...
-
Page 12: Clear The Spray Tip
Spraying Troubleshooting - note: If spray tip is difficult to rotate, relieve pressure by 1) slowly turn PRIME/ Clear the SPRAY knob to PRIME, 2) unlock the spray gun and Spray Tip 3) squeeze trigger while pointing at scrap material/ cardboard. -
Page 13: Clean The Spray Gun Filter
Spraying Troubleshooting - Clean the Spray Gun Filter Start You will need: • Wrench • Warm, soapy water for latex material • Mineral spirits for oil based materials • Replacement spray gun filter (if necessary) ImPORTanT: never clean the filter by 1. -
Page 14: Clean The Inlet Filter
Spraying Troubleshooting - Clean the Inlet Filter Start You will need: • Warm, soapy water for latex material • Mineral spirits for oil based materials ImPORTanT: make sure your floors and furnishings are covered with drop cloths to prevent accidental drips. 1. -
Page 15: Short Term Storage
Shutdown Short Term Storage Start You will need: • Water • Plastic bag or bucket • Rags • Stir stick This procedure should be used when taking 1. Peform the Pressure Relief 2. Place spray gun in plastic 3. Pour 1/2 cup water slowly on a short term break or when ending your Procedure, page 7. -
Page 16: Cleanup - Latex Materials
Cleanup Cleaning notes - read before cleaning • When using latex material, clean sprayer and components with warm, soapy water. For oil based material use mineral spirits. Never use mineral spirits with latex materials. MINERAL • NEVER use gasoline to clean sprayer. SPIRITS •... - Page 17 5. Remove the inlet filter from 6. Thread pump cleaning 7. Unclip the return tube from the suction tube 8. Turn the water supply to the garden hose on. the suction tube and place adapter onto garden hose. and place it into the waste container. Turn Turn the pump ON.
-
Page 18: Cleanup - Oil-Based Materials
Cleanup - Oil-Based Materials You will need: Start • Mineral spirits if using oil-based material • Warm, soapy water if using latex material • Waste container Follow these steps if you sprayed oil-based materials, or if you sprayed latex materials 1. Perform Pressure Relief 2. Remove the spray tip 3. -
Page 19: Cleaning The Spray Gun Components
Cleaning the Spray Gun Components Start You will need: • Soft bristled brush • Light household oil • Warm, soapy water if using latex material • Mineral spirits for oil based material • Wrench 1. Peform the Pressure 2. Pull trigger guard to separate 3. -
Page 20: Long-Term Storage
Long Term Storage Start You will need: HOUSEHOLD • Light household oil / Piston Lube 5 SECONDS • Rags • Wrench ImPORTanT: Store the HOUSEHOLD 1. Remove the suction tube. 2. Fill a cup or other container with 3. Cover the outlet valve with a rag. Turn unit indoors with the two ounces of Piston Lube and power ON and let the pump run for five... -
Page 21: Cleaning The Sureflo Valve
Cleaning the Sureflo Valve Start You will need: • Wrench Cleaning or servicing the Sureflo Valve may be required if the unit has priming problems. Priming problems may be prevented by properly cleaning the sprayer 1. Remove the suction tube. 2. Unscrew the Sureflo Valve assembly (a) from the and following the long-term storage steps. -
Page 22: Troubleshooting
The extension cord is damaged or has too low a capacity Replace extension cord There is a problem with sprayer motor Take sprayer to Titan Authorized Service Center Problem B: The sprayer starts but does not draw material when the PRIME/SPRAY knob is set to PRIME Cause... - Page 23 Solution Gun filter housing is loose Tighten handle Internal parts of spray gun are worn or dirty Take sprayer to Titan Authorized Service Center Problem F: The spray tip assembly leaks Cause Solution Check tip assembly and assemble properly see page 19, steps 6-7...
-
Page 24: Parts List
Español - Descripción Cant. 0516772 Stand assembly Ensemble de support Ensamblaje del banco 0516773 Cap kit (100) Trousse de capuchon (100) Juego de tapa (100) 0516225A Cart assembly (200) Ensemble du chariot (200) Ensamblaje de carrito (200) 0516581A AutoOiler cap... - Page 25 Juego de succión 0516127 Suction set (200) Dispositif d’aspiration (200) Juego de succión (200) 0512371 Return tube (100) Tube de retour (100) Tubo de retorno (100) 0512389 Return tube (200) Tube de retour (200) Tubo de retorno (200) 0512390 Clip (cart models) Agrafe (modèles du chariot)
- Page 26 Français - description Español - Descripción Cant. 692-515 tip, 515 Buse de TR tip, 515 Boquilla de TR , 515 0089959 Filter, 100 mesh (yellow, Filtre, maille 100 (jaune, Filtro, malla 100 2 pack) trousse de 2) (amarillo, juego de 2) 0515228 Seal Joint d’etanchéite...
- Page 27 Accessories • Accessoires • Accesorios Part no. no de piéce Pieza no. English - Description Français - description Español - Descripción 0516701 Piston repair kit Jeu de joints pour tronçon d’acheminement Juego de reparación del pistón 0516713 Hose connector kit Raccord de flexible Conector de manguera 0552945 Tip guard...
-
Page 28: Warranty
100 - two years from date of purchase. 100 - deux années à compter de la date d’achat. 100 - dos años contado a partir de la fecha de compra. 200 - two years from date of purchase. 200 - dos años contado a partir de la fecha de compra.
Need help?
Do you have a question about the 100 and is the answer not in the manual?
Questions and answers