Table of Contents
Advertisement
Quick Links
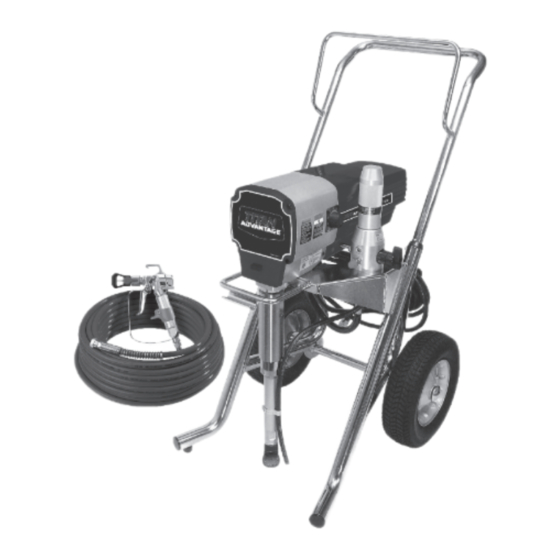
ADVANTAGE 1100
Electric Piston Pump
Register your product online at:
www.titantool.com
_ _ _ _ _ _ _ _ _ _
Serial Number*
* See page 3 for location
Owner's Manual
before reading this manual!
Model
0552068
Model
0552069
NOTE: This manual contains important
warnings and instructions. Please read
and retain for reference.
© Titan Tool Inc. All Rights Reserved. Form No. 0552846F
0914
•
Do not use this equipment
Advertisement
Table of Contents

Related Manuals for Titan ADVANTAGE 1100


Summary of Contents for Titan ADVANTAGE 1100
- Page 1 Please read and retain for reference. _ _ _ _ _ _ _ _ _ _ Serial Number* * See page 3 for location © Titan Tool Inc. All Rights Reserved. Form No. 0552846F 0914 •...
-
Page 2: Safety Precautions
ImPOrTaNT: when the sprayer is used with a generator • Do not aim the gun at, or spray any person or animal. or uncontrolled line voltage, the use of Titan’s “Line Surge • Keep hands and other body parts away from the discharge. For Protector”... -
Page 3: Table Of Contents
Occupational Safety and Health Act (OSHA). These standards, particularly part 1910 of the General Standards and part 1926 of the Construction Standards should be consulted. © Titan Tool Inc. All rights reserved. -
Page 4: General Description
5. Allow the sprayer to run for 15–30 seconds to flush the test fluid out through the return hose and into the waste container. 6. Turn off the sprayer by moving the pressure control knob to the OFF position in the black zone. © Titan Tool Inc. All rights reserved. -
Page 5: Painting
© Titan Tool Inc. All rights reserved. -
Page 6: Pressure Relief Procedure
If the pressure is set too low, tailing will appear or the paint will spatter out in gobs rather than in a fine spray. Paint tailing pattern Do not ex wrist while spraying. © Titan Tool Inc. All rights reserved. -
Page 7: Unclogging The Spray Tip
10. Turn the unit on and set the pressure to Turbo PulseClean by turning the pressure control knob 4. If you have any further questions concerning your TITAN to its CLEAN position in the red zone. Airless Sprayer, call TITAN: Technical Service (U.S.) ........ -
Page 8: Replacing The Prime/Spray Valve
Core Spring NOTE: The filter housing should be hand-tightened, but make O-ring sure the filter housing is seated fully into the pump manifold. Filter Housing © Titan Tool Inc. All rights reserved. -
Page 9: Replacing The Motor Assembly (With Electronic Control)
Parts List section of this electronic cover screws. manual). ImPOrTaNT: use only Titan electronic cover screws to secure the 15. Position the electronic cover over the electronic control electronic cover (see Drive assembly parts list). use of any other assembly. -
Page 10: Replacing The Transducer
18. Remove the upper packing assembly from the top of the cylinder. 19. Remove the adapter and lower packing assembly from the bottom of the cylinder. NOTE: Be careful not to scratch, score, or otherwise damage the cylinder during removal of the packings. © Titan Tool Inc. All rights reserved. - Page 11 37. Push the lower packing assembly into position using the lower packing insertion tool (see Fluid Section Assembly parts list for lower packing insertion tool P/N). © Titan Tool Inc. All rights reserved.
-
Page 12: Troubleshooting
Faulty or loose wiring. Inspect or take to a Titan authorized service center. Excessive motor temperature. Allow motor to cool. The unit will not prime. - Page 13 Notes © Titan Tool Inc. All rights reserved.
- Page 14 • Maintenez la propreté de la zone et veillez à ce qu’elle ne contienne tension de la ligne ou non, l’utilisation de Titan “Line Surge Protector” (P pas de conteneurs de peinture ou de solvant, de chiffons et autres / N 800-935) est recommandé.
- Page 15 Il pourrait s’avérer nécessaire de consulter un plasticien ou un spécialiste en chirurgie reconstructive de la main. Français © Titan Tool Inc. Tous droits réservés.
- Page 16 ImPOrTaNTE: cuando se usa el rociador con un generador o línea o sin disolvente. control, uncontrolled line voltage, se recomienda que Titan’s “Line Surge • Coloque la bomba al menos a 7,62 metros (25 pies) del objeto que se Protector”...
- Page 17 La toxicidad es un factor a considerar con ciertos revestimientos inyectados directamente en la corriente sanguínea. Puede ser aconsejable consultar con un cirujano plástico o un cirujano especialista en reconstrucción de las manos. Español © Titan Tool Inc. Todos los derechos reservados.
-
Page 18: Parts List
Jam nut ................1 0507690 PRIME/SPRAY valve assembly......1 0552155A Fluid section assembly ..........1 812-003 Outlet fitting ..............1 0507798 Siphon tube..............1 0507671 Fitting ................1 730-334 Hose clamp ..............1 0507387 Hose (not shown) .............1 710-046 Inlet screen ..............1 © Titan Tool Inc. All rights reserved. -
Page 19: Drive Assembly
Grommet ..............1 0551972 Surge suppressor (not shown) ......1 800-934 Fuse holder ..............1 704-400 Wire assembly (not shown) ........1 800-929 Fuse ................1 NOTE: all electrical work should be performed by a Titan authorized service center. © Titan Tool Inc. All rights reserved. -
Page 20: Fluid Section Assembly
Repacking kit (includes items 3, 5, 6, 8, 10, 11, 15, and 17–19) 0552150 Lower packing insertion tool Install lower packing so large beveled edge will be facing up when the cylinder is upright. © Titan Tool Inc. All rights reserved. -
Page 21: Upright Cart Assembly
Screw ................2 812-003 Outlet fitting ..............1 856-921 Screw ................4 800-907 Plug, 1/4” ..............1 856-002 Washer .................4 0507690 PRIME/SPRAY valve assembly......1 0507774 Screw ................4 0507655 Cord wrap ..............2 0507379 Wheel ................2 9890104 Cap ................2 © Titan Tool Inc. All rights reserved. -
Page 22: Suction Set Assembly (Low Boy)
(includes items 1–3, 5, 9, and 10) .......1 0294534 Wheel spacer .............4 590-508 Roll pin .................2 0278373 Wheel ................2 335-018 Plug ................2 9890104 Cap ................2 9805230 Screw ................1 0552191 Cart weldment ............1 710-204 Plug ................2 © Titan Tool Inc. All rights reserved. -
Page 23: Electrical Schematic
NOTE: all electrical work should be performed by a Titan authorized service center. Transducer Ground to Wire Assembly Gear Housing 0507962 Potentiometer Assy ORANGE BLACK Electronic Control Assy GREEN Motor BLACK WHITE Relay WHITE WHITE Surge Suppressor BLACK/RED/WHITE © Titan Tool Inc. All rights reserved. -
Page 24: Limited Warranty
Titan Tool, Inc., (“Titan”) warrants that at the time of delivery to the original purchaser for use (“End User”), the equipment covered by this warranty is free from defects in material and workmanship. With the exception of any special, limited, or extended warranty published by Titan, Titan’s obligation under this warranty is limited to replacing or repairing without charge those parts which, to Titan’s reasonable satisfaction, are...
Need help?
Do you have a question about the ADVANTAGE 1100 and is the answer not in the manual?
Questions and answers