Table of Contents
Advertisement
Quick Links
Advertisement
Table of Contents

Related Manuals for GeoVision GV-NVR System Lite


Summary of Contents for GeoVision GV-NVR System Lite
- Page 1 GV-NVR System Lite User’s Manual User’s Manual...
- Page 2 9F, No. 246, Sec. 1, Neihu Rd., Neihu District, Taipei, Taiwan Tel: +886-2-8797-8377 Fax: +886-2-8797-8335 http://www.geovision.com.tw Trademarks used in this manual: GeoVision, the GeoVision logo and GV series products are trademarks of GeoVision, Inc. Windows and Windows XP are registered trademarks of Microsoft Corporation. May 2010...
- Page 3 GV-NVR System Lite Welcome to the GV-NVR System Lite User’s Manual. The Manual provides an overview of the GV-NVR System Lite and its accessories. It also includes the instructions to guide you through the installation and use of the GV-NVR System Lite: Chapter 1, Introduction •...
-
Page 4: Table Of Contents
3.9 Exiting to Windows ....................23 3.10 Returning to GV-Desktop..................24 3.11 Restoring System ....................25 3.12 Updating GV-NVR System Lite................27 Chapter 4 Firmware Upgrade for GV-IPCAM H.264 ........... 28 4.1 Using the Web Configuration Interface..............29 4.2 Using the IP Device Utility ..................30 Chapter 5 Mobile Phone Connection.............. - Page 5 5.4 BlackBerry Phone....................50 5.5 3G Mobile Phone....................52 5.6 I-Mode Phone ......................55 5.7 iPhone ........................57 Chapter 6 NVR Health Analysis ................62 6.1 System Settings...................... 62 6.2 System Log......................64 6.3 Information of Your Computer System..............65 6.4 Health Analysis Form....................
-
Page 6: Regulatory Notices
Regulatory Notices CE Notice This is a Class A product. In a domestic environment, this product may cause radio interference in which case the user may be required to take adequate measures. RoHS Compliance The Restriction of Hazardous Substances (RoHS) Directive is to forbid the use of hazardous materials of production. -
Page 7: Safety Instructions
Safety Instructions Observe these safety instructions to help ensure against injury to yourself and damage to the product. Read all safety and installation instructions before you operate the product. Do not operate the product in high humidity areas or expose it to water or moisture. Do not put the product in an unstable, a slanting or vibrated place. -
Page 8: Note
Note The bundled software preinstalled in the GV-NVR System Lite (GV-Desktop < Program button < Multicam Installation) is a lite version, specially designed for the GV-NVR System Lite to implement the GV-IPCAM H.264: 1. It includes a lite version of video analysis applications, featuring Advanced Motion Detection, Privacy Mask and Scene Change Detection only. -
Page 9: Chapter 1 Introduction
Exclusively designed for GV-IPCAM H.264 for networking surveillance, the GV-NVR System Lite supports a plug and play function to connect up to 4 cameras automatically. The GV-NVR System Lite is an ideal NVR system for small business or retail stores. -
Page 10: Packing List
1.1 Packing List The GV-NVR System Lite package includes the following items: Important: Please keep the original carton and all packing materials for future shipping need. • GV-NVR System Lite x 1 • GV-IPCAM H.264 x 4 (The shipping models of the GV-IPCAM H.264 are by the orders.) •... -
Page 11: Options
Introduction 1.2 Options Optional devices can expand your GV-NVR System Lite’s capabilities and versatility. Contact your dealer for more information. GV-Data Capture V3 Box can integrate the GV-NVR System GV-Data Capture V3 Box Lite to an electronic POS system, while GV-Data Capture V3E Box can establish such integration through LAN or Internet. -
Page 12: Chapter 2 Overview
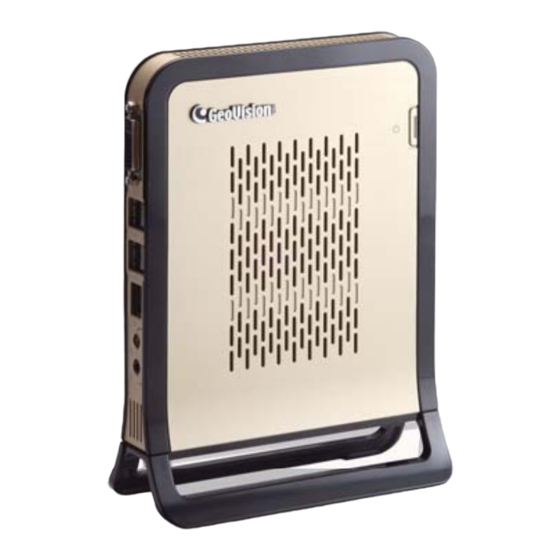
Connects to the power outlet. AUX Port Connects the speaker amplifier. Base Stand Screw Fastens the Base Stand to the GV-NVR System Lite. Base Stand Supports the GV-NVR System Lite to stand. Power Button Turns on the power of GV-NVR System Lite. -
Page 13: Right-Side View
Overview 2.2 Right-Side View Figure 2-2 No. Name Description Audio Input Connects a microphone. Audio Output Connects speakers. USB 2.0 Port Connects USB devices. -
Page 14: Chapter 3 Getting Started
Chapter 3 Getting Started There are two methods to mount the GV-NVR System Lite. One is to use the base stand to support the unit to stand. The other is to use the VESA monitor mount to mount the unit on the back of the computer monitor. -
Page 15: Installing Computer Mount
1. Using the 4 fix screws, tighten the VESA monitor mount on the back of the computer monitor. Figure 3-2 2. Attach the GV-NVR System Lite to the VESA monitor mount and tighten the stand screw. Stand Screw Figure 3-3 Note: For the mounting method of computer monitor, make sure your monitor is VESA compliant. -
Page 16: Basic Installation
1. Connect the speakers to the GV-NVR System Lite. 2. Connect the microphone to the GV-NVR System Lite. 3. Using the USB cables, connect a keyboard and a mouse to the GV-NVR System Lite. 4. Connect the GV-USB Dongle to the GV-NVR System Lite. -
Page 17: Getting Started
Getting Started After the power is on, the GV-NVR System Lite will run a series of self-tests, and later series of messages may be displayed as the various hardware and software subsystems are activated. Then the GV-System Software (Multicam Surveillance System) will load automatically and bring you to the main screen with 4-channel display. -
Page 18: Installing Gv-Ipcam H.264
3.4 Installing GV-IPCAM H.264 The GV-NVR System Lite supports up to 4 channels and is exclusively designed for GV-IPCAM H.264. The GV-IPCAM H.264 can be automatically connected to the GV-NVR System Lite once the GV-IPCAM H.264 is connected to the same network with GV-NVR System Lite and the GV-NVR System Lite is turned on. -
Page 19: Formatting The External Hard Drive
Getting Started 3.5 Formatting the External Hard Drive The GV-NVR System Lite records audio and video to the internal hard drive. You can also use an external hard drive to expand recording space. You must format the hard drive before you can use it. - Page 20 3. The Initialize and Convert Disk Wizard appears. Click Next to continue. Figure 3-8 Note: If the Wizard does not appear, you need to initialize the drives one by one. To manually initialize a drive, right-click on the name of the drive and select Initialize Disk. 4.
- Page 21 Getting Started 5. The screen gives you the option to convert the drives from basic to dynamic storage. Leave all drives unchecked, and click Next to continue. Figure 3-10 6. When the initialization is complete, click Finish to close the wizard. Figure 3-11...
- Page 22 7. Right-click in the unallocated space of a new drive, and select New Partition. Figure 3-12 8. The New Partition Wizard appears. Click Next to continue. Figure 3-13...
- Page 23 Getting Started 9. Select Primary partition, and click Next to continue. Figure 3-14 10. The default partition size is the same as the maximum disk space. Make changes if necessary. Click Next to continue. Figure 3-15...
- Page 24 11. Assign a drive path that is not in use by other devices, and click Next to continue. Figure 3-16 Note: The default drive path starts from E:\. 12. Type a name in the Volume label box, ex. HDD1, and click Next to continue. Figure 3-17...
- Page 25 Getting Started 13. When the formatting is complete, click Finish to close the wizard. Figure 3-18 14. When the drive is successfully initialized, partitioned, and formatted, its status description should display “Healthy.” Figure 3-19...
-
Page 26: Adding The External Hard Drive To The Recording Path
3.6 Adding the External Hard Drive to the Recording Path Before you start recording to the external hard drive, you need to add the formatted external hard drive to the recording path. 1. On the GV-Desktop, click the Programs button, and select Hot Swap HDD Tool. The MediaMan Tools window appears. -
Page 27: Configuring An Ip Address
Getting Started 3.7 Configuring an IP Address The GV-NVR System Lite has a default IP address to connect to the GV-IPCAM H.264 automatically. However, you can still configure the IP address for network connection arrangement. To configure the IP address, follow the steps below: 1. - Page 28 3. Double-click Network Connections, right-click Local Area Connection, and select Properties. Figure 3-24 4. In the Local Area Connection Properties dialog box, select Internet Protocol (TCP/IP) and click Properties. Figure 3-25 5. Select Use the following IP address, type the IP information in the fields, and click OK to finish the setting.
-
Page 29: Changing Video Codec And Resolution
Note: 1. The default resolution for Live View images (CIF) cannot be changed. 2. Once the GV-IPCAM H.264 is connected to the GV-NVR System Lite, you can only change the video resolution and codec on the GV-NVR System Lite. To change the video codec and resolution, follow the steps below. - Page 30 Recording resolution. Figure 3-30 Note: For these changes to be applied through the GV-NVR System Lite, it is required that the GV-IPCAM H.264 uses the default username and password that are admin. To modify the username and password, you can select Change Setting.
-
Page 31: Exiting To Windows
Getting Started 3.9 Exiting to Windows The GV-NVR System Lite is protected by GV-Desktop that is limited to run the selected programs. If you need to exit to Windows desktop, follow these steps. 1. On the GV-Desktop, click the Settings button, and type the valid ID and password. The default ID and Password are “0000”. -
Page 32: Returning To Gv-Desktop
3.10 Returning to GV-Desktop Click the Windows Start button, select All Programs, click GVCombo, and click Key Lock Utility. Figure 3-32 Windows XP desktop... -
Page 33: Restoring System
Note: After recovery, you need to re-install all settings and passwords. But the recovery will not delete your recording files saved in the partition D since it only reformats the partition C. 1. Restart the GV-NVR System Lite. This image appears. Figure 3-33 2. - Page 34 3. Select Recovery GeoVision NVR System. Figure 3-35 4. Wait until the “Recover your partition now. Are you sure?” message appears. Click OK to start the recovery. Figure 3-36 5. When the recovery process is complete, the confirmation message “The recovery process is finished.
-
Page 35: Updating Gv-Nvr System Lite
Getting Started 3.12 Updating GV-NVR System Lite If you like to update your GV-NVR System Lite, contact your dealer for more information. Before contacting your dealer, you may check software update news at our website: http://www.geovision.com.tw... -
Page 36: Chapter 4 Firmware Upgrade For Gv-Ipcam H.264
Do not turn the camera power off in 10 minutes after the firmware is updated. If you use the IP Device Utility for firmware upgrade, the GV-NVR System Lite used to upgrade firmware must be under the same network of the camera. -
Page 37: Using The Web Configuration Interface
Firmware Upgrade for GV-IPCAM H.264 4.1 Using the Web Configuration Interface of GV-IPCAM H.264 In the Live View window, click the Show System Menu button, select Remote Config, and click the Firmware Upgrade tab. The Remote Config dialog box appears. Figure 4-1 Click the Browser button to locate the firmware file (.img) saved at your GV-NVR System Lite. -
Page 38: Using The Ip Device Utility
4.2 Using the IP Device Utility The IP Device Utility provides a direct way to upgrade the firmware to multiple units of GV-IPCAM H.264. Note GV-NVR System Lite used to upgrade firmware must be under the same network of the camera. - Page 39 Firmware Upgrade for GV-IPCAM H.264 Double-click one camera in the list. This dialog box appears. Figure 4-4 Click the Firmware Upgrade tab. This dialog box appears. Figure 4-5 Click the Browse button to locate the firmware file (.img) saved at your GV-NVR System Lite.
-
Page 40: Chapter 5 Mobile Phone Connection
Chapter 5 Mobile Phone Connection You can receive live video streaming from the GV-NVR System Lite by using a PDA, Smartphone or 3G-enabled mobile phone. The GV mobile phone applications and their major features are listed as below. Overview of GV Mobile Phone Applications... - Page 41 Mobile Phone Connection TCP/IP (Streaming) Protocol Video Streaming, Remote Playback (RPB), Audio and etc. Functions Handheld Device View BlackBerry Smart Phone Viewer OS Supported BlackBerry OS 4.2.1 or later Port Live View Port: 8866, Http Port: 80 TCP/IP (JPEG) Protocol Video Streaming, I/O device control Functions Handheld Device View...
-
Page 42: Windows Pda
Overview of GV Mobile Phone Applications chart earlier in this chapter. When GView V2 detects the big screen panel of the mobile phone, images from the connected GV-NVR System Lite will be horizontally rotated for a better view. Resolution is set to be CIF by default. - Page 43 Figure 5-2 Connecting to GV-NVR System Lite Once GView V2 is installed on your PDA, you can use it to monitor your GV-NVR System Lite. Make sure your PDA has wireless LAN adapter properly in place with access to the Internet.
- Page 44 The login screen appears. Figure 5-4 3. Enter the IP address of your GV-NVR System Lite, port value (default value is 8866), a username and a password. Then click OK. 4. Once the connection is established, the live video will appear.
- Page 45 Figure 5-6 4. Enter the IP address of the GV-NVR System Lite, port value (default value is 5511), a username and a password. Then click OK to connect. 5. Select the desired recording on the event list for playback.
-
Page 46: Other Functions
Other Functions In addition to live view and playback, GView V2 offers these functions: viewing and controlling I/O devices, adjusting image quality, starting and stopping recording. On the live view screen, click the buttons on the toolbar to have the desired functions. Figure 5-7 Button Description... - Page 47 Mobile Phone Connection Accessing I/O Devices To access the connected I/O devices, use the drop-down list to select the desired camera and click the button. The I/O module button appears on the toolbar. Figure 5-8 The number on the toolbar indicates the connected module. Click the desired number to access its I/O devices.
- Page 48 Viewing Input-Triggered Events All input triggers are logged on the Alarm list. Click the “I” button (Figure 5-9) to view the list of trigger events. Figure 5-10 Forcing Outputs To force any connected output devices, click the “O” button (Figure 5-9), and click the desired number.
- Page 49 Mobile Phone Connection Viewing Camera Status To view the camera status, click the button on the live view screen (Figure 5-7). Figure 5-12 This screen displays the status of camera activity. Three messages indicate the current camera status. Message Description Normal The camera is turned on and not recording.
-
Page 50: Windows Smartphone
Smartphone user’s manual for how to install a program to the Smartphone. Activating the MSView V2 / V3 Function To allow remote access to the GV-NVR System Lite, you must enable the Mobile function on the WebCam Server (Figure 5-2). - Page 51 2. Click Type and select Live. Figure 5-14 3. On the login screen, enter the IP address of the GV-NVR System Lite, port value (default value is 8866), a username and a password. Then click Control and select Connect. Figure 5-15...
- Page 52 4. Once the connection is established, the live video will appear. You can use the scroll key on your Smartphone to navigate camera channels. Figure 5-16 Playing Back the Recordings To play back the recordings, follow these steps: 1. Start the WeBCam Server with the following two functions enabled. A.
- Page 53 Mobile Phone Connection 4. On the Login screen, enter the IP address of the GV-NVR System Lite, port value (default value is 5511), a username and a password. Then click Select and click GV DVR to start the connection. Figure 5-17 5.
-
Page 54: Symbian Smartphone
Smartphone user’s manual for how to install a program to the Smartphone. 8. Change the date on your Smartphone back to today’s date. Activating the SSView V3 Function To allow remote access to the GV-NVR System Lite, you must enable the Mobile function on the WebCam Server (Figure 5-2). - Page 55 2. Click Options, and select Live Connect. Figure 5-19 3. On the Login screen, enter the IP address of the GV-NVR System Lite, port value (default value is 8866), a login username and a password. Then click Options and select Connect.
- Page 56 [<] and [>] buttons on the mobile device to select the desired server for connection. Playing Back the Recordings To play back the recordings from the GV-NVR System Lite, follow these steps: 1. Start the WeBCam Server with the following two functions enabled.
- Page 57 Mobile Phone Connection 4. On the Login screen, enter the IP address of your GV-NVR System Lite, port value (default value is 5511), a username and a password. Then click Options and select Video Server. 5. Select the desired recording on the event list for playback.
-
Page 58: Blackberry Phone
Activating the BBView Function To allow remote access to GV-NVR System Lite, enable these two functions on the WebCam Server: 1. On the main screen, click the Network button, select WebCam Server, click the JPG tab, and select Create JPEG/GIF file(s) (Figure 5-23). - Page 59 Mobile Phone Connection Connecting to GV-NVR System Lite To connect your BlackBerry phone to GV-NVR System Lite, follow these steps: 1. Click the BBView application on your phone, select Create Live Connection. The Login screen appears. 2. Enter the IP address, port value (default value is 8866), a username and a password to log in GV-NVR System Lite.
-
Page 60: Mobile Phone
3G-enabled mobile phone. Activating the 3G Mobile Phone Function To allow remote access to GV-NVR System Lite, you must enable the 3GPP function on the WebCam Server. On the main screen, click the Network button, select WebCam Server, click the 3GPP tab, activate the settings of communication ports, and then click OK. - Page 61 Mobile Phone Connection 3. Select Live. If you want to change the video settings, use the drop-down lists to configure video size, quality and audio codec. Then scroll down the page to click Submit. Figure 5-26 4. On the camera list, click the desired camera to access its live view, and then click Next. Figure 5-27 5.
- Page 62 Playing Back the Recordings You can play back the recordings on the 3G mobile phone. Note that only the videos recorded in the CIF resolution are available for playback. To search the recordings of the specific time, follow these steps: 1.
-
Page 63: I-Mode Phone
The images are in GIF or JPEG format with resolution of 96x72 pixels. Activating the i-Mode Function To allow the remote access to GV-NVR System Lite, you must enable the Create JPEG/GIF file(s) function on the WebCam Server (Figure 5-23). - Page 64 2. Enter the IP address of your GV-NVR System Lite in the Address column, and then press Address: http://65.59.37.172 Cancel Figure 5-31 3. Type a valid username and password, and then press Submit. User Name: Passwords: Submit Cancel Figure 5-32 4.
-
Page 65: Iphone
Activating the GV-iView Function To allow remote access to GV-NVR System Lite, the following two functions must be enabled on the WebCam server: 1. On the main screen, click the Network button, select WebCam Server, click the JPG tab, and select Create JPEG/GIF file(s) (Figure 5-23). - Page 66 To access live view on your mobile device: 1. Activate GV-iView on the mobile device. 2. On the login screen, enter the IP address of the GV-NVR System Lite, port value (default value is 8866), ID and Password. Then press Connect. Once the connection is established, the live display of 6 cameras will appear.
- Page 67 Mobile Phone Connection Other Functions After you enlarge one channel, you can find the following buttons for control. Figure 5-36 Button Name Function Enable Record Activates recording controls. The button is available when you press the Enable Record One Channel Record button.
- Page 68 Figure 5-37 My Favorite On the login screen (Figure 5-38) you can find the My Favorite option, allowing you to add several links of GV-NVR System Lite servers for quick connections. Up to 20 links can be created. Figure 5-38...
- Page 69 1. On the login screen (Figure 5-35), press RPB View 2. Enter the IP address of the GV-NVR System Lite, port value (default value is 5511), ID and Password. You can also search the recordings of a specified date and time by selecting RPB Time Setting and entering the date and time.
-
Page 70: Chapter 6 Nvr Health Analysis
It is recommended to have the health analysis during the first week after you install the GV-NVR System Lite, and then have the checkup every three months. It will take 5 working days for response. - Page 71 NVR Health Analysis 2. Select Backup MultiCam Settings or Restore Defaults, and select Backup Current System. This dialog box appears. Figure 6-2 3. Press the Next Step button to back up all your system settings. The Save As dialog box appears. 4.
-
Page 72: System Log
6.2 System Log Please provide the sys*.mdb files of system log. The files by default are saved at D:\Log\database. If you have modified the default location, you can check the path by the following steps: 1. Click the Configure button on the Main System, point to General Setting, and then select System Log Setting. -
Page 73: Information Of Your Computer System
NVR Health Analysis 6.3 Information of Your Computer System To get the information of your computer system, please follow the steps below to install the free software PC WIZARD. By using the software, the following computer information can be easily collected and saved for analysis: Processor: includes Type, Frequency, Data Cache L1, Trace Cache L1, Cache L2, Voltage, Processor Temperature, FPU Coprocessor. - Page 74 4. In the Save As dialog box, select Format HTML and click OK. Figure 6-6 5. Select the Save location, type the file name, and then click Save to save the Processor information as HTML file. 6. Repeat Steps 3-5 to save the Drives information as HTML file.
-
Page 75: Health Analysis Form
NVR Health Analysis 6.4 Health Analysis Form Please send the related data for analysis along with this Health Analysis Form to dvrsystem@geovision.com.tw. Health Analysis of GV-NVR System Lite Contact Person: Title: Company Name: Telephone: (O) Fax: E-Mail: Model: Bar Code: 6.5 Check List... -
Page 76: Chapter 7 Troubleshooting
Specifications System Intel Processor 1 GB Microsoft Windows XP Embedded DirectX 9.0c Output: 40W, 19V, 2.1A Power Input: 100~240V, 50~60Hz Video Video Input 4 channels Compression MJPEG / MEPG4 (ASP) / H.264 Live Resolution 320 x 240 Recording Resolution 1280 x 1024 / 640 x 480 / 320 x 240 Recording Frame Rate 1.3 M 15 fps per channel... - Page 77 Specifications Searching and Playback Search Method Date / Time Date / Time / Event Search Selectable on the tree list and calendar Log Search Through the log data to find the video event / time DVD+R (DL) / DVD-R (DL) / DVD+R / DVD+RW / DVD-R / Backup Type DVD-RW / CD-R / CD-RW Note: For backup function, you need to connect an external USB DVD/CD burner.
- Page 78 Environment Operating Temp. 0°C ~ 35 °C / 32 °F ~ 95 °F Humidity 0% ~ 80% RH (non-condensing) Physical Color Champagne gold Dimensions 153.5 x 20 x 172.5 mm / 6.04 x 0.79 x 6.79 in (W x H x D) Weight 650 g / 1.44 lbs Language...
-
Page 79: Specifications
Specifications System Intel Processor 1 GB Microsoft Windows XP Embedded DirectX 9.0c Output: 40W, 19V, 2.1A Power Input: 100~240V, 50~60Hz Video Video Input 4 channels Compression MJPEG / MEPG4 (ASP) / H.264 Live Resolution 320 x 240 Recording Resolution 1280 x 1024 / 640 x 480 / 320 x 240 Recording Frame Rate 1.3 M 15 fps per channel... - Page 80 Specifications Searching and Playback Search Method Date / Time Date / Time / Event Search Selectable on the tree list and calendar Log Search Through the log data to find the video event / time DVD+R (DL) / DVD-R (DL) / DVD+R / DVD+RW / DVD-R / Backup Type DVD-RW / CD-R / CD-RW Note: For backup function, you need to connect an external USB DVD/CD burner.
- Page 81 Environment Operating Temp. 0°C ~ 35 °C / 32 °F ~ 95 °F Humidity 0% ~ 80% RH (non-condensing) Physical Color Champagne gold Dimensions 153.5 x 20 x 172.5 mm / 6.04 x 0.79 x 6.79 in (W x H x D) Weight 650 g / 1.44 lbs Language...
-
Page 82: Warranty Policy
Other packaged accessories and software (including but not limited to System Software) are excluded. If a defect where due to causes attributable to GeoVision arises and a valid claim is received by GeoVision within the Limited Warranty Period, at its option, GeoVision will (1) repair the... - Page 83 EXPRESSED OR IMPLIED WILL APPLY AFTER THIS PERIOD. GEOVISION SHALL NOT BE LIABLE FOR SPECIAL, DIRECT, INDIRECT, CONSEQUENTIAL DAMAGES. GEOVISION SHALL NOT BE LIABLE FOR LOST PROFITS, LOST OF DATA, PROGRAMS OR OTHER INFORMATION, DAMAGE TO OTHER PROPERTY CAUSED BY ANY...
- Page 84 2. Securely pack the product in its original carton using the original packing material, or in equivalent packaging. 3. The product shall be returned to GeoVision, Taiwan at your expense for shipping and insurance costs. BEFORE YOU DELIVER YOUR GV-NVR SYSTEM LITE FOR WARRANTY SERVICE, IT IS YOUR RESPONSIBILITY TO BACK UP YOUR DATA.
- Page 85 Microsoft Software License Terms for: Windows® XP Embedded Runtime These license terms are an agreement between you and [OEM]. Please read them. They apply to the software included on this device. The software also includes any separate media on which you received the software. The software on this device includes software licensed from Microsoft Corporation or its affiliate.
-
Page 86: Microsoft Software License Terms For: Windows® Xp Embedded Runtime
Microsoft Software License Terms c. Device Connections. • You may use terminal services protocols to connect the device to another device running business task or processes software such as email, word processing, scheduling or spreadsheets. • You may allow up to ten other devices to access the software to use •... - Page 87 (iii) download the software to licensed devices and use it on them. For more information, please refer to the device documentation or contact [OEM]. • Internet-Based Services. Microsoft provides Internet-based services with the software. Microsoft may change or cancel them at any time. a.
- Page 88 Microsoft Software License Terms http://microsoft.com/windows/windowsmedia/mp10/privacy.aspx. • Windows Media Digital Rights Management. Content owners use Windows Media digital rights management technology (WMDRM) to protect their intellectual property, including copyrights. This software and third party software use WMDRM to play and copy WMDRM-protected content. If the software fails to protect the content, content owners may ask Microsoft to revoke the software’s ability to use WMDRM to play or copy protected content.
- Page 89 transfer, that party must agree that these license terms apply to the transfer and use of the software. You may not retain any copies of the software including the backup copy. 9. Not Fault Tolerant. The software is not fault tolerant. [OEM] installed the software on the device and is responsible for how it operates on the device.
-
Page 90: Warranty Form
Warranty Form User’s Manual for GV-NVR System Lite Thank you for purchasing the GV-NVR System Lite. To help us validate your purchase and better serve you in the future, please go to h ttp://www.geovision.com.tw/english/4_6.asp click GeoVision Online Registration in My Favorite for a direct link to register online within 30 days from the date of purchase. - Page 91 GeoVision, Inc. 9F, No. 246, Sec. 1, Neihu Rd., Neihu District, Taipei, Taiwan Tel: +886-2-8797-8376 Fax: +886-2-8797-8335 Email: sales@geovision.com.tw dvrsystem@geovision.com.tw http://www.geovision.com.tw...
Need help?
Do you have a question about the GV-NVR System Lite and is the answer not in the manual?
Questions and answers