
Related Manuals for Strong SRT 7004


Summary of Contents for Strong SRT 7004
- Page 1 Digital High Definition Satellite Receiver SRT 7004 User manual Manuale utente Bedienungsanleitung Manual del usuario Manuel d’Utilisateur Manual do Utilizador...
-
Page 4: Table Of Contents
8.0 TRoublEshooTIng 9.0 sPECIfICATIons sTRong declares that this item complies with the basic requirements and other relevant regulations of directives CE 2004/108/EC and 73/23/EC, Rohs 2002/95/EC Subject to alterations. In consequence of continuous research and development technical specifications, design and appearance of products may change. -
Page 5: Instruction
PART 1 • English 1.0 InsTRuCTIon 1.1 safety Instructions do noT InsTAll YouR RECEIvER: In a closed or poorly ventilated cabinet; directly on top of or under any other „ „ equipment; on a surface which might obstruct the ventilation slots. do noT EXPosE ThE RECEIvER oR ITs ACCEssoRIEs: To direct sunlight or any other equipment that generates heat;... -
Page 6: Equipment Set-Up
„ the receiver. Always make backups of data on your USB storage device before using it with this receiver. STRONG will not take responsibility for any loss of information or circumstances caused by loss of information. Please ensure that either the USB device is already formatted to FAT/FAT32, or format „... -
Page 7: Your Receiver
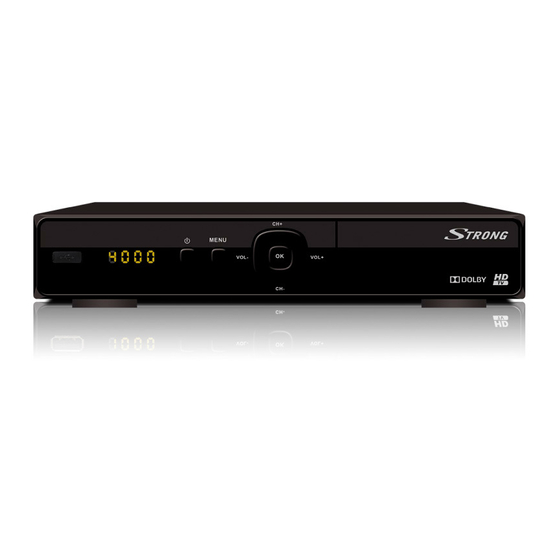
PART 1 • English 2.0 YouR RECEIvER 2.1 default PIn: 0000 2.2 front panel Fig. 1 1. usb: For connection of USB pen drive for software upgrade storage devices 2. lEd display: Shows channel number in operation and time in Standby 3. -
Page 8: Installing The Batteries
Freezes the playback of multimedia files. 17. 3 Stops playback of multimedia files. 18. 4 Optional. Please see www . strong . tv 19. mEnu To open the main menu in viewing mode or to go one step back in the menu 20. -
Page 9: Using The Remote Control
PART 1 • English Remove the battery cover from the remote control and put 2x AAA size batteries inside the compartment. The diagram inside the battery compartment shows the correct way to install the batteries. 1. Open the cover 2. Install batteries 3. -
Page 10: Connecting To Ethernet
PART 1 • English 1. Connect the LNBs of your fixed antenna to the inputs of a DiSEqC 1.0/1.1 switch 2. Connect the output or “to receiver” connector of the DiSEqC 1.0/1.1 switch to the SAT IN connector on your receiver. 3. -
Page 11: Quick Guide For Using Your Receiver
5.0 QuICk guIdE foR usIng YouR RECEIvER We at STRONG understand that you can’t wait to enjoy your new HD receiver. The following quick guide will make you familiar with the basic operation of this device. We do, however, advice you to read the full manual to get the best performance from your STRONG HD receiver. -
Page 12: Info Banner
PART 1 • English 6.1.1 direct access To gain direct access to a certain channel, simply enter its number with the 0~9 buttons on the remote control. Channel numbers can be up to four digits long. Entering a number with less than four digits is possible. -
Page 13: Teletext
PART 1 • English 6.4 Teletext Your receiver includes a fully featured Teletext. To access Teletext, press the TEXT button in viewing mode and press the 0~9 or pq buttons to select the number of the page you wish to see. Subpages (if loaded and available) can be selected with the tu buttons. - Page 14 PART 1 • English 7.1.1 satellite setting Press the pq buttons to highlight the satellite your dish is aimed at. Its antenna settings will be shown at the right side. You can enter the right side with the tu buttons and return to the satellite list with EXIT.
- Page 15 PART 1 • English IF Channel: Select the IF channel number according to the specifications of your SatCR LNB. note: Any SatCR LNB in the chain needs a different IF channel number. Center Frequency: Select the Center Frequency according to the specifications of your SatCR LNB.
- Page 16 PART 1 • English note: Deleted satellites and transponders from the pre-installed lists can only be retrieved by performing a factory reset. 7.1.4 Automatic sAT scan Select the options if you want to do automatic scan. Satellite: Select the satellite you wish to scan, as previously set up in the Satellite Setting menu.
-
Page 17: Channel
Information Find technical information about this receiver as Model, Hard and Software versions and the STRONG website: www . strong . tv. This information might be asked for if you contact us. 7.2 Channel Press mEnu and select Channel by pressing the tu buttons. Use the pq buttons to select the TV Channel Editor submenu. - Page 18 PART 1 • English 3. Now in viewing mode you can select channels from the chosen favourite group only by pressing pq. If you want to change to the main channel list, toggle the fAv button in viewing mode until FAV Off is displayed. delete a Tv or radio programme 1.
- Page 19 PART 1 • English note: Programmes will only be locked when channel lock is set to On in the System menuParental Control. note: We recommend changing of the default password (0000) to one of your preference. Please refer to chapter 7.2.5 system for more details. disable a locked Tv or radio programme Press the gREEn button on the programme marked with the lock symbol.
-
Page 20: Clock Setting
PART 1 • English 7.2.5 system Press mEnu and select System. Select an option and press ok to enter a menu item. Use tu to adjust the settings. This menu consists of the following items: Language, OSD Style, Clock setting, TV setup, Adv Timer, Parental Control, Update&Backup and Factory Setting. - Page 21 PART 1 • English For 4:3 TVs: 4:3LB: 4:3 LetterBox: The full 16:9 picture will be displayed on your 4:3 TV set with black bars above and below the picture. 4:3PS: 4:3 Pan&Scan: The centre of the 16:9 picture will be displayed full-screen on your 4:3 TV 16:9LB Combination of Letter-box and Pan&Scan.
-
Page 22: Parental Control
The upgrade can be performed with an USB device, preferably an USB pen drive. The USB device must have been formatted in FAT32. Download the required update file for your receiver model from the support page on our website http://www . strong . tv or contact your local dealer. -
Page 23: Factory Setting
PART 1 • English Unzip the file on your computer, if necessary, and then copy it to root folder of your USB storage device. Connect the USB storage device to the front USB port of the receiver. Press mEnu and select System then Update &... -
Page 24: Multimedia
In this menu you can make video and photo configurations. The unit supports USB devices with FAT32 format. Make sure your USB device is formatted correctly. noTE: STRONG cannot guarantee compatibility (operation and/or bus power) with all USB „ „... - Page 25 Press gREEn to select the correct character set for subtitle files. *STRONG cannot guarantee the playback of video files although extensions are listed here, as the correct playback depends on codec used, data bit rate and resolution as well.
-
Page 26: Troubleshooting
Service line or a STRONG dealer. Alternatively you can send a support mail via our website: www . strong . tv. NEVER open or disassemble your receiver. This may cause a dangerous situation and will void the warranty. -
Page 27: Specifications
Service Hotline or (interrupted) software update. send email to our Support via www . strong . tv No picture or sound, but HDMI or Scart is not selected Switch to correct TV input display and green LED are on. - Page 28 Audio playback: MP3, WMA formats Picture view: JPG, BMP formats *STRONG cannot guarantee the playback of video files although extensions are listed here, as it depends on codec used, data bit rate and resolution. network Connector: Ethernet RJ45 Wired IP setup: Auto (DHCP) and Manual setup.
- Page 29 PART 1 • English TV SCART RGB, CVBS, Audio L/R output with volume control S / PDIF Dolby Digital Out (Coaxial) Power socket for external power supply general data Supply voltage: 100 – 240 V AC 50/60 Hz Output voltage: DC 12V, 2A Power consumption: max.
Need help?
Do you have a question about the SRT 7004 and is the answer not in the manual?
Questions and answers