
Summary of Contents for Network Technologies SPLITMUX-DVI-4
- Page 1 ® SPLITMUX Series SPLITMUX-DVI-4 Quad Screen Video Splitter Installation and Operation Manual MAN093 Rev Date 12-1-11...
- Page 2 Drive, Aurora, Ohio 44202. CHANGES The material in this guide is for information only and is subject to change without notice. Network Technologies Inc reserves the right to make changes in the product design without reservation and without notification to its users.
- Page 3 SPLITMUX-DVI-4 3.02 Release Notes Correction for display of serial number in the OSD. SPLITMUX-DVI-4 3.00 Release Notes Transparent USB 2.0 Matrix The transparent USB 2.0 Matrix allows switching of up to four USB devices to the connected hosts. New improved Video ICs The new video processor of V-Switch quad II provides best image quality in Quad, PiP, Dual and Fullscreen mode.
- Page 4 More on Cascading By cascading the Splitmux-DVI-4, you can connect up to 16 computers, and show them simultaneously on a single display. Please see drawings at the end of this manual. They are for 8 computers on a single console (or computers with multiple outputs).
- Page 5 SPLITMUX-DVI-4- 1.40 Release Notes Touch Screen Support SPLITMUX version 1.40 adds touch screen support to allow the user to operate four computers with a touch screen. The initial release includes support for touch screens from the following manufacturers: • elo AccuTouch 2116 Controller Series...
-
Page 6: Table Of Contents
- SECURITY LEVELS OSD MODE - PIP - START OSD CONFIGURATION - BACkUP - RECALL - FACTORY RESET OSD CONSOLE - VIDEO OUTPUT - LAYOUT / LANGUAGE - TOUCHSCREEN - FADE - MULTI MONITOR - EDID SPLITMUX-DVI-4 - Installation and Operation Manual... - Page 7 MAINTENANCE AND REPAIR - TECHNICAL SUPPORT ANNEX DECLARATION OF CONFORMITY FCC DECLARATION kEYBOARD COMMANDS DEVICE CONFIGURATION PROGRAM FIRMWARE UPDATE SERIAL CABLE DCP-XML REMOTE CONTROL SUPPORTED TOUCH SCREEN CONTROLLER SUPPORTED VIDEO INPUT SUPPORTED VIDEO OUTPUT CASCADING DELIVERABLES SPLITMUX-DVI-4 - Installation and Operation Manual...
- Page 8 INTRODUCTION FEATURES Thank you for choosing SPLITMUX-DVI-4 from NTI. This product represents the latest state-of-the-art tech- nology in keyboard-video-mouse (kVM) switching. The SPLITMUX-DVI-4‘s key advantage over conventional kVM switches is that it allows you to simultaneously display and administer 4 computers on a single console. It combines key features of a high-end kVM switch and a digital multiviewer scaling and converting videos at both inputs and output.
- Page 9 USB & PS/2 for keyboard / mouse / touch screen / trackball Use either PS/2 or USB ports on the computer to connect keyboard and mouse to SPLITMUX-DVI-4. It supports any combination. To connect the console, SPLITMUX-DVI-4 features two USB ports for mouse, keyboard, touchscreen or trackball connection.
- Page 10 Internal AC adapter, 100 to 240V 50/60 Hz Power consumption: 40 watts Operating temperature: 5 to 45°C Storage temperature: -10 to 60 °C Rel. humidity: 5 to 65% non-condensing *(at WUXGA: reduced blanking only - WUXGAr) SPLITMUX-DVI-4 - Installation and Operation Manual...
- Page 11 Electronic devices should never be placed on the ground between the cables. Never obstruct any vents the device may have. Take care to ensure adequate ventilation. Maintenance: This device is maintenance-free. Never open the casing. No settings can be made inside the device. SPLITMUX-DVI-4 - Installation and Operation Manual...
-
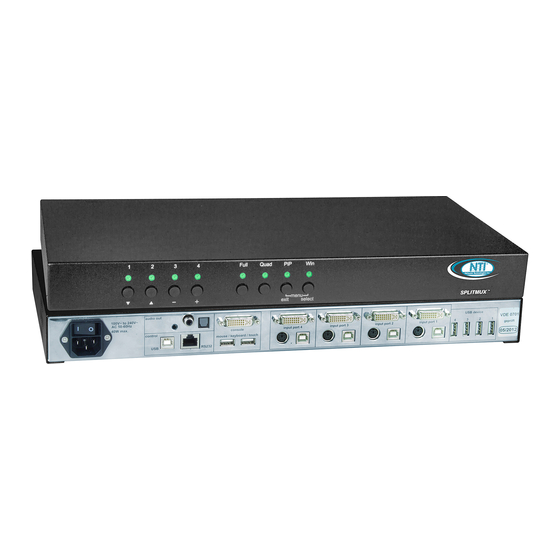
Page 12: Front Panel
FRONT PANEL The SPLITMUX-DVI-4 front panel has seven status indicators (LEDs) and seven buttons. Buttons 1 to 4 switch between channels, LEDs 1 to 4 indicate the status of the individual channels. Full, Quad and PiP buttons and LEDs are used to switch and indicate display modes and other functions, e.g. open the OSD menu etc. -
Page 13: Push Buttons
The selection window closes upon expiry of the channel selection timeout period. Channel selection timeout is configured in OSD under SYSTEM QUAD MODE. Use the “Time out of channel selection:” menu item to define how long the selector is to be displayed. SPLITMUX-DVI-4 - Installation and Operation Manual... -
Page 14: Additional Button Functions
Simultaneously press Quad and PiP buttons for longer than one second to open the OSD menu. Note: While the OSD menu is open, the active computer can still be operated by mouse. OSD Menu SPLITMUX-DVI-4 - Installation and Operation Manual... -
Page 15: Rear Panel
Plug for enclosed power cable. 2 - Reset Press this button, using a suitable pointed object (e.g. ballpoint pen), for an entire reset of SPLITMUX-DVI-4. Note: Due to the “keep alive” function of keyboard and mouse, turning power off/on resets only the video circuit. - Page 16 5. - RS 232 / RJ45 port Connect external serial control devices to this RJ-45 port to operate SPLITMUX-DVI-4 remotely, e.g. connect to this port to access the OSD menu from a computer using the ConfDev device configuration tool (see page 67).
- Page 17 INSTALLATION INSTALLATION SPLITMUX-DVI-4 is best located as close as possible to the sources / computers to reduce the length of cables. By default, SPLITMUX-DVI-4 is delivered as desktop version. Using the rack mount kit supplied, it may also be mounted in a 19” rack. See deliverables page 76.
- Page 18 Printer, USB-Stick, ... POWERING UP ThE SYSTEM Switch on SPLITMUX-DVI-4 with the power switch on the rear panel. All front panel LEDs light up briefly indicating that SPLITMUX-DVI-4 is ready for operation. SPLITMUX-DVI-4 is now in Quad mode (default).
- Page 19 USB DEVICE 1-4 USB PORT STATUS Shows USB 2.0 matrix status CHANGE Switch to / Switching mode / Device name hELP HOTkEY List of keyboard commands INFO Revision level – firmware / hardware CONTACT Contact information SPLITMUX-DVI-4 - Installation and Operation Manual...
- Page 20 Press the Quad / exit button to return to the previous page (higher menu level) or exit the OSD. Changed settings are saved automatically. Note: keyboard commands are possible while the OSD window is open. To activate hotkey commands, use the CTRL key instead of the currently set hotkey (page 65f). SPLITMUX-DVI-4 - Installation and Operation Manual...
-
Page 21: Hotkey
Double Click Hotkeys The command mode is indicated by LED flashing on the console keyboard. Default setting: Multiple Hotkey: CTRL + ALT Note: For a list of hotkeys to operate SPLITMUX-DVI-4 see Annex page 65f. SPLITMUX-DVI-4 - Installation and Operation Manual... -
Page 22: Hotmouse Function
Use the arrow keys to navigate in the SYSTEM menu to the entry HOTMOUSE and press ENTER/SELECT to open the HOTMOUSE window. Hotmouse is an exclusive function that comes with NTI SPLITMUX-DVI-4. It works with your standard mouse or trackball. -
Page 23: Quad Mode
The selector indicates the active channel (mouse and keyboard enabled). Alternatively, press front button „Quad”. Press hotkey + arrow key to switch the selector (active channel) from one channel to the next. After expiry of the selector timeout, the selector closes. SPLITMUX-DVI-4 - Installation and Operation Manual... -
Page 24: Osd Position
Use arrow keys to navigate in the SYSTEM menu to the entry OSD LANGUAGE and press ENTER/SELECT to open the OSD LANGUAGE window. Set OSD LANGUAGE to either Deutsch (German), Español (Spanish), or English (default: English). SPLITMUX-DVI-4 - Installation and Operation Manual... -
Page 25: Security - Security Levels
SECURITY window opens. Enter the desired security level (0 to 8) under “Select security level”. SECURITY LEVEL 0 This is the default setting of SPLITMUX-DVI-4. All settings are allowed and all functions are enabled. SPLITMUX-DVI-4 - Installation and Operation Manual... - Page 26 START (see page 31). This configuration will be maintained when security level, under MODE SPLITMUX-DVI-4 is reset, in case of power failure, or when power is turned off and on again. SECURITY LEVEL 8 Security level 8 allows you to work only on one channel (computer) in a predefined display mode (Quad, Fullscreen or PiP mode).
- Page 27 As security level 2, with the following additional settings in the OSD: SYSTEM DISABLE CHANNEL CONSOLE MULTIMONITOR / VIDEO OUTPUT VIDEO DVI/VGA COMPUTER MOUSE / RESET PS/2 - Switch video output to VGA (using hotkey ‘V’ or front panel buttons 1+2) SPLITMUX-DVI-4 - Installation and Operation Manual...
-
Page 28: Test Pattern
SPLITMUX-DVI-4’s video output. It is recommended to use all available test patterns for the test procedure. To exit TEST PATTERN mode, use the front panel buttons „Quad” „Full” or „PiP” or hotkey commands accordingly. SPLITMUX-DVI-4 - Installation and Operation Manual... -
Page 29: Disable Channel
PiP images are not displayed on screen c) these channels are not selectable in Fullscreen mode For example, if you have connected three computers (channel 1 to 3) to SPLITMUX-DVI-4, use the arrow keys to navigate to the number 3 and confirm by pressing ENTER/SELECT. - Page 30 Default setting is “off”, which prevents any external CONTROL. Use a serial cable to connect a control unit to the RS 232 port (RJ 45) on the SPLITMUX-DVI-4 rear panel. To synchronize several devices, special Y cables are required. Settings for the connection are:...
-
Page 31: Example Of Dcp Control
(see example on page 70) Important: Each time you restart a SPLITMUX-DVI-4 set to synchronize, it will send all its settings to the next connected device. This process also takes place after activating synchronize in the OSD menu. When starting a chain of devices, always start by first switching on the device at the end of the chain. -
Page 32: Example Of Dcp Synchronization
To synchronize, SPLITMUX-DVI-4 1 sends every change in settings as a DCP message via the serial Y cable to the RX input of SPLITMUX-DVI-4 2. SPLITMUX-DVI-4 2 adopts the settings and sends a DCP message via TX output over the Y cable to the RX input of SPLITMUX-DVI-4 3. -
Page 33: Security Levels
DCP up to the specified protection level. Maximum security level for: CONSOLE CHANNEL VIDEO CHANNEL VIDEO LAYOUT PIP LAYOUT PIP SIZE PIP OFFSET PIP ZOOM PIP CHANNEL DUAL CHANNELS (L/R) PIP SCAN TIME SPLITMUX-DVI-4 - Installation and Operation Manual... - Page 34 Use this option to change the position of PiP images. PiP images can be moved vertically to any position on the screen’s right hand margin. Note: All settings also possible via Hotmouse menu, see page 54. SPLITMUX-DVI-4 - Installation and Operation Manual...
- Page 35 ON SCREEN DISPLAY OSD - MODE - PIP PIP Display Modes SPLITMUX-DVI-4 offers the following PiP modes: PIP display mode triple: All other video sources are displayed (three PiP images) Triple gap: PiP images are displayed with a gap in place of the active channel.
- Page 36 Single direct: One channel is selected to be displayed as permanent full image (active channel). Only the PiP can be switched. Press front panel buttons 1, 2, 3, or 4 to switch the full image. SPLITMUX-DVI-4 - Installation and Operation Manual...
- Page 37 OSD, hotkeys or front buttons. Single scan: Within a PiP image, the three other video sources are displayed one after the other; the delay can be set to between one and nine seconds. SPLITMUX-DVI-4 - Installation and Operation Manual...
-
Page 38: Start
This feature allows you to define the start configuration, i.e. the display mode (Quad, Fullscreen, or PiP), active channel, and PiP settings which SPLITMUX-DVI-4 uses after a reset or when the system is powered up. When the START menu is called up, the current start configuration is displayed. To modify your start configuration, change parameters in the channel, mode, and PiP fields. -
Page 39: Recall
Use arrow keys to navigate in the CONFIGURATION menu to the entry RECALL and press ENTER/SELECT to open the RECALL window. Use this feature to replace the current settings with the last configuration saved using the BACKUP command. SPLITMUX-DVI-4 - Installation and Operation Manual... -
Page 40: Factory Reset
Use arrow keys to navigate in the CONFIGURATION menu to the Factory Reset and press ENTER/SELECT to open the DEFAULTS window. Use this function to reset the current settings of SPLITMUX-DVI-4 to the factory default configuration. All four input EDIDs are also reseted to their default values. -
Page 41: Video Output
EDID data. Choose the EDID menu item to check whether the connected monitor provides this data. If the monitor does not offer this data, SPLITMUX-DVI-4 sets VGA mode (640x480@60Hz) as default and activates Sync on Green. -
Page 42: Layout / Language
Use arrow keys to navigate in the CONSOLE menu to the entry kEYBOARD and press ENTER/SELECT to open the kEYBOARD window. Set the keyboard layout to the desired language, English, Deutsch (German), Español (Spanish), Français (French), Italiano (Italian) or Japanese. SPLITMUX-DVI-4 - Installation and Operation Manual... -
Page 43: Touchscreen
To control SPLITMUX-DVI-4 using a touchscreen, connect the touchscreen to SPLITMUX-DVI-4 by connecting the VGA or DVI cable from the SPLITMUX-DVI-4 monitor port to the input of the touchscreen. Connect the USB port of the touchscreen to the SPLITMUX-DVI-4 console USB port. Please see page 8ff for a description of the SPLITMUX-DVI-4 ports. - Page 44 This activates keyboard and mouse of that quadrant and allows operating the computer in full screen. The other sources are not visible during this time. After a timeout of 5 seconds without keyboard/mouse activity, SPLITMUX-DVI-4 automatically switches back to Quad mode. The timeout can be set to values between 1 and 10 seconds.
-
Page 45: Fade
TOUChSCREEN (continued) Mouse position Absolute mouse position SPLITMUX-DVI-4 works best together with touchscreens when using absolute mouse positioning mode with the connected computers. To enable absolute mouse positioning mode, use the menu COMPUTER MOUSE in the OSD (see page 46). -
Page 46: Multi Monitor
MULTI MONITOR window. Multi Monitor is used if computers with multiple video output are connected to SPLITMUX-DVI-4 but only one keyboard and mouse to operate the computer. If you use graphics cards with multiple video outputs, you must assign the computer’s mouse and keyboard to the corresponding video output (channels 1-4). -
Page 47: Edid
EDID (Extended Display Identification Data) is a VESA standard data format that contains basic information about a monitor and its capabilities. This information is stored in the monitor by the manufacturer and can be read by SPLITMUX-DVI-4 or graphics card via a monitor cable’s Display Data Channel (DCC) interface. -
Page 48: Input Status
If there is no signal at this input, the analog signal input will be checked. This function can be used to connect e.g. 8 sources (4x VGA + 4x DVI) via Y-cables to SPLITMUX-DVI-4. SPLITMUX-DVI-4 - Installation and Operation Manual... -
Page 49: Brightness
AUTO/MAN field and set MAN for manual. Use the “+” or “-” keys in the value field to adjust the vertical position between –20 and +20, and the horizontal position between –63 and +63. SPLITMUX-DVI-4 - Installation and Operation Manual... -
Page 50: Screen Width
Use arrow keys to navigate in VIDEO menu to the PHASE line and press ENTER/SELECT to open the PHASE window. Incorrect phase (sampling time of pixel color value) may result in blurring, bad contrast, or poor legibility. Use this setting to adjust phase. SPLITMUX-DVI-4 - Installation and Operation Manual... -
Page 51: Format
Quad mode. By default, „fit to screen” is disabled to display each source in its native aspect ratio in all display modes (Quad, PiP, Full) of SPLITMUX-DVI-4. SPLITMUX-DVI-4 - Installation and Operation Manual... - Page 52 Provided appropriate PiP size (20%) is set, PiP images are thus placed entirely outside the full screen channel. No screen content is overlapped. All content of all souces is visible. SPLITMUX-DVI-4 - Installation and Operation Manual...
-
Page 53: Keyboard
For USB ports, you may specify absolute or relative mouse positioning. Choose absolute mouse positioning if a device is connected to the console that supports absolute coordinates, such as graphic trays, screen pads or kVM extenders. SPLITMUX-DVI-4 - Installation and Operation Manual... -
Page 54: Reset Ps/2
This window presents an overview of the status of the input EDIDs and the display EDID. Use arrow keys to select one EDID and press ENTER/SELECT to open the window with detailed settings for this EDID. SPLITMUX-DVI-4 - Installation and Operation Manual... - Page 55 Use arrow keys to navigate to “Signal“ and press ENTER/SELECT to switch between analog or digital. This setting specifies whether the EDID should identify the SPLITMUX-DVI-4 as an analog or digital device. Usually it is safe to leave this setting at “digital”.
- Page 56 Note: The content of the input EDIDs can be reset to default by the OSD function CONFIGURATION / FACTORY RESET. All user settings will be changed to factory default if factory reset is selected. SPLITMUX-DVI-4 - Installation and Operation Manual...
- Page 57 Connect a single finger printer to log in on all four computers connected to SPLITMUX-DVI-4; or connect a memory stick to copy data from one computer to the stick, and from the stick to another computer connected to SPLITMUX-DVI-4: Data can be copied between computers without beeing networked.
-
Page 58: Switching Mode
When switching channel/computer this USB device/port will automatically be switched to the activated channel/computer. Note: After power on, all USB devices are disconnected from computers except devices with switching mode “automatically with active channel”. SPLITMUX-DVI-4 - Installation and Operation Manual... -
Page 59: Change Name
Use hotkey + „u” (by default: hotkey = Ctrl + Alt) to quickly access the USB DEVICE 1-4 menu. This allows quick access to this menu when switching manually. To directly open the switching menu of e.g. USB device/port 1 use hotkey + „F1” (by default: hotkey = Ctrl + Alt). SPLITMUX-DVI-4 - Installation and Operation Manual... -
Page 60: About
The HELP / ABOUT windows show the current revision levels of SPLITMUX-DVI-4 hardware and firmware. The HELP / CONTACT window contains information on how to contact NTI support. For contact info see also page 62. SPLITMUX-DVI-4 - Installation and Operation Manual... - Page 61 - ACTIVATING hOTMOUSE CURSOR hOTMOUSE Hotmouse is an exclusive function offered by NTI SPLITMUX-DVI-4. It works with your standard mouse or trackball. Similar to using hotkeys on your keyboard, Hotmouse is a quick and comfortable way to operate SPLITMUX-DVI-4 simply with your standard mouse, trackball, or touch screen. No software or additional hardware is required.
- Page 62 Hotmouse Cursor in the respective channel field (1 to 4) and press the left mouse button. Note: When you move into another channel field, the channel number in the Hotmouse Cursor changes. Example: Switch active channel from 1 to 3 SPLITMUX-DVI-4 - Installation and Operation Manual...
- Page 63 Activate Hotmouse Cursor. Move the Hotmouse Cursor to the PiP-image area, hold down the left mouse button and drag the PiPs to the desired vertical position. Note: As soon as the Hotmouse Cursor moves over a PiP image, its appearance changes (arrows, channel number). Example: Move PiP images upwards. SPLITMUX-DVI-4 - Installation and Operation Manual...
- Page 64 As soon as the Hotmouse Cursor moves to the left edge of the PiP image area, its appearance changes (horizontal arrows, channel number). Scaling PiP images up Hold left mouse button Scaling PiP images down Hold left mouse button SPLITMUX-DVI-4 - Installation and Operation Manual...
-
Page 65: Activating
Clicking on the I I arrow symbols sets the minimum or maximum value. After having completed the settings, click on CLOSE to close the Hotmouse Menu window and exit the Hotmouse Function. Hotmouse Help window SPLITMUX-DVI-4 - Installation and Operation Manual... -
Page 66: Full
Use the mouse to navigate to a channel in the Hotmouse Menu and click the left mouse button to activate it. You can also switch to a different mode with the left mouse button. Hotmouse Menu in Fullscreen mode Fullscreen mode SPLITMUX-DVI-4 - Installation and Operation Manual... - Page 67 Triple no gap: PiP images are displayed without a gap. Triple tile: The size of the main image and the PiP images is optimized so that the main image and the PiP ima- ges are shown as large as possible without overlap- ping. SPLITMUX-DVI-4 - Installation and Operation Manual...
- Page 68 Use the „active“ setting to select the active channel. To switch the active channel use the OSD, Hotkeys or front butons. Single scan: Cycles through the PiP images at a set interval. SPLITMUX-DVI-4 - Installation and Operation Manual...
- Page 69 SERVICE INFORMATION MAINTENANCE AND REPAIR SPLITMUX-DVI-4 does not contain any user-serviceable parts. Please report any malfunction or deviation from the functionality described in this manual during operation to NTI’s Technical Support Department. If we cannot solve your problem by phone and find that the fault is due to the unit, we will repair your unit free of charge during our warranty period.
- Page 70 ANNEX DECLARATION OF CONFORMITY SPLITMUX-DVI-4 - Installation and Operation Manual...
- Page 71 Radio Interference Regulation of Industry Canada. Le présent appareil numérique n’émet pas de bruits radioélectriques dépassant les limites applicables aux appareils numériques de la classe A prescrites dans le Règlement sur le brouillage radioélectrique publié par Industrie Canada. SPLITMUX-DVI-4 - Installation and Operation Manual...
- Page 72 ANNEX kEYBOARD COMMANDS SPLITMUX-DVI-4 supports two types of hotkey: „multiple keys” and „double click”. By default, SPLITMUX-DVI-4 is set to „multiple keys”. Use the OSD menu to choose the hotkey type and keys (see page 14). Multiple keys: Press multiple keys plus command key.
- Page 73 Open USB device/port 4 switch menu Other Commands Open OSD Directly open OSD USB Device 1-4 Safe output resolution Directly open OSD PiP menu (In the background display mode switches to PiP as long as menu is open) SPLITMUX-DVI-4 - Installation and Operation Manual...
- Page 74 ANNEX DEVICE CONFIGURATION PROGRAM Installation of Device Configuration Program (CONFDEV) The Device Configuration Program allows you to remotely operate the OSD of SPLITMUX-DVI-4 on an external Windows computer via serial connection. To install the device configuration software CONFDEV, you need •...
- Page 75 Settings Click the „device configuration” button to open the SETTINGS window. It allows you to set the font size for the OSD window, log parameters, and the COM port SPLITMUX-DVI-4 is connected to. Remote OSD operation Click the green arrow to open the On Screen Display (OSD) of SPLITMUX-DVI-4 remotely on your external Windows computer.
- Page 76 „serial cable” (RJ45-DB9 adaptor + RJ45 CAT5 cable) • the current executable firmware file Use the serial cable to connect the COM port of your computer to the RS232 port on SPLITMUX-DVI-4. Start the executable firmware file. Set the desired COM port and press „Update”.
- Page 77 This adaptor is connected to your external serial control device (e.g. computer). To the adaptor any CAT5 patch cable (wired straight-through) can be connected. The CAT5 cable again is connected to the RJ45 port of SPLITMUX-DVI-4. The adaptor (plus a standard CAT5 cable (in green)) always is delivered with SPLITMUX-DVI-4.
- Page 78 DCP-XML REMOTE CONTROL DCP-XML permits remote control of SPLITMUX-DVI-4 by a computer or other devices using the RS-232 serial port of SPLITMUX-DVI-4. To connect to this port, use the "serial cable” (NTI RJ45-DB9 adaptor + standard RJ45 CAT5 cable). DCP is an XML-based protocol.
- Page 79 - MicroTouch™ DST, only restrict: (first calibrate it at computer, then same procedure but while connected at SPLITMUX-DVI-4; only left mouse key support, right mouse key has no function). E.g. integrated at display NEC Multeos 32” und 40“ LCD with touch option.
- Page 80 * digital: all video formats up to 162 MHz pixel clock following DMT, CVT or GTF standard timings are supported. Within this range ANY digital resolution is supported. Analog input may not be detected correctly. See page 47 EDID/DDC. SPLITMUX-DVI-4 - Installation and Operation Manual...
- Page 81 HDTVp 1920 1080 Note: When set to auto (by default) SPLITMUX-DVI-4 reads the EDID of the monitor connected and automatically supports its resolution. Note: Fluid video performance: With digital input and a resolution of 800x600, the input frame rate may be increased up to 180 Hz.
- Page 82 In this master-slave-system, any SPLITMUX-DVI-4 can be used as master or slave. It is the same hardware. One SPLITMUX-DVI-4 is used as master unit. To the output of the master unit the console with keyboard mouse and display or touch screen is connected. To each input of the master unit, a slave SPLITMUX-DVI-4 can be connected.
- Page 83 1 video cable DVI/DVI, length 2.0 m 1 Y-cable PS/2 for mouse and keyboard, length 2.0 m 1 USB cable plug A - plug B, length 2.0 m • 1 serial adaptor with green CAT5 cable. SPLITMUX-DVI-4 - Installation and Operation Manual...
Need help?
Do you have a question about the SPLITMUX-DVI-4 and is the answer not in the manual?
Questions and answers