
Related Manuals for Nexcom NEX 883


Summary of Contents for Nexcom NEX 883
- Page 1 NEXCOM International Co., Ltd. Industrial Computing Solutions Industrial Motherboards NEX 883 User Manual NEXCOM International Co., Ltd. www.nexcom.com Published December 2012...
-
Page 2: Table Of Contents
1.4 I/O Panel ...................5 3.3.6 Intel(R) Smart Connect Technology..........33 3.3.7 AMT Configuration ..............34 Chapter 2: Installation 3.3.8 Super IO Configuration ..............35 3.3.9 ACPI Configuration ..............36 2.1 Screw Holes ..................6 Copyright © 2011 NEXCOM International Co., Ltd. All Rights Reserved. NEX 883 User Manual... - Page 3 4.1 Install Operating System ..............42 4.2 Support CD Information ..............42 4.2.1 Running Support CD ..............42 4.2.2 Drivers Menu ................42 4.2.3 Utilities Menu ................42 4.2.4 Contact Information ..............42 Copyright © 2011 NEXCOM International Co., Ltd. All Rights Reserved. NEX 883 User Manual...
-
Page 4: Preface
The information in this document is subject to change without prior notice designed to provide reasonable protection against harmful interference and does not represent commitment from NEXCOM International Co., Ltd. when the equipment is operated in a commercial environment. This equip-... -
Page 5: Rohs Compliance
NEXCOM are renowned. The model selection criteria will be based on market demand. Vendors and suppliers will ensure that all designed components will be RoHS compliant. Copyright © 2011 NEXCOM International Co., Ltd. All Rights Reserved. NEX 883 User Manual... -
Page 6: Warranty And Rma
? If RMA goods can not be repaired, NEXCOM will return it to the cus- and deterioration during transportation. In case of damages occurred tomer without any charge. during transportation, the repair is treated as “Out of Warranty.” Copyright © 2011 NEXCOM International Co., Ltd. All Rights Reserved. NEX 883 User Manual... -
Page 7: Safety Information
There is a danger of explosion if battery is incorrectly replaced. Replace only with the same or equivalent type recommended by the manufactur- er. Discard used batteries according to the manufacturer’s instructions. Copyright © 2011 NEXCOM International Co., Ltd. All Rights Reserved. NEX 883 User Manual... -
Page 8: Safety Precautions
11. All cautions and warnings on the equipment should be noted. 19. The computer is provided with CD drives that comply with the ap- propriate safety standards including IEC 60825. viii Copyright © 2011 NEXCOM International Co., Ltd. All Rights Reserved. NEX 883 User Manual... -
Page 9: Technical Support And Assistance
2. Maintenance: to keep the unit clean, use only approved cleaning prod- ucts or clean with a dry cloth. 3. CompactFlash: Turn off the unit’s power before inserting or removing a CompactFlash storage card. Copyright © 2011 NEXCOM International Co., Ltd. All Rights Reserved. NEX 883 User Manual... -
Page 10: Global Service Contact Information
Shanghai, 200062, China Tel: +86-27-8722-7400 Taichung City 406, R.O.C. Tel: +86-21-6150-8008 Fax: +86-27-8722-7400 Tel: +886-4-2249-1179 Fax: +86-21-3251-6358 Email: sales@nexcom.cn Fax: +886-4-2249-1172 Email: sales@nexcom.cn www.nexcom.cn www.nexcom.com.tw Japan www.nexcom.cn Copyright © 2011 NEXCOM International Co., Ltd. All Rights Reserved. NEX 883 User Manual... - Page 11 Fax: +33 (0) 1 40 90 31 01 Email: sales.uk@nexcom.eu Email: sales.fr@nexcom.eu www.nexcom.eu www.nexcom.eu Germany NEXCOM GmbH Leopoldstraße Business Centre, Leopoldstraße 244, 80807 Munich, Germany Tel: +49-89-208039-278 Fax: +49-89-208039-279 Email: sales.de@nexcom.eu www.nexcom.eu Copyright © 2011 NEXCOM International Co., Ltd. All Rights Reserved. NEX 883 User Manual...
-
Page 12: Package Contents
1: I haPter ntroduCtIon 1.1 Package Contents Thank you for purchasing NEXCOM NEX 883 motherboard, a reliable motherboard produced under ASRock’s consistently stringent quality NEXCOM NEX 883 Motherboard control. It delivers excellent performance with robust design conforming to NEXCOM commitment to quality and endurance. - Page 13 -ATX : Press button to PWR on after Audio 3 (Mic-In, Line-Out, Line-In) power input ready Serial 2 (RS-232/ 422/ 485) Environment Temperature 0ºC ~ 60ºC PS/ 2 1 (Combo) Copyright © 2011 NEXCOM International Co., Ltd. All Rights Reserved. NEX883 User Manual...
-
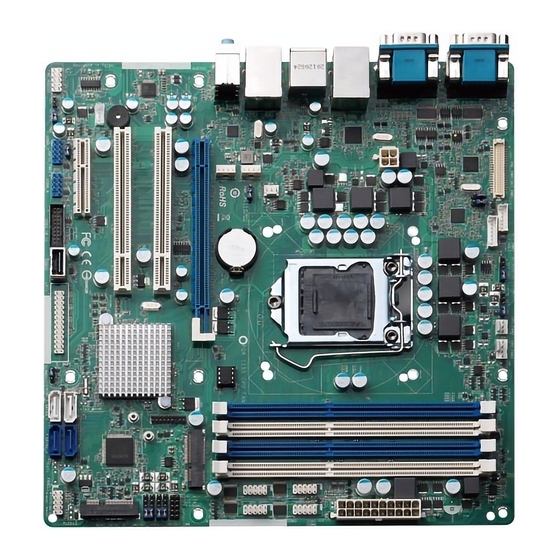
Page 14: Motherboard Layout
SA TA2_2 JGPIO_PWR1 USB3_10_1 1 LPT1 PLED PWRBT N HD_AUDIO1 CI 1 CI 2 CLRCMOS 1 USB12 HDLED R ESET USB6_7 USB8_9 SA TA3_1 SA TA2_3 P ANEL1 Copyright © 2011 NEXCOM International Co., Ltd. All Rights Reserved. NEX883 User Manual... - Page 15 26 SATA3 Connector (SATA3_1) 27 SATA3 Connector (SATA3_0) 28 Clear CMOS Header (CLRCMOS1) 29 Printer Port Header (LPT1) 30 USB 2.0 Port (USB12) 31 USB 3.0 Header (USB3_10_11) Copyright © 2011 NEXCOM International Co., Ltd. All Rights Reserved. NEX883 User Manual...
-
Page 16: I/O Panel
No Link • 7 Line out (Lime) • 14 DisplayPort (DP1) Blinking Orange 100Mbps connection Data Activity Green 1Gbps connection Link * Only NEX 883 has DisplayPort. Copyright © 2011 NEXCOM International Co., Ltd. All Rights Reserved. NEX883 User Manual... -
Page 17: Chapter 2: Installation
Do not over-tighten the screws! Doing so may damage the 4. Whenever you uninstall any component, place it on a grounded anti- motherboard. static pad or in the bag that comes with the component. Copyright © 2011 NEXCOM International Co., Ltd. All Rights Reserved. NEX 883 User Manual... -
Page 18: Installation Of Memory Modules (Dimm)
(White Slot) (Blue Slot) (White Slot) Populated Populated Populated Populated Populated Populated Populated Populated For the configuration (3), please install identical DDR3 DIMMs in all four slots. Copyright © 2011 NEXCOM International Co., Ltd. All Rights Reserved. NEX 883 User Manual... -
Page 19: Installing A Dimm
Step 3. Firmly insert the DIMM into the slot until the retaining clips at both ends fully snap back in place and the DIMM is properly seated. Copyright © 2011 NEXCOM International Co., Ltd. All Rights Reserved. NEX 883 User Manual... -
Page 20: Expansion Slot
Align the card connector with the slot and press firmly until the card is completely seated on the slot. Step 5. Fasten the card to the chassis with screws. Step 6. Replace the system cover. Copyright © 2011 NEXCOM International Co., Ltd. All Rights Reserved. NEX 883 User Manual... -
Page 21: Jumpers Setup
Description Jumper Setting Description (3-pinCLRCMOS1) (3-pin PWR_JP1) 1-2 : AT Mode (see p.8, No. 28) (see p.8, No. 41) 2-3 : AXT Mode Default Clear CMOS Copyright © 2011 NEXCOM International Co., Ltd. All Rights Reserved. NEX 883 User Manual... -
Page 22: Jumper Setting
(5-pin SET_CM6: see p.8, No. 17) 1-2 : +12V (5-pin SET_CM5: see p.8, No. 18) 2-3 : +5V (5-pin SET_CM4: see p.8, No. 19) (5-pin SET_CM3: see p.8, No. 20) Copyright © 2011 NEXCOM International Co., Ltd. All Rights Reserved. NEX 883 User Manual... -
Page 23: Onboard Headers And Connectors
LVDS_A_DATA1# LCD_BLT_VCC LCD_BLT_VCC LVDS_A_DATA1 LVDS_A_DATA2# LVDS_A_DATA2 LVDS_A_DATA3# LVDS_A_DATA3 LVDS_A_CLK# LVDS_A_CLK LVDS_B_DATA0# LVDS_B_DATA0 LVDS_B_DATA1# LVDS_B_DATA1 LVDS_B_DATA2# LVDS_B_DATA2 DPLVDD_EN LVDS_B_DATA3# LVDS_B_DATA3 LVDS_B_CLK# LVDS_B_CLK CON_LBKLT_EN_R CON_LBKLT_CTL_R LCD_BLT_VCC LCD_BLT_VCC LCD_BLT_VCC Copyright © 2011 NEXCOM International Co., Ltd. All Rights Reserved. NEX 883 User Manual... - Page 24 3-Pin CPU fan to the CPU fan connector on this motherboard, GPIO_BLT_DW please connect it to Pin 1-3. Pin 1-3 Connected 3-Pin Fan Installation (3-pin CPU_FAN2) (see p.8 No. 8) +12V CPU_FAN_SPEED Copyright © 2011 NEXCOM International Co., Ltd. All Rights Reserved. NEX 883 User Manual...
- Page 25 COM port headers support serial port modules. RRXD1 DDTR#1 DDSR#1 CCTS#1 RRI#1 RRTS#1 TTXD1 DDCD#1 Signal Name Signal Name DDCD#1 TTXD1 RRTS#1 RRI#1 RRXD1 DDTR#1 DDSR#1 CCIS#1 Copyright © 2011 NEXCOM International Co., Ltd. All Rights Reserved. NEX 883 User Manual...
- Page 26 HDLED+ HDLED- Digital Output 1 Digital Input 1 RESET#1 Digital Output 2 Digital Input 2 DUMMY PLED+ Digital Output 3 Digital Input 3 PLED- PWRBTN# JGPIO_PWR1 Copyright © 2011 NEXCOM International Co., Ltd. All Rights Reserved. NEX 883 User Manual...
- Page 27 LED, speaker and etc. When connecting your chassis front panel module to this header, make sure the wire assignments and the pin assign-ments are matched correctly. SATA3_1 Copyright © 2011 NEXCOM International Co., Ltd. All Rights Reserved. NEX 883 User Manual...
- Page 28 Signal Name Signal Name Signal Name Signal Name STB# SPD0 SPD1 USB_PWR SPD2 SPD3 SPD4 SPD5 SPD6 SPD7 USB_PWR ACK# BUSY SLCT AFD# ERROR# DUMMY PINIT# SLIN# Copyright © 2011 NEXCOM International Co., Ltd. All Rights Reserved. NEX 883 User Manual...
- Page 29 Signal Name Signal Name Signal Name Signal Name Signal Name Dummy IntA_PB_D+ IntA_PB_D- Signal IntA_PB_SSTX+ IntA_PB_SSTX- IntA_PB_SSRX+ IntA_PB_SSRX+ Vbus IntA_PA_D+ IntA_PA_D- IntA_PA_SSTX+ IntA_PA_SSTX- IntA_PA_SSRX+ IntA_PA_SSRX- Vbus Copyright © 2011 NEXCOM International Co., Ltd. All Rights Reserved. NEX 883 User Manual...
- Page 30 MIC2_R MIC2_L Signal Name Signal Name Signal Name Signal Name MIC2_L MIC2_R SPK L- SPK L+ OUT2_R J_SENSE SPK R+ SPK R- OUT2_L PRESENCE# MIC_RET OUT_RET Copyright © 2011 NEXCOM International Co., Ltd. All Rights Reserved. NEX 883 User Manual...
- Page 31 Please connect the fan cable to the fan connector and match the black wire to the ground pin. +12V Signal Name Signal Name Signal Name Signal Name CHA FAN SPEED +12V +12V Copyright © 2011 NEXCOM International Co., Ltd. All Rights Reserved. NEX 883 User Manual...
- Page 32 LAD1 LAD2 LAD3 SMB_DATA_MAIN PCIRST# SMB_CLK_MAIN FRAME PCICLK Signal Name Signal Name Signal Name PCICLK FRAME PCIRST# LAD3 LAD0 +3VSB SMB_CLK_MAIN SMB_DATA_MAIN LAD2 LAD1 S_PWRDWN# SERIRQ# Copyright © 2011 NEXCOM International Co., Ltd. All Rights Reserved. NEX 883 User Manual...
-
Page 33: Serial Ata2 (Sata2)/ Serial Ata3 (Sata3) Hard Disks Installation
Connect one end of the SATA data cable to the motherboard’s SATA2 / SATA3 connector. Step 4. Connect the other end of the SATA data cable to the SATA2 / SATA3 hard disk. Copyright © 2011 NEXCOM International Co., Ltd. All Rights Reserved. NEX 883 User Manual... -
Page 34: Hot Plug And Hot Swap Functions For Sata2/ Sata3 Hdds
If SATA2/ SATA3 HDDs are built as RAID 1 or RAID 5 then it is called “Hot Swap” for the action to insert and remove the SATA2/ SATA3 HDDs while the system is still power-on and in working condition. Copyright © 2011 NEXCOM International Co., Ltd. All Rights Reserved. NEX 883 User Manual... -
Page 35: Driver Installation Guide
CD driver page. Please follow the order from top to bottom to install those required drivers. Therefore, the drivers you install can work properly. Copyright © 2011 NEXCOM International Co., Ltd. All Rights Reserved. NEX 883 User Manual... -
Page 36: Chapter 3: Uefi Setup Utility
<Enter> to get into the sub screen. You can also use purpose only, and they may not exactly match what you see on the mouse to click your required item. your screen. Copyright © 2011 NEXCOM International Co., Ltd. All Rights Reserved. NEX 883 User Manual... -
Page 37: North Bridge Configuration
To jump to the Exit Screen or exit the current screen F7: Discard Changes F9: Load UEFI Defaults F10: Save & Exit F12: Print Screen ESC: Exit Version 2.14.1219. Copyright (C) 2011 American Megatrends, Inc. Copyright © 2011 NEXCOM International Co., Ltd. All Rights Reserved. NEX 883 User Manual... -
Page 38: North Bridge Configuration
F10: Save & Exit F12: Print Screen ESC: Exit Version 2.14.1219. Copyright (C) 2011 American Megatrends, Inc. Setting wrong values in this section may cause the system to malfunction. Copyright © 2011 NEXCOM International Co., Ltd. All Rights Reserved. NEX 883 User Manual... -
Page 39: Cpu Configuration
/ 7 and want to ® enable this function, please set this item to [Enabled]. This item will be hidden if the current CPU does not support Intel SpeedStep technology. Copyright © 2011 NEXCOM International Co., Ltd. All Rights Reserved. NEX 883 User Manual... - Page 40 Selected option will program into C State package limit register. The de- fault value is [Auto]. CPU Thermal Throttling You may select [Enabled] to enable CPU internal thermal control mecha- nism to keep the CPU from overheating. Copyright © 2011 NEXCOM International Co., Ltd. All Rights Reserved. NEX 883 User Manual...
-
Page 41: North Bridge Configuration
Use this item to enable/ disable Intel Virtualization Technology for ® primary display. Configuration options: [VBIOS Default], [CRT], [DVI], Directed I/O. [HDMI] and [LVDS]. The default value is [VBIOS Default]. Copyright © 2011 NEXCOM International Co., Ltd. All Rights Reserved. NEX 883 User Manual... -
Page 42: South Bridge Configuration
Select [Auto] or [Disabled] for the onboard HD Audio Front Panel. Onboard HDMI HD Audio This allows you to enable or disable the Onboard HDMI HD Audio feature. Copyright © 2011 NEXCOM International Co., Ltd. All Rights Reserved. NEX 883 User Manual... -
Page 43: Storage Configuration
Mode]and [RAID Mode]. The default value is [IDE Mode]. AHCI (Advanced Host Controller Interface) supports NCQ and other new features that will improve SATA disk performance but IDE mode does not have these advantages. Copyright © 2011 NEXCOM International Co., Ltd. All Rights Reserved. NEX 883 User Manual... -
Page 44: Intel(R) Rapid Start Technology
5-6 seconds. The default is [Disabled]. as Twitter, Facebook, etc. updated automatically while the computer is in sleep mode. The default is [Enabled]. Copyright © 2011 NEXCOM International Co., Ltd. All Rights Reserved. NEX 883 User Manual... -
Page 45: Amt Configuration
WatchDog Use this to enable or disable MEBx Selection Screen. The default is [Disabled]. Use this to enable or disable WatchDog Timer. The default is [Disabled]. Copyright © 2011 NEXCOM International Co., Ltd. All Rights Reserved. NEX 883 User Manual... -
Page 46: Super Io Configuration
COM2 Configuration Use this to set parameters of COM2. COM3 Configuration Use this to set parameters of COM3. COM4 Configuration Use this to set parameters of COM4. Copyright © 2011 NEXCOM International Co., Ltd. All Rights Reserved. NEX 883 User Manual... -
Page 47: Acpi Configuration
Use this item to enable or disable ACPI HPET Table. The default value is [Enabled]. Please set this option to [Enabled] if you plan to use this motherboard to submit Windows ® Vista certification. Copyright © 2011 NEXCOM International Co., Ltd. All Rights Reserved. NEX 883 User Manual... -
Page 48: Usb Configuration
Use this item to enable or disable the use of USB 2.0 controller. USB 3.0 Controller Use this item to enable or disable the use of USB 3.0 controller. Copyright © 2011 NEXCOM International Co., Ltd. All Rights Reserved. NEX 883 User Manual... -
Page 49: Hardware Health Event Monitoring Screen
[Enabled] F9: Load UEFI Defaults Case Open Feature [Disabled] F10: Save & Exit F12: Print Screen ESC: Exit Version 2.14.1219. Copyright (C) 2011 American Megatrends, Inc. Copyright © 2011 NEXCOM International Co., Ltd. All Rights Reserved. NEX 883 User Manual... -
Page 50: Boot Screen
F1: General Help F7: Discard Changes F9: Load UEFI Defaults F10: Save & Exit F12: Print Screen ESC: Exit Version 2.14.1219. Copyright (C) 2011 American Megatrends, Inc. Copyright © 2011 NEXCOM International Co., Ltd. All Rights Reserved. NEX 883 User Manual... -
Page 51: Security Screen
F1: General Help F7: Discard Changes F9: Load UEFI Defaults F10: Save & Exit F12: Print Screen ESC: Exit Version 2.14.1219. Copyright (C) 2011 American Megatrends, Inc. Copyright © 2011 NEXCOM International Co., Ltd. All Rights Reserved. NEX 883 User Manual... -
Page 52: Exit Screen
F1: General Help devices. F7: Discard Changes F9: Load UEFI Defaults F10: Save & Exit F12: Print Screen ESC: Exit Version 2.14.1219. Copyright (C) 2011 American Megatrends, Inc. Copyright © 2011 NEXCOM International Co., Ltd. All Rights Reserved. NEX 883 User Manual... -
Page 53: Install Operating System
4.2.2 Drivers Menu The Drivers Menu shows the available device’s drivers if the system detects installed devices. Please install the necessary drivers to activate the devices. Copyright © 2011 NEXCOM International Co., Ltd. All Rights Reserved. NEX 883 User Manual...
Need help?
Do you have a question about the NEX 883 and is the answer not in the manual?
Questions and answers