Table of Contents
Advertisement
Quick Links
Advertisement
Table of Contents

Related Manuals for Sagem MF 4640


Summary of Contents for Sagem MF 4640
- Page 1 TELECOM SAGEM FAX 4640 User Manual...
-
Page 2: D Irectory
ELCOME Congratulations for purchasing this SAGEM new generation communication terminal. Your Laser Fax Machine is the answer to all your most demanding professional needs. This User's Manual presents the model in the range: Model Equipment • 33.6 kbps fax. FAX 4640 •... -
Page 3: O Peration
Control panel key: return to previous menu and correct key: manual line taking, tone monitoring data entry. during fax transmission. keys: navigation keys. key: print the functions list. 18.Alphabetical keypad. key: scanning resolution during key: enter or go to next line. transmission or copy. -
Page 5: Table Of Contents
CONTENTS NSTALLATION Installing your terminal Installation requirements Operational precautions Unpacking the machine parts Description Installing the removable parts Installing the printer paper tray Installing the printer output stacker Installing the document feeder for scanning Installing the original document output stacker Loading paper 1-10 Loading paper manually... - Page 6 Technical parameters IRECTORY Creating subscribers records Adding a record Creating subscribers lists Adding a list Adding or deleting a number from the list Consulting a record or a list Modifying a record or a list Deleting a record or a list Printing the directory PERATION Sending...
- Page 7 Other functions 5-12 Logs 5-12 Printing the functions list 5-13 Printing the machine settings 5-13 Memorizing a sequence of keys 5-13 Counters 5-14 Deposit and polling 5-15 Locks 5-16 Entering the locking code 5-16 Locking the keyboard 5-16 Locking the numbers 5-17 Department code 5-17...
- Page 8 Printer errors 6-20 Error messages 6-20 Printer paper jam 6-21 Paper jam at the feeders and trays 6-22 Scanner incidents 6-24 Scanner paper jam 6-24 Miscellaneous incidents 6-25 Machine packing and transportation 6-25 Characteristics 6-26 Unit characteristics 6-26 AFETY AND NVIRONMENT Safety Environment...
-
Page 9: I Nstallation
Installation NSTALLATION NSTALLING YOUR TERMINAL NSTALLATION REQUIREMENTS A proper location helps to ensure that your printer provides you with the long service life for which it is designed. Double-check to make sure that the location you select has the following characteristics: •... - Page 10 Installation • When installing the terminal close to a wall, make sure the distance between the wall and the upper edge of the stacker is at least 25 centimetres for easier opening of the upper cover. • Make sure there is no chance of ammonia or other organic gasses being generated in the area. •...
- Page 11 Installation Terminal The following describes precautions for using the terminal: • Never turn the terminal off or open any of its covers during a print operation. • Never place flammable gasses, liquids or objects that generate magnetic forces near the ter- minal.
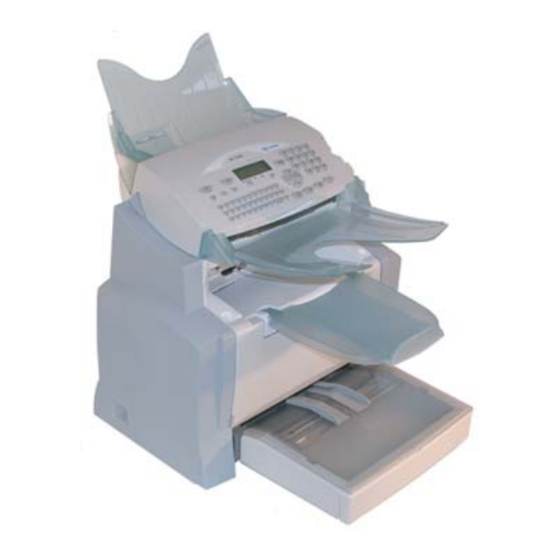
- Page 12 Installation NPACKING THE MACHINE PARTS Remove the plastic bags and check for the parts depicted below. 1: Scanner output stacker 5: Telephone line cord (model depending on country) 2: Printer output stacker 6: Fax/printer terminal 3: Printer paper feed tray 7: Document feed tray for scanning 4: AC power cord (model depending on country)
- Page 13 Installation Pull out the two pads from the paper feed inlet. Press the paper size guide on the right, in order to push both paper size guides to the left or to the right. Pull out the plastic tab and the shipping tape from the paper feed inlet.
- Page 14 Installation ESCRIPTION Scanner Document feed tray for scanning Control panel Adjustable paper guide Original document Scanner release output stacker button Printer output stacker Printer On/Off switch Printer paper Second cassette feed tray paper tray (500 pages) Second paper cassette (option) Chip card reader AC power connector...
- Page 15 Installation NSTALLING THE REMOVABLE PARTS This section details the installation of the terminal's removable parts. NSTALLING THE PRINTER PAPER TRAY Using the printer's left and right notches, gently push the tray in until it stops (as illustrated below).
- Page 16 Installation Fit the tray cover. NSTALLING THE PRINTER OUTPUT STACKER With both hands, slightly bend the centre part of the stacker upwards in order to insert its clips into the notches located on the upper part of the printer. Release the stacker so that it recovers its initial shape.
- Page 17 Installation NSTALLING THE DOCUMENT FEEDER FOR SCANNING Fit the stacker by inserting its two toes into the notches provided at the rear of the terminal. NSTALLING THE ORIGINAL DOCUMENT OUTPUT STACKER Fit the output stacker on the upper front part of the terminal by inserting its two toes into the notches provided.
- Page 18 Installation OADING PAPER Press the paper size guide on the right in order to push both paper size guides to the left or to the right. Place a stack of paper into the tray. In case of letterhead paper, be sure to place the paper printed side up.
- Page 19 Installation Fit the paper tray cover into place. OADING PAPER MANUALLY When printing on special paper, such as 60 to 160 g/m max. colour paper or transparent film (laser printer compatible), you should load the paper manually, one sheet after the other. To do so: Insert your sheet of paper or film between the two feed pawls 1 and 2 located on the paper tray cover until it stops in the printer.
- Page 20 Installation NSTALLING THE SECOND PAPER CASSETTE UNIT OPTION Remove the second paper cassette unit and tray 2 from their packaging, including the protective tape used to hold the various components in place. Place the printer on top of the base unit. Remove the cover from tray 2.
- Page 21 Installation Replace the cassette cover and insert tray 2 into the second paper cassette unit. Remark: Be sure to use both hands whenever tray 2 is removed from or inserted into the second paper cassette unit. 1-13...
- Page 22 Installation ONNECTIONS Key to the diagram: A: Telephone line connector B: AC power connector 1: Line cord (model depending on country) 2: AC power cord (model depending on country) Make sure the On/Off switch is set to 0 (Off). 1-14...
- Page 23 Installation ELEPHONE CONNECTION Plug end of the telephone line (1) into the connector (A) on the fax machine, and the other end into the wall telephone socket. OWER LINE CONNECTION AND SWITCH Caution - Refer to safety procedures in the Safety and Environment Chapter. Plug end of the main power cord (2) into the connector (B) on the fax machine, and the other end in the wall outlet.
- Page 24 Installation 1-16...
-
Page 25: G Etting Started
Getting started ETTING STARTED AVIGATION METHODS RESENTATION The navigator gives you access to the menus visible on screen. The navigator This navigator has 5 keys and allows you to move within the menus available on your machine. -
Page 26: Moving Within The Menus
Getting started Moving within the menus Use key Symbol used Enter the main menu. Select the next line in a menu. Select the previous line in a menu. Confirm entry and go to the following menu. Return to the previous menu. Confirm and exit from the current menu. -
Page 27: Menu-Driven Access
Getting started Use key Symbol used Confirm your entry. Delete a character by moving the cursor to the left. Confirm your entry and return to the initial screen. The display screen The screen has two lines of 16 characters. The cursor shows the line you selected. -
Page 28: Direct Access By Number
Getting started When in the selected menu, use the navigator arrows to move the cursor in front of the required sub-function. FUNCTIONS LISTT LOGS Validate your choice by pressing OK. Direct access by number You may print the functions list (M 51 OK) to know the number of a function. From the stand-by mode: Press the M key, enter the number of the required function and validate your choice by pressing OK. - Page 29 Getting started MAIN MENU 2: S ETUP Functions Function description Page M 20 OK Geographical settings p. 3-3 EOGRAPHICAL 201 OK The country you select will set the corresponding OUNTRY p. 3-3 network, language and keyboard 202 OK Set the network individually p.
- Page 30 Getting started MAIN MENU 7: M AILBOXES Functions Function description Page M 71 OK Create and modify a MBX p. 5-23 REATE M 72 OK Deposit a document into a MBX p. 5-24 EPOSIT M 73 OK Print the contents of a MBX p.
-
Page 31: S Etting Your Machine
Setting your machine ETTING YOUR MACHINE AIN SETTINGS At the first power on, set-up the date and time, the network type, the language and check the others parameters shown hereafter. EFORE TRANSMISSION Date/Time At any moment you may change the date and time on your fax machine. To change the date and time: M 21 OK - SETUP / DATE/TIME Enter the numbers of the required time and date one after another,... -
Page 32: Sending
Setting your machine Summer time / winter time setting A menu is available from which you can choose to change to summer / winter time automatically or not. The 21>DATE/TIME menu includes 2 submenus: Manual mode 211 OK - SETUP / DATE/TIME / MODIFY Your fax machine will prompt you to change the date and time via the numeric pad. -
Page 33: Geographical Settings
Setting your machine Type of network You may connect your fax to either a PSTN or private network such as private automatic branch exchange (PABX). You must select the network which is the most convenient. To select the type of network: M 251 OK - SETUP / NETWORK / NETWORK TYPE Select option then confirm your choice with OK. -
Page 34: Local Prefix
Setting your machine Local prefix This function is used when your fax is installed with a private network, behind a company’s PABX. It allows you to program an additional automatic local prefix (to be defined), enabling you to automatically exit the company’s telephone network system, but only under certain conditions: •... -
Page 35: Before Reception 3-5
Setting your machine Document feed type You may choose the way you want to feed your documents: • from memory, transmission will take place only after memory storage of the document and dialling. It allows you to get your originals back quickly to free up the machine. •... -
Page 36: Saving An Access Code
Setting your machine You can assure document confidentiality by using the 4 digit access code. Once saved, you will require this access code for: • printing fax messages in memory, • activate or deactivate the fax answering machine. Saving an access code M 383 OK - FAX / FAX ANSW. -
Page 37: Technical Parameters
Setting your machine Relay broadcast Your fax machine (initiator) can relay a document, in other words, transmit a document to your subscribers via a remote fax and with a precise relay list. To do this the initiator fax and the remote fax must both have the relay function. To relay you need to supply the remote fax with the document and the relay list number. - Page 38 Setting your machine With the keys , modify the parameter settings by following the table below and press OK. Parameter Setting Signification 1 - SCANNING 1 - NORMAL Default value of the scan mode resolution for the documents 2 - FINE MODE to be transmitted.
- Page 39 Setting your machine Parameter Setting Signification 12 - RINGS 2 TO 5 Number of rings to automatically start your machine. 20 - E.C.M. 1 - WITH This parameter helps correct the calls made on 2 - WITHOUT disturbed telephone lines. It is used when the lines are weak or too noisy.
- Page 40 Setting your machine 3-10...
- Page 41 Directory IRECTORY Your fax lets you create a directory by memorising subscriber records and subscriber lists. • Your machine can store up to 250 subscriber records with names and phone numbers. • You may also group several names to build a subscriber list with up to 24 subscriber lists. A subscriber list is made from the subscriber records already stored.
- Page 42 Directory REATING SUBSCRIBERS RECORDS For each subscriber record you are not required to fill in each line, only name, tel are required: • of your subscriber, NAME • , and fax number of your subscriber, • , this number is automatically assigned by the fax, it allows quick access to the RECORD NO.
- Page 43 Directory REATING SUBSCRIBERS LISTS A subscriber list is made from the subscriber records already stored. For each list fill in the following lines: • of the list, NAME • to the list, this number is automatically assigned by the fax. It allows NUMBER ASSIGNED quick access to the answering machine, •...
- Page 44 Directory For every subscriber included in the list repeat the above step then validate with OK. Remark: You can stop record creation at any time by pressing The list ID number will automatically appear on the screen, if you wish to modify this number you may do so by choosing another free number and validate with OK.
- Page 45 Directory ODIFYING A RECORD OR A LIST M 13 OK - DIRECTORY / MODIFY The directory appears in alphabetical order. keys to select the subscriber list (L) you wish to modify and press OK Use the to confirm. Modify the line or lines in the subscriber record or subscriber list and confirm each modification with OK.
- Page 46 Directory...
- Page 47 PERATION ENDING OCUMENT POSITIONING Scanner Place your original documents in the document feeder: - face down, Paper guide - first page under the stack. Set the paper guide to the document width. Once the operation is over, take your original documents back from the document exit tray.
-
Page 48: Contrast
HOOSING THE RESOLUTION CONTRAST Resolution You have 4 modes for document transmission. The mode choice depends on the type of document to be transmitted: • Normal mode, symbolised by Std at the bottom of the display screen. To be used for good quality documents, without drawings or small details, •... -
Page 49: From The Redial Key
Assigned number dialling Press key Your fax lists the subscribers records and lists in the Directory in alphabetical order. then Use keys of the navigator to scroll all subscribers for choice, and choose the required subscriber or subscriber list. Press key Then press the letter assigned to the subscriber (refer to paragraph 11 OK - Directory / New Contact, page 4-2). -
Page 50: Immediate Transmission
RANSMISSION OVER THE UBLIC WITCHED ELEPHONE (PSTN) ETWORK Immediate transmission Position the document (refer to paragraph Document positioning, page 5-1). Enter the fax number or choose your dialling mode (refer to paragraph Dialling, page 5-2) then press The "Line" icon flashes during the call phase, it stays lit when both faxes are in communication. At the end of transmission the initial screen is displayed. -
Page 51: Transmission With Auto Redial
You may enter the number of pages before transmission and confirm with OK. Confirm postponed transmission by pressing key Your document is stored and will be sent at the new time. Transmission with auto redial This function allows you to monitor the dialling operation during a fax transmission. In this case, the maximum transmission rate will be 14400 bps. -
Page 52: Tx Forwarding
Set the re-direction contact M 3912 OK - FAX / REROUTING / CALL NUMBER Using the keys within the navigator select the subscriber from the directory (if the directory is empty the display will show DIRECTORY EMPTY). Enter the number of the subscriber manually or store the name and related number in the directory M 3913 OK - FAX / REROUTING / COPY Local printout of the information relayed to your system... -
Page 53: Consult Or Modify The Waiting Queue Immediately Perform Transmission From The Waiting Queue
RANSMISSION WAITING QUEUE This function lets you obtain a recap of all documents queuing, for transmission, including those in deposit or in delayed transmission, etc. It allows you to: • consult or modify the waiting queue. In this waiting queue the documents are coded the following way: Order number in the queue / document status / subscriber’s telephone number. -
Page 54: Cancelling A Transmission In Progress
Printing a document in waiting or in deposit M 64 OK - COMMANDS / PRINT In the waiting queue, select the desired document and confirm your choice with OK. Print the waiting queue M 65 OK - COMMANDS / PRINT LIST A document called ** COMMAND LIST ** is printed. -
Page 55: Standard Copy
ECEPTION Reception of all documents over the telephone network is done one at a time at fax reception. ECEPTION OVER THE UBLIC WITCHED ELEPHONE (PSTN) ETWORK Fax reception depends on the parameter settings of your machine: OPYING Your fax offers to print out one more copies of one or more pages. OCAL COPY Standard copy Position the document face down (refer to paragraph Document positioning, page 5-1). -
Page 56: Scanner Settings
Set the required contrast value with keys and press OK to confirm. Set the required brightness value with keys and press OK to confirm. Choose the type of paper, with keys and press OK to confirm. NORMAL THICK and press OK to Choose the paper tray, with keys AUTOMATIC... - Page 57 Zoom Your fax offers to reduce or magnify a specific part of a document from 25% to 400%. Enter the desired zoom value with the numerical keypad ( ZOOMING Confirm your setting by pressing key OK. Assembly Choose the copy type between ASSEMBLED NOT ASSEMBLED Confirm your choice by pressing key OK.
-
Page 58: Logs
Printer settings Paper Select the type of paper, with keys NORMAL THICK Confirm your setting by pressing key OK. 1) When the THICK type of paper is selected, the printing speed is slowed down.. Remarks: 2) Use the manual feeder for paper substances over 90 g/m Paper tray Select the paper tray to be used ( ) using keys... - Page 59 RINTING THE FUNCTIONS LIST You may print the functions list of your fax machine at any time: Press the i key. To print the functions list: M 51 OK - PRINT / FUNCTIONS LIST RINTING THE MACHINE SETTINGS At any moment, you may print the list of your fax’s parameter settings to control any changes possibly made to the default parameters.
-
Page 60: Counters
Press keys 3, 1 then OK. Enter the subscriber fax number. Press key and enter the second subscriber fax number or subscribers list. Repeat this last step for all subscribers or subscribers lists. Press key F1: the sequence is memorized. To send a fax directly to your subscriber (key F1 preset) Press F1. -
Page 61: Placing A Document In Deposit
EPOSIT AND POLLING You may Deposit a document in your fax and keep it available to one or more subscribers who can obtain a fax of this document by calling your fax with the Poll function. Setting the machine for document deposits, you must define the type: •... -
Page 62: Entering The Locking Code
Depending on the type of poll you should: Choice Procedure Immediate poll Press Delayed poll Press OK Next to the current time, enter the time you wish to poll the document and press OCKS There are restrictions to the use of your fax: •... -
Page 63: Activating The Department Code
Press key OK to confirm. Remark: After each operation, the machine interlocks automatically. Locking the numbers This function locks dialling and the numerical keypad is disabled. Transmissions are only possible from numbers included in the directory. You can still send mails by typing in the addressee’s address (if this has no numbers in it). To access the number interlocking option: M 813 OK - ADVANCED FCT / LOCK / LOCK NUMBER Enter the four-digit interlock code with the keypad. -
Page 64: Setting The Department Codes
Deactivating the department code M 881 OK - ADVANCED FCT / DEPT. CODES / ACTIVATION Using the browser’s keys, select WITHOUT. Press OK to confirm; the function is deactivated. Setting the department codes The administrator must enter the department number to be created, between 01 and 98; the number 00 is reserved for the administrator to enter his or her own department code and department name before being able to record other codes for different users. -
Page 65: Creating A Department Code
Creating a department code Only the administrator, using the Mastercode is able to attribute other department codes. Enter your mastercode and confirm by OK. M 882 OK - ADVANCED FCT / DEPT. CODES / NEW DEPT. Enter a number between 01 and 98 or select a free number using the keys, as shown on the machine’s display. -
Page 66: Printing A Department Code
Printing a department code The administrator may print reports for each department entered. These reports show the department number (between 01 and 98), its name, the associated access code and the number of pages transmitted and copied by this department. M 884 OK - ADVANCED FCT / DEPT. - Page 67 SE OF THE DEPARTMENT CODES BY A DEPARTMENT To access the different machine functions, each department must enter its own access code as delivered by the administrator. When the "DEPARTMENT CODE" function is activated, the screen displays: THU 20 FEB 10:15 ENTER DEPT.
- Page 68 HARGE CODE NTERING THE CHARGE CODE The charge code is a number that is sent on-line after your correspondent’s fax machine number. To add a charge code after entering your correspondent’s number you must press the key. This inserts the "+" symbol after the number and you may then type your charge code. Example: 9738088444+**** The charge code will always be hidden.
-
Page 69: Mbx Management
Later you may: • modify the features of an MBX, • print the contents of an MBX, only possible if the MBX contains one or more documents (with a star "*" next to the MBX). When the contents of an MBX have been printed it becomes empty, •... -
Page 70: Printing The Mbx List
Select the menu , then confirm your choice with OK. MAILBOX CODE MAILBOX NAME Perform data modification of the menu and confirm with OK. If needed, repeat the last two steps for the other menu. Printing the contents of a MBX M 73 OK - MAILBOXES / PRINT MBX Select a free MBX out of the 31 MBX, or enter the number of a free MBX directly (1-31) and confirm with OK. -
Page 71: Mbx Polling From A Remote Fax
Enter your subscriber’s number for MBX deposit or choose your dialing mode (refer to paragraph Dialling, page 5-2) and validate with OK. Enter the subscriber’s MBX number and confirm with OK. If you wish to delay transmission, enter the new transmission time next to the current time and press OK. - Page 72 5-26...
-
Page 73: Maintenance
Maintenance AINTENANCE AINTENANCE ENERAL To ensure the best operating conditions for your fax, it is recommended that you regularly clean the inside. For normal usage, please respect the following rules: • Never leave the cover open unless required. • Do not attempt to oil the machine. •... -
Page 74: Replacing Cartridges
Maintenance EPLACING THE CONSUMABLES TONER AND DRUM To check the remaining capacities of the consumables: M 85 OK - ADVANCED FCT / CONSUMABLES The toner cartridge and the drum cartridge come with a chip card. After replacing a consumable item in the printer, you need to inform the machine about its features. Replacing cartridges Replacing the toner cartridge To replace the toner cartridge, proceed as shown below. - Page 75 Maintenance Caution - The fusing unit located inside the printer may become very hot during operation. To avoid injury - do not touch. 2 - Remove the drum/toner cartridge assembly. In order to protect the environment, do not throw away the used toner cartridge. Used cartridges should be disposed of in accordance with local regulations concerning waste materials.
- Page 76 Maintenance 3 - Unlock the toner cartridge by turning the blue locking clip in the direction shown in the illustration below. 4 - Separate the drum cartridge from the toner cartridge. Drum cartridge Toner cartridge 5 - Remove the new toner cartridge from its box, holding it firmly in both hands.
- Page 77 Maintenance 6 - Shake the toner cartridges alternately in the directions shown by the arrows in the illustration below. 7 - Remove the protective plastic strip from the cartridge.
- Page 78 Maintenance 8 - Insert the new toner cartridge in the drum cartridge until locked in place. Caution - Make sure not to touch the green coloured drum roller located under the fold away flap of the drum cartridge, which could cause deterioration to the print quality of your faxes and your local photocopies.
- Page 79 Maintenance 9 - Insert the toner/drum cartridge in the printer as shown below. 10 - Close the printer cover pressing it carefully but firmly until it clicks into position. Press OK on the scanner control panel. The display shows: TUE 02 APR 13:39 INSERT GAUGE CARD...
- Page 80 Maintenance Insert chip card (supplied with the toner cartridge) into the card reader ensuring that the chip is entered as shown in the illustration below. The following is displayed on the scanner control panel screen: CHANGE TONER? YES = OK - NO = C Press OK.
-
Page 81: Replacing The Drum Cartridge
Maintenance Replacing the drum cartridge To replace the drum cartridge, proceed as shown below. When the display shows: CHANGE DRUM <OK> TO CONFIRM 1 - Open the printer cover. - Page 82 Maintenance 2 - Remove the drum/toner cartridge assembly. In order to protect the environment, do not throw away the used drum cartridge. Used cartridges should be disposed of in accordance with local regulations concerning waste materials. Caution - The fusing unit located inside and at the bottom of the printer may become very hot during operation.
- Page 83 Maintenance 4 - Separate the drum cartridge from the toner cartridge. Caution - Make sure not to touch the green coloured drum roller located under the fold away flap of the drum cartridge, which could cause deterioration to the print quality of your faxes and your local photocopies.
- Page 84 Maintenance 5 - Insert the new toner cartridge in the drum cartridge until locked in place. 6 - Insert the toner/drum cartridge in the printer as shown below. 6-12...
- Page 85 Maintenance 7 - Close the printer cover pressing it carefully but firmly until it clicks into position. Press OK on the scanner control panel. The display shows: TUE 02 APR 13:39 INSERT GAUGE CARD 6-13...
- Page 86 Maintenance Insert chip card (supplied with the drum cartridge) into the card reader ensuring that the chip is entered as shown in the illustration below. Flèche verte The following is displayed on the scanner control panel screen: CHANGE DRUM? YES = OK - NO = C Press OK.
-
Page 87: Cleaning The Printer
Maintenance LEANING Cleaning the printer Dust, dirt and paper debris on the outer surfaces and inside the printer can interfere with printer performance. Clean the printer regularly. Caution - Use a soft cloth to clean the printer. Never use abrasive or corrosive detergents. The fusing unit can become very hot during operation. -
Page 88: Cleaning The Paper Feed Roller
Maintenance Cleaning the paper feed roller 1 - Turn off the printer and unplug the power cord. 2 - Remove the drum/toner cartridge set from the machine. 3 - Use a soft cloth to clean the paper feed roller located under the fusing unit. 4 - Put the drum/toner cartridge set back in place (refer to paragraph Replacing cartridges, page 6-2). -
Page 89: Communication Errors
Maintenance ERVICING For guaranteed performance of your terminal, some maintenance work (replacing the fusing unit and the transfer roll) has to be done on the printer approximatly every 50,000 printed pages. Please contact your supplier for this operation. CANNER CALIBRATION You can perform this operation when the quality of photocopied documents is no longer satisfactory. -
Page 90: Communication Error Codes
Maintenance Transmission from memory You have the choice between: • waiting until the transmission takes place at the given time, • restarting the transmission using the transmission queue (refer to paragraph Immediately per- form transmission from the waiting queue, page 5-7). In this case, for a document composed of several pages, the transmission will take place from the page where the error occurred, •... - Page 91 Maintenance Code 0B - Wrong number of pages There is a difference between the number of pages indicated during preparation for the transmission and the number of pages sent, check the number of pages in the document. Code 0C - Received document error Ask the subscriber who called you to check the length of his document (it may be too long to be completely received).
-
Page 92: Printer Errors
Maintenance RINTER ERRORS Error messages If the printer has one of the problems described below, the corresponding message is displayed on the screen. Message Action Replace the toner cartridge. CHANGE TONER <OK> TO CONFIRM Proceed as indicated in paragraph Replacing the toner cartridge, page 6-2. -
Page 93: Printer Paper Jam
Maintenance Printer paper jam Inside the printer Use the following procedure to remove any sheets of paper jammed inside the printer. Caution - The fusing unit inside the printer can become very hot during operation. To avoid injury - do not touch. Open the front cover of the printer. -
Page 94: Paper Jam At The Feeders And Trays
Maintenance Paper jam at the feeders and trays The figures below show different type of paper jam you might experience when using your machine. Remove any stuck sheets as shown by the arrow depending on where the paper jam occurs At the printer output stacker 6-22... - Page 95 Maintenance At the paper tray At the manual feed tray Second cassette unit and paper tray (option) 6-23...
-
Page 96: Scanner Paper Jam
Maintenance CANNER INCIDENTS Scanner paper jam When a paper jam occurs, the message REMOVE DOCUMENT appears on the control panel screen. If jams often occur in a specific part of the unit, the latter needs to be checked, cleaned or repaired. Open the scanner cover by pressing key (A). -
Page 97: Machine Packing And Transportation
Maintenance ISCELLANEOUS INCIDENTS At switch-on nothing appears on screen Check that the mains cable is plugged in, and check the mains plug if necessary. The fax does not detect the presence of your inserted document. The message READY does not appear on the screen At the start and during scanning, REMOVE DOCUMENT appears on the screen Remove the document or press the key. -
Page 98: Unit Characteristics
Maintenance HARACTERISTICS Device type: Office fax machine, fast, operation with all Group 3 devices according to ITU-T recommendations. NIT CHARACTERISTICS Dimensions: Width: 430 mm Depth: 460 mm Height: 420 mm (not including stacker) Weight: 14 kg Electric power supply: 220-240 V - 50/60 Hz - 4 A Power consumption (max. - Page 99 Maintenance Internet (general specifications): V90 modem (up to 56 kbps) TCP/IP/PPP protocols SMTP/POP3/MIME protocols for E-mails File format: - Image: TIFF-F for black/white documents and JPEG for color documents - PDF: monochrome and color Specifications may change for improvement without prior notice. 6-27...
- Page 100 Maintenance 6-28...
-
Page 101: S Afety And E Nvironment
Safety and Environment AFETY AND NVIRONMENT AFETY SAFETY WARNING Before powering on your unit, make sure the mains outlet it is connected to meets the require- ments printed on the warning label on your unit, or on the separate power supply (depending on the model). -
Page 102: Environment
NERGY The purpose of the International ENERGY STAR® Program is to promote the development and popularization of energy-efficient office equipment. As an ENERGY STAR® Partner, Sagem Communication has determined that this product meets the ENERGY STAR® guidelines for energy efficiency. - Page 103 (temperature, humidity), the average number of pages per print operation, the type of paper used, etc. The declaration of compliance can be consulted on the site www.sagem.com category "Support", or can be requested at the following address: SAGEM Communication - Customer relations department...
- Page 104 Data subject to change without notice *252551036A* Sagem Communication Société anonyme au capital de 300 272 000 € - 480 108 158 RCS PARIS 27, rue Leblanc - 75512 PARIS CEDEX 15 - FRANCE www.sagem.com...
Need help?
Do you have a question about the MF 4640 and is the answer not in the manual?
Questions and answers