Table of Contents
Advertisement
Quick Links
Thank you for purchasing the Roland JP-8080 synthesizer module.
Before using this unit, carefully read the sections entitled:
"IMPORTANT SAFETY INSTRUCTIONS" (page 2)
"USING THE UNIT SAFELY" (page 3)
"IMPORTANT NOTES" (page 15)
These sections provide important information concerning the
proper operation of the unit. Additionally, in order to feel
assured that you have gained a good grasp of every feature
provided by your new unit, this manual should be read in its
entirety. The manual should be saved and kept on hand as a
convenient reference.
Copyright © 1998 ROLAND CORPORATION
All rights reserved. No part of this publication may be reproduced in any form
without the written permission of ROLAND CORPORATION.
Advertisement
Table of Contents

Related Manuals for Roland JP-8080


Summary of Contents for Roland JP-8080
- Page 1 Thank you for purchasing the Roland JP-8080 synthesizer module. Before using this unit, carefully read the sections entitled: “IMPORTANT SAFETY INSTRUCTIONS” (page 2) “USING THE UNIT SAFELY” (page 3) “IMPORTANT NOTES” (page 15) These sections provide important information concerning the proper operation of the unit.
-
Page 2: Important Safety Instructions
The lightning flash with arrowhead symbol, within an CAUTION equilateral triangle, is intended to alert the user to the RISK OF ELECTRIC SHOCK presence of uninsulated “dangerous voltage” within the DO NOT OPEN product’s enclosure that may be of sufficient magnitude to ATTENTION : RISQUE DE CHOC ELECTRIQUE NE PAS OUVRIR constitute a risk of electric shock to persons. -
Page 3: Using Thr Unit Safely
• Before using the unit in a foreign country, consult instructions below, and the Owner's Manual. with your retailer, the nearest Roland Service Center, or an authorized Roland distributor, as list- ......................ed on the "Information" page. • Do not open or perform any internal modifications ...................... -
Page 4: Table Of Contents
Broadening the Sound (Multi Effects Level) ..................30 Adding an Echo Effect (Delay) ......................31 Storing a Performance ..........................32 Step 3. Shortcuts! Convenient Functions of the JP-8080 Using Voice Modulator..........................35 Producing an Effect as though an Instrumental Sound were Talking (Formant Filter)......35 Adjusting the Volume of Each Frequency Range to Create a New Sound (Filter Bank) ......36... - Page 5 Checking the Current Value of a Parameter (Temporary Scope) ...............63 Edit While Viewing the Slider/Knob Values (Edit Scope) ................64 Resetting the Sound to the Panel Settings (Manual)..................65 Playing Sounds Using the JP-8080 Alone (Preview) ................65 Sound Edit, Convenient Functions Chapter 3. Functions that Modify the Sound Selecting the Basic Waveform for the Sound (1) (Oscillator 1) ............66...
- Page 6 PITCH ENVELOPE Section..........................72 Modifying the Brightness........................73 FILTER Section ..............................73 FILTER ENVELOPE Section ..........................75 Modifying the Volume...........................76 AMP (Amplifier) Section ..........................76 AMP ENVELOPE (Amplifier Envelope) Section ..................76 Modulating the Sound (LFO 1)......................77 Maiking Effect Settings (Effects) ......................78 Adjusting the High and Low Tone (Tone Control) ..................78 Adding Spaciousness and Depth to the Sound (Multi Effects Level) ............78 Adding an Echo Effect (Delay) ........................79 Chapter 4.
- Page 7 Erasing a Motion ..............................102 Chapter 8. Using Voice Modulator How Voice Modulator Work.......................103 Internal Structure of The JP-8080........................104 Setting Up the Voice Modulator for Immediate Use (Voice Modulator Initialize) ....106 Types of Voice Modulator Initialize......................107 Making Voice Modulator Settings in Edit Mode ................108 Setting the Type of The Formant Filter/Filter Bank (Algorithm).............108...
- Page 8 Formatting a Memory Card ...........................129 Saving to a Memory Card..........................129 Erasing a Pattern/Motion That was Saved on a Memory Card ...............133 Restoring Saved Settings to the JP-8080 .......................134 Saving Settings on an External Sequencer (Bulk Dump)..............137 Procedure ................................137 Types of Bulk Dump............................137 Restoring Saved Settings to the JP-8080 .......................138...
- Page 9 Recording Procedure............................146 Various Ways to Use Voice Modulator.....................146 Inputting an External Sound Directly Into the Voice Modulator .............146 Inputting an External Sound Synthesized on the JP-8080 Into the Voice Modulator......147 Using the JP-8080 with the MC-505 ....................149 Appendices Sound-Creating Tips Bass (1)..............................152...
- Page 10 Channel Messages............................168 System Messages..............................169 Troubleshooting ............................170 Error Messages............................174 Performance List............................176 Patch List..............................179 Parameter List ............................182 Patch Parameters..............................182 Performance Common Parameters .......................184 Performance Part Parameters.........................186 System Parameters............................186 Recording Parameters .............................187 Transmit/Receive Setting List......................188 Voice Modulator Initialize Setting List ....................189 MIDI Implementation..........................191 MIDI Implementation Chart.......................208 Specifications ............................209 Index ................................211...
-
Page 11: Main Features
Main Features The JP-8080 is a synthesizer sound module which uses digital technology to simulate an analog synthesizer. It lets you enjoy creating tonal changes in realtime, and a wide range of performance possibilities. A further enhancement of the JP-... -
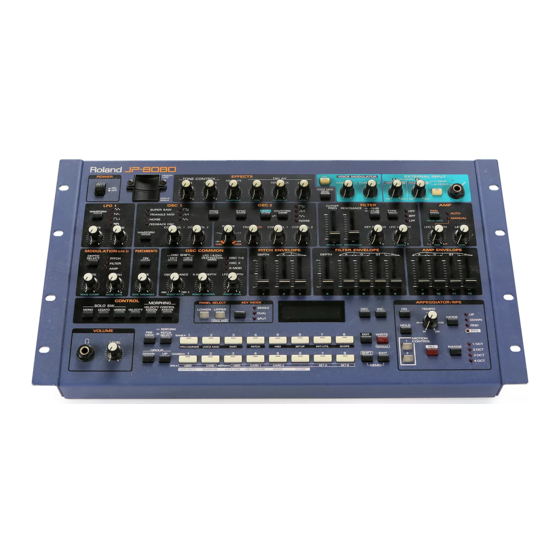
Page 12: Front And Rear Panel
PORTAMENTO section VOICE MOD SEND (voice modulator send) Make settings for portamento (a function which smoothly Turn this on when you wish to input the JP-8080 patch to changes the pitch between notes) (p.88). the Voice Modulator. OSC 1 (oscillator 1) section VOICE MODULATOR section Select the waveform which will be the basis of the sound. -
Page 13: Control Section
FILTER FILTER ENVELOPE sections VOLUME LEVEL knob Adjust the filter to modify the brightness of the sound (p.28, This controls volume of the entire JP-8080. Rotating the knob 73–75). toward the right will increase the volume (p.19). AMP (amplifier) PREVIEW button... - Page 14 Front and Rear Panel – Front /Rear Panel – SHIFT button ARPEGGIATOR/RPS section Use this button in conjunction with other buttons to access Here you can make arpeggiator/RPS settings (p.90, 92). You functions printed on the front panel in a white box (e.g., RPS can also record RPS patterns or register Motions.
-
Page 15: Important Notes
Placement ••••••••••••••••••••••• tents of data that was stored in the unit’s memory and/or a memory card once it has been lost. Roland Corporation Using the unit near power amplifiers (or other equipment assumes no liability concerning such loss of data. -
Page 16: Printing Conventions In This Manual
References such as (p.**) indicate pages in this manual to which you can refer. The dark/lit/blinking status of an indicator is distinguished as follows. dark blink Performances/Patches for the Explanation of the Functions On the JP-8080, the performances/patches for the explanation of the functions are provided: Performance P1: 83 Template1: Individual Trigger (p.118) Delay Sync, Chorus Sync (p.119, 120) -
Page 18: Step 1. Playing The Sounds
Step 1. Playing the Sounds Connections The JP-8080 does not contain an amplifier or speakers. In order to hear the sound, you will need to con- nect a keyboard amp, audio system, or headphones. Audio cables, MIDI cables, and stereo headphones are not included. You may purchase these items sepa- rately at your dealer. -
Page 19: Turning On The Power
Set your MIDI keyboard to a mode in which it transmits only a single channel of MIDI messages. In order to take full advantage of the superior sound of the JP-8080, we recommend that you listen to it in stereo. If you are using a mono system, make connections using the OUTPUT L (MONO) jack. -
Page 20: Turning Off The Power
Restoring the Factory Settings (Factory Reset) If you have modified the settings on your JP-8080 after you purchased it, you may find it difficult to fol- low the explanations in this Quick Start section. If this is the case, you can use the following procedure to restore the factory settings before you read through the Quick Start section. -
Page 21: Listening To The Demo Songs
• • • • • • • • • • • • • • • • • • • • • • • • • • • • • • • • • • • • • • • • • • • • • • • • • • • • • • • • • • • • • • • • • • • • • • • • • • • • • • • • • • • • • • • • • • • • • • • • • • • • • • • • • • • • • • • • • • • • Listening to the Demo Songs The JP-8080 contains demo songs that show off the musical potential of the instrument. Here’s how to lis- ten to these demo songs. -
Page 22: Midi Channel Settings
The JP-8080 receives MIDI messages from another device, and produces sound in response. In order to play the JP-8080 from a MIDI keyboard connected to REMOTE KBD IN, you will need to set the transmit channel of the MIDI keyboard to match the Remote Keyboard Channel of the JP-8080. -
Page 23: Playing The Sounds
Playing the Sounds The JP-8080 contains a wide variety of sounds. In this section we will select Performances to hear the vari- ous sounds. The Performances are organized into the following groups. USER: Sounds which can be rewritten PRESET1–3: Sounds which cannot be rewritten CARD01–64: Sounds saved on an optional memory card... -
Page 24: Using The Preview Function
• • • • • • • • • • • • • • • • • • • • • • • • • • • • • • • • • • • • • • • • • • • • • • • • • • • • • • • • • • • • • • • • • • • • • • • • • • • • • • • • • • • • • • • • • • • • • • • • • • • • • • • • • • • • • • • • • • • • Using the Preview Function •••••••••••••••••••••••••••••• The JP-8080 allows you to audition notes without a MIDI keyboard or any other external device. This is called the “Preview” function. -
Page 25: Step 2. Modifying The Sound
Press [WAVEFORM] three times to select “FEEDBACK OSC.” Solo SW [MONO] will be turned on, and the JP-8080 will play monophonically. (one note at a time) When FEEDBACK OSC is selected, the Solo SW [MONO] or [LEGATO] will be turned on. This cannot be... -
Page 26: Using The External Inputs
Leave [CONTROL 2] at the position shown in the illustration, and rotate [CONTROL 1] to change the har- monics in various ways. When you move [CONTROL 1]/[CONTROL 2], the waveform name and parameter name will appear in the display. Using the same procedure, listen to the sound of other waveforms. Rotate [CONTROL 1]/[CONTROL 2] to change the sound in various ways. - Page 27 Settings have been made so moving the sliders or knobs will simultaneously modify both the Upper and Lower sounds. Use the various functions described below to modify the sound in. Be aware that selecting a sound on your synthesizer (keyboard) in step 4 or later will cause the JP-8080’s performance to change as well. (p.60) •...
-
Page 28: Making The Sound Brighter/Darker (Cutoff Frequency)
Making the Sound Brighter/Darker (Cutoff Frequency) Let’s try modifying the brightness of the sound. Select the Performance P1: 88 (p.23). By playing the MIDI keyboard, you will hear the Upper Patch sound. Let’s modify this sound. Move the FILTER section [CUTOFF FREQ] slider. Raising the slider will make the sound sharper and brighter. -
Page 29: Modulating The Sound (Lfo 1)
Leave [RESONANCE] at the position shown in the illustration, and now try moving [CUTOFF FREQ]. You will hear a characteristic synthesized sound. A combination of changes in [CUTOFF FREQ] and [RES- ONANCE] is one of the most frequently used sound modifications on synthesizers. •... -
Page 30: Adjusting The High And Low Tone (Tone Control)
Broadening the Sound (Multi Effects Level) The JP-8080 provides 13 types of effects, and these can be assigned to [MULTI-FX LEVEL] and used. For this example, let’s select a performance to which “chorus” is assigned, and try modifying the sound. -
Page 31: Adding An Echo Effect (Delay)
Select the Performance P1: 88 (p.23). By playing the MIDI keyboard, you will hear the Upper Patch sound. Let’s modify this sound. Rotate the EFFECTS section [MULTI-FX LEVEL] knob. This will adjust the depth of the chorus effect. • • • • • • • • • • • • • • • • • • • • • • • • • • • • • • • • • • • • • • • • • • • • • • • • • • • • • • • • • • • • • • • • • • • • • • • • • • • • • • • • • • • • • • • • • • • • • • • • • • • • • • • • • • • • • • • • • • • • For details on the settings of the [MULTI-FX LEVEL] “Adding Spaciousness and Depth to the Sound (Multi Effects Level)”... -
Page 32: Storing A Performance
Storing a Performance Now that you have worked through the examples in Step 2 and created a sound that’s to your liking, let’s write the Performance into memory. Once you modify the sound with a slider/knob and button, then “ * ” (asterisk) will appear at the left of the Performance number, indicating that the settings of the selected Performance have been modified. - Page 33 If you hold down one of the [DEC]/[INC] buttons and then press the other button, the change will become more rapid in the direction of the first-pressed button. You can use this function whenever using the [DEC]/[INC] buttons to specify a value. The following characters can be selected.
- Page 34 • • • • • • • • • • • • • • • • • • • • • • • • • • • • • • • • • • • • • • • • • • • • • • • • • • • • • • • • • • • • • • • • • • • • • • • • • • • • • • • • • • • • • • • • • • • • • • • • • • • • • • • • • • • • • • • • • • • • In addition to the operations explained in Step 2, each one of the front panel sliders and knobs etc.
-
Page 35: Step 3. Shortcuts! Convenient Functions Of The Jp-8080
To learn more about the formant filter “Chapter 8. Using Voice Modulator” (p.103) You can also input a human voice from a tape or CD, or use instrumental sounds other than the JP-8080. “Various Ways to Use Voice Modulator” (p.146) -
Page 36: Adjusting The Volume Of Each Frequency Range To Create A New Sound (Filter Bank)
• • • • • • • • • • • • • • • • • • • • • • • • • • • • • • • • • • • • • • • • • • • • • • • • • • • • • • • • • • • • • • • • • • • • • • • • • • • • • • • • • • • • • • • • • • • • • • • • • • • • • • • • • • • • • • • • • • • • Producing Arpeggios when Chords are Played (Arpeggiator) The JP-8080 allows you to automatically play an arpeggio (broken chord) simply by holding down two or more notes. - Page 37 The arpeggiator can also be used during Preview. “Playing Sounds Using the JP-8080 Alone (Preview)” (p.65) • • • • • • • • • • • • • • • • • • • • • • • • • • • • • • • • • • • • • • • • • • • • • • • • • • • • • • • • • • • • • • • • • • • • • • • • • • • • • • • • • • • • • • • • • • • • • • • • • • • • • • • • • • • • • • • • • • • •...
-
Page 38: Playing Patterns With One Finger (Rps)
Playing Patterns with One Finger (RPS) Normally, pressing a key on the MIDI keyboard will play only the note that was pressed. However RPS (Real-time Phrase Sequence) is a function that plays back a variety of musical patterns when a key is pressed, instead of the note for that key. -
Page 39: Preparing To Create Patterns (Pattern Clear)
RPS can also be used during Preview. “Playing Sounds Using the JP-8080 Alone (Preview)” (p.65) • • • • • • • • • • • • • • • • • • • • • • • • • • • • • • • • • • • • • • • • • • • • • • • • • • • • • • • • • • • • • • • • • • • • • • • • • • • • • • • • • • • • • • • • • • • • • • • • • • • • • • • • • • • • • • • • • • • •... -
Page 40: Recording A Pattern
To cancel the pattern clear operation, press [CLEAR] or [EXIT]. Press [WRITE]. The display will indicate “Completed,” and the sound will stop. The pattern that had been assigned to the key has been cleared. Press [EXIT]. The [REC] indicator will go dark. •... - Page 41 Since in this example we will be creating a one-measure pattern, use [DEC]/[INC] several times to select “1.” Press [QUANTIZE] (NUMBER [2]). The indicator will light, and the display will indicate the shortest note value that will be recorded. Use [DEC]/[INC] several times to select “ .”...
-
Page 42: If You Make A Mistake While Recording
Press [EXIT]. The [REC] indicator will go dark, and recording will end. Press the key, and listen to the pattern playback. • • • • • • • • • • • • • • • • • • • • • • • • • • • • • • • • • • • • • • • • • • • • • • • • • • • • • • • • • • • • • • • • • • • • • • • • • • • • • • • • • • • • • • • • • • • • • • • • • • • • • • • • • • • • • • • • • • • • For details on settings for recording “Settings for Recording”... - Page 43 Press [ERASE] (NUMBER [5]). The indicator will light, and the following display will appear. At the timing that the wrong note sounds, press the key for that note. While you contin- ue holding that key, all notes on that key will be erased. Key-on Key-off G3 C3...
-
Page 44: Easily Controlling Complex Tonal Changes (Motion Control)
To playback a Motion simultaneously when a Pattern is selected “Playing Back a Motion From the Beginning Each Time a Key is Pressed (Motion Restart)” (p.99) The JP-8080 has two Motion Sets, with motion [1] and [2] as a single set. “Switching Motion Sets” (p.99) -
Page 45: Preparing To Record A Motion (Clearing A Motion)
Motion Control can also be used during Preview. “Playing Sounds Using the JP-8080 Alone (Preview)” (p.65) • • • • • • • • • • • • • • • • • • • • • • • • • • • • • • • • • • • • • • • • • • • • • • • • • • • • • • • • • • • • • • • • • • • • • • • • • • • • • • • • • • • • • • • • • • • • • • • • • • • • • • • • • • • • • • • • • • • •... -
Page 46: Recording A Motion
Recording a Motion •••••••••••••••••••••••••••••••••••• Now let’s create a Motion for the pattern that we recorded in the previous section. 3,11 3,12 4,14 10,13 7,15,16 Select the Performance P1: 88 (p.23). Press PANEL SELECT [LOWER]. The indicator will light, and the Lower Patch will be selected. Move the [CUTOFF FREQ] and [RESONANCE] to the center position. - Page 47 Since in this example we will be creating a Motion that is four measures long, use [DEC]/[INC] several times to select “4.” Press [METRONOME] (NUMBER [4]). The indicator will light, and the type and volume of the metronome sound will be displayed. Use [DEC]/[INC] several times to select “Beep: VOLUME 2.”...
-
Page 48: If You Make A Mistake While Recording
While playing back the pattern that you created in the previous section, press MOTION CONTROL [2] and listen to the sound of the recorded motion change. • • • • • • • • • • • • • • • • • • • • • • • • • • • • • • • • • • • • • • • • • • • • • • • • • • • • • • • • • • • • • • • • • • • • • • • • • • • • • • • • • • • • • • • • • • • • • • • • • • • • • • • • • • • • • • • • • • • • For details on recording settings “Settings for Recording”... - Page 49 Move the slider or knob that you moved by mistake through its entire range of move- ment. When you move the slider or knob through its entire range, its data will be erased. After you have erased the movement for the incorrectly-moved slider or knob, press [EXIT].
-
Page 50: Playing Two Sounds At Once (Key Mode)
Playing Two Sounds at Once (Key Mode) Settings for two sounds (called Patches) are assigned to each Performance of the JP-8080. The Key Mode setting determines how these two Patches will be combined. When you select a Performance, one of the three [KEY MODE] indicators will light to indicate the Key Mode setting of the selected Performance. -
Page 51: Playing Two Patches From Each Key (Dual)
Playing Two Patches From Each Key (Dual) •••••••••••••••••• Now let’s layer the two Patches of Performance P1: 87. Press [KEY MODE] to select DUAL. When you play the MIDI keyboard, the Lower Patch and Upper Patch sounds will be heard simultaneously. Playing Different Patches in the Left and Right Keyboard Areas (Split) ••••••... -
Page 52: Demo Song List
Labyrinth Shadow Speak to me NUMBER [1]–[7]: Music by Mitsuru Sakaue Copyright © 1996, Roland Corporation NUMBER [8]: Music by Mitsuru Sakaue Copyright © 1998, Roland Corporation • • • • • • • • • • • • • • • • • • • • • • • • • • • • • • • • • • • • • • • • • • • • • • • • • • • • • • • • • • • • • • • • • • • • • • • • • • • • • • • • • • • • • • • • • • • • •... -
Page 54: Chapter 1. Overview Of The Jp-8080
About maximum simultaneous polyphony The sound generator of the JP-8080 can produce up to 10 simultaneous notes (voices) when the Voice Modulator is off, and up to 8 notes (voices) when the Voice Modulator is on. If incoming messages request more than this number of notes at any one time, the newly received notes will take priority, and the oldest sounding notes will be turned off one by one. -
Page 55: Patches And Performances
Parts On the JP-8080, two Patches are always selected, and you can choose to play just one or both Patches. The two Patches are assigned to locations referred to as the Upper Part and the Lower Part. When you select a Patch, you are actually selecting the Patch that is assigned to one of these Parts. -
Page 56: About Memory
(Common) On the JP-8080, the Patch numbers that are stored as part of each Performance do not simply refer to Patches that are kept separately in memory — the actual settings of the entire Patch can be stored in the Performance itself. - Page 57 Preset Memory It is not possible to modify the contents of Preset memory. Preset memory contains 384 Preset Patches and 192 Preset Performances. The Temporary Area When you select a Patch or Performance, the settings of the selected Patch or Performance are called into a temporary memory location known as the Temporary Area.
- Page 58 These are read/write cards which can store data from internal system memory and user memory. You can use memory cards to store data for which there is no room in internal user memory, or data which you wish to use on another JP-8080. Before a memory card can be used, it must be formatted. (p.129) Either “S2M-5”...
-
Page 59: Chapter 2. Sound Selecting And Editing Procedure
EXT IN jacks. (p.26, 70) USER This is the sound group inside JP-8080 which can be rewrit- CARD sounds can be selected only if a memory card is ten. Sounds you yourself create can be stored in this group. -
Page 60: Selecting Performances From An External Device
(controller number 0, 32) and Program Change messages Transmit a Bank Select MSB (controller number 0) from a connected MIDI keyboard etc. to the JP-8080. In this message to the JP-8080. case, the settings will differ slightly depending on whether... -
Page 61: Selecting A Patch
First, the patch which has been saved within a performance USER: A, B must be saved to USER or CARD (p.128). Then you can This is the sound group inside JP-8080 which can be rewrit- select that patch. ten. Sounds you yourself create can be stored in this group. -
Page 62: Selecting Patches From An External Device
After making the setting, be sure to press [EDIT] or If the MIDI channel of each JP-8080 Part has the same [EXIT] so that the upper left of the display reads setting as the Performance Ctrl CH (p.124) parameter, “PATCH.”... -
Page 63: Editing A Patch
If at this time you press [SCOPE], the lower left of the display will indicate (Edit), and you will enter Edit Editing a Patch Scope mode (see following section). To end Temporary Scope, press [EDIT] or [EXIT]. If you use the Temporary Scope when the Voice You can move the sliders and knobs etc. -
Page 64: Edit While Viewing The Slider/Knob Values (Edit Scope)
Velocity Edit Scope and Control Edit Edit While Viewing the Slider/Knob Scope Values (Edit Scope) The width of change for the various parameters assigned to If you wish to edit while viewing the value of the Velocity (p.82) or Control (p.84) can be edited while you slider/knob, you can use the following procedure to make view the value in the display. -
Page 65: Resetting The Sound To The Panel Settings (Manual)
JP-8080 Alone (Preview) The Manual function matches the parameter values to the current slider/knob positions. The JP-8080 lets you play sounds even without connecting a When editing a Patch to modify the sound, the parameter MIDI keyboard. values will not always necessarily match the positions of the sliders/knobs. -
Page 66: Chapter 3. Functions That Modify The Sound
Chapter 3. Functions that Modify the Sound Chapter 3 explains the sound-related parameters. All of the parameters explained in this chapter can be set independently for each Patch. It is a good idea to first use PANEL SELECT [LOWER]/[UPPER] to make sure of the patch for which you are making settings. - Page 67 sound at all.) Also, since the cutoff frequency will change (Square wave) depending on the key that you play, the noise will change. This sound is similar to a woodwind instrument. It also The cutoff frequency will rise as you play higher notes, and widely used in making typical “synthesizer”...
-
Page 68: Selecting The Basic Waveform For The Sound (2) (Oscillator 2)
In the same way as for the OSC 1 section, this selects the On the JP-8080 you can use the Shape parameter to make waveform that will be the basis of the sound. By combining fine adjustments to sawtooth wave sounds to create a vari- OSC 1 and OSC 2, a variety of sounds can be created. - Page 69 [SYNC] (Sync Switch) (Sawtooth wave) This switches sync on/off. When this is on, the indicator This waveform is used for nearly all instruments except for will light, and a complex sound with many overtones will woodwinds. Many sounds unique to synthesizers can be be produced.
-
Page 70: Using The External Inputs
When the [RANGE] knob is in the fully left (-WIDE) or fully Using the External Inputs right (+WIDE) position, this knob can be rotated toward the left to adjust the pitch -4–0 octaves, or toward the right to adjust the pitch 0– +4 octaves. Audio from an external source can be input via the external When [RANGE] is -24–... -
Page 71: Modifying The Waveform And Pitch Of The Sound
[EXT] (External Input Switch) Modifying the Waveform and When [EXT] is turned on, the [WAVEFORM] will automati- Pitch of the Sound cally be turned off, the sound from the EXT IN jack or MIC jack will be input. To turn [EXT] off, press [WAVEFORM] to select a wave- In the OSC COMMON (Oscillator Common) section and form for OSC 2. -
Page 72: Pitch Envelope Section
If OSC1 [WAVEFORM] is set to SUPER SAW or NOISE, PITCH ENVELOPE Section the Cross Modulation effect can not be obtained. If the Cross Modulation effect is difficult to hear, rotate OSC COMMON [OSC BALANCE] toward the left (the OSC 1 position). Tonal changes using Cross Modulation Leave [X-MOD DEPTH] raised, and move OSC2 [RANGE] or [FINE/WIDE] to modify the tone in various ways with-... -
Page 73: Modifying The Brightness
LPF (Low Pass Filter): This type of filter allows partials lower than the cutoff fre- Functions using OSC 1 and OSC 2 quency to pass. This is the most common type of filter, and Functions which use OSC 1 and OSC 2 (Sync, Ring is useful when you want to make the sound more mellow. -
Page 74: Key Follow
level Filter Type and Cutoff Frequency When the filter is set to HPF, raising the cutoff frequency frequency will decrease the lower partials, making the sound brighter. Cutoff Frequency At the same time, the volume will also decrease. With high settings of this parameter, some waveforms may produce no sound at all. -
Page 75: Filter Envelope Section
For both HPF and BPF, setting the Key Follow to +32 will Cutoff Frequency allow you to play all notes with the same brightness. When [CUTOFF FREQ] is set to the center position, the Key Follow effect will be clearly noticeable. time Ways to use Key Follow If you are playing a brass-type sound for a solo, you might... -
Page 76: Modifying The Volume
The [LEVEL] setting is saved in the Patch, so if you want each Patch to have a different volume, you can set each Patch accordingly. In contrast, the VOLUME [LEVEL] is used to adjust the volume of the entire JP-8080. [PAN] (Auto Pan/Manual Pan Switch) AMP ENVELOPE... -
Page 77: Modulating The Sound (Lfo 1)
This sets the modulation speed for LFO 1. At the knob is Example of different envelopes rotated to the right, the modulation speed will increase. The following two Patches of the JP-8080 contain typical amplifier envelope settings. If you wish to create a decay-type sound like that of a piano,... -
Page 78: Maiking Effect Settings (Effects)
(Multi Effects Type) The type of multi effects can be changed as appropriate for Adjusting the High and Low Tone the sound or song that you are playing. The JP-8080 pro- (Tone Control) vides 13 types of multi effects. SUPER CHORUS SLW: Slow chorus with deep modula- The TONE CONTROL lets you emphasize or attenuate the tion. -
Page 79: Adding An Echo Effect (Delay)
Adding an Echo Effect (Delay) The type of delay can be changed as appropriate for the sound or song that you are playing. The JP-8080 provides 5 types of delay. Delay is an effect that adds echoes to the sound. The set- tings of the DELAY section affect how the delay sound is PANNING L->R: The delayed sound is assigned to left and... -
Page 80: Chapter 4. Taking Advantage Of The Performance Functions
Chapter 4. Taking Advantage of the Performance Functions In addition to the parameters which were explained in chapter 3, the JP-8080 provides a variety of functions that you can use to modify the sound in real-time. Solo Switch On/Off Playing Single Notes... -
Page 81: Playing Analog Synthesizer-Like Solos (Envelope Type In Solo)
You can use velocity (the force (speed) at which notes are of the previous sound. played/released) to simultaneously control multiple para- JThe JP-8080 can simulate this characteristic to add an ana- meters. log synthesizer-like feel to solos that are played using Velocity settings can be made independently for each Patch. -
Page 82: Velocity On/Off
Note Off velocity (the speed at which Press [VELOCITY ASSIGN] or [EXIT]. the key was released) were 80 (in a range of 127 steps). On the JP-8080, these are referred to as the standard The indicator will change to lit, and the previous display velocity values. -
Page 83: Canceling The Settings Of A Parameter
When the MIDI keyboard is played with different velocities, Canceling the Settings of a the various parameter values will change in the amount Parameter specified by step 4, relative to the current slider/knob posi- tions. If you wish to cancel the settings only for a specific parame- This means that if you move the sliders/knobs after making ter of the parameters being controlled, use the following settings, this will change the parameter values that are pro-... -
Page 84: Controlling Multiple Parameters Simultaneously (Control Assign)
• [LFO1 DEPTH] of the Filter section sliders/knobs were moved simultaneously. • [DEPTH] of the Filter Envelope section The ribbon controller of the Roland JP-8000 synthesizer • [LFO1 DEPTH] of the Amp section (except when Manual Pan) will transmit aftertouch messages when you touch the •... -
Page 85: Modifying Th Pitch (Morph Bend Assign Switch)
If the Control Assign is used simultaneously with Create the sound that will be heard when the maxi- Velocity (p.81) or Motion Control (p.98), any overlap- mum value (127) of aftertouch is received. ping parameters will have their values added to pro- These operations will determine the width over which duce the resulting change. -
Page 86: Canceling The Settings Of A Parameter
Canceling the Settings of a Control Using MIDI Messages Other Than Parameter Aftertouch and Breath (Control Up/Down) If you wish to cancel the settings only for a specific parame- You can make settings in order to control using MIDI mes- ter of the parameters being controlled, use the following sages other than aftertouch and breath (MODULATION: procedure to set the width of change to 0 for that parameter. -
Page 87: Adding Cyclic Change (Modulation (Lfo 2))
[DEPTH] Adding Cyclic Change Rotate [DEPTH] to set the depth of the LFO 2 effect on the (MODULATION (LFO 2)) currently selected Depth Select item (PITCH, FILTER, or AMP). Rotating the knob to the right of center will produce a Chapter 3 explained how to use LFO 1 to cyclically modu- greater effect. -
Page 88: Smoothly Changing The Pitch Between Notes (Portamento)
Smoothly Changing the Pitch Transposing Your Performance Between Notes (Portamento) (Part Transpose) Portamento is a function that smoothly changes the pitch Part Transpose allows you to modify the pitch that is pro- from the first-played note to the pitch of the next-played duced when you play the MIDI keyboard, over a range of note. -
Page 89: Changing The Pitch (Bend Range Up/Down)
Press PANEL SELECT [LOWER]/[UPPER] to select Changing the Pitch the Part whose setting you wish to modify. (Bend Range Up/Down) If you press both [LOWER] and [UPPER] simultaneous- ly, both indicators will light, and you can simultaneous- ly edit the settings of both Parts. When the pitch bend lever of a MIDI keyboard is moved In this case, the panel will show the settings of the left/right (or up/down, in the case of a wheel), the pitch of... -
Page 90: Chapter 5. Producing Arpeggios When Chords Are Played (Arpeggiator)
Chapter 5. Producing Arpeggios When Chords are Played (Arpeggiator) Here’s how to use the arpeggiator to play arpeggios automatically. * The arpeggiator is controlled by note messages received at REMOTE KBD IN. It is not possible to control the arpeggiator from MIDI IN. Settings for Playing Playing Arpeggios Arpeggiator settings are made in the ARPEGGIATOR/RPS... -
Page 91: Changing The Beat Of The Arpeggio (Arpeggio Beat Pattern)
[HOLD] (Arpeggio/RPS Hold Switch) Selecting the Part for Arpeggiation This switches Hold on/off for the arpeggiator. When Hold in Dual Mode (Arpeggio Destination) is On the indicator will light, and the arpeggio will continue playing even if you take your fingers off the keys. If you When the Key mode is Dual, you can select one of three play a different chord while the arpeggio is being held, the ways in which the Upper or Lower Part will be arpeggiated. -
Page 92: Chapter 6. Playing Original Patterns With One Finger (Rps)
Chapter 6. Playing Original Patterns with One Finger (RPS) RPS is a function which lets you playback a pattern simply by pressing a single note. * RPS is controlled by note messages received at REMOTE KBD IN. It is not possible to control RPS from MIDI IN. If the number of voices assigned to Lower is less than the number of notes which occur at the same timing within the Playing Patterns... -
Page 93: Setting The Timing At Which Patterns Will Switch (Pattern Trigger Quantize)
Pattern Trigger Quantize is common to the entire JP-8080. Make sure that memory card is inserted in the card OFF: Patterns will switch at the moment that a key is slot. -
Page 94: Recording A Pattern
[LOOP LENGTH] 1–4 (measures) Specify the number of measures in the pattern for record- Recording a Pattern ing/playback. The pattern will be played/recorded repeatedly from the first measure to the number of measures that you specify. This section explains the procedure for recording a pattern. Loop Length: setting of 2 measures Patterns are recorded into internal memory. -
Page 95: Recording A Pattern
If Input Quantize is turned Off, the Gate Time Ratio set- Press ARPEGGIATOR/RPS [ON]. ting is ignored, and notes will be recorded with the The indicator will light. length that they were played. Press [MODE] several times to select RPS. REAL: Notes will be recorded with the length that The RPS indicator will light. -
Page 96: Erasing Unwanted Notes
To stop recording, press [REC] or [EXIT]. Erasing the notes of a specific area When you press [REC], the JP-8080 will enter record- ready status ([REC] blinking). You can return once again to step 7 and record. To return from record-ready status to the normal condition, press [EXIT]. -
Page 97: Copying A Pattern
Copying a Pattern Use [DEC]/[INC] to specify the transposition value. With a setting of “0,” the pattern will be copied with its original key. The pattern of any key (internal or memory card) can be copied to a different internal key. At this time, you can specify that the data be copied with a transposition of up to 2 octaves in semitone steps. -
Page 98: Chapter 7. Easily Controlling Complex Tonal Changes (Motion Control)
Changes (Motion Control) The JP-8080 is able to record slider/knob movements, and play them back. By playing back the recorded slid- er/knob movements (Motions) in time with your music, you can add a variety of tonal changes to your playing. -
Page 99: Moving Sliders Or Knobs While Playing Back Motions
Motion to the slider/knob movement. Switching Motion Sets The JP-8080 has two Motion Sets (SET A/SET B), with two motions in each set. Also, up to four sets (CARD1: SET A/SET B, CARD2: SET A/SET B) can be saved in a memory card. -
Page 100: Recording A Motion
(Example) Recording a Motion Recording a motion with a loop length of 4 measures, and then changing the loop length for playback Loop Length: setting of 2 measures Motions can be recorded into internal memory. Settings for Recording Measures 1–2 are Not played back played back repeatedly Before you record a Motion, you must set recording-related... - Page 101 previously recorded motion to be overwritten. <With a LOOP LENGTH of 1–8 measures:> Recording will begin when you move a slider/knob, and Recording will begin when you move a slider/knob will end automatically at the end of the last measure. or press [REC].
-
Page 102: Erasing The Movement Of A Slider Or A Knob
<With a Loop Length of 99 (PLAY ONCE)> Recording will begin when you move a slider/knob or press [REC]. If you move a previously-recorded slider/knob, the pre- viously recorded data will be replaced as the newly recorded data is recorded. The movements of other sliders/knobs will be recorded in addition to the existing data. -
Page 103: Chapter 8. Using Voice Modulator
Formant Filter As the “instrumental sound,” you can use not only the Upper patch or Lower patch of the JP-8080, but also any A formant filter analyzes “a human voice” (an audio signal) sound that is input from the EXT IN INST/LOWER jack. -
Page 104: Internal Structure Of The Jp-8080
Morph Sense it set to “-.” The width of parameter change will be the same as speci- fied by Control Assign (p.84). Internal Structure of The JP-8080 The following diagram shows the internal structure of the JP-8080. Instrumental sounds /... -
Page 105: Ext->Vocal Send
This setting is made in Edit mode. (p.108) (Voice Modulator Send Switch) This parameter is set independently for each performance. When you wish to input the sound of the JP-8080’s Upper patch or Lower patch into the Voice Modulator, press this OSC 2 (oscillator 2) section button to turn on the indicator. -
Page 106: Setting Up The Voice Modulator For Immediate Use (Voice Modulator Initialize)
Modulator, and set the various switches appropriately. The indicator will light green. Above a certain level, the limiter JP-8080 provides a convenient “Voice Modulator Initialize” will operate automatically to adjust the level, in order to function which makes these settings automatically. -
Page 107: Types Of Voice Modulator Initialize
After initializing to “F.FLT: ROBOT” or “F.FLT: HUSKYROBOT” How Vocal Morph Control works Of the sound which is input to the Vocal Input of Voice Connect a mic (sold separately) to the MIC jack, and use Modulator, the signal level in the 1.2 kHz frequency region [VOCAL/UPPER] to adjust the input volume. -
Page 108: Making Voice Modulator Settings In Edit Mode
When you execute Voice Modulator Initialize, the algorithm and the parameters assigned to [CONTROL 1] and [CONTROL 2] of the Voice Modulator section will be as follows. Voice Modulator Initialize Algorithm [CONTROL 1] [CONTROL 2] F.FLT: VINTAGE SOLID VOCAL MIX ENSEMBLE LEVEL F.FLT: SILKY SMOOTH... -
Page 109: Changing The Parameter Assigned To [Control 1]/[Control 2]
Setting the Switches [CONTROL 1]/[CONTROL 2] Here’s how to set switches which were explained Control1 Assign in “Internal structure of the JP-8080” (p.104). Control2 Assign Ext->Inst Send OFF, ON When you use panel select to select the Voice Modulator (External To Instrumental Send Switch) Panel (p.111), you can use the knobs/sliders labeled in blue... -
Page 110: Making Ensemble Settings
FLANGER SLOW: A flanger with deep modulation. FLANGER FAST: A flanger with rapid modulation. On the JP-8080, the delay time cannot be set longer than DEEP PHASING SLW: A phaser with deep and slow mod- 1250 ms (1.25 seconds) for a mono delay, nor longer ulation. -
Page 111: Making Vocal Morph Control Settings
3–8 MEASURES: Controlling Voice Modulator The ensemble rate will be synchronized to the tempo of the Parameters in Realtime internal sequencer, and ensemble will be applied at the interval of the specified note or measure. If the MIDI Sync (p.123) setting is set to MIDI IN or REMOTE KBD IN, the ensemble rate will synchronize to Use Panel Select to Select The the external MIDI clock (p.144). - Page 112 ENSEMBLE LEVEL 0–127 As the slider is raised, the volume will increase. To avoid excessive volume which could damage your amp [ENSEMBLE] or speaker, be careful not to raise the slider excessively. Specify the depth of the ensemble. Ensemble is a type of chorus which is applied more deeply.
- Page 113 [ROBOT LEVEL] The sound which is input to the Inst Input will be output The Voice Modulator of the JP-8080 provide an internal from OUTPUT L, and the sound which is input to the Vocal oscillator (robot oscillator) which allows you to obtain a for- Input will be output from OUTPUT R.
- Page 114 CHARACTER 1–12 0–127 [1]–[12] when Algorithm is SOLID, SMOOTH, or WIDE The sound that is input to the Vocal Input is divided by twelve band pass filters into twelve frequency bands, and the volume of each band is adjusted by these sliders. Raising a slider will increase the volume of that frequency band.
-
Page 115: Chapter 9. Other Settings
Chapter 9. Other Settings In addition to the parameters that are edited directly by the sliders or knobs, the JP-8080 allows you to set a variety of other parameters. These parameters are assigned to [PFM COMMON]–[SETUP] (BANK [1]–BANK [6]) located below the display. -
Page 116: Setting The Number Of Voices For Each Part (Voice Assign)
FILTER&: The filter and amplifier envelopes will be keyboard, causing the sound to begin changing. However started. on the JP-8080, you can cause just the filter or the amplitude envelope to start at a different timing than the other envelopes. - Page 117 Indv Trig Src CH 1–16 For example, you might use this capability to receive note messages for both the musical performance and the triggers (Individual Trigger Source Channel) from a sequencer. Specify the MIDI channel on which the note messages used as triggers will be transmitted and received.
-
Page 118: Settings For Each Part (Performance Part)
An example of using Individual Trigger Settings for Each Part Let’ s try out the Individual Trigger function by playing a (Performance Part) MIDI keyboard connected to REMOTE KBD IN. Select Performance P1:83. Press [EDIT]. Press and hold any desired notes in the Upper Part. The [EDIT] indicator will light and the BANK[1]–[8] Play keys in the Lower Part. -
Page 119: Synchronizing Chorus Modulation To The Tempo/Lfo 1 (Chorus Sync)
(double note triplet) (dotted whole note) (double note) On the JP-8080, it is not possible to make the delay time 3–8 MEASURES: longer than 1250 ms (1.25 seconds) for a mono delay, or longer than 625 ms for a panning delay. If you attempt... -
Page 120: Synchronizing Lfo 1 Rate To The Tempo (Lfo Sync)
An example of using Delay Sync If you wish to create a sound using LFO Sync, an easy way to do so is to select the above Performance and then use the Let’s try out the Delay Sync effect. sliders and knobs to modify the sound to your liking. Select Performance P1: 84. -
Page 121: Increasing The Volume Of A Specific Patch (Patch Gain)
However Input a trigger sound from the EXT IN jack on the JP-8080, you can cause just the filter or the amplitude envelope to start at a different timing than the other or the MIC jack envelopes. -
Page 122: Midi Settings (Midi)
Local Switch If sound is being input from the INST/LOWER jack, adjust This switch determines whether or not the JP-8080’s con- [OSC BALANCE] for the Lower Part. If sound is being trollers (knobs, sliders, buttons), will be connected to its input from the VOCAL/UPPER jack or MIC jack, adjust sound generator (p.54), and whether the controller (key-... -
Page 123: Midi Sync
REMOTE KBD IN and MIDI IN from being transmitted to Modulator Delay Time, and Ensemble Rate will be synchro- the sound source in duplicate. nized to the tempo specified by the JP-8080’s [TEMPO] or to JP-8080 the tempo of an external MIDI device. - Page 124 (Edit Transmit/Receive Mode) Operations performed on an external MIDI device connect- When JP-8080 sliders/knobs other than the following are ed to REMOTE KBD IN will be handled exactly in the same moved, this setting specifies whether or not the edited data way as when JP-8080 controllers are operated (including will be transmitted as MIDI messages.
-
Page 125: Making Overall Settins (Setup)
If you want the JP-8080 to receive the MIDI message that Control Up/Control Down it transmitted, the Edit Transmit/Receive Mode must be Some MIDI messages are able to modify multiple parame- the same during both transmission and reception. If dif- ters simultaneously. -
Page 126: Master Tuning
Master Tuning Master Tune 427.5–452.9 (Hz) 1cent steps for a pitch adjustment of +/- 50 cents. This is displayed as a frequency (Hz). Concerning tuning The setting 427.5 Hz–452.9 Hz indicates the pitch of A4 (middle A). This is referred to as “standard pitch,” and is the note that is normally used to indicate the pitch of an instrument. -
Page 127: Chapter 10. Saving Your Settings
Chapter 10. Saving Your Settings Performances/patches that you create can be saved either in internal memory, a memory card, or on an exter- nal sequencer. Also, performances/patches that have been saved in internal memory can be saved on a mem- ory card or an external sequencer in groups. -
Page 128: Saving Data
PANEL SELECT [LOWER]/[UPPER] to select the part. Press [WRITE]. The power of the JP-8080 must be turned off before Use GROUP [DOWN]/[UP] to select the save desti- inserting or removing a memory card. If a memory card nation group. -
Page 129: Formatting A Memory Card
Formatting a Memory Card Installing the Card Protector A card protector to prevent theft of the memory card is included with the JP-8080. Use the following procedure to With the power turned off, insert the memory card install the card protector. - Page 130 Press [INIT/UTIL] (BANK [7]) several times to access the Card display. The [INIT/UTIL] indicator will light. Use [DEC]/[INC] several times to choose “USER->CARD.” Press [WRITE]. Use [DEC]/[INC] several times to choose “PATCH.” Press [WRITE]. Use [DEC]/[INC] several times to choose “PERFOR- Press [WRITE].
- Page 131 Saving RPS patterns to a card (PATTERN) To cancel the Saving operation, press [EXIT]. Press [WRITE]. Patterns that have been recorded to internal memory can be The display will indicate “Completed.” saved to a memory card. The pattern data has now been saved to the card. Patterns can be saved in three ways: –all 48 patterns togeth- er,”...
- Page 132 Press [WRITE]. The display will indicate “Completed.” The display will indicate “Completed.” All settings of the JP-8080 have now been saved to the System settings have now been saved to the card. memory card. Press [EXIT] to return to the previous display.
-
Page 133: Erasing A Pattern/Motion That Was Saved On A Memory Card
Erasing a Pattern/Motion That Press [WRITE]. A message will ask for confirmation. was Saved on a Memory Card In some cases when you attempt to save data to a memory card, an indication of "Card Memory Full!" will appear, and it will not be possible to save the data. -
Page 134: Restoring Saved Settings To The Jp-8080
Restoring Saved Settings to Press [EXIT] to return to the previous display. the JP-8080 Restoring patch data to internal memory (PATCH) If you wish to modify the settings that have been saved on a memory card, or to use the system settings that have been... - Page 135 RPS patterns can be restored to internal memory in three ways: all 48 together, in groups of 24, or one at a time. On the JP-8080, all patterns and motion share the same To cancel without restoring, press [EXIT]. memory space. This means that depending on how the internal memory is used, an indication of “Memory...
- Page 136 Use [DEC]/[INC] several times to choose “SYSTEM A confirmation message will appear. SETUP.” To cancel without restoring, press [EXIT]. Press [WRITE]. Press [WRITE]. A confirmation message will appear. The display will indicate “Completed.” All settings of the JP-8080 have now been restored to internal memory.
-
Page 137: Saving Settings On An External Sequencer (Bulk Dump)
ALL, PATCH: USER A or PATCH: USER B are execut- ed, the temporary settings will not be transmitted. The JP-8080 is able to transmit a variety of settings to an external device as exclusive messages. This function is ALL: All User Patches, All User Performances, All Motion referred to as “Bulk Dump.”... -
Page 138: Restoring Saved Settings To The Jp-8080
Motion that was dumped may cause a “Memory Full!” display to appear when it is sent back to the JP-8080, and that it will not be possible to send the data back to the JP-8080. If this occurs, delete unneeded Patterns or Motions from memory (p.97, 102),... - Page 139 JP-8080, parameters unique to the JP-8080 will not be overwritten, but will remain with their pre- vious settings. Thus, if you wish to bulk dump JP-8000 sounds to the JP-8080 and reproduce the identical settings, please use the fol- lowing procedure.
-
Page 140: Chapter 11. Setting Sounds To Basic Values (Initialize)
Setting Sounds to Basic Values (Initialize) Restoring the Factory Settings (Factory Reset) The “Initialize” function lets you restore JP-8080 performances or patches to certain basic values. The “Factory Preset” function lets you restore performances, patches, patterns, motions and system settings to their factory settings. -
Page 141: Types Of Factory Reset
Types of Factory Reset Returning Only a Specific User Performance or User Patch to the Factory Settings The factory-set user performances and user patches contain Data which will be returned to the factory the same performance and patch settings as Preset 2. settings If you wish to return only a specific User Performance or ALL: All user performances, user patches, user patterns,... -
Page 142: Performance Parameters
Standard Settings When PERFORM: TEMPORARY is executed, the Upper/Lower Patch parameters and Performance parameters will be set as follows. When PATCH: TEMPORARY is executed, Patch parameters will be set as follows. Performance parameters The Voice Modulator parameters ([VOICE MOD] (BANK [2]) and Voice Modulator panel parameters) are the same as when Voice Modulator Initialize is executed to “F.FLT: VINTAGE.”... - Page 143 Patch parameters Multi-FX Type SUPER CHORUS SLW Delay Type PANNING L->R [ PATCH ] ( BANK [ 4 ] ) Patch Name INIT PATCH Env Type in Solo STANDARD Bend Range Up Patch Gain 0 dB Bend Range Down – 2 Ext Trig Switch Morph Bend Assign Ext Trig Dest...
-
Page 144: Chapter 12. Example Applications
Now that you understand this method of use, let’s try playing the JP-8080 from other types of MIDI device. When just a single JP-8080 is used, a maximum of ten simultaneous notes can be sounded (a maximum of eight notes when Voice Modulator are on), and there is the limitation that only two Parts can be received. However... -
Page 145: Recording A Performance On An External Sequencer
Turn this on. The JP-8080’s sound source can play either one part or two This will allow exclusive messages recorded on the external tracks (parts). The other tracks must be played on an exter- sequencer to be received in order to control various parame- nal sound source. -
Page 146: Recording Procedure
In the same way, record the remaining parts. Tape/CD player For the track(s) to be played on the JP-8080, you can record JP-8080 control movements and motions in the same way. As shown in the diagram, connect your external Some sequencers are not able to record exclusive mes- device or mic to the JP-8080. -
Page 147: Inputting An External Sound Synthesized On The Jp-8080 Into The Voice Modulator
To obtain a formant filter effect, simultaneously input an Inputting an External Sound Synthesized external sound (by playing a note or playing back a tape on the JP-8080 Into the Voice Modulator or CD) and input your voice from the mic. Hold down [SHIFT] and press PANEL SELECT (1) Formant Filter [UPPER]. - Page 148 As shown in the diagram, connect your external settings. device to the JP-8080. Press PANEL SELECT [LOWER] to select the Lower Initialize the performance to a standard set of set- part.
-
Page 149: Using The Jp-8080 With The Mc-505
This allows an additional range of possibilities, such as Use EXTERNAL INPUT [INST/LOWER] / [VOCAL/UPPER] using a JP-8080 patch to play one part of an MC-505 pattern, to adjust the volume of the external inputs. or using the D Beam controller to control a JP-8080 patch. - Page 150 On the MC-505, move [CUTOFF] and [RESONANCE]. The sound of the Upper patch will change. You can also use the ENVELOPE sliders of the MC-505 to control the Upper part. (However, the JP-8080 does not have PITCH ENVELOPE [S] and [R], so these cannot be controlled.) In the same way, by setting the MC-505’s PART SELECT...
-
Page 152: Sound-Creating Tips
This section will give you know-how and tips for editing a Patch to create various types of sounds. Refer to the explanations and the panel diagrams, and actually operate your JP-8080 to hear the results. * Items for which a setting is not given in the panel diagram do not need to be set. -
Page 153: Bass (2)
Bass (2) 6, 13 Use the Initialize operation to set the performance Make PORTAMENTO [ON] light to turn in on. to the standard settings. Move PORTAMENTO [TIME] to the position [INIT/UTIL]: Initialze: FPERF: TEMPORARY shown in the diagram. Since the bass has a low pitch range, set the OSC Increase TONE CONTROL [BASS] as desired to COMMON section OSC SHIFT to “-2OCT.”... -
Page 154: Tb-303
TB-303 [ PFM COMMON ] ( BANK [ 1 ] ) Arp Beat Pattern PORTA-B3 Let's create a TB-303 simulation with a minimal techno feel. In the OSC2 section, set [WAVEFORM] to a square wave. We will sound an arpeggio as we create the sound. In the FILTER ENVELOPE section, move [DEPTH] Use the initialize operation to set the performance [D] [R] to the positions shown in the diagram. -
Page 155: Strings
Strings While you are creating a strings sound, it is a good idea to Set [MULTI-FX LEVEL] to the maximum setting. audition the sound by playing chords of four notes or so. This will give the sound greater breath and depth. This will give you a better idea of the character of the sound then if you play only an individual note. -
Page 156: Sweep Pad
Sweep Pad Lets create a pad using the HPF. In the AMP ENVELOPE section, set [A] and [R] to the positions shown in the diagram. Use the Initialize operation to set the performance The sound will linger for a time after the note is to the standard settings. -
Page 157: Synth Brass
Synth Brass By skillfully using the pitch envelope, you can create a In the FILTER ENVELOPE section, set all sliders to synth brass sound. the positions shown in the diagram. The sound will become brighter. Use the Initialize operation to set the performance to the standard settings. -
Page 158: Synth Kick Drum
Synth Kick Drum Patch Gain +6 dB 5, 11 6, 12 Use the Initialize operation to set the performance Set the Patch Gain to “+6dB.” to the standard settings. [PATCH]: Patch Gain: +6dB [INIT/UTIL]: Initialze: PERF: TEMPORARY Be careful not to damage your speakers, etc. In the OSC COMMON section, set OSC BALANCE In the FILTER section, move [CUTOFF FREQ] and to the far right position. -
Page 159: Tubular Bells
Tubular Bells Let's use the ring modulator to create the sound of a bell. In the FILTER ENVELOPE section, set [DEPTH] [D] [R] to the positions shown in the diagram. Use the Initialize operation to set the performance The sound will become brighter. to the standard settings. -
Page 160: Electric Piano
Electric Piano There are inevitable limitations in using conventional sub- Set the FILTER section [KEY FOLLOW] to the tractive synthesis to attempt to simulate the sound of an desired position. electric piano, but by using X-MOD (cross modulation) you Play and compare notes in the high and low keyboard can produce the complex waveform that is required. -
Page 161: Organ
Organ 3, 10 Use the Initialize operation to set the Performance In the FILTER section, set the [CUTOFF FREQ] to the basic settings. value to 71. [INIT/UTIL]: Initialze: PERF: TEMPORARY This will use filter oscillation to add a parallel fifth har- mony. -
Page 162: Synth Voice
Synth Voice 7 8 9 Let’s use the BPF to create a human voice (synth voice). In the FILTER section, set [KEY FOLLOW] to the position shown in the diagram. Use the Initialize operation to set the performance to the basic settings. In the FILTER section, set [TYPE] to “BPF.”... -
Page 163: Morphing
Morphing Let’s create a sound using the Vocal Morph Control. Now let’s create the electric piano sound. We will create a sound which allows you to transform an In the OSC1 section, set [WAVEFORM] to “SUPER electric piano sound into a strings sound by inputting your SAW.”... - Page 164 Morphing (continued) Next we will specify the width of change for the Sing or speak an “a” sound into the mic. parameters that will be controlled by changes in The electric piano sound will change into a strings your voice. sound.
-
Page 165: Understanding Sound
Understanding Sound Since moving the controllers on the JP-8080’s front panel will modify the sound, it’s easy to make new sounds. However if you have a certain sound in mind, moving the controllers at random will not get you any closer to the desired sound. In order to create the sound you want, you will need a basic understanding of sound. -
Page 166: Time-Variant Changes In The Sound (Envelope)
note. This is because each of the three elements of sound Sawtooth wave Square wave (pitch, brightness and volume) change as time passes. These time-variant changes are referred to as the “enve- lope,” and every natural instrument has its own characteris- tic envelope. -
Page 167: Adding Expression To Sound
Effects Adding Expression to Sound Effects can be categorized into two types: those which mod- ify the overtone (partial) structure to modify the original In addition to the “three elements of sound,” there are sound itself, and those which add sound to the original many ways in which expression can be added. -
Page 168: What Is Midi
(System messages). The main This connector receives MIDI messages from an external types of MIDI message used by the JP-8080 are as follows. MIDI device. The MIDI messages which are received at this connector can control RPS or the arpeggiator. -
Page 169: System Messages
Program Change a particular instrument. Thus, each manufacturer defines its This message is used to select sounds. On the JP-8080, the own exclusive message format, and uses this format to con- program numbers 1–128 of this message will select Patches vey proprietary data. -
Page 170: Troubleshooting
If this does not resolve the problem, contact your dealer or a nearby Roland service center. * Roland will take no responsibility for the recovery of any settings or data, nor for any damages incurred thereby. Have volume messages been received from an... - Page 171 Has the OSC 2 section [CONTROL 1] (GATE Are a human voice and an instrumental sound not THRESHOLD) been increased? being input simultaneously? If inputting from the INST/LOWER jack, check the set- In order to use the formant filter, you must input both a ting of the Lower OSC 2 [CONTROL 1].
- Page 172 JP-8080. Check the Master Tune setting (p.126). Has a Pitch Bend message been received from an I want to use only the sound of the JP-8080 external device, leaving the pitch “hanging”? Has Ext->Inst Send been turned on? Try moving the pitch bend lever of the connected MIDI Turn off Ext->Inst Send (p.109).
- Page 173 Is the maximum simultaneous polyphony being exceeded? Is the sequencer being played back at a correct The JP-8080 can produce up to 10 simultaneous notes tempo? (voices) when the Voice Modulator is off, and up to 8 Playback the sequencer at the tempo that was used notes (voices) when the Voice Modulator is on.
-
Page 174: Error Messages
Since motion controls and patterns share the same Contact your dealer or a nearby Roland service center memory area on a memory card, it may be impossible to to have the battery replaced. - Page 175 The manufacturer/type of the memory card is not one The data in user memory has been damaged. that is specified for the JP-8080. Contact your dealer or a nearby Roland service center Please use either an S2M-5 (2 M byte) or an S4M-5 (4 M to repair.
-
Page 176: Performance List
Performance List Preset1 (CC# = 51H, CC#32 = 00H) No. (PC#) Performance Name Lower Patch Name Upper Patch Name No. (PC#) Performance Name Lower Patch Name Upper Patch Name P1:11 (001) Chariots Chariots L Chariots U P1:51 (033) Wicked Wicked L Wicked U P1:12 (002) Fizzoid Bass Fizzoid Bass L... - Page 177 P2: 47 (Trance Mission) is a sound which uses the Individual Trigger function. It is effective to press a key below B2 and When the JP-8080 is shipped from the factory, the User play chords in the Upper part. Performances contain the same settings as the correspond-...
- Page 178 Preset3 (CC# = 51H, CC#32 = 02H) No. (PC#) Performance Name Lower Patch Name Upper Patch Name No. (PC#) Performance Name Lower Patch Name Upper Patch Name P3:11 (001) PlyLowC,ThenChrd PlyLoCthenChrd L PlyLoCthenChrd U P3:51 (033) Fommrujebo Fommrujebo Fommrujebo P3:12 (002) Str/Onde Str/Onde Str/Onde P3:52 (034) Deviant...
-
Page 179: Patch List
Patch List Preset1 (CC# = 51H, CC#32 = 00H) (PC#) Patch Name (PC#) Patch Name (PC#) Patch Name (PC#) Patch Name P1:A11 (001) Spit'n Slide Bs P1:A51 (033) Intervalic P1:B11 (065) Whammy Mammy P1:B51 (097) Stargate P1:A12 (002) Velo Decay Bass P1:A52 (034) Squared Away P1:B12 (066) Wicked Lead P1:B52 (098) Lost in Time... - Page 180 P2:A48 (032) AW/DM Resonance4 P2:A88 (064) Dusseldorf 2 P2:B48 (096) Thick P2:B88 (128) From Space... : MONO : LEGATO When the JP-8080 is shipped from the factory, the User Patches contain the same settings as the correspondingly- numbered Preset2 Patches.
- Page 181 Preset3 (CC# = 51H, CC#32 = 02H) (PC#) Patch Name (PC#) Patch Name (PC#) Patch Name (PC#) Patch Name P3:A11 (001) Culture Bass P3:A51 (033) Viking P3:B11 (065) Eurodance Perc 2 P3:B51 (097) 70's Mono P3:A12 (002) Techno Brie P3:A52 (034) Nova Pad P3:B12 (066) Lo-Fi Chops P3:B52 (098) Mega HPF Lead P3:A13 (003) Wired Funk...
-
Page 182: Parameter List
Parameter List Patch Parameters Parameter Full Name of Parameter Value EFFECTS Section TONE CONTROL BASS Tone Control Bass -64–+63 TREBLE Tone Control Treble -64–+63 MULTI-FX LEVEL Multi Effects Level 0–127 DELAY TIME Delay Time 0–127 FEEDBACK Delay Feedback 0–127 LEVEL Delay Level 0–127 VOICE MOD SEND... - Page 183 DEPTH Filter Envelope Depth -64–+63 FILTER ENVELOPE Section Filter Envelope Attack Time 0–127 Filter Envelope Decay Time 0–127 Filter Envelope Sustain Level 0–127 Filter Envelope Release Time 0–127 AMP Section LEVEL Amplifier Level 0–127 Auto Pan/Manual Pan Switch OFF, AUTO, MANUAL LFO 1 DEPTH Amplifier LFO 1 Depth -64 (L)–+63 (R)
-
Page 184: Performance Common Parameters
Performance Common Parameters Parameter Full Name of Parameter Value PANEL SELECT Section LOWER, UPPER Lower, Upper LOWER, UPPER, LOWER & UPPER, VOICE MOD KEY MODE Key Mode Select SINGLE, DUAL, SPLIT KEY MODE Section ARPEGGIATOR/RPS Arpeggio/RPS Switch OFF, ON Section MODE Mode UP, DOWN, UP &... - Page 185 Ext->Inst Send External To Instrumental Send Switch OFF, ON Ext->Vocal Send External To Vocal Send Switch OFF, ON V Delay Type Voice Modulator Delay Type PANNING L->R/R->L/SHORT, MONO SHORT/LONG V Delay Sync Voice Modulator Delay Sync OFF, 1/16, 1/8 (3), 1/16 (.), 1/8, 1/4 (3), 1/8 (.), 1/4, 1/2 (3), 1/4 (.), Ensemble Type Ensemble Type...
-
Page 186: Performance Part Parameters
Performance Part Parameters Parameter Full Name of Parameter Value [PFM PART] (BANK [3]) Part Transpose Part Transepose -24–+24 semitone Part MIDI CH Part MIDI Channel 1–16, OFF Chorus Sync Chorus Sync OFF, 1/16, 1/8(3), 1/16(.), 1/8, 1/4(3), 1/8(.), 1/4, 1/2(3), 1/4(.), 1/2, 1/1(3), 1/2(.), 1/1, 2/1(3), 1/1(.), 2/1, 3–8MEASURES, LFO1 Delay Sync... -
Page 187: Recording Parameters
Recording Parameters Parameter Full Name of Parameter Value Pattern Loop Length Pattern Loop Length 1–4 measures Input Quantize Input Quantize OFF, 1/16 (3), 1/16, 1/8 (3), 1/8, 1/4 (3), 1/4 Gate Time Ratio Gate Time Ratio REAL, STACCATO, 33%, 50%, 66%, 100% Metronome Pattern Metronome... -
Page 188: Transmit/Receive Setting List
Transmit/Receive Setting List Parameter MODE1 MODE2 EFFECTS Section TONE CONTROL BASS TREMOLO: CC92 TREMOLO: CC92 TREBLE PHASER: CC95 PHASER: CC95 MULTI-FX LEVEL CHORUS: CC93 CHORUS: CC93 DELAY TIME EFFECT-CTL1: CC12 EFFECT-CTL1: CC12 FEEDBACK EFFECT-CTL2: CC13 EFFECT-CTL2: CC13 LEVEL CELESTE: CC94 CELESTE: CC94 LFO 1 Section RATE... -
Page 189: Voice Modulator Initialize Setting List
Voice Modulator Initialize Setting List FORMANT FILTER VINTAGE SILKY HUSKYVOICE BREAKBEATS REAR/FRONT ON (FRONT) ON (FRONT) ON (FRONT) ON (FRONT) VOICE MOD SEND (UPPER) ON VOICE MOD SEND (LOWER) ON VOICE MOD ON/OFF SW PANEL SELECT LOWER/UPPER LOWER/UPPER LOWER/UPPER LOWER/UPPER Algorithm SOLID SMOOTH... - Page 190 FORMANT FILTER FILTER BANK VOCAL MORPH CTRL ROBOT HUSKYROBOT STANDARD RADIO VOCAL MORPH CTRL REAR/FRONT ON (FRONT) ON (FRONT) OFF (REAR) OFF (REAR) ON (FRONT) VOICE MOD SEND (UPPER) ON VOICE MOD SEND (LOWER) ON VOICE MOD ON/OFF SW PANEL SELECT LOWER/UPPER LOWER/UPPER VOICE MOD...
-
Page 191: Midi Implementation
Date: Apr. 16. 1998 MIDI Implementation Model: JP-8080 Version: 1.00 ------------------------------------------------------------------------------------------------------------------------ * If an unavailable (nonexistent) Bank Select number is received it will be ignored, and Mark Meaning Range only the Program Change will be received. MIDI channel 0H-FH (ch.1 - ch.16) * The Patches corresponding to each Bank Select are as follows. - Page 192 Volume (Controller number 7) * If a voice is already sounding at the same note number as the source note number, that voice will change pitch to the pitch of the newly received Note On, and continue status 2nd byte 3rd byte sounding (i.e., will be played legato).
-
Page 193: Program Change
Program Change * When All Note Off is received, all currently sounding notes of the corresponding chan- nel will be turned off. However if Hold 1 is on, the sound will be held until these are status 2nd byte turned off. Omni Off (Controller number 124) pp=Program number... -
Page 194: System Exclusive Messages
= ID number: This is the ID number (manufacturer ID) that specifies the manufactur- er whose exclusive message this is. Roland’s manufacturer ID is 41H. Exclusive status ID numbers 7EH and 7FH are defined in an expansion of the MIDI... - Page 195 * When Tx/Rx Edit SW ([MIDI]) is ON and Tx/Rx Edit Mode ([MIDI]) is set to MODE2, Breath type (Controller number 2) the Tx/Rx Setting ([MIDI]) will be valid. In this case, this message will change the status 2nd byte 3rd byte value of the parameter assigned to the received control change for the part specified by PANEL SELECT.
- Page 196 Portamento Control (Controller number 84) Pitch Bend Change status 2nd byte 3rd byte status 2nd byte 3rd byte kk = Source Note Number: 00H - 7FH (C-1 - G9) mm,ll=Pitch Bend value: 00 00H - 40 00H - 7F 7FH (-8192 - 0 - +8191) * A Note On message received immediately after a Portamento control will be sounded * This is received only when Remote KBD CH ([MIDI]) is ALL or when the MIDI chan- with the pitch changing smoothly from the source note number.
- Page 197 = ID number: This is the ID number (manufacturer ID) that specifies the manufacturer whose exclusive message this is. Roland’s manufacturer ID is 41H. ID numbers 7EH and 7FH are defined in an expansion of the MIDI stan- dard as Universal Non-realtime messages (7EH) and Universal Realtime Messages (7FH).
- Page 198 3. MIDI messages transmitted from MIDI OUT Modulation (Controller number 1) status 2nd byte 3rd byte * When MIDI Thru is ON (ALL), messages received at MIDI IN will be re-transmitted from MIDI OUT except for Active Sensing messages. Breath type (Controller number 2) status 2nd byte...
- Page 199 = ID number: This is the ID number (manufacturer ID) that specifies the manufacturer whose exclusive message this is. Roland’s manufacturer ID is 41H. ID kk = Source Note Number: 00H - 7FH (C-1 - G9) numbers 7EH and 7FH are defined in an expansion of the MIDI stan-...
- Page 200 If the original data is BCH, the binary expression of BCH is 10111100. Thus, 01H is transmitted as the first byte. As the next byte, we transmit the remaining 0111100 = 3CH without change. For reception, data will be ignored if the two bytes are not received together. * Parameter names given as —- are parameters which are used only by the JP-8000. They will be ignored if received by the JP-8080. +-------------------------------------------------------------------------------+...
- Page 201 4-1-3. Tx/Rx Setting size = 2AH (42 byte) +---------------------------------------------------------------------------------------------------------------+ | Offset Address | Parameter Name | Sys.Ex.Value | Meaning of Value |===============|=======================================|===============|=======================================| | 00 00 00 00 | Tx/Rx Setting (LFO1 Rate) | 00h - 60h | OFF, CC#1-31, AFTER, CC#33-95, SYSEX | 00 00 00 01 | Tx/Rx Setting (LFO1 Fade) | 00h - 60h...
- Page 202 4-2-2. Voice Modulator size = 29h (41 byte) +---------------------------------------------------------------------------------------------------------------+ | Offset Address | Parameter Name | Sys.Ex.Value | Meaning of Value |===============|=======================================|===============|=======================================| | 00 00 00 00 | Voice Modulator Switch | 00h - 01h | OFF, ON | 00 00 00 01 | Voice Modulator Panel Mode | 00h - 01h | OFF, ON...
- Page 203 4-3. Patch size = 01h 78h (248 byte) +---------------------------------------------------------------------------------------------------------------+ | Offset Address | Parameter Name | Sys.Ex.Value | Meaning of Value |===============|=======================================|===============|=======================================| | 00 00 00 00 | Patch Name 1 | 20h - 7Dh | ASCII Code | 00 00 00 01 | Patch Name 2 | 20h - 7Dh | ASCII Code...
- Page 204 | 00 00 01 1B | Velocity Switch | 00h - 01h | OFF, ON |#00 00 01 1C | Velocity: LFO1 Rate | 00h - FEh | -127 - +127 |#00 00 01 1E | Velocity: LFO1 Fade | 00h - FEh | -127 - +127 |#00 00 01 20 | Velocity: LFO2 Rate...
- Page 205 Address block map 00 00 00 00 +---------------+. . . 00 00 00 00 +---------------+ | System Area | System | refer to 4-1-1 +---------------+. 00 00 20 00 +---------------+ . refer to 4-1 | Motion Setup | refer to 4-1-2 00 00 30 00 +---------------+ | Tx/Rx Setting | refer to 4-1-3...
- Page 206 Examples of exclusive messages and calculating the checksum What is the decimal equivalent of 5AH? Roland exclusive messages (RQ1, DT1) are transmitted with a checksum at the end of the From the above table, 5AH = 90. data (before F7) to check that the data was received correctly. The value of the checksum is determined by the address and data (or size) of the exclusive message.
- Page 207 Note: SP indicates “space”. (1) Exclusive status (2) ID number (Roland) (3) device ID (17) (4) model ID (JP-8080) (5) command ID (DT1) (6) EOX Next we calculate the checksum. 03H + 02H + 42H + 00H + 00H + 00H + 01H + 78H = 3 + 2 + 66 + 0 + 0 + 0 + 1 + 120 = 192 (sum) 192 (total) 128 = 1(quotient) ...
-
Page 208: Midi Implementation Chart
Date : Apr. 14, 1998 MIDI Implementation Chart Model JP-8080 Version : 1.00 Transmitted Recognized Remarks Function... Basic Default 1–16 1–16 Channel Changed 1–16 1–16 Default Mode 3 Mode 3 Mode Messages Mode 3, 4 (M=1) Altered ************** Note 0–127 0–127... -
Page 209: Specifications
Specifications Synthesizer Section Arpeggiator/RPS Section Parts Arppegio Mode 2 (Upper, Lower) DOWN Key Mode UP&DOWN Single, Dual, Split RANDOM Maximum Polyphony Arppegio Beat Patterns 10 Voices (Voice Modulator OFF) 1/4, 1/6, 1/8, 1/12, 1/16, 1/32, PORTA-A1—A11, PORTA- 8 Voices (Voice Modulator ON) B1—B15, SEQUENCE-A1—A7, SEQUENCE-B1—B5, SEQUENCE-C1—C2, SEQUENCE-D1—D8, ECHO1—3, Waveform... - Page 210 Motion Control Section Input Impedance External Input jacks INST/LOWER (MONO): 24 k Motion Data (Internal Memory) VOCAL/UPPER: 24 k Motions: 2 x 2 sets (SET A, B) MIC jack: Maximum Loop Length (Measures): 8 Maximum Recording Length (Measures): 99 Output Impedance Output jacks Recording Method L(MONO):...
-
Page 211: Index
Index Copy Patch..................61 Pattern...................97 AMP ENVELOPE..............76 Cross Modulation Depth ............71 FILTER ENVELOPE............75 Ctrl Edit Scope ................64 PITCH ENVELOPE.............72 CUTOFF FREQ ..............28, 73 Aftertouch.................169 Cutoff Slope................73 Algorithm .................108 AMP ENVELOPE section............76 AMP section ................76 Arp Beat Pattern ................91 AMP ENVELOPE..............76 Arpeggiator ................37, 90 Arpeggio Dest ................91 FILTER ENVELOPE............75 Asterisk ..................32... - Page 212 Error Messages.................174 Exclusive Messages ..............169 LCD Contrast ................125 EXT ..................71, 105 LEGATO ..................80 EXT IN jacks ...............27, 106 Ext Trig Dest................121 LEVEL Ext Trig Switch.................121 AMP ..................76 Ext->Inst Send ..............105, 109 DELAY................31, 79 Ext->Vocal Send...............105, 109 MULTI-FX ..............31, 78 EXTERNAL INPUT section ..........71, 106 ROBOT................113 VOICE MODULATOR .............113 VOICE MODULATOR DELAY ........112...
- Page 213 MODULATION (LFO 2) section ..........87 Pattern MONO..................80 Clear ..................39 Morph Bend Assgn ..............85 Copy ..................97 MORPHING.................82, 84 Playback................38, 92 Motion Control Recording ..............40, 94, 95 Clear ..................45 Pattern Trig Qtz .................93 Playback................44, 98 Perform Ctrl CH ..............124 Recording ..............46, 100 Performance ................55 Motion Restart................99 Performance...
- Page 214 RPS..................38, 92 TIME Rx Exclusive SW ..............124 DELAY................31, 79 PORTAMENTO..............88 VOICE MODULATOR DELAY ........112 TONE CONTROL..............30, 78 TREBLE .................30, 78 AMP ENVELOPE..............76 Tremolo ................87, 167 FILTER ENVELOPE............75 TRIANGLE MOD ..............66 Sample and Hold (LFO 1) ............77 Triangle Wave Save................32, 127, 129 LFO 1..................77 Sawtooth Wave OSC 1..................68...
- Page 215 –DELAY LEVEL ..............112 –DELAY TIME..............112 –LEVEL ................113 –NOISE CUTOFF ..............113 –NOISE LEVEL..............113 –PAN...................113 –RELEASE ................112 –RESONANCE ..............112 VOLUME ..................19 Wah..................87, 167 WAVEFORM LFO 1................29, 77 OSC 1................25, 66 OSC 2..................68 X-MOD DEPTH .................71 Others -12dB/-24dB ................73 LFO 1..................77 OSC 1..................68 OSC 2..................69 (LFO 1) ................77 OSC 1..................67...
- Page 216 Information When you need repair service, call your nearest Roland Service Center or authorized Roland distributor in your country as shown below. ARGENTINA INDIA LEBANON AUSTRIA PORTUGAL Instrumentos Musicales S.A. Rivera Traders Pvt. Ltd. A. Chahine & Fils E. Dematte &Co.
-
Page 217: Blank Chart
Blank Chart (1) Performance parameters [ PFM COMMON ] ( BANK [ 1 ] ) [ VOICE MOD ] ( BANK [ 2 ] ) Performance Name Algorithm Part Detune Control1 Assign Output Assign Control2 Assign Voice Assign Ext->Inst Send Split Point Ext->Vocal Send Arpeggio Dest... - Page 218 Blank Chart (2) Patch parameters (Upper) Multi-FX Type Delay Type [ PATCH ] ( BANK [ 4 ] ) Patch Name Env Type in Solo Bend Range Up Patch Gain Bend Range Down Ext Trig Switch Morph Bend Assgn Ext Trig Dest Unison Detune Patch parameters (Lower) Multi-FX Type...
- Page 219 For EU Countries CAUTION Danger of explosion if battery is Apparatus containing incorrectly replaced. Replace only with the same or Lithium batteries equivalent type recommended by the manufacturer. Discard used batteries according to the manufacturer’s instructions. ADVARSEL! VARNING Lithiumbatteri - Eksplosionsfare ved Explosionsfara vid felaktigt batteribyte.
- Page 220 01458945 '99-6-AE2-31K...
Need help?
Do you have a question about the JP-8080 and is the answer not in the manual?
Questions and answers