Table of Contents
Advertisement
Quick Links
Advertisement
Table of Contents

Related Manuals for Baumatic BHI909TS. GWK


Summary of Contents for Baumatic BHI909TS. GWK
- Page 1 BHI909TS.GWK 90cm Induction & Gas...
- Page 2 User Manual for your Baumatic BHI909TS.GWK 90 cm Induction & Gas Hob NOTE : This User Instruction Manual contains important information, including safety & installation points, which will enable you to get the most out of your appliance. Please keep it in a safe place so that it is easily available for future reference;...
-
Page 3: Table Of Contents
Gas connection Ventilation requirements 35-36 Gas Safety (Installation and Use) Regulations Gas Adjustment (Conversion to LPG) Minimum flow adjustment for hob gas taps Gas tap maintenance My appliance isn’t working correctly 41 - 43 Error codes Baumatic consumables Contact details... -
Page 4: Environmental Note
Environmental note o The packaging materials that Baumatic uses are environmentally friendly and can be recycled. o Please discard all packaging material with due regard for the environment. -
Page 5: Important Safety Information
No modifications to the appliance are permitted by Baumatic Ltd. o You should not store or place flammable or highly flammable liquids/materials on top of or near the appliance. Items made from... - Page 6 Safety o Baumatic strongly recommend that babies and young children are prevented from being near to the appliance and not allowed to touch the ap pliance at any time. During and after use, all surfaces will be hot. o If it is necessary for younger family members to be in the kitchen,...
- Page 7 Please see the specific section of this booklet that refers to installation. o Baumatic Ltd. declines any responsibility for injury or damage, to person or property, as a resu lt of improper use or incorrect installation of this appliance.
- Page 8 If in doubt, you should consult the manufacturer of your device or your doctor. In this respect, Baumatic can only guarantee the conformity of our own product. o If an object made of metal, (e.g. saucepan lid, knife, fork or spoon) is placed on a cooking zone that is switched on, it can get hot.
-
Page 9: Specifications
Specifications Product dimensions: Aperture dimensions: Depth: 510 mm Depth: 490 mm Width: 900 mm Width: 880 mm Height: 55 mm Height: 20 mm (min) Product specifications: 1 x 3.00 kW induction zone (Ø 210 mm) 1 x 2.30 kW induction zone with booster (3.00 kW) (Ø 210 mm) ... -
Page 10: Standard Accessories
Standard accessories o Induction hob scraper o LPG conversion jets Electrical details Rated Voltage: 220 - 240 Vac 50 / 60 Hz Supply Connection: 40A (double pole switched fused outlet with 3mm contact gap) Max Rated Inputs: 7.40 kW Mains Supply Lead: 3 core x 6 mm²... -
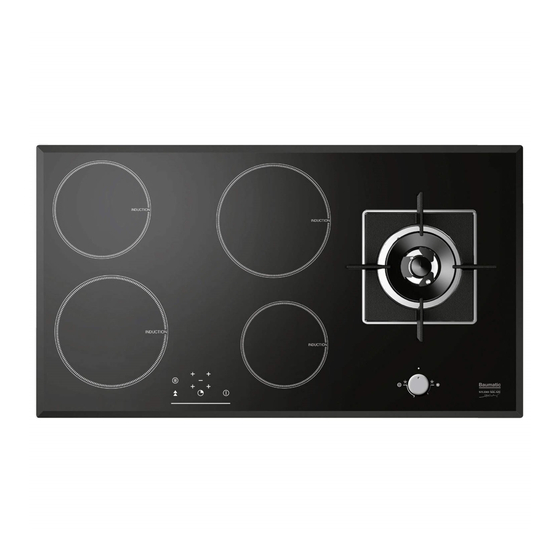
Page 11: Hob Surface Layout
Hob surface layout A) 3.00 kW induction zone (Ø 210 mm) B) 1.40 kW induction zone (Ø 160 mm) (booster = 1.85 kW) C) 2.30 kW induction zone (Ø 210 mm) (booster = 3.00kW) D) 1.40 kW induction zone (Ø 160 mm) E) Induction zone control panel F) 4.00 kW triple crown gas burner G) Gas wok zone control knob... -
Page 12: Control Panel Layout
Control panel layout Induction hob 1) ON / OFF button 2) Plus button(s) / cooking zone selection button(s) 3) Minus button 4) – 5) Timer button Zone temperature status display(s) 7) Timer display 8) – 9) Timer indicator LED 10) – 11) Booster button Gas Hob F1) Single (inner) flame... -
Page 13: Touch Controls
Touch controls o All operations are performed by means of the touch controls that can be found on the control panel. o The controls respond to touch so you do not need to add any pressure. o You should use the ball of your finger not the tip when using the controls. -
Page 14: Switching On A Zone And Setting A Power Level
Switching on a zone and setting a power level IMPORTANT: A zone must be selected within 20 seconds of turning the hob on. After this time the hob will return to stand-by mode. o Make sure that the bottom of the pan and the surface of the hob are clean and dry before placing a suitable pan on the cooking zone that you wish to use. -
Page 15: Power Levels
Power levels o For a general guide to cooking various foods at the different power levels please refer to the table below. o Please note that this table should be viewed as a guide only and that other factors such as cookware, weight and amount of food and personal preference will all influence the power level required. -
Page 16: Switching Off A Zone
Switching off a zone o Press the cooking zone selection button of the cooking zone that you want to switch off. o Press and hold down the minus button until the number in the cooking zone indicator reaches “0”. Alternatively you can press the plus and minus buttons simultaneously to reset the zone to “0”. -
Page 17: Pan Sensor
Pan sensor Each zone has a sensor on it, so it can detect the presence of a pan. o The sensor is fine-tuned to detect a pan being placed on it. The pan should be one size smaller than the nominal diameter of the zone. -
Page 18: The Hob Timer (Minute Minder)
The hob timer (minute minder) Your hob has a timer which will countdown a period of time between 1 and 99 minutes. At the end of the countdown period an audible signal will sound. No induction zone can be in use while using the minute minder. -
Page 19: The Hob Timer (Linked To A Cooking Zone)
The hob timer (linked to a cooking zone) You are able to link a countdown time to a cooking zone so that when the countdown time has elapsed the cooking zone will switch off automatically. o Press the ON/OFF button to turn the hob on. o Press the cooking zone selection button of the cooking zone that you want to use and place a suitable pan on the selected cooking zone. -
Page 20: Locking The Hob Top
o You can cancel the hob timer at any time by selecting the relevant zone using the selection button (2) and then pressing the plus and minus buttons simultaneously. The timer display will show “00” and the minute minder will be cancelled. -
Page 21: Safety Cut-Off
Safety cut-off o If one or more of the cooking zones are accidentally left on, a safety cut off will activate after a certain period of time. The length of time depends on the power level that a zone or zones have been set on. - Page 22 IMPORTANT: The induction hob surface is tough; however it is not unbreakable and can be damaged. Especially if pointed or hard objects are allowed to fall on it with some force. o DO NOT USE THE HOB IF THE SURFACE BECOMES BROKEN CRACKED. SHOULD CONTACT BAUMATIC CUSTOMER CARE DEPARTMENT IMMEDIATELY.
-
Page 23: Using The Gas Hob
Using the gas hob Switching on the burner IMPORTANT: You should clean the hob surface (see “Cleaning and maintenance” section). The following symbols will appear on the control panel, next to the control knob: Circle: gas off Turn the knob right to ignite and use the single/inner burner (F1). Turn the knob left to ignite and use the triple flame burner (F2). -
Page 24: Automatic Ignition With Flame Failure Device
Automatic ignition with flam e failure safety device The wok burner is fitted with a flame failure safety device, which is designed to stop the flow of gas to the burner head in the event of the flame going out. To ignite a burner: o Press in the control knob of the burner and turn it to the ignition position. -
Page 25: Energy Saving Tips
Energy saving tips Burner Pan size Ø min Ø max 200 mm 320 mm o The diameter of the bottom of the pan should correspond to that of the burner. o The burner flame must never extend beyond the diameter of the pan. -
Page 26: Cleaning And Maintenance
Cleaning and maintenance Cleaning operations must only be carried out when the hob is cool. The appliance should be disconnected from your mains supply before commencing any cleaning process. Cleaning the induction hob top Any residues that are left on the hob top surface from cleaning agents will damage it. -
Page 27: Using A Induction Hob Scraper
Using a induction hob scraper A induction hob scraper will be provided with your appliance. The following guidelines should be followed when using the induction hob scraper:- o The scraper should be placed on the induction surface at an angle. o Residues should be removed by sliding the blade carefully over the induction surface. -
Page 28: Maintaining The Cast Iron Pan Stand
Maintaining the cast iron pan stands o IMPORTANT: Make sure that the hob surface and pan stands have cooled before you attempt to touch them. o Wipe the pan stands over with a soft, damp cloth that has been put into warm soapy water. The cloth should be wrung out after being taken out of the soapy water. -
Page 29: Installation
Installation The installation must be carried out by a suitably qualified person, in accordance with the current version of the following. o UK Regulations and Safety Standards or their European Norm Replacements. o Building Regulations (issued by the Department of the Environment). - Page 30 This appliance is classified as Class 3 and therefore is to be built into a kitchen unit (depending on size) or 600 mm worktop that is between 30 mm and 40 mm thick. The following minimum clearance distances must be observed:- o The rear edge of the hob must be a minimum distance of 50 mm from the rear wall.
-
Page 31: Unpacking The Appliance
Unpacking the appliance When unpacking the appliance please check that the following items are contained within the packaging: 1 x Baumatic hob Pan stand Burner assemblies Instruction manual Warranty card... - Page 32 o Apply the sealing strip provided around the edge of the appliance. o Do not leave a gap in the sealing strip or overlap the thickness. IMPORTANT: Do not use a silicon sealant to seal the appliance against the aperture. This will make it difficult to remove the hob from the aperture in future, particularly if it needs to be serviced.
-
Page 33: Electrical Connection
Electrical connection This appliance must be installed by a qualified person in accordance with the latest edition of the I.E.E. Regulations and in compliance with Baumatic’s instructions. Before connecting the appliance, make sure that the supply voltage marked on the rating plate corresponds with your mains supply voltage. -
Page 34: Connecting The Mains Supply Cable
o The brass links must be positioned as shown in the diagram above and once established ALL terminal screws must be tightened down firmly. o You should use a good quality screwdriver to carefully, fully tighten ALL of the terminal screws. o If when the hob is first switched on, only two of the zones work, you should recheck that the terminal screws are all fully tightened. -
Page 35: Gas Connection
Conversion for use on LPG and other gases must only be undertaken by a qualified person. For information on the use of other gases, please contact the Baumatic Customer Care Department. o The hob must be installed by a qualified person, in accordance... - Page 36 o If there are any other fuel burning appliances in the same room the current edition of BS 5440: Part 2: should be consulted to determine air vent requirements. o Ensure that the room containing the hob is well ventilated, keep natural ventilation holes or install a mechanical ventilation device (mechanical cooker hood).
-
Page 37: Gas Safety (Installation And Use) Regulations
Gas Safety (Installation and Use) Regulations IMPORTANT: The appliance MUST be connected to the gas supply by use of a ½ BSP Elbow, seal, copper pipe and an isolation tap fitted in an easily accessible position. o It is the law that all gas appliances are installed by competent persons in accordance with the current edition of the Gas Safety Installation and Use Regulations. -
Page 38: Gas Adjustment (Conversion To Lpg)
Gas adjustment (Conversion to LPG) work must carried GASSAFE registered engineer. IMPORTANT: Always isolate the hob from the electricity supply before changing the injectors and/or adjusting the minimum flow of the burners. o Remove pan-stands, burners flame spreaders (A). o Unscrew the injector (B) and replace it with the stipulated injector for the new gas supply (see the table on the next page). -
Page 39: Minimum Flow Adjustment For Hob Gas Taps
Minimum flow adjustment for hob gas taps. work must carried GASSAFE registered engineer. IMPORTANT: Always isolate the hob from the electricity supply before changing the injectors and/or adjusting the minimum flow of the burners. o Switch the burner on and set the knob at the minimum position. o Remove the knob from the tap and place a small bladed screwdriver in the adjusting screw located under the knob. -
Page 40: Gas Tap Maintenance
Gas tap maintenance These maintenance operations MUST ONLY be carried out by a GASSAFE registered engineer. IMPORTANT: Before carrying out any maintenance operations, disconnect the appliance from the gas and electricity supplies. If a gas tap becomes stiff to operate, then you should proceed as follows: o Remove the control knobs, pan supports, burners, hob fixing screws and clamps. -
Page 41: My Appliance Isn't Working Correctly
My appliance isn’t working correctly Problem Possible Causes Solution The induction hob cannot be No power to the Make sure the hob is turned on. appliance. connected to the power supply correctly and that it is switched on. Check whether there is a power cut in your home or area. -
Page 42: Error Codes
The residual heat indicator The cooking zone has No action required but if has not come on after a the cooking zone appears only been turned on for a cooking zone has been short period of time and to be hotter than 60°C switched off. - Page 43 - like plinths, or any installation other than the one specified by Baumatic Ltd. has been completed. Please refer to the conditions of guarantee that appear on the...
-
Page 44: Baumatic Consumables
BC005 Stainless Steel Cleaner and Protector (250 ml) o BC007 E-Cloth – General Purpose Cloth o BC008 Microwave Cover To order a Baumatic consumable product please call 0123 5437 244 and quote the product code. You can also order online from eshop.baumatic.co.uk... -
Page 47: Contact Details
Advice Line Telephone (0118) 933 6933 Deutschland 0049(0)180-5888975 E-mail: Oesterreich +43 (0) 820 / 420423 sales@baumatic.co.uk customercare@baumatic.co.uk www.baumatic.de spares@baumatic.co.uk technical@baumatic.co.uk Italy Baumatic Italia S.R.L. Website: Via Galvani N.3 www.baumatic.co.uk 35011 Campodarsego (PD) Facebook: +3904 9920 2297 www.facebook.com/baumatic.uk www.baumatic.it Republic of Ireland Holland Baumatic Benelux B.V.
Need help?
Do you have a question about the BHI909TS. GWK and is the answer not in the manual?
Questions and answers