
Related Manuals for MOTU Traveler-mk3


Summary of Contents for MOTU Traveler-mk3
- Page 1 Traveler ™ User Guide for Mac 1280 Massachusetts Avenue Cambridge, MA 02138 Business voice: (617) 576-2760 Business fax: (617) 576-3609 Web site: www.motu.com Tech support: www.motu.com/support...
-
Page 2: Important Safeguards
MOTU Traveler-mk3. 8. Lightning - For added protection for the MOTU Traveler-mk3 during a lightning storm, unplug its power supply from any wall outlets. This will prevent damage to the MOTU Traveler-mk3 due to lightning and power line surges. - Page 3 Authorization Number on the outside of the box below the shipping address. That license agreement is a contract, and clicking “Accept” binds you and MOTU to This warranty does not apply if the equipment has been damaged by accident, all its terms and conditions.
-
Page 4: Table Of Contents
Contents Quick Reference: Traveler-mk3 Front Panel Quick Reference: Traveler-mk3 Rear & Side Panels Quick Reference: MOTU Audio Setup About the Traveler-mk3 Packing List and Mac System Requirements Installing the Traveler-mk3 Hardware Installing the Traveler-mk3 Mac Software MOTU Audio Setup Traveler-mk3 Front Panel Operation... -
Page 7: Quick Reference: Motu Audio Setup
1x rate (e.g. 48kHz instead of 192 kHz). Click the General tab to access these settings. Check this option if you would like the MOTU Audio Setup icon to appear in the application dock as soon as a MOTU FireWire interface is detected (switched on, plugged in, etc.) -
Page 9: About The Traveler-Mk3
About the Traveler-mk3 CHAPTER Overview ..........9 Digitally controlled analog trim for all analog ■... -
Page 10: The Traveler-Mk3 Rear Panel
THE TRAVELER-MK3 REAR PANEL † The Traveler-mk3 optical connectors support The Traveler-mk3 rear panel has the following several standard optical I/O formats, which connectors: provide varying channel counts. See “Optical” on page 11 for details about optical bank operation. Eight gold-plated, balanced quarter-inch (TRS) ■... - Page 11 files on disk for instant recall. to daisy chain multiple interfaces — up to four Optical MOTU FireWire interfaces on a single FireWire The two optical banks provide 16 channels of bus. It can also be used to connect other FireWire ADAT optical at 44.1 or 48 kHz, 8 channels of...
-
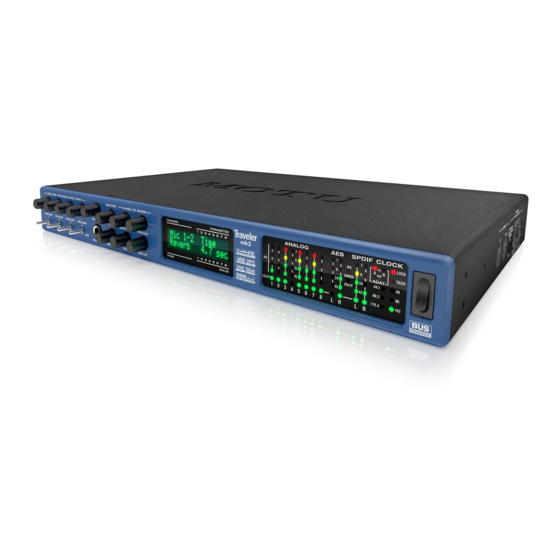
Page 12: The Traveler-Mk3 Front Panel
The included MOTU SMPTE Console™ software Programmable LCD metering Push the METERS knob to cycle among three provides a complete set of tools for generating and meter display modes in the LCD: 1) vertical multi- regenerating SMPTE time code, which allows you channel meters, 2) horizontal long-throw metering to slave other devices to the computer. -
Page 13: 16-Bit And 24-Bit Recording
Bus power provides convenient portability with computer) as a complete rack-mounted mixer. laptop computers. An external battery pack Input signals to the computer can be recorded wet, provides both portability and extended operation, dry, or dry with a wet monitor mix (for musicians even in remote locations. -
Page 14: Audiodesk
file-based operations, sample- accurate editing and placement of audio, and more. DIGITAL PERFORMER The Traveler-mk3 system is fully integrated with MOTU’s award-winning Digital Performer audio sequencer software package. OTHER HOST AUDIO SOFTWARE The Traveler-mk3 system includes a standard... -
Page 15: Packing List And Mac System Requirements
You Traveler-mk3 product registration card ■ can do so online at motu.com/register. Please be sure to register AudioDesk as well, so that you will MAC SYSTEM REQUIREMENTS be eligible to receive technical support and... - Page 16 P A C K I N G L I S T A N D M A C S Y S T E M R E Q U I R E M E N T S...
- Page 17 Syncing word clock devices......30 Traveler-mk3. Connecting multiple MOTU FireWire interfaces ..30...
-
Page 18: Installing The Traveler-Mk3 Hardware
CONNECT THE TRAVELER-MK3 INTERFACE CONNECT AUDIO INPUTS AND OUTPUTS 1 Plug one end of the Traveler-mk3 FireWire cable The Traveler-mk3 audio interface has the following (included) into the FireWire socket on the audio input and output connectors: computer as shown below in Figure 3-1. 8 balanced, +4 dB quarter-inch analog outputs ■... - Page 19 44. You can also adjust trim in the grouped in stereo pairs (5-6 and 7-8) If you need to MOTU CueMix FX software. See “Input trim” on split a pair to deal with it as two individual mono page 83.
- Page 20 4 After splitting the stereo pair, if necessary, turn The Traveler-mk3 supplies +12dB of digital trim the PARAM knob until you see the TRIM (boost) for each optical input, which can be parameter in the LCD (Figure 3-6): adjusted from CueMix FX (“Input trim” on page 83) or the front panel (“The IN (inputs) menu”...
- Page 21 46). For details about using the clock source setting and the MOTU Audio Setup software in general, see chapter 5, “MOTU Audio Setup” (page 37). I N S T A L L I N G T H E T R A V E L E R - M K 3 H A R D W A R E...
-
Page 22: Connect Midi Gear
CONNECT MIDI GEAR Connecting additional gear with MIDI THRUs If you need to connect several pieces of MIDI gear, Connect your MIDI device’s MIDI IN jack to the run a MIDI cable from the MIDI THRU of a device Traveler-mk3’s MIDI OUT jack (Connection A already connected to the Traveler-mk3 to the MIDI below). - Page 23 When operating under bus power, daisy-chaining POWER OPTIONS is not recommended The Traveler-mk3 can draw power from three The Traveler-mk3 can be daisy-chained with other possible sources: FireWire devices from a single FireWire connection to the computer. However, if the 1.
- Page 24 Examples of bus- powered operation DC power supply Here are a few typical examples of bus-powered If you do not want the Traveler-mk3 to draw power Traveler-mk3 operation: from the computer, and AC power is available, you can power the Traveler-mk3 from any standard Bus power from a desktop computer 8-18 volt, 12 watt DC power supply with any Your desktop computer is running off of its usual...
-
Page 25: A Typical Traveler-Mk3 Setup
CueMix software, or both. During recording, you can use Console software. synthesizer Traveler-mk3 side panel MIDI IN MIDI OUT MOTU 8pre or other optical quarter-inch 8-channel mic input expander analog outs ADAT optical monitors guitars (with or... -
Page 26: Operating The Traveler-Mk3 As Aconverter
88.2 or 96 kHz” on page 20. connect the Traveler-mk3 optical output to the MAKING SYNC CONNECTIONS optical input on another MOTU audio interface, If you connect devices digitally to the such as a Traveler, 896mk3 or even another Traveler-mk3, or if you need to synchronize the Traveler-mk3. - Page 27 MOTU Audio Setup to confirm that the Clock Source setting is Internal as Not phase-locked Phase-locked shown below. For details, see chapter 5, “MOTU Audio Setup” (page 37). Device A Device B Figure 3-15: When transferring audio, two devices must have phase- locked audio clocks to prevent clicks, pops or other artifacts.
-
Page 28: Syncing To Smpte Time Code
Word FireWire cable audio cable cable Launch the MOTU SMPTE Console to specify the time code frame Other digital audio device Mac running AudioDesk, rate and amount of freewheel. Also, confirm that the Clock slaved to the Traveler-mk3 Digital Performer or other host software. -
Page 29: Syncing Aes/Ebu And S/Pdif Devices
SPDIF or AES/EBU S/PDIF or AES/EBU device With this setup, in MOTU Audio Setup, choose Internal, or any other clock source setting except SPDIF or AES/EBU. The other device slaves to the Traveler via word clock for digital transfers in both directions. -
Page 30: Syncing Word Clock Devices
Slaving to 2x and 1/2x word clock All MOTU FireWire audio interfaces that support 96 kHz operation have the ability to slave to a word clock signal running at either one half or one quarter of their current clock rate. - Page 31 MOTU FireWire audio interfaces) to a computer. Resolving to other Core audio drivers Multiple interfaces cannot be bus-powered The MOTU FireWire driver has the ability to Do not run the Traveler-mk3, UltraLite or other resolve to other Core Audio drivers. This allows the...
- Page 32 Connecting other MOTU FireWire interfaces the master interface from the Clock Source menu, as You can add an original MOTU 828 to the end of a demonstrated below in Figure 3-23. This causes FireWire daisy chain (because the 828 has only one...
-
Page 33: Installing The Traveler-Mk3 Mac Software
More specifically, MOTU SMPTE Console ....... 35 we use CoreAudio to refer to Mac OS X’s standard... - Page 34 CoreMIDI and Audio MIDI Setup CoreMIDI is the “under-the-hood” portion of Mac OS X that handles MIDI services for MIDI hardware and software. CoreMIDI provides many universal MIDI system management features, including MIDI communication between your Traveler-mk3 FireWire interface and all CoreMIDI compatible software.
- Page 35 SMPTE time code, and to generate SMPTE for striping, regenerating or slaving other devices to the computer. For details, see chapter 12, “MOTU Figure 4-3: Connecting devices to the Traveler-mk3. In this example, a controller keyboard is connected to the Traveler-mk3’s MIDI IN, and a SMPTE Console”...
- Page 36 I N S T A L L I N G T H E T R A V E L E R - M K 3 M A C S O F T W A R E...
-
Page 37: Accessing The Traveler-Mk3 Settings
..........42 Then click the MOTU Traveler mk3 item in the list, Channel Names. -
Page 38: Motu Audio Setup
■ the four available analog output pairs or phones. Figure 5-2: MOTU Audio Setup gives you access to all of the settings in the Traveler-mk3 hardware. M O T U A U D I O S E T U P... -
Page 39: Clock Source
Clock Source Use this setting whenever you are recording input The Clock Source determines the digital audio from a DAT deck or other S/PDIF device into the clock that the Traveler-mk3 will use as its time Traveler-mk3. It is not necessary in the opposite base. -
Page 40: Default Stereo Input/Output
TOSLink format, as Other audio devices (drivers) explained in “Optical input/output” on page 41. The MOTU FireWire Audio Driver has the ability to resolve to other Core Audio drivers. Doing so The TOSLink clock source setting refers to the... -
Page 41: Phones Assign
The Default Stereo Input and Default Stereo Output back to the computer via the Stereo Return 1-2 bus. settings in MOTU Audio Setup (Figure 5-2 on This stereo return bus from the Traveler-mk3 page 38) let you specify the stereo input and output... -
Page 42: Clip Hold Time
‘GENERAL’ TAB SETTINGS Launch MOTU Audio Setup when hardware becomes available Check this option if you would like the MOTU Audio Setup icon to appear in the application dock as soon as a MOTU interface is detected (switched Figure 5-5: Traveler-mk3 channel names as they appear in Digital on, plugged in, etc.) -
Page 43: Precision Digital Trim And Pad
Traveler-mk3 Front Panel Operation CHAPTER OVERVIEW PRECISION DIGITAL TRIM AND PAD The Traveler-mk3 offers complete front-panel Turn the Precision Digital Trim™ detented rotary programming via six rotary encoders and a 2x16 encoders on the Traveler-mk3 front panel backlit LCD display. All Traveler-mk3 settings can (Figure 6-1) to adjust the input level of their be accessed via these front-panel controls. -
Page 44: Traveler-Mk3 Front Panel Operation
pad setting is still visible) to toggle the 20dB pad on or off. After a few seconds, the LCD display will return to the previous screen. Other mic/guitar input settings The Traveler-mk3 mic/guitar inputs are equipped with many features to handle a wide variety of recording situations. - Page 45 Choosing a channel Digital input and output (AES/EBU + S/PDIF) ■ Turn the METERS knob to cycle among all active Optical bank A input and output ■ channels or channel pairs. Stereo pairs show two meters together. Optical Bank B input and output ■...
-
Page 46: Meters And Status Leds
METERS AND STATUS LEDS display a level meter and gain reduction reading The meters and LEDs (Figure 6-8) provide status that updates as you turn the volume knob. After a and metering information for all Traveler-mk3 brief time-out, the display returns to its previous inputs and outputs. -
Page 47: Traveler-Mk3 Setup Menu
TRAVELER-MK3 SETUP MENU Save/Name Preset An Traveler-mk3 preset holds all current To access the Traveler-mk3 SETUP menu, push the CueMix FX mix settings (everything in the PARAM knob until you see Traveler-mk3 SETUP CUEMIX menu). SETUP menu and AUDIO menu displayed in the LCD. -
Page 48: Audio Menu
LCD. It must be changed in AutoSave Status MOTU Audio Setup instead. Or, you can disconnect the Traveler-mk3 All of the parameters in the Traveler-mk3 are from the computer to change the Clock Source from the front panel. -
Page 49: Cuemix Menu
Type II — for 2x optical connection to MOTU The IN (inputs) menu ■ Push the CHANNEL button repeatedly until you products that are equipped with optical ports and see “I:” in the channel section of the LCD support 2x operation (Figure 6-12). - Page 50 channel strip in CueMix FX (Figure 11-3 on “ O: ” Indicates The current Access individual parameters the OUT channel. here, such as the frequency page 82), as well as the settings in the Channel tab (outputs) menu. setting for a band of EQ. (Figure 11-8 on page 86).
- Page 51 The MIX (Mixes) menu REVERB — these are the reverb send and return ■ Push the CHANNEL button repeatedly until you controls for the bus master fader. Access them with see “MIX 1” (or “MIX 2”, etc.) in the channel the PARAMETER knob.
-
Page 52: Inputs Menu
INPUTS MENU OUTPUTS MENU CHANNEL PAGE PARAM CHANNEL PAGE PARAM INPUTS INPUT PAIR OUTPUTS ENABLE Mic 1-4 PHASE Analog 1-2 (global) COPY Analog 5-6 L-R/M-S (stereo or M/S) Analog 3-4, etc. PASTE Analog 7-8 SWAP RESET etc. WIDTH TRIM ENABLE TRS only REF LEVEL (High-pass) -
Page 53: Mixes Menu
MIXES MENU STAND-ALONE OPERATION All settings, including all mix settings and global CHANNEL PAGE PARAM settings, are saved in the Traveler-mk3’s memory, MIXES MASTER ASSIGN and they remain in effect even when the Mix 1 MUTE Mix 2 FADER Traveler-mk3 is not connected to a computer. This etc. - Page 54 T R A V E L E R - M K 3 F R O N T P A N E L O P E R A T I O N...
-
Page 55: Digital Performer
Traveler-mk3 settings, such as sample rate and clock source, but to access all of the Traveler-mk3 settings, open MOTU Audio Setup, as shown in Figure 7-1: Choose Setup menu> Configure Audio System> Configure Hardware Driver to open the dialog shown above and access the Figure 5-2 on page 38. - Page 56 If you won’t be using the choose Internal. optical connectors, turn them off. Note: these settings can only be accessed in the MOTU Audio If you have digital audio devices connected to the Setup application. For details, see “Optical input/ Traveler-mk3, or if you are not sure about the clock output”...
-
Page 57: Working With Traveler-Mk3 Inputs And Outputs
Digital Performer’s AND OUTPUTS complete mixing environment. For example, the Once you’ve enabled the MOTU FireWire Audio Traveler-mk3 can serve as a monitor mixer routing driver as explained earlier in “The Traveler-mk3 channels to musicians, or it can serve as an settings”... -
Page 58: Synchronization
details. You can even set up your Traveler-mk3 are phase-locked. For details, see “Choosing a configuration file as a DP startup clipping so that it clock source for optical connections” on page 21 automatically loads when you open the project. See and “Making sync connections”... -
Page 59: Audiodesk
Traveler-mk3 CoreAudio driver. To access the rest of the Traveler-mk3 clock source, but to access all of the Traveler-mk3 settings, open MOTU Audio Setup. settings, open MOTU Audio Setup, as shown in For complete details about the Traveler-mk3 Figure 5-2 on page 38. - Page 60 If you won’t be using the optical Internal. connectors, turn them off. Note: these settings can only be accessed in the MOTU Audio Setup If you have digital audio devices connected to the application. For details, see “Optical input/output”...
- Page 61 (Figure 8-2). If you don’t see the optical inputs and/ As you read through the following sections to or outputs, check the MOTU Audio Setup to make decide what form of synchronization you might sure they are turned on and set to the format you need with other devices in your studio, be sure to require.
- Page 62 If you need to slave AudioDesk and the powerful, state-of-the-art MIDI sequencing. Talk Traveler-mk3 to SMPTE time code, you can do so to your authorized MOTU dealer for details about with or without a dedicated synchronizer. upgrading from AudioDesk to Digital Performer.
-
Page 63: Installing The Traveler-Mk3 Mac Os X Drivers
Preparing MIDI input and output ....63 Run MOTU Audio Setup ......63 Choosing the MOTU FireWire Core Audio driver . -
Page 64: Other Mac Os X Audio Software
28. operating at 44.1 or 48 kHz). Use the Return Assign Phones Assign menu in MOTU Audio Setup to choose which This Traveler-mk3 setting lets you choose what output pair or mix bus you would like to hear on you’ll hear from the headphone jack. - Page 65 Figure 9-2. Choose the MOTU Traveler-mk3 Garage Band In Garage Band, go to the Audio/MIDI preferences from the Driver menu. For information about the and choose MOTU Traveler-mk3 from the Audio I/O Buffer Size setting, see “Adjusting the audio I/O Output and Audio Input menus (Figure 9-4).
-
Page 66: Working With Traveler-Mk3 Inputs And Outputs
For other audio applications, the procedure is window, choose Audio preferences from the menu similar to that shown above. Consult your owner’s and choose MOTU Traveler-mk3 from the Audio manual for further information. Output menu as shown below in Figure 9-6. For... - Page 67 Inputs at 1x sample rates Inputs at 4x sample rates Inputs are always listed in the same order as When operating the Traveler-mk3 at a 4x sample follows, when operating the Traveler-mk3 at 1x rate (176.4 or 192 kHz), inputs are listed as follows: sample rates (44.1 or 48 kHz): Input Number of...
-
Page 68: Number Of Channels
Outputs at 2x sample rates MIDI I/O VIA THE TRAVELER-MK3 MIDI PORTS When operating the Traveler-mk3 at a 2x sample Once you’ve followed the procedure for enabling rate (88.2 or 96 kHz), outputs are listed as follows: the Traveler-mk3’s MIDI features as explained in Output Number of List... - Page 69 Synchronizing digital audio connections If you have devices connected to the Traveler-mk3 digital inputs (optical, S/PDIF or AES/EBU), you need to be concerned with the synchronization of the Traveler-mk3’s digital audio clock with other devices connected to it digitally (if any). For example, if you have a digital mixer connected to the Traveler-mk3 via an ADAT optical light pipe cable, you need to make sure that their audio clocks...
- Page 70 O T H E R M A C O S X A U D I O S O F T W A R E...
- Page 71 Reducing Monitoring Latency CHAPTER OVERVIEW Monitoring live input....... . . 71 Monitoring latency is that slight delay you hear Adjusting the audio I/O buffer .
-
Page 72: Reducing Monitoring Latency
Digital Performer or AudioDesk manual for information about a few examples. the Host Buffer Multiplier setting. 1. Live input (from mic, guitar, etc.) enters the MOTU interface. 3. Mic signal is ‘patched thru’ back to the audio interface with host-based 2. - Page 73 Figure 10-4: In Logic Pro or Logic Express, go to the Audio Driver preferences to access the Buffer Size option shown above. 1. Live input (from mic, guitar, etc.) enters the MOTU interface. 3. Mic signal is mixed with the 2. CueMix FX immediately patches the live...
- Page 74 CueMix FX imposes no strain on the computer. ■ The trade-off, however, is that CueMix FX bypasses your host audio software. Instead, live audio inputs are patched directly through to outputs in the Traveler-mk3 itself and are mixed with disk tracks playing back from your audio software.
- Page 75 Controlling CueMix FX from your audio software Some audio applications allow you to control CueMix FX monitoring from within the application (without the need to use CueMix FX). In most cases, this support consists of patching an Traveler-mk3 input directly to an output when you record-arm a track.
- Page 76 R E D U C I N G M O N I T O R I N G L A T E N C Y...
-
Page 77: Cuemix Fx
CueMix FX CHAPTER OVERVIEW A 16-BUS MIXER WITH EQ, COMPRESSION AND REVERB CueMix FX is a cross-platform software All Traveler-mk3 inputs and outputs can be mixed application that provides graphic, on-screen and controlled by the on-board CueMix FX 16-bus control for the Traveler-mk3’s flexible CueMix FX (8 stereo bus) digital mixer driven by hardware- on-board mixer and effects processing. -
Page 78: Advantages Over Host-Based Mixing And Processing
Each input, output and mix bus provides a send to CueMix mixing and effects processing imposes ■ the Classic Reverb processor, which then feeds no processor drain on the computer’s CPU. reverb returns to mix busses and outputs, with a CueMix routing can be maintained ■... -
Page 79: Cuemix Fx Basic Operation
CUEMIX FX BASIC OPERATION Output channels The Outputs tab (Figure 11-6 on page 85) gives you Here is a brief overview of the CueMix FX mixer. access to settings for each Traveler-mk3 output Eight stereo mix busses pair, including EQ, dynamics processing and send/ CueMix provides eight stereo mix busses: Bus 1, return controls for feeding and returning the Bus 2, Bus 3, and so on. -
Page 80: The Mixes Tab
THE MIXES TAB Assigning a mix bus output Click the Mixes tab (Figure 11-2) to gain access to Choose the desired output pair for the mix bus from the bus output menu (Figure 11-2). The bus the Traveler-mk3’s eight stereo mix busses. The output menu displays all current available Mixes tab displays one mix bus at a time. - Page 81 Bus mute page 86). Clicking the mix bus master fader focus The bus mute button (Figure 11-2) disables button brings the assigned output into focus, if (silences) the mix. there is one. Bus level meter Input pan section The bus level meter, which is post-fader, shows you The input pan knob (Figure 11-2) pans the input the level of the mix81 output.
-
Page 82: The Inputs Tab
THE INPUTS TAB record a completely unprocessed input signal, do The Traveler-mk3 provides many features for not apply any changes to it in the Input tab. The managing analog and digital input signals. Some of only exception to this is the reverb send, which these features, such as the Traveler-mk3’s digitally simply splits the input signal and feeds a copy of it controlled analog trims, are implemented in the... - Page 83 Input channel focus Once you adjust the trim levels, you can save them Click the channel focus button (Figure 11-3) to as a file on disk for future instant recall. See “Saving view and edit parameters in the channel settings and loading hardware presets”...
-
Page 84: The Outputs Tab
EQ/Dynamics enable/disable buttons Click the EQ or Dynamics button at the bottom of Orange the input channel (Figure 11-3) to toggle the effect Green on or off. Note that you can program EQ and Blue EQ band selectors compressor settings, even when the effect is Yellow currently disabled. - Page 85 The output reverb return (Figure 11-6) feeds the Output EQ and Dynamics The EQ/Dynamics section in the Outputs tab output of the Traveler-mk3’s global reverb (Figure 11-6) works identically to the EQ/ processor directly to the output. This includes any Dynamics section for the Inputs tab (Figure 11-3).
-
Page 86: The Channel Settings Section
THE CHANNEL SETTINGS SECTION The Channel tab The Channel tab (Figure 11-8) displays settings for The channel settings section in the CueMix FX input channels. Click any focus button in the window (Figure 11-1) displays three tabs for Inputs tab to view the Channel tab settings for the Channel, EQ and Dynamics settings for the channel. - Page 87 out. Conversely, if a TRS input is currently in focus, be the talkback input, and only one input can be then pad switch is grayed out and the reference the listenback input. See “Talkback and listenback” level switches are enabled. on page 101.
- Page 88 conditions: the input is unmuted in mix bus 6, its provided, each with four EQ types that provide fader is up, and there is signal activity from the current popular EQ styles and vintage analog EQ input going into the mix bus. styles alike.
- Page 89 individual band of EQ has a Filter enable/disable Q handle: Drag the Q handle lines to graphically switch (Figure 11-10), allowing you to enable as adjust the Q setting for the currently selected filter. few or as many bands as needed for each individual To select the filter, click its filter handle.
- Page 90 FFT display amplitude scale is in dB and is adjustable between 3 Choose Show FFT from the Filter display options and 24 dB using the vertical scale buttons menu (Figure 11-10) to superimpose a real-time (Figure 11-10). Fast Fourier Transform (FFT) frequency Adjusting filters in the display measurement curve over the EQ filter display, as To view a filter in the display, turn on the filter.
- Page 91 the left/right frequency spectrum. The amplitude color scale runs from black (silence) to red (full scale) as follows: Silence Full scale Figure 11-17: The Info Box. Black Blue Green Yellow Orange The info box includes the industry standard Figure 11-15: Spectrogram color-to-amplitude spectrum. scientific note (pitch) name when the control point Using the full window filter display is located at a frequency that resides within a...
- Page 92 Type I actual Q value for the EQ curve being applied is dependent on three factors: the gain setting, the filter style, and the Q setting. Filter types Each filter can be independently set to one of four different filter types: I, II, III and IV. These, and the additional shelf filters for the LMF and HMF band, are discussed in the section “EQ filter styles”.
- Page 93 Type II Type III Figure 11-19: Type II EQ filter style. Figure 11-20: Type III EQ filter style. The Type II EQ filter produces constant Q response The Type III EQ filter increases Q as boost is during boost or cut. The Type II style emulates applied.
- Page 94 Type IV Shelf filters Figure 11-21: Type IV EQ filter style. The Type IV EQ filter is a more extreme form of the Type III filter. It exhibits a high degree of interaction between Q and gain in order to maintain as closely as possible an equal amount of area under the response curve as gain is adjusted.
- Page 95 response corresponds to a second order shelf, still Overshoot tends to produce more of what one with no overshoot. This is the same response as would expect to hear when applying shelving and conventional parametric EQs. In some situations, is therefore considered to be more musical than this form of accurate, clean shelving can sound shelving without overshoot.
- Page 96 The Dynamics tab Compressor The Compressor (Figure 11-26) lowers the level of The Dynamics tab (Figure 11-26) displays the Dynamics processing settings for the input or the input when it is above the threshold. The output channel that currently has the focus. Click amount of attenuation is determined by the Ratio any focus button in the Inputs or Outputs tab to and the input level.
- Page 97 Output level Automatic gain control using light The Output Level meter (Figure 11-26) displays the The the Automatic Gain Control (AGC) circuit of peaks of the output signal. Trim is applied before the LA-2A uses a vintage opto-coupler known by the Output Level meter.
- Page 98 It is precisely this self-adjusting behavior that Bus activity LEDs (inputs only) makes optical compressors the tool of choice for smoothing out vocals, bass guitar and full- Channel meter program mixes without destroying perceived display dynamics. Meters tab Compressor/Limit buttons The Comp and Limit buttons (Figure 11-26) model Pre/post the original LA-2A Limit/Compress mode switch.
- Page 99 The Reverb tab together. The resulting stereo output from the The Reverb tab (Figure 11-28) provides access to reverb can then be inserted into a mix bus or the Traveler-mk3’s single, global reverb processor, output using stereo returns. which provides high-fidelity reverberation and Reverb sends graphic control over its parameters.
-
Page 100: The Monitor Group
☛ Primary controls Here’s a tip: try using initial reflections The Primary Controls section (Figure 11-28) in the without any subsequent reverb (turn the reverb Reverb tab provides the following basic parameters time down as far as it will go). You’ll hear for programming the reverb. -
Page 101: Dsp Meter
Talkback and Listenback. For Talkback, set up a dedicated mic in your control room and connect it Monitor group meters to a mic input on your MOTU audio interface. For The monitor group meters (Figure 11-1 on Listenback, set up a dedicated listenback mic in the... - Page 102 only occurs when talkback or listenback is Control room engaged. Audio playing back from disk (your host Talkback software) is not affected. Main outs Talk dim Analog out 7-8 Live room Headphone distribution amp Listen dim Listenback Figure 11-30: Typical hardware setup for Talkback and Listenback. Figure 11-31: The Talkback/Listenback controls.
-
Page 103: Shortcuts
DEVICES MENU The Load Hardware Preset and Save Hardware If you are working with more than one MOTU Preset commands in the CueMix FX file menu let audio interface product, this menu displays all you name, save and load presets in the interfaces that are currently on line. -
Page 104: Configurations Menu
When this menu item is unchecked, your control Phones Assign setting in MOTU Audio Setup. surface will affect CueMix FX all the time, even However, this menu provides one extra option that when CueMix FX is not the front-most application. - Page 105 all times). This mode is useful when you do not need to use the control surface with any other software. CueMix Control Surfaces CueMix FX includes support for the following control surface products: Mackie Control™ ■ Mackie HUI™ ■ Mackie Baby HUI™ ■...
- Page 106 C U E M I X F X...
-
Page 107: Motu Smpte Console
OVERVIEW MOTU SMPTE Setup....... . .107 The Traveler-mk3 can resolve directly to SMPTE Clock/Address. -
Page 108: Frame Rate
choose the SMPTE / SMPTE setting in the Clock/ Freewheel The Freewheel light illuminates when the Address menu. This means that the system will use Traveler-mk3 is freewheeling address (time code), SMPTE as the clock (time base) and SMPTE as the clock or both. -
Page 109: Generator Section
Freewheel clock Stripe Freewheeling occurs when there is glitch or Click this button to start or stop time code. To set drop-out in the incoming SMPTE time code for the start time, click directly on the SMPTE time some reason. The Traveler-mk3 can freewheel past code display in the Generator section and type in the drop-out and then resume lockup again as the desired start time. -
Page 110: Resolving Dp Or Audiodesk To Smpte Time Code
External Sync command in the Studio menu is checked. Make sure the Clock Source setting in the MOTU Audio Setup window is set to SMPTE. Also, make sure that you’ve connected an LTC input signal to the Traveler-mk3 Time Code input, and that you’ve specified that input in the SMPTE... -
Page 111: Troubleshooting
Check to make sure you have the desired optical entered in your name and a valid keycode. Your inputs and/or outputs enabled in the MOTU Audio name must contain at least 3 characters, and you Setup. - Page 112 If you haven’t already done so, solve your problem as quickly as possible: please take a moment to register on line at motu.com, or fill out and mail the registration card The serial number of the Traveler-mk3 system. ■...
- Page 113 Index Symbols AutoSave Status troubleshooting 74, 77-105 CueMix FX +4dBu Application follows control surface .kext Balance Balanced analog AudioDesk Battery power 13, 24 Channel Names -10 dBV jack Configurations menu 6, 11, 18 1394 connector 6, 9, 10, 13 Bit depth control surfaces 192kHz Buffer Size...
- Page 114 108, 109 infinite Frequency 18, 43 Mic/guitar inputs Laptop operation connecting 71, 73, 78 Latency Front panel overview Launch MOTU Audio Setup when hard- metering 5, 6 phantom power ware becomes available meters trim MIDI contrast activity LEDs display Gain...
- Page 115 Peak mode clock source setting MOTU Performance connection MIDI driver Phantom power 5, 12, 18 lights 5, 12 MOTU Audio Setup 33, 37 Phase meters Channel Names 6, 11 Phase-lock optical MOTU SMPTE Setup Phones 5, 12, 44, 67, 68...
- Page 116 System requirements SMPTE setting Width knob minimum summary of features Word clock 6, 11, 27, 29 recommended computer tab (MOTU Audio Setup) In setting Word Clock In setting sync setting 18, 83 Trim Synchronization TACH Troubleshooting word clock EQ knobs don’t work...
Need help?
Do you have a question about the Traveler-mk3 and is the answer not in the manual?
Questions and answers