
Related Manuals for MOTU MicroBook


Summary of Contents for MOTU MicroBook
-
Page 1: User Guide
MicroBook ™ User Guide 1280 Massachusetts Avenue Cambridge, MA 02138 Business voice: (617) 576-2760 Business fax: (617) 576-3609 Web site: www.motu.com Tech support: www.motu.com/support... -
Page 2: Important Safeguards
3. Heed Warnings — All warnings on the MOTU MicroBook and in the owner' s manual should be adhered to. 4. Follow Instructions — All operating and use instructions should be followed. 5. Cleaning — Unplug the MOTU MicroBook from the computer before cleaning and use a damp cloth. Do not use liquid or aerosol cleaners. - Page 3 That license agreement is a contract, and clicking Authorization Number on the outside of the box below the shipping address. “Accept” binds you and MOTU to all its terms and conditions. In the event This warranty does not apply if the equipment has been damaged by anything contained in this summary is incomplete or in conflict with the actual...
-
Page 4: Table Of Contents
Contents Quick Reference: MicroBook Front Panel Quick Reference: MicroBook Rear Panel Quick Reference: CueMix FX About the MicroBook Packing List and System Requirements Installing the MicroBook Hardware Installing the MicroBook Software Mac OS X Audio Software Windows Audio Software CueMix FX Troubleshooting Mic Adapter Pin-outs Index... -
Page 7: Quick Reference: Cuemix Fx
CHAPTER Launch CueMix FX (in your Mac Applications folder or in the Windows Start menu under Programs>MOTU>CueMix FX) to control the MicroBook. This chapter gives you a quick overview. For further details, see chapter 7, “CueMix FX” (page 39). 1. Input settings include trim 3. - Page 8 1. Click the Outputs tab to access Choosing Sine, White, or Pink 3. If you want to apply EQ or settings for the MicroBooks produces a sine wave or white/ dynamics processing to the outputs. For example, you can pink noise from the Micro- output, click here to enable it choose one of five different Book’s signal generator (item...
-
Page 9: About The Microbook
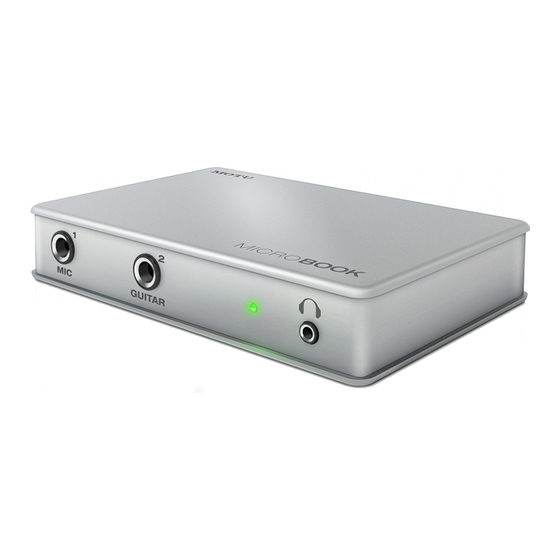
About the MicroBook CHAPTER Overview Obtaining your MicroBook The MicroBook is a USB audio interface serial number for Mac and Windows with on-board The MicroBook holds its serial effects and mixing that offers four inputs number electronically in the unit and eight outputs for recording and itself. - Page 10 S/PDIF digital out on RCA (duplicates MicroBook is a complete, portable ■ Main Out). “studio in a box” when used with a Mac or Windows computer. Headphone output on an eighth-inch ■ stereo “mini” jack with independent Precision Digital Trim™ volume control.
- Page 11 knee controls. The 7-band parametric EQ is modeled after British analog console EQs, featuring four filter styles (gain/Q profiles) to effectively cover a wide range of audio material. Low-pass and high-pass filters are also supplied with slopes that range from 6 to 36 dB. The MicroBook’s flexible effects architecture allows you to apply EQ and compression on every input and output.
- Page 12 A B O U T T H E M I C R O B O O K...
-
Page 13: Packing List And System Requirements
MicroBook box when you Pentium 4 1 GHz Pentium CPU (or ■ first open it, please immediately contact AMD equivalent) or faster your dealer or MOTU. At least 256 MB (megabytes) of RAM; ■ One MicroBook ■... - Page 14 To obtain must be registered separately. You can do the serial number, follow the hardware so online at motu.com/register. Doing so and software installation instructions in will allow you to be eligible to receive the next two chapters, and then do the...
-
Page 15: Installing The Microbook Hardware
Installing the MicroBook CHAPTER Hardware OVERVIEW Windows users: install the software first ..15 Connect the MicroBook interface ... 15 Connect audio inputs and outputs..16 Bus power . - Page 16 ☛ Do not connect a +4 (line level) input virtual effects pedals, etc.), consider to the mic input (because it will overdrive using MOTU’s ZBox guitar impedance the preamp). adapter (sold separately), which adds proper impedance characteristics that Phantom power cannot be modeled in software.
- Page 17 the eighth-inch stereo mini plug for line 2 Click the Focus button for the desired level input (from an iPod or other input channel. source). 3 Click the Channel tab (Figure 3-4) to ☛ Do not use the stereo mini input and access the channel’s input settings.
- Page 18 Digital out however, this situation does not allow for The S/PDIF RCA “digital out” connector remote battery operation, as the card provides stereo digital audio output to adapter requires AC. another device: the S/PDIF output always Examples of bus- powered operation mirrors the Main Outs.
- Page 19 A TYPICAL MICROBOOK SETUP MicroBook’s CueMix™ FX mixer to Here is a typical MicroBook studio setup. apply EQ and compression to what you This rig can be operated without an are recording and monitor it via the main external mixer. All mixing and processing outs, headphone outs, or any other can be done either in the MicroBook, in output pair.
- Page 20 I N S T A L L I N G T H E M I C R O B O O K H A R D W A R E...
-
Page 21: Installing The Microbook Software
Before you connect the MicroBook audio interface to your PC and turn it on, insert AUDIODESK WORKSTATION SOFTWARE (MAC ONLY) the MOTU Audio installer disc and run AudioDesk is an advanced digital audio the MicroBook Installer. This ensures workstation software package for the... - Page 22 Figure 4-1: AudioDesk for Mac OS X. I N S T A L L I N G T H E M I C R O B O O K S O F T W A R E...
-
Page 23: Mac Os X Audio Software
Audio driver. Check the audio system or audio drivers, just run the installer on the audio hardware configuration window in MOTU Audio installer disc as detailed in your software. There will be a menu there chapter 4, “Installing the MicroBook that lets you choose among various Software”... - Page 24 AudioDesk Digital Performer Choose the MicroBook as your audio Choose the MicroBook as your audio input output device by choosing MOTU input output device by choosing Audio System options>Configure Configure Audio System> Configure Hardware Driver from the Setup menu. Hardware Driver from the Setup menu.
- Page 25 MicroBook from the Audio Output and Audio tab as shown in Figure 5-4. Choose Audio Input menus (Figure 5-6). For the MOTU MicroBook from the Driver information about the Optimize for menu. For information about the I/O setting, see “Adjusting the audio I/O Buffer Size setting, see “Adjusting the...
- Page 26 MOTU MicroBook ASIO preferences from the menu and choose in the left-hand section (Figure 5-8). MOTU MicroBook from the Audio Output menu as shown below in Figure 5-10. For information about the Buffer Size setting, see “Adjusting the audio I/O buffer” on page 34.
- Page 27 SAMPLE RATE to reduce this delay. For details, see Choose the desired overall sample rate chapter 7, “Reducing Monitoring for the MicroBook system and your host Latency” (page 33). software. Newly recorded audio will have WORKING WITH CUEMIX FX MIXING this sample rate.
- Page 28 MONITORING LIVE INPUT “Adjusting the audio I/O buffer” for There are two ways to monitor live audio details about how to reduce or eliminate input with a MicroBook: the audible monitoring delay that the computer introduces. 1 Through the computer Figure 5-12 on page 29 shows method #2.
- Page 29 “CueMix FX hardware monitoring” later ADJUSTING THE AUDIO I/O BUFFER A buffer is a small amount of computer in this chapter for details on how to use memory used to hold data. For audio CueMix FX with your audio software, or interfaces like the MicroBook, buffers are with CueMix FX.
- Page 30 Under Mac OS X, audio I/O buffer size is Cubase handled by the host audio application (not the MicroBook Core Audio driver). Most audio software applications provide an adjustable audio buffer setting that lets you control the amount of delay you’ll hear when monitoring live inputs or processing them with software plug-ins.
- Page 31 Lower latency versus higher CPU AudioDesk’s Performance Monitor. If you overhead hear distortion, or if the Performance meter The buffer setting has a large impact on is peaking, try raising the buffer size. the following things: If you are at a point in your recording Patch thru latency project where you are not currently ■...
- Page 32 It completely eliminates the patch thru On the other hand, if you really need to ■ delay (reducing it to a small number of use the mixing and processing provided samples — about the same amount as by your audio software, you should not one of today’s advanced digital mixers).
-
Page 33: Windows Audio Software
Inputs and outputs ......37 The MOTU Windows audio driver allows Working with CueMix FX mixing and effects 37 the MicroBook to provide multi-channel 24-bit operation . -
Page 34: Installing The Microbook Windows Drivers
Once you’ve made the preparations audio drivers, just run the installer on the described so far in this chapter, you’re MOTU Audio installer disc as detailed in ready to run your audio software and chapter 4, “Installing the MicroBook enable the MOTU MicroBook ASIO or Software”... - Page 35 Preferences window, choose Audio outputs, select MOTU MicroBook ASIO preferences from the menu and choose in the left-hand section (Figure 6-3). ASIO MOTU MicroBook ASIO from the Audio Card Driver menu as shown below in Figure 6-5. Figure 6-3: Working with MicroBook inputs and outputs in Cubase or Nuendo.
- Page 36 1 Choose Audio from the Options menu. 2 Click the General tab. 3 Choose ASIO from the Driver Mode menu, as shown in Figure 6-6. Figure 6-7: Activating the MOTU audio ASIO driver in SONAR by highlighting MicroBook inputs and outputs. ☛...
-
Page 37: Sample Rate
Other audio settings in SONAR SAMPLE RATE Choose the desired overall sample rate There are a few other settings in SONAR for the MicroBook system in your host that impact MicroBook operation: audio software. Newly recorded audio 1 In the Audio Options window, click the will have this sample rate. -
Page 38: 24-Bit Operation
24-BIT OPERATION Your MicroBook hardware fully supports 24-bit recording capabilities. Simply enable 24-bit operation as instructed in your digital audio workstation’s manual. The MicroBook always supplies a 24-bit data stream. W I N D O W S A U D I O S O F T W A R E... -
Page 39: Cuemix Fx
CueMix FX CHAPTER OVERVIEW can be recorded wet, dry, or dry with a CueMix FX is a cross-platform software wet monitor mix (for musicians during application that provides graphic, on- recording, for example). screen control for the MicroBook’s Effects include: flexible CueMix FX on-board mixer and effects processing. -
Page 40: Cuemix Fx Installation
CUEMIX FX INSTALLATION single stereo audio stream that you can CueMix FX is installed with the rest of then assign to any MicroBook output your MicroBook software. pair — or combination of output pairs — that you choose. For example, Mix 1 CUEMIX FX BASIC OPERATION could go to the headphones, Mix 2 could Here is a brief overview of the CueMix FX... - Page 41 Viewing one mix bus at a time Channel focus and settings CueMix FX displays one mix bus at a time Click the focus button for a channel in the Mixes tab (Figure 7-1 on page 40). (Figure 7-1) to view channel-specific To select which mix you are viewing, parameters in the Channel Settings choose it from the mix bus menu.
-
Page 42: The Inputs Tab
THE INPUTS TAB input pair. Use the Focus button Click the Inputs tab (Figure 7-2) to access (Figure 7-2) to access the Channel , EQ, and control all of these input channel and dynamics tab settings for each input. settings for each MicroBook input or Inputs tab Input name Channel focus... -
Page 43: The Mixes Tab
THE MIXES TAB From Host 1-2. This is the audio playing Click the Mixes tab (Figure 7-3) to gain from your host audio software. By access to the MicroBook’s five stereo mix bringing up this fader, you can combine busses. The Mixes tab displays one mix live inputs (mic, guitar, and line 1-2) with bus at a time: choose each mix from the any audio from the computer. -
Page 44: The Outputs Tab
THE OUTPUTS TAB Signal flows from top to bottom Settings in each Output tab channel strip The Outputs tab (Figure 7-4) lets you are applied to the signal in order from top apply EQ and dynamics to any output to bottom. For example, EQ occurs pair, just before the signal leaves the before Dynamics. -
Page 45: The Meters Tab
THE METERS TAB The Meters tab (Figure 7-5) serves as a Channel meter comprehensive meter bridge for all display inputs, outputs and mix busses in the Meters tab MicroBook, giving you a “bird’s-eye” view of all signal activity. Pre/post processing Channel meter display switch The channel meter display (Figure 7-5) -
Page 46: The Signal Generator Tab
THE SIGNAL GENERATOR TAB USB ROUTING TO HOST The Signal Generator tab (Figure 7-6) Choose Devices menu>MicroBook>Setup provides settings for the Sine Wave to access the USB Routing To Host settings generator (frequency and amplitude) and below (Figure 7-7). The MicroBook the White/Pink noise generators sends four channels of audio to the host (amplitude). -
Page 47: Scope Channels
SCOPE CHANNELS The FFT curve is post-filter. Therefore, The Scope buttons (Figure 7-7) let you the FFT shows the results of the EQ choose what input channels (as assigned filter(s) being applied. by the Source menus) will be fed to the Spectrogram CueMix FX audio analysis (scoping) Choose Options menu>... - Page 48 where left channel amplitude equals zero; a thick white horizontal line marks where right channel amplitude equals zero (Figure 7-10, below). There are also thick white diagonal lines for y = x and y = -x. Phase Analysis To open the Phase Analysis window Figure 7-11: R e c t a n g u l a r v e r s u s Po l a r display with a logarithmic plot.
-
Page 49: Troubleshooting
If or fill out and mail the registration card you are using a USB hard drive on the included with your MicroBook. - Page 50 Please contact us online at Please provide the following information www.motu.com/suggestions or write to: to help us solve your problem as quickly as possible: MicroBook Development Team MOTU Inc.
-
Page 51: Mic Adapter Pin-Outs
Mic Adapter Pin-outs APPENDIX Below is a diagram showing the pin-out assignments for the female XLR-to-male quarter inch microphone adapter included with the MicroBook package: XLR pin 1 = ground ■ XLR pin 2 = tip ■ XLR pin 3 = ring ■... - Page 52 A P P E N D I X B : M I C A D A P T E R P I N - O U T S...
-
Page 53: Index
Index 20 dB pad 16 Outputs tab 44 Installer disc 24-bit 27, 38 overview 39, 40 replacing 49 recording 10 Sig Gen tab Invert phase 42 48V phantom power 5 Customer support 49 Laptop operation 18 Ableton (see Live) Digital (S/PDIF) output 18 Latency 28, 31, 39 Analog inputs/outputs Digital Performer 23... - Page 54 Outputs tab 8, 41, 44 Samplers Trim 17 connecting 19 Troubleshooting 49-50 Scope channels 46, 47 flashing power LED 5 Packing list 13 Serial number 9, 13, 14, 46 TRS connectors 16, 17 Pad 16 Setup 14 Patch thru Show latency 31 FFT 47 Unbalanced analog 16, 17...
Need help?
Do you have a question about the MicroBook and is the answer not in the manual?
Questions and answers