
Related Manuals for Simons Voss Technologies SmartHandle AX Advanced 105


Summary of Contents for Simons Voss Technologies SmartHandle AX Advanced 105
- Page 1 Kurzanleitung SmartHandle AX Advanced Quick Guide 105/145 Guide abrégé Korte handleiding Guida breve Kort vejledning Snabbguide BS25.990616 11.03.2024...
- Page 2 SmartHandle AX Advanced 105/145 Abbildungen/Images ................. deutsch ......................english ......................français ......................nederlands ..................... italiano ......................dansk ....................... svensk......................2 / 64...
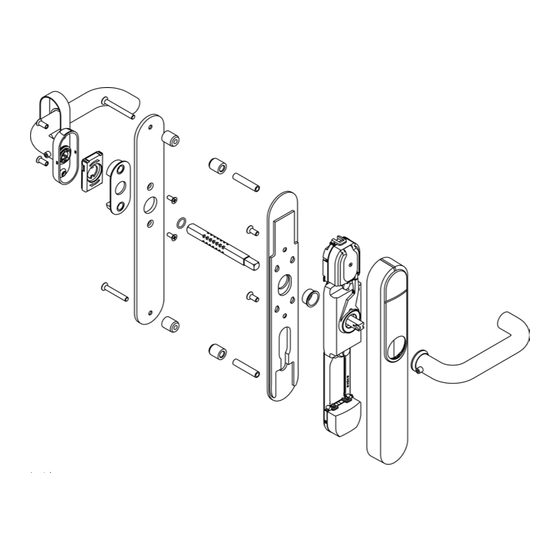
- Page 3 4. Structure SmartHandle AX Advanced 105/145 4. Structure Inside Outside 5. Prepare door (drilling template) Ø8.0 Abbildungen/Images 3 / 64...
- Page 4 5. Prepare door (drilling template) SmartHandle AX Advanced 105/145 4 / 64 Abbildungen/Images...
- Page 5 5. Prepare door (drilling template) SmartHandle AX Advanced 105/145 Abbildungen/Images 5 / 64...
- Page 6 5. Prepare door (drilling template) SmartHandle AX Advanced 105/145 6 / 64 Abbildungen/Images...
- Page 7 5. Prepare door (drilling template) SmartHandle AX Advanced 105/145 Ø8.0 Abbildungen/Images 7 / 64...
- Page 8 6. For door thickness X: have the threaded rods and spindle ready SmartHandle AX Advanced 105/145 at hand 6. For door thickness X: have the threaded rods and spindle ready at hand Door thickness - 5 mm (±2 mm) Door thickness + 58 mm (±2 mm)
-
Page 9: Installing The Fitting
7. Installing the fitting SmartHandle AX Advanced 105/145 7. Installing the fitting SW2.5 TX15 *no MO *no MO Abbildungen/Images 9 / 64... - Page 10 7. Installing the fitting SmartHandle AX Advanced 105/145 *no MO *7 mm 10 / 64 Abbildungen/Images...
- Page 11 7. Installing the fitting SmartHandle AX Advanced 105/145 M5×12 Abbildungen/Images 11 / 64...
- Page 12 7. Installing the fitting SmartHandle AX Advanced 105/145 *7 mm *CW (clockwise) *CCW (counter-clockwise) 12 / 64 Abbildungen/Images...
- Page 13 7. Installing the fitting SmartHandle AX Advanced 105/145 M4x10 SW2.5 *8,5 mm/10 mm Abbildungen/Images 13 / 64...
- Page 14 7. Installing the fitting SmartHandle AX Advanced 105/145 *8,5 mm/10 mm 14 / 64 Abbildungen/Images...
- Page 15 7. Installing the fitting SmartHandle AX Advanced 105/145 Size Door thickness (mm) Spindle length (mm) Ring position 38 – <41 38 – <41 41 – <46 41 – <46 46 – <51 51 – 53 51 – <56 51 – <56 56 –...
- Page 16 7. Installing the fitting SmartHandle AX Advanced 105/145 Size Door thickness (mm) Screws 38 – 53 M5×35 51 – 63 M5×40 62 – 73 M5×50 71 – 83 M5×60 82 – 93 M5×70 91 – 176 M5 X M5 X...
- Page 17 7. Installing the fitting SmartHandle AX Advanced 105/145 M5×35 *M min. M5×40 *M max. M5×50 *L min. M5×60 *L max. M5×70 Abbildungen/Images 17 / 64...
- Page 18 7. Installing the fitting SmartHandle AX Advanced 105/145 TX15 18 / 64 Abbildungen/Images...
- Page 19 7. Installing the fitting SmartHandle AX Advanced 105/145 Abbildungen/Images 19 / 64...
- Page 20 7. Installing the fitting SmartHandle AX Advanced 105/145 TX15 20 / 64 Abbildungen/Images...
- Page 21 8. Removing the fitting (105/145) SmartHandle AX Advanced 105/145 8. Removing the fitting (105/145) SW1.5 SW1.5 SW1.5 Abbildungen/Images 21 / 64...
-
Page 22: Replacing The Batteries
9. Replacing the batteries SmartHandle AX Advanced 105/145 9. Replacing the batteries 22 / 64 Abbildungen/Images... - Page 23 9. Replacing the batteries SmartHandle AX Advanced 105/145 Abbildungen/Images 23 / 64...
- Page 24 9. Replacing the batteries SmartHandle AX Advanced 105/145 24 / 64 Abbildungen/Images...
- Page 25 9. Replacing the batteries SmartHandle AX Advanced 105/145 Abbildungen/Images 25 / 64...
- Page 26 9. Replacing the batteries SmartHandle AX Advanced 105/145 26 / 64 Abbildungen/Images...
- Page 27 9. Replacing the batteries SmartHandle AX Advanced 105/145 Abbildungen/Images 27 / 64...
-
Page 28: Help And Other Information
12. Help and other information SmartHandle AX Advanced 105/145 12. Help and other information 28 / 64 Abbildungen/Images... -
Page 29: Allgemeine Sicherheitshinweise
1. Allgemeine Sicherheitshinweise SmartHandle AX Advanced 105/145 Beschädigung durch mechanische Einwirkung 1. Allgemeine Sicherheitshinweise Dieses Produkt enthält elektronische Bauteile, die durch mechanische Ein- Signalwort: Mögliche unmittelbare Auswirkungen bei Nichtbeachtung wirkung aller Art beschädigt werden können. WARNUNG: Tod oder schwere Verletzung (möglich, aber unwahrscheinlich), Vermeiden Sie das Anfassen der Elektronik. - Page 30 2. Produktspezifische Sicherheitshinweise SmartHandle AX Advanced 105/145 2. Produktspezifische Sicherheitshinwei- 6. Für Türdicke X: Gewindestangen und Vierkant vorbereiten Messschieber vorhanden. ü ACHTUNG ü Säge vorhanden. ü PH2-Schraubendreher vorhanden. Erschwerte Montage durch herausgedrückte Gewindehülsen Messen Sie die Türdicke. Die Gewindehülsen im Beschlag sind mit einer Presspassung montiert. Über- mäßiges Drücken beim Festschrauben des Beschlags auf der Fixierplatte...
- Page 31 7. Beschlag montieren SmartHandle AX Advanced 105/145 Vierkantlänge Bereich Türdicke (mm) Ringposition HINWEIS (mm) 38 - <41 Reduzierhülsen für vorhandene 14-mm-Bohrungen 38 - <41 Bereits vorhandene 14-mm-Bohrungen erschweren die sichere Befestigung 41 - <46 des SmartHandle AX Advanced. Stecken Sie die mitgelieferten Silikon-Reduzierhülsen in die vorhande- 41 - <46...
-
Page 32: Batterien Wechseln
8. Beschlag demontieren (105/145) SmartHandle AX Advanced 105/145 9. Batterien wechseln HINWEIS HINWEIS Reduzierhülsen für vorhandene 14-mm-Bohrungen Bereits vorhandene 14-mm-Bohrungen erschweren die sichere Befestigung des SmartHandle AX Advanced. Funktionsstörungen durch schlechten Kontakt oder unterschiedliche Ent- ladung Stecken Sie die mitgelieferten Silikon-Reduzierhülsen in die vorhande- ... -
Page 33: Technische Daten
10. Technische Daten SmartHandle AX Advanced 105/145 18. Drücken Sie das Cover gegen die Tür und schieben Sie es gleichzeitig Beachten Sie örtliche Bestimmungen zur getrennten Entsorgung von nach oben. Batterien. Führen Sie die Verpackung einer umweltgerechten Wiederverwertung ... -
Page 34: General Safety Instructions
1. General safety instructions SmartHandle AX Advanced 105/145 Damage due to polarity reversal 1. General safety instructions This product contains electronic components that may be damaged by re- Signal word: Possible immediate effects of non-compliance verse polarity of the power source. -
Page 35: Installing The Fitting
4. Structure SmartHandle AX Advanced 105/145 ü TX15 screwdriver at hand. Adapter sleeve, 8.5 mm spindle Caliper gauge at hand. ü Adapter sleeve, 10 mm spindle For non-MO: insert the blank cylinder. 4. Structure NOTE 5. Prepare door (drilling template) Feed the blank cylinder into the hole using a screwdriver Pin or scriber at hand. - Page 36 8. Removing the fitting (105/145) SmartHandle AX Advanced 105/145 24. Screw the inner part and the outer part (PH2) with the required screws. 16. Measure the total length of the spindle. NOTE Locate the inside of the spindle (four-edge end up to the centre of the Reducing sleeves for existing 14 mm holes...
-
Page 37: Technical Data
9. Replacing the batteries SmartHandle AX Advanced 105/145 19. Press the inlay into place. 9. Replacing the batteries NOTE Batteries are now replaced. 10. Technical data Malfunctions due to poor contact or different discharge Operating temperature range -25 °C to +60 °C Contact surfaces that are too small/contaminated or different discharged batteries can lead to malfunctions. - Page 38 12. Help and other information SmartHandle AX Advanced 105/145 Technical support +49 (0) 89 / 99 228 333 Email support-simonsvoss@allegion.com si-support-simonsvoss@allegion.com FAQs https://faq.simons-voss.com/otrs/public.pl SimonsVoss Technologies GmbH, Feringastr. 4, D-85774 Unterfoehring, Germany 38 / 64...
-
Page 39: Consignes De Sécurité Générales
1. Consignes de sécurité générales SmartHandle AX Advanced 105/145 Endommagement lié à une action mécanique 1. Consignes de sécurité générales Ce produit contient des composants électroniques susceptibles d’être en- Mot indicateur: Effets immédiats possibles du non-respect dommagés par une action mécanique quelconque. - Page 40 2. Consignes de sécurité propres au produit SmartHandle AX Advanced 105/145 2. Consignes de sécurité propres au pro- 6. Pour épaisseur de porte X : préparer duit les tiges filetées et le carré Pied à coulisse disponible. ü ATTENTION ü Scie disponible.
- Page 41 7. Monter la garniture SmartHandle AX Advanced 105/145 Épaisseur de Longueur du car- Position de la Zone NOTE porte (mm) ré (mm) bague 38 - <41 Douilles de réduction pour les trous de 14 mm existants 38 - <41 Les trous de 14 mm existants compliquent la fixation sûre du SmartHandle 41 - <46...
-
Page 42: Remplacer Les Piles
8. Démonter la garniture (105/145) SmartHandle AX Advanced 105/145 9. Remplacer les piles NOTE NOTE Douilles de réduction pour les trous de 14 mm existants Les trous de 14 mm existants compliquent la fixation sûre du SmartHandle AX Advanced. Dysfonctionnements dus à un mauvais contact ou à une décharge diffé- rente Insérez les douilles de réduction en silicone fournies dans les trous exis-... -
Page 43: Caractéristiques Techniques
10. Caractéristiques techniques SmartHandle AX Advanced 105/145 19. Appuyez fermement sur l’incrustation. Veuillez tenir compte des dispositions locales applicables concernant la collecte séparée des piles. Recyclez l’emballage d’une manière écologique. Les piles sont changées. 10. Caractéristiques techniques Assistance technique +49 (0) 89 / 99 228 333 Plage de températures (fonctionne-... -
Page 44: Algemene Veiligheidsinstructies
1. Algemene veiligheidsinstructies SmartHandle AX Advanced 105/145 Beschadiging door mechanische impact 1. Algemene veiligheidsinstructies Dit product heeft elektronische componenten die kunnen worden bescha- Signaalwoord: Mogelijke onmiddellijke gevolgen van niet-naleving digd door elk type mechanische impact. WAARSCHUWING: Dood of ernstig letsel (mogelijk, maar onwaarschijnlijk), Vermijd dat u de elektronica aanraakt. - Page 45 3. Leveromvang SmartHandle AX Advanced 105/145 Voor X: markeer de punten waar gezaagd moet worden op de draad- 3. Leveromvang stangen en op het vierkant. SmartHandle AX Advanced voor de conventionele montage 105/145. Speciaal gereedschap Korte handleiding ...
- Page 46 8. Beslag demonteren (105/145) SmartHandle AX Advanced 105/145 Bereik Deurdikte (mm) Schroeven 38 - 53 M5×35 Plaats de basis in de eenheid van de binnendeurkruk. 51 - 63 M5×40 14. Schroef de binnendeurkruk samen met de schroefdraadhulzen en de 10 62 - 73 M5×50...
-
Page 47: Batterijen Vervangen
9. Batterijen vervangen SmartHandle AX Advanced 105/145 Maak daarbij de cover los door met het speciale gereedschap de inlay Haak met het speciale gereedschap de klem van de batterijmodule naar buiten te buigen. weer vast. Steek een inbussleutel van 1,5 mm in het gat van de opname voor de vierkantstift in de moduledrager. - Page 48 12. Hulp en verdere informatie SmartHandle AX Advanced 105/145 Conformiteitsverklaringen https://www.simons-voss.com/nl/certificaten.html Informatie over verwijdering Voer het apparaat (SI-S3.*M.VCN*, SV-S3.*M.G2*, SV-S3.*AM.G2*, SV-S3.*A.G2*, SI-S3.*M.WO*, SI-S3.*LN*) niet af als huishoudelijk afval, maar overeenkomstig de Europese Richtlijn 2012/19/EU bij een gemeentelijke inzamelpunt voor speciaal elektrotechnisch afval.
-
Page 49: Avvisi Di Sicurezza Generali
1. Avvisi di sicurezza generali SmartHandle AX Advanced 105/145 Danni dovuti a effetti meccanici 1. Avvisi di sicurezza generali Il presente prodotto contiene componenti elettronici che potrebbero subire Parola segnale: Possibili effetti immediati di non conformità danni dovuti a effetti meccanici di qualunque tipo. -
Page 50: Oggetto Di Fornitura
2. Avvertenze di sicurezza specifiche del prodotto SmartHandle AX Advanced 105/145 Rimontare la serratura a incasso. 2. Avvertenze di sicurezza specifiche del prodotto 6. Per lo spessore della porta X: prepara- AVVISO zione delle aste filettate e del quadro Montaggio difficoltoso a causa di manicotti filettati spinti fuori. - Page 51 7. Montaggio della maniglia SmartHandle AX Advanced 105/145 Inserire il supporto del modulo con la piastra di fissaggio nel lato esterno Lunghezza qua- Spessore porta della porta. Area dro maniglia Posizione anello (mm) (mm) NOTA 38 - <41 38 - <41 Manicotti di riduzione per i fori da 14 mm già...
-
Page 52: Sostituzione Delle Batterie
8. Smontaggio della maniglia (105/145) SmartHandle AX Advanced 105/145 9. Sostituzione delle batterie NOTA NOTA Manicotti di riduzione per i fori da 14 mm già presenti I fori da 14 mm già presenti rendono difficoltoso il fissaggio sicuro di Smart- Handle AX Advanced. -
Page 53: Dati Tecnici
10. Dati tecnici SmartHandle AX Advanced 105/145 19. Premere saldamente l’inserto. Conferire l’imballaggio presso un punto di raccolta ai fini del riciclaggio ecologico. Le batterie sono sostituite. Supporto tecnico 10. Dati tecnici +49 (0) 89 / 99 228 333... -
Page 54: Generelle Sikkerhedshenvisninger
1. Generelle sikkerhedshenvisninger SmartHandle AX Advanced 105/145 Beskadigelse på grund af fejltilslutning 1. Generelle sikkerhedshenvisninger Dette produkt indeholder elektroniske komponenter, som kan blive beskadi- Signalord: Mulige direkte virkninger i tilfælde af manglende overholdelse get på grund af fejltilslutning af spændingskilden. - Page 55 4. Montering SmartHandle AX Advanced 105/145 ü PH2-skruetrækker til rådighed. Adaptersæt 7 mm firkant TX15-skruetrækker til rådighed. ü Adaptertylle 8,5 mm firkant Måleapparat til kalibre er tilgængeligt. ü Adaptertylle 10 mm firkant For ikke-MO: Indsæt blindcylinderen. 4. Montering BEMÆRK...
- Page 56 8. Afmontering af beslag (105/145) SmartHandle AX Advanced 105/145 16. Mål firkantens samlede længde. 24. Skru den indre del og den ydre del (PH2) sammen med de leverede skruer. Bestem firkantens inderside (firkantens ende til midten af den første rille BEMÆRK...
-
Page 57: Udskiftning Af Batterier
9. Udskiftning af batterier SmartHandle AX Advanced 105/145 Batterierne er udskiftet. 9. Udskiftning af batterier 10. Tekniske data BEMÆRK Temperaturområde (drift) -25 °C til +60 °C Batteritype 4× CR2450 3V lithium Funktionsfejl på grund af dårlig kontakt eller anden afladning Murata ... - Page 58 12. Hjælp og flere oplysninger SmartHandle AX Advanced 105/145 e-mail support-simonsvoss@allegion.com si-support-simonsvoss@allegion.com https://faq.simons-voss.com/otrs/public.pl SimonsVoss Technologies GmbH, Feringastr. 4, D-85774 Unterföhring, Tyskland 58 / 64...
-
Page 59: Allmänna Säkerhetsanvisningar
1. Allmänna säkerhetsanvisningar SmartHandle AX Advanced 105/145 Skada på grund av polvändning 1. Allmänna säkerhetsanvisningar Den här produkten innehåller elektroniska komponenter som kan skadas på Signalord: Eventuella omedelbara effekter av bristande efterlevnad grund av polvändning i spänningskällan. VARNING: Död eller allvarlig skada (möjligt, men osannolikt), OBSERVERA: Vänd inte spänningskällans poler (batterier resp. - Page 60 4. Uppbyggnad SmartHandle AX Advanced 105/145 ü TX15-skruvmejsel finns. Adapterhylsa 8,5 mm-fyrkant Mätare för kalibreringsmått finns. ü Adapterhylsa 10 mm-fyrkant För icke-MO: Sätt i blindcylindern. 4. Uppbyggnad INFO 5. Förbereda dörr (borrschablon) För in blindcylindern i hålet med skruvmejseln.
- Page 61 8. Demontera handtag (105/145) SmartHandle AX Advanced 105/145 16. Mät fyrkantens totallängd. 24. Skruva samman innerdelen och ytterdelen med de fastställda skruvarna (PH2). Fastställ fyrkantens insida (fyrkantsände till mitten av första spår = INFO 26 mm). 18. Bestäm O-ringens position med tabellen.
-
Page 62: Försäkran Om Överensstämmelse
9. Byt batterier. SmartHandle AX Advanced 105/145 Batterierna är bytta. 9. Byt batterier. 10. Tekniska data INFO Temperaturområde (drift) –25 °C till +60 °C Batterityp 4× CR2450 3 V litium Funktionsstörningar på grund av dålig dålig kontakt eller annan urladd- ning Murata ... - Page 63 12. Hjälp och ytterligare information SmartHandle AX Advanced 105/145 Teknisk support +49 (0) 89 / 99 228 333 support-simonsvoss@allegion.com si-support-simonsvoss@allegion.com https://faq.simons-voss.com/otrs/public.pl SimonsVoss Technologies GmbH, Feringastr. 4, D-85774 Unterföhring, Tyskland 63 / 64...
- Page 64 © 2024, SimonsVoss Technologies GmbH, Unterföhring All rights are reserved. Text, images and diagrams are protected under copyright law. The content of this document must not be copied, distributed or modified. You can find more information on our website. Subject to technical changes. SimonsVoss and MobileKey are registered brands belonging to SimonsVoss.
Need help?
Do you have a question about the SmartHandle AX Advanced 105 and is the answer not in the manual?
Questions and answers