Advertisement
Quick Links
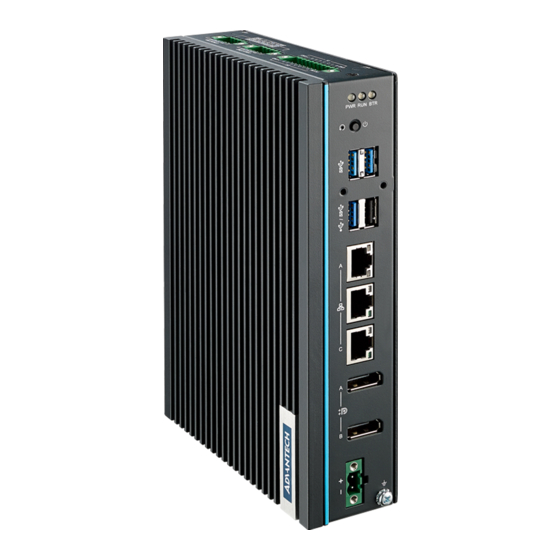
UNO-148 V2
Fanless DIN-Rail Edge Controller Feature with
13th Gen Intel® Core™ I CPU
Startup Manual
Packing List
Before you begin installing your card, please make sure that
the following items have been shipped:
1. UNO-148 V2 (with DIN-rail mount)
2. 1 x 2x5 Plug-in block for COM port
3. 1 x 2x1 Plug-in block for power wiring
4. 1 x 2x10 Plug-in block for digital I/O wiring
5. 1 x M2x4L screws for mPCIe card installation
6. 1 x Earth-ground cable
7. Startup Manual
8. China RoHs sheet
9. Warranty card
If any of these items are missing or damaged, please con-
tact your distributor or sales representative immediately.
Note:
Acrobat Reader is required to view any PDF
file. Acrobat Reader can be downloaded at: get.
adobe.com/reader (Acrobat is a trademark of
Adobe)
For more information on this and other Advantech
products, please visit our website at:
http://www.advantech.com
For technical support and service, please visit our sup-
port website for UNO-148 V2 at:
Register your products on our website and get 2
months extra warranty for Free at:
http://www.register.advantech.com
Part No. 2001M14800
Printed in China
Packing List (Cont.)
Caution: DANGER OF EXPLOSION IF BATTERY IS
Attention: DANGER D'EXPLOSION SI LA BATTERIE EST
Specifications
Processor System
• Intel® Core™ i3-1315UE, 1.2 GHz (up to 4.5 GHz)
• Intel® Core™ i5-1335UE, 1.3 GHz (up to 4.5 GHz)
• Intel® Core™ i7-1365UE, 1.7 GHz (up to 4.9 GHz)
Memory
• Built-in 8 GB DDR5, 4800 MHz (up to 64GB with 2 slots)
Graphics
• Intel® UHD Graphics for CPU i3 & i5
• Intel Iris X for CPU i7
• I/O: I/O Board (UNOB-UH11/UNOB-UH11A)
Serial Ports
• 4 x RS-232/422/485 (terminal block)
50 bps ~115.2 kbps (isolation protection: 2500 V
Ethernet
• 2 x Intel® i226-ITGbE, IEEE802.1AS, 802.3az
• 1 x Intel® i219-LM GbE, IEEE802.1AS, 802.3az
Storage
• 2 x M.2 M-Key 2280 NVME SSD (PCIe x4 signal)
Expansion
• 1 x Full-size mPCIe (PCIe/USB 2.0 signal)
• 1 x M.2 (E-Key) 2230 Wi-Fi modules (PCIe/USB 2.0
signal)
• 1 x Nano SIM card slot
External I/O
• Display: 2 x DP 1.4, up to 3840 x 2160 (4K) @ 60 Hz
• USB: 2 x USB 3.2 Gen2, 1 x USB 3.2 Gen1x USB 2.0
• Serial: 4 x RS-232/422/485 (terminal block)
50 bps ~115.2 kbps (isolation protection: 2500 V
1st Edition
June 2024
INCORRECTLY REPLACED. REPLACE ONLY
WITH THE SAME OR EQUIVALENT TYPE
RECOMMENDED BY THE MANUFACTURER,
DISCARD USED BATTERIES ACCORDING TO
THE MANUFACTURER'S INSTRUCTIONS.
INEXACTEMENT REMPLACÉE. REMPLACEZ
SEULEMENT AVEC LA MÊME CHOSE OU
LE TYPE ÉQUIVALENT RECOMMANDÉ PAR
LE FABRICANT, JETTENT LES BATTERIES
UTILISÉES INSTRUCTIONS DE S SELON
FABRICANT DES'.
UNO-148 V2 Startup Manual 1
)
DC
)
DC
Advertisement

Subscribe to Our Youtube Channel
Related Manuals for Advantech UNO-148 V2


Summary of Contents for Advantech UNO-148 V2
- Page 1 Adobe) • Intel® Core™ i7-1365UE, 1.7 GHz (up to 4.9 GHz) Memory For more information on this and other Advantech • Built-in 8 GB DDR5, 4800 MHz (up to 64GB with 2 slots) products, please visit our website at: Graphics http://www.advantech.com...
-
Page 2: Declaration Of Conformity
2. This device must accept any interference received, including interference that may cause undesired opera- tion. Warning: To avoid electromagnetic interference, this prod- uct should not be installed or used in residential environments. 2. Secure the heatsink and NVME bracket with screws. 2 UNO-148 V2 Startup Manual... - Page 3 5. Install the NVME and secure it with the post. mPCIE Installation Remove the pre-installed screws from the system. Install the mPCIe module. Reinstall and secure the screws. 6. Attach the heatsink to the system using three screws. UNO-148 V2 Startup Manual 3...
- Page 4 1. Remove the 2 screws from the bottom cover. 2. Remove iDoor cover. 3. Secure 5 screws on 2nd stack to combine base unit. 2. Secure 6 screws on 2nd stack to combine base unit. 4. Secure the iDoor cover back. 4 UNO-148 V2 Startup Manual...
- Page 5 3. Secure the 6 screws on 2nd stack to combine base unit. 5. Place front cover and bottom cover back then secure with screws. 4. HDD extension slot: lock HDD into HDD tray and insert HDD tray on the track then tighten the screws. UNO-148 V2 Startup Manual 5...
-
Page 6: Safety Instructions
13. Never open the equipment. For safety reasons, the equipment should be opened only by qualified service personnel. 14. If any of the following occurs, have the equipment checked by service personnel: • The power cord or plug is damaged. 6 UNO-148 V2 Startup Manual... - Page 7 (A). 18. RESTRICTED ACCESS AREA: The equipment should only be installed in a restricted access area. 19. DISCLAIMER: These instructions are provided according to IEC 704-1 standards. Advantech disclaims all responsibility for the accuracy of any statements contained herein.
-
Page 8: System Dimensions
0.40 0.50 0.40 180~314.99 0.20 0.50 0.35 0.60 0.40 0.60 0.50 315~800 0.30 0.80 0.50 1.10 0.70 1.00 0.60 ANGLE D=3L/1000 SCALE UNITS SHEET SIZE THIRD ANGLE 1 Of 1 TOLERANCES Other 1.5 (Max) PROJECTION 8 UNO-148 V2 Startup Manual... - Page 9 50 bps ~115.2 kbps(隔离保护:2500 V 电源要求 • 电源类型:AT • 输入电压:10 ~ 36 V • 电源接口: 1 x 2-pin 接线端子 料号:2001M14800 第一版 • 最小输入功率:12 V 5 A,24 V 2.5 A 中国印刷 2024 年 6 月 本产品可采用经 UL 认证的电源或 DC 电源,支持 19 UNO-148 V2 快速入门手册 1...
- Page 10 4.1 in x 5.9 in) • 重量:1.8 kg (3.96 lb) 符合性声明 2. 用螺丝固定散热器和 NVME 支架。 本品符合 FCC 规则第 15 款限制。操作符合下列两种情况: 1. 此装置不可产生干扰,且 2. 此装置必须接受任何干扰,包括可能导致非预期造作的 干扰。 警告: 为避免电磁干扰,不得在住宅环境中安装或使用 本产品。 3. 粘贴散热垫于散热器上。 系统 I/O 接口 4. 拆卸螺丝。 5. 安装 NVME,并用铜柱锁附。 2 UNO-148 V2 快速入门手册...
- Page 11 简单安装步骤(续) 简单安装步骤(续) 6. 最后用 3 颗螺丝将散热器固定在系统上。 天线预留孔 1. 将天线预留孔内(外)压(折)即可移除。 安装 M.2 2230 拆除螺丝,安装 M.2 2230,然后锁回螺丝。 2. 将 SMA Conn. 组装于预留孔,最后拧紧垫片及螺母。 iDoor 模块 1. 拆掉底盖上的 2 颗螺丝。 安装 mPCIE 拆除螺丝,安装 mPCIE,然后锁回螺丝。 UNO-148 V2 快速入门手册 3...
- Page 12 • 设备曾暴露在过于潮湿的环境中使用; • 设备无法正常工作,或您无法通过用户手册来使其正常 工作; 4. 将螺丝锁回底盖。 • 设备跌落或者损坏; • 设备有明显的外观破损。 15. 请不要把设备放置在超出我们建议的储存温度范围的 环境,即不要低于 -40°C(40°F)或高于 85°C (185°F),否则可能会损坏设备。 16. 注意:如果电池更换不正确,将有爆炸的危险。因此, 只可以使用制造商推荐的同一种或者同等型号的电池进 行替换。请按照制造商的指示处理旧电池。 17. 根据 IEC 704-1:1982 的规定,操作员所在位置的声压 级不可高于 70dB(A)。 18. 限制访问区域:本设备只能应安装在限制访问区域。 19. 免责声明:该安全指示符合 IEC 704-1 的要求。研华公 司对其内容的准确性不承担任何法律责任。 4 UNO-148 V2 快速入门手册...
- Page 13 I/O 接口 UNO-148 V2 快速入门手册 5...
- Page 14 0.45 0.40 0.50 0.40 180~314.99 0.20 0.50 0.35 0.60 0.40 0.60 0.50 315~800 0.30 0.80 0.50 1.10 0.70 1.00 0.60 ANGLE D=3L/1000 SCALE UNITS SHEET SIZE THIRD ANGLE 1 Of 1 TOLERANCES (Max) PROJECTION Other 1.5 6 UNO-148 V2 快速入门手册...
- Page 15 50 bps ~115.2 kbps(隔離保護:2500 V 電源要求 • 电源類型:AT • 輸入電壓:10 ~ 36 V • 電源介面: 1 x 2-pin 接線端子 料號:2001M14800 第一版 • 最小輸入功率:12 V 5 A,24 V 2.5 A 中國印刷 2024 年 6 月 本產品可採用經 UL 認證的電源或 DC 電源,支援 19 UNO-148 V2 快速入門手冊 1...
- Page 16 4.1 in x 5.9 in) 簡單安裝步驟 • 重量:1.8 kg (3.96 lb) 安裝 NVME 1. 拆卸底蓋上的 2 顆螺絲。 符合性聲明 本品符合 FCC 規則第 15 款限制。操作符合下列兩種情況: 1. 此裝置不可產生干擾,且 2. 此裝置可以接受任何干擾,包括可能導致非預期操作的 干擾。 警告: 為避免電磁干擾,不得在住宅環境中安裝或使用 本產品。 系统 I/O 介面 2. 用螺絲固定散熱器和 NVME 支架。 3. 粘貼散熱墊於散熱器上。 2 UNO-148 V2 快速入門手冊...
- Page 17 簡單安裝步驟(續) 簡單安裝步驟(續) 4. 拆卸螺絲。 安裝 mPCIE 5. 安裝 NVME,並用銅柱鎖附。 拆除螺絲,安裝 mPCIE,然後鎖回螺絲。 6. 最後用 3 顆螺絲將散熱器固定在系統上。 天線預留孔 1. 將天線預留孔內(外)壓(折)即可移除。 安裝 M.2 2230 拆除螺絲,安裝 M.2 2230,然後鎖回螺絲。 UNO-148 V2 快速入門手冊 3...
- Page 18 常工作; - 設備跌落或者損壞; - 設備有明顯的外觀破損。 3. 鎖回 iDoor 門蓋。 15. 請勿將設備放置在超出建議溫度範圍的環境,即不要低 於 -40°C(40°F)或高於 85°C (158°F),否則可能 會造成設備損壞。 16. 注意:若電池更換不正確,將有爆炸危險。因此,只可以 使用製造商推薦的同一種或者同等型號的電池進行替換。 請按照製造商的指示處理舊電池。 17. 根據 IEC 704-1:1982 規定,操作員所在位置音量不可 高於 70 分貝。 18. 限制區域:請勿將設備安裝於限制區域使用。 19. 免責聲明:該安全指示符合 IEC 704-1 要求。研華公司 對其內容之準確性不承擔任何法律責任。 4 UNO-148 V2 快速入門手冊...
- Page 19 I/O 介面 UNO-148 V2 快速入門手冊 5...
- Page 20 0.45 0.40 0.50 0.40 180~314.99 0.20 0.50 0.35 0.60 0.40 0.60 0.50 315~800 0.30 0.80 0.50 1.10 0.70 1.00 0.60 ANGLE D=3L/1000 SCALE UNITS SHEET SIZE THIRD ANGLE 1 Of 1 TOLERANCES (Max) PROJECTION Other 1.5 6 UNO-148 V2 快速入門手冊...
Need help?
Do you have a question about the UNO-148 V2 and is the answer not in the manual?
Questions and answers