Table of Contents
Advertisement
Advertisement
Table of Contents

Related Manuals for Sunbeam ExpressBake BMM4000SS


Summary of Contents for Sunbeam ExpressBake BMM4000SS
- Page 1 ExpressBake Bread Maker User Guide BMM4000SS...
- Page 2 Congratulations For more information on your bread maker and if you have any concerns regarding the performance, please visit www.sunbeam.com. au or call: Sunbeam Customer Service Australia 1300 881 861 New Zealand 0800 786 232...
-
Page 3: Table Of Contents
Contents Sunbeam’s Safety Precautions Using your ExpressBake safely Features of your ExpressBake Control Panel Quick Start Guide Hints and Tips Using the Time Delay Using the Bake Only Menu Power Interruption Program Protection Fruit and Nut Dispenser ExpressBake Hints & Tips... -
Page 4: Sunbeam's Safety Precautions
If you have any concerns regarding the performance and use of your appliance, please visit www.sunbeam.com.au or contact the Sunbeam Consumer Service Line. Ensure the above safety precautions are understood. -
Page 5: Using Your Expressbake Tm Safely
Using your ExpressBake safely Before use Where to use 1. Read all instructions, product labels and 1. Use only on a stable, heat-resistant warnings. Save these instructions. surface. 2. Remove all foreign matter from the bread 2. Do not use the bread maker where it will pan and baking chamber. -
Page 6: Features Of Your Expressbake
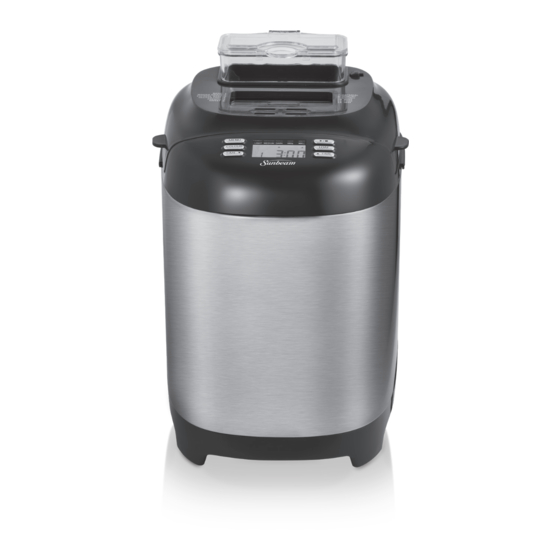
Features of your ExpressBake Control panel Viewing window Fruit & nut dispenser Ingredient compartment Measuring cup Baking chamber 10. Measuring spoon Bread pan 11. Hook Kneading blade (not shown) -
Page 7: Control Panel
Control Panel 12. Menu functions 17. Bread size 13. Menu select 18. Start/stop 14. Crust colour 19. Chosen program 15. Time decrease 20. Operation time 16. Time increase... -
Page 8: Quick Start Guide
Quick Start Guide Step 1 Step 9 Remove all packaging materials. Insert the Press the START/STOP button. kneading blade into the bread pan. Note: If you accidentally select the wrong menu option, hold Start/Stop button to reset Step 2 the bread maker. Add ingredients into the bread pan before HINT: LIFT THE LID AND CHECK THE placing in the bread maker. -
Page 9: Hints And Tips
Hints and Tips Measuring Ingredients Ingredient order is important The most important secret of making bread is The second most important secret of making exact measurements. With wet ingredients, bread is putting the ingredients into the use the provided measuring cup. After filling bread maker in the exact order given in the the measuring cup, place it on a flat surface recipe. -
Page 10: Using The Bake Only Menu
Using the Bake Only menu The BAKE menu setting is useful if the bread 2. Adjust the amount of time using the crust is too light or requires more baking TIME and TIME buttons. time. This setting will bake for 1 hour and 30 3. -
Page 11: Expressbake Tm Hints & Tips
ExpressBake Hints & Tips Add Ingredients in the Correct Order Experienced cooks consider bread making to be as much of an art as a science. Keep in Read all recipes from top to bottom, and mind that some recipes may require a little remember: experimentation before they are exactly the - FIRST, liquid ingredients... -
Page 12: Care And Cleaning
Care and Cleaning Before cleaning the ExpressBake , unplug it Caring for your non-stick baking pan from the power outlet and allow it to cool Do not use metal utensils to remove completely. ingredients or bread, as they may damage the non-stick coating. -
Page 13: Menu Functions
Menu Functions Your bread maker can bake almost any kind of bread. Recipes are included to show you which setting to use. The table below gives an overview of the available functions. Function Approx. Time Description (900g loaf) 1. Basic 3:00 Most commonly used. - Page 14 Recipes Menu 1: Basic • Size - 680g/900g • Crust - light/med/dark • Fruit & Nut • Time Delay • Keep Warm Use to bake standard bread loaves which are light in texture with a thin crust. 1. Ensure kneading blade is in the bread pan. 2.
-
Page 15: Whole Grain
Menu 2: Whole Grain • Size - 680g/900g • Crust - light/med/dark • Fruit & Nut • Time Delay • Keep Warm Starts with a 25 minute preheat cycle during which flours or grains absorb liquid ingredients to soften and combine. 1. - Page 16 Menu 2: Whole Grain - continued Buttermilk Bread 680g Water, luke-warm 1 ¼ cup Butter or margarine 1 ½ tablespoons White Vinegar 1 teaspoon Brown Sugar 2 tablespoons Bread Flour 2 cups Whole Wheat Flour 1 cup Rye Flour 1 cup Powdered Buttermilk 2 tablespoons Gluten Flour...
-
Page 17: Expressbake Tm
Menu 3: ExpressBake • Size - 680g/900g • Keep Warm Use to make breads in under 1 hour. The loaves tend to have a thicker, darker crust as well as being shorter and denser due to the shorter rise times and higher cooking temperature. The delay timer and colour buttons cannot be used with this setting. -
Page 18: Gluten Free
Menu 4: Gluten Free • Size - 680g/900g • Crust - light/med/dark • Fruit & Nut • Time Delay • Keep Warm Designed for breads using gluten free ingredients. Important - check all ingredients to ensure they are gluten free. 1. -
Page 19: French
Menu 5: French • Size - 680g/900g • Crust - light/med/dark • Fruit & Nut • Time Delay • Keep Warm Use to bake breads that a lighter in texture with a crispier crust. Generally loaves are lower in fat and sugar. 1. -
Page 20: Sweet Breads
Menu 6: Sweet Breads • Size - 680g/900g • Crust - light/med/dark • Fruit & Nut • Time Delay • Keep Warm For breads that require additional ingredients such as sugar, dried fruit or chocolate which sweetens the bread. the baking temperature is lower to prevent burning. Note - a light crust colour is recommended for best results. - Page 21 Menu 6: Sweet Breads - continued Apple Walnut Bread 680g Apple Sauce ¾ cup Apple Juice Butter or margarine 3 tablespoons 1 large Salt 1 teaspoon Bread Flour 4 cups Brown Sugar ¼ cup Cinnamon 1 ¼ teaspoons Bicarb of Soda ½...
-
Page 22: Oatmeal
Menu 7: Oatmeal • Size - 680g/900g • Crust - light/med/dark • Time Delay • Keep Warm Has extra rising time to activate the yeast and prevent the bread from becoming too dense. 1. Ensure kneading blade is in the bread pan. 2. -
Page 23: Dough
Menu 9: Dough • Time Delay Use to create dough which can be shaped and baked to create bread, rolls, pizza bases or pasta. 1. Ensure kneading blade is in the bread pan. 2. Add ingredients to the bread pan in order listed. 3. - Page 24 Menu 9: Dough - continued Bread Pretzel Dough Water, Luke-warm White Sugar ½ teaspoon Salt ¼ teaspoon Bread Flour 2 cups Dry yeast 1 ½ teaspoons 1. On completion, remove the dough from the baking chamber. Ensure the blade is removed from the dough before shaping.
- Page 25 Menu 9: Dough - continued Pizza Dough 680g 900g Water, Luke-warm 1 cup cups Olive Oil 2 tablespoons 3 tablespoons Salt ½ teaspoon ¾ teaspoon Plain Flour 3 cups 4 cups Dry yeast 1 ½ teaspoons 2 teaspoons 1. On completion, remove the dough from the bread maker. Ensure the blade is removed from the dough before shaping.
-
Page 26: Bake
Menu 10: Bake • Fruit & Nut • Time Delay Bake setting is for baking dough, the preset time is 60 minutes but this can be adjusted using the TIME buttons. This setting can be used instead of an oven for baking prepared dough. 1. -
Page 27: Jam
Menu 12: Jam • Keep Warm Use to prepare preserves, chutneys and ketchup. 1. Ensure kneading blade is in the bread pan. 2. Add ingredients to the bread pan in order listed. 3. Insert bread pan into the baking chamber and turn clockwise until the pan is clicked into place. -
Page 28: Questions And Answers
Questions and Answers Question Answer It is normal for the height and shape of each loaf to vary depending on Why does the height and the ingredients, accurate measurement of ingredients and the room shape of each loaf differ? temperature. This can happen as the kneading blade is removable for easy cleaning. -
Page 29: Troubleshooting
Troubleshooting Machine Malfunctions Display Window Bread Sides of Browned & Sides Time Indicator Ingredients takes bread Under centre brown Slices Check does not not mixed too long collapse browned sticky & but flour unevenly turn on to bake & bottom raw or not coated &... - Page 30 Troubleshooting continued Baking Results Open, Bread Browned Heavy Not baked coarse or Bread doesn’t Floured Over & floured Check dense in centre holey Collapse rises rise browned sides, texture texture too much enough centre following sticky/raw Measurement Errors FLOUR Not enough Too much YEAST Not enough...
- Page 31 To assist us in managing warranty claims, we recommend you register your product as soon as practicable after purchase, on our Sunbeam website and uploading a copy of your original receipt. View the Support section of the Sunbeam website.
- Page 32 NEWELL AUSTRALIA PTY LTD. ABN 68 075 071 233 Sunbeam is a registered trademark. ExpressBake is a trade mark. Made in China to Sunbeam’s specification. Due to minor changes in design or otherwise, the product you buy may differ slightly from the one shown here.
Need help?
Do you have a question about the ExpressBake BMM4000SS and is the answer not in the manual?
Questions and answers
Do I need to take the blade or paddle out to clean it. Bread particles get stuck underneath and I can’t remove them. The blade will not lift out.
The manual does not explicitly state whether the blade or paddle should be removed for cleaning when bread particles get stuck underneath. However, it does mention unplugging the machine before cleaning and allowing it to cool. It also advises against using metal utensils to remove ingredients or bread to avoid damaging the non-stick coating.
This answer is automatically generated