i-SENS CareSens N POP Owner's Booklet
Uc se monitoring system
Hide thumbs
Also See for CareSens N POP:
- Owner's booklet (27 pages) ,
- Manual (25 pages) ,
- Owner's booklet (27 pages)
Table of Contents
Advertisement
Quick Links
i-SENS, Inc.
43, Banpo-daero 28-gil
Seocho-gu, Seoul 06646, Korea
www.i-sens.com
Australian Distributor:
Pharmaco (Australia) Ltd
Gordon, NSW 2072
Phone: 1800 114 610
Website: www.pharmacodiabetes.com.au
© 2021 i-SENS, Inc. All Rights Reserved
PGUAA-0000290 REV0 2021/09
NZ Distributor:
Pharmaco (NZ) Ltd
Auckland
Phone: 0800 GLUCOSE (0800 458267)
Website: www.pharmacodiabetes.co.nz
Owner's Booklet
Advertisement
Table of Contents

Related Manuals for i-SENS CareSens N POP


Summary of Contents for i-SENS CareSens N POP
- Page 1 Seocho-gu, Seoul 06646, Korea www.i-sens.com Australian Distributor: NZ Distributor: Pharmaco (Australia) Ltd Pharmaco (NZ) Ltd Gordon, NSW 2072 Auckland Phone: 1800 114 610 Phone: 0800 GLUCOSE (0800 458267) Website: www.pharmacodiabetes.com.au Website: www.pharmacodiabetes.co.nz © 2021 i-SENS, Inc. All Rights Reserved PGUAA-0000290 REV0 2021/09...
- Page 2 • The information in this manual is correct at the time of printing. However, i-SENS reserves the right to make any necessary changes at any time without notice as our policy is one of continuous...
-
Page 3: Table Of Contents
Specifications CareSens N POP Blood Glucose Monitoring System - - - - - - - - - - - - - - - - - - - - - - - - - - - - - - - - - - - - - - - - - - - - - - - - - - - - - - - - - - - - - - - - - - - - - - - - - - - - - - - - - - - - - - - - - - - - - - - - - - - - - - - - - - - - - - - - - - - - - - - - - - - - - - - - - - - - - - - - - - - - - - - - - - - - - - - - - - - - - - - - - - - - - - - - - - - - - - - - - - - - - - - - - - - - - - - - - - - - - - - - - - - - - - - - - - - - - - - - - - - - - - - - - - - - - - - - - - - - - - - - - - - - - - - - - - - - - - - - - - - - - - - - - - - - - - - - - - - - - - - - - - - - - - - - - - - - - - - - - - - - - - - - - - - - - - - - - - - - - - - - - - - - - - - - - - - - - - - - - - - - - - - - - - - - - - - - - - - - - - - - - - - - - - -... -
Page 4: Important Information: Read This First
The CareSens N POP Blood Glucose Monitoring System is intended for use outside the body (in vitro diagnostic use) and is intended for use as an aid to monitor the effectiveness of diabetes management. - Page 5 N POP meter detects this electrical current and measures the amount of glucose in the blood sample. • The CareSens N POP blood glucose meter is designed to minimise code related errors in monitoring by using the no-coding function. •...
-
Page 6: Specifications
41.4 g (with batteries) Operating ranges Temperature 5–50 °C Relative humidity 10–90 % Hematocrit 15–65 % Storage/Transport conditions Glucose meter 0–50 °C (with batteries) Temperature Test strip 1–30 °C Control solution 8–30 °C Relative humidity Test strip 10–90 % 6 www.i-sens.com... -
Page 7: Caresens N Pop Blood Glucose Monitoring System
CareSens N POP Blood Glucose Monitoring System Components CareSens N POP Blood Glucose Meter CareLance (Lancing Device) Registration Card Lancets (50) Carrying Case Owner’s Booklet CareSens N Blood Glucose Quick Reference Guide Test Strips (10) Logbook Batteries (2) • Check all the components after opening the CareSens N POP blood glucose monitoring system package. -
Page 8: Inserting Or Replacing The Batteries
• If you suspect your child has swallowed a button/coin cell battery immediately call the Poisons Information Centre on 13 11 26 in Australia, or 0800 764 766 in New Zealand. 8 www.i-sens.com... - Page 9 The CareSens N POP meter uses two 3.0 V lithium batteries. Before using the meter, check the battery compartment and insert batteries if empty. When the symbol appears on the display while the meter is in use, the batteries should be replaced as soon as possible.
- Page 10 Step 5 Tighten the screw on the battery cover with a mini Phillips-head screwdriver (size: PH0/PH00). Note Removing the meter batteries will not affect your stored results. However you may need to reset your meter settings. See page 15–20. 10 www.i-sens.com...
-
Page 11: Caring For Your System
Keep the device away from sources of strong electromagnetic radiation, especially when measuring your blood glucose. • CareSens N POP meter should be used only with the CareSens N test strips. • Store all the meter components in the carrying case to prevent loss and help keep the meter clean. -
Page 12: Caresens N Blood Glucose Test Strip
CareSens N Blood Glucose Test Strip The CareSens N POP blood glucose monitoring system measures blood glucose quickly and accurately. It automatically absorbs the small blood sample applied to the narrow edge of the strip. Contact bars Gently push the test strip, with its... - Page 13 Caution • The CareSens N test strips should be used only with fresh capillary whole blood samples. • Do not reuse test strips. • Do not use test strips past the expiration date. • Test strips in new, unopened vials and test strips in vials that have been opened can be used up until the expiration date printed on the test strip box and vial label if the test strips are used and stored according to its storage and handling...
-
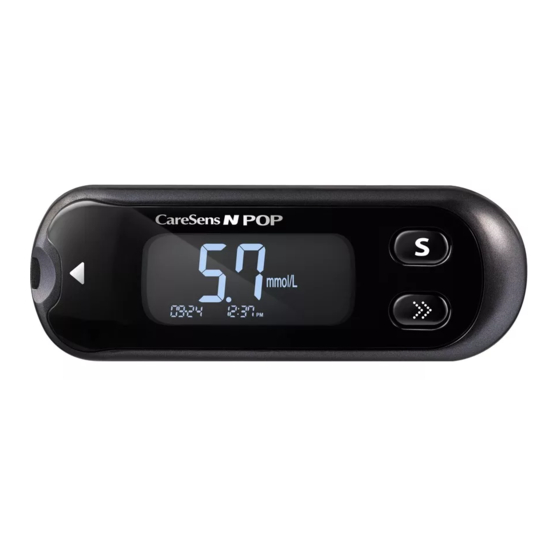
Page 14: Caresens N Pop Blood Glucose Meter
CareSens N POP Blood Glucose Meter S Button Turns the meter on/off, confirms menu selections, and changes information Display Shows results, messages Test Strip Port >> Button Insert test strip Selects or Data Port here changes Used to transfer data... -
Page 15: Caresens N Pop Blood Glucose Meter Display
CareSens N POP Blood Glucose Meter Display It is recommended to check if the display screen on the meter matches the illustration below every time the meter turns on. Do not use the meter if the display screen does not exactly match the illustration as the meter may show incorrect results. -
Page 16: Setting Up Your System
Step 2 Setting the Year Press and release to adjust until the correct year appears. After setting the year, press the button to confirm your selection and progress to the next step. 16 www.i-sens.com... - Page 17 Step 3 Setting the Month A number indicating the month will blink on the left corner of the screen. Press until the correct month appears. Press the button to confirm your selection and progress to the next step. Step 4 Setting the Date Press until the correct date appears.
- Page 18 After the hour is set, press the button to progress to the next step. Step 7 Setting the Minute Press until the correct minute appears. After setting the minute, press the button to progress to the next step. 18 www.i-sens.com...
-
Page 19: Setting The Sound On/Off
Setting the Sound On/OFF Step 8 On pressing , the screen will display On or OFF. Press button to confirm the selection. The meter will beep in the following instances if set to On. • When you push the button or button to turn on the meter •... -
Page 20: Turning On The Strip Expiration Date Indicator
Note If the pre-set expiration date expires, the meter will display the following. For example, in the case when the expiration date is set to October of 2023, the meter displays "EP" at the start of November of 2023. 20 www.i-sens.com... -
Page 21: Turning On The Hypoglycemia (Hypo) Indicator
Turning on the Hypoglycemia (HYPo) Indicator Step 10 In this mode the Hypoglycemia (possible low blood sugar) level can be selected. The ‘HYPo’ will be displayed with hypoglycemia symbol On pressing the button, the screen will display the On or OFF. Press the button when ‘On’... -
Page 22: Checking The System
You may do a control solution test: • When you want to practice the test procedure using the control solution instead of blood, • When using the meter for the first time, • Whenever you open a new vial of test strips, 22 www.i-sens.com... -
Page 23: Control Solution Testing
• If the meter or test strips do not function properly, • If your symptoms are inconsistent with the blood glucose test results and you feel that the meter or test strips are not working properly, • If you drop or damage the meter. Control Solution Testing Step 1 Insert a test strip into the meter’s test strip port,... - Page 24 The range printed on the test strip vial is for the CareSens Control Solution only. It does not have any connection to your blood glucose level. Note The CareSens Control Solution can be ordered separately. Please contact your authorised i-SENS sales representative. 24 www.i-sens.com...
-
Page 25: Comparing The Control Solution Test Results
• When the control solution is contaminated. If results continue to fall outside the range printed on the test strip vial, the CareSens N Test Strip and Meter may not be working properly. Do not use your system and contact your authorised i-SENS sales representative. -
Page 26: Using The Lancing Device
Using the Lancing Device You will need a lancing device in order to collect a blood sample. You may use CareLance contained in the CareSens N POP Blood Glucose Monitoring System or any other medically approved lancing device. Ejection System... -
Page 27: Preparing The Lancing Device
Preparing the Lancing Device Step 1 Wash hands and sample site with soap and warm water. Rinse and dry thoroughly. Step 2 Unscrew and remove the lancing device tip. Step 3 Firmly insert a new lancet into the lancet holder. Hold the lancet firmly. Gently twist to pull off protective disk. - Page 28 Note The skin depth to get blood samples will vary for various people at different sample sites. The lancing device's adjustable tip allows the best depth of skin penetration to get an adequate sample size. 28 www.i-sens.com...
-
Page 29: Preparing The Meter And Test Strip
Flagging Post-meal Test Results The CareSens N POP meter allows you to flag a result of a post-meal test with ( ) symbol. The post-meal test flag ( can be attached just before applying the blood sample. -
Page 30: Applying Blood Sample
(thickness and stickiness) or insufficient volume, the Er4 message may appear. It is recommended that the application of blood sample to the test strip be performed virtually vertical to the sample site as shown in the diagram below. 30 www.i-sens.com... - Page 31 Good Insufficient Sample Sample Note The meter may switch off if the blood sample is not applied within 2 minutes of the symbol appearing on the screen. If the meter turns off, remove the strip and reinsert it to switch on the meter.
-
Page 32: Discarding Used Lancets
Place protective cover on lancet. Push the lancet ejector forward with the thumb to dispose of the used lancet in a proper biohazard container. Caution The lancet is for single use only. Never share or reuse a lancet. Always dispose of lancets properly. 32 www.i-sens.com... -
Page 33: Alternate Site Testing
Alternate Site Testing Before using AST, please consult your healthcare professional. What is AST (Alternate Site Testing)? Usually, when someone tests their glucose, they take the blood sample from the tip of the finger. However, since there are many nerve endings in the fingertip, it can be quite painful. When doing a glucose test, using different parts of the body such as the forearms and palms can reduce the pain during testing. - Page 34 • During the two hours after a meal or exercise • When sick or when glucose levels seem quite lower than test value • When hypoglycemia is not well recognised • When insulin has the biggest effect • 2 hours after an insulin injection 34 www.i-sens.com...
- Page 35 AST Precautions • Before using AST, please consult your healthcare professional. • Do not ignore the symptoms of hyperglycemia or hypoglycemia. • When the results of the test do not reflect your opinion, retest using the fingertip test. If the fingertip result still does not reflect the way you feel, please consult your healthcare professional.
-
Page 36: Hi And Lo Messages
"Lo" appears when a test result is less than 1.1 mmol/L and indicates severe hypoglycemia (very low glucose levels). If "Lo" is displayed again upon retesting, please contact your healthcare professional immediately. * When hypoglycemia indicator is on, symbol also appears. 36 www.i-sens.com... -
Page 37: Target Blood Glucose Ranges
Target Blood Glucose Ranges Reminders Your target ranges from your healthcare professional Time of day Before breakfast Before lunch or dinner 1 hour after meals 2 hours after meals Between 2 a.m. and 4 a.m. Expected Values : Normal blood glucose levels for an adult without diabetes are: below 5.5 mmol/L before meals and fasting*, and less than 7.8 mmol/L two hours after meals. -
Page 38: Transferring Test Results
Transferring Test Results Test results stored in CareSens N POP meter can be transferred from the meter to a computer using SmartLog/ PC care software and cable. 'Pc' is displayed on the meter screen when the data cable connects the meter with a computer. -
Page 39: Meter Memory
Meter Memory The CareSens N POP meter can save up to 1,000 glucose test results with time and date. If the memory is full, the oldest test result will be deleted and the latest test result will be stored. The CareSens N POP meter calculates and displays the averages of total test results, pre-meal test (Pr) results, and post-meal test ) results from the last 1, 7, 14, 30 and 90 days. - Page 40 Post-meal average (1, 7, 14, 30, 90 days) button Use the button to scroll back through the averages seen previously. Note The control solution test results saved with 'check' are not included in the averages. 40 www.i-sens.com...
-
Page 41: Viewing Test Results Stored In The Meter's Memory
Viewing Test Results Stored in the Meter's Memory Step 1 Press the button to turn the meter on. The current date and time will be displayed on the bottom of the screen followed by the 1 day average value and the number of the test results saved The number of within the current day. -
Page 42: Setting The Post-Meal Alarm (Pp2 Alarm)
Setting the PP2 Alarm OFF To turn off the PP2 alarm, press and hold for 3 seconds. 'PP2' and 'OFF' will appear on the screen. Then the screen will change automatically to the memory check mode without the ‘alarm’ displayed. 'alarm' disappears 42 www.i-sens.com... -
Page 43: Setting The Strip Expiration Date Indicator
Setting the Strip Expiration Date Indicator The test strip expiration date indicator can be set in the CareSens N POP meter. The strip expiration date is printed on the test strip vial. At any stage, if the button is pressed for 3 seconds, the meter will be turned off. - Page 44 Step 3 Setting the Month A number indicating the month will blink. Press the button until the correct month appears. After finishing the setting, press and hold the button for 3 seconds to turn off the meter. 44 www.i-sens.com...
-
Page 45: Understanding Error And Other Messages
CareSens N blood glucose test strip. There is a problem Do not use the meter. with the meter. Contact your authorised i-SENS sales representative. An electronic error Repeat the test with a occurred during the new test strip. If the error test. - Page 46 The temperature temperature within during the test was the operating range. below the operating range. Note If the error messages persist, contact your authorised i-SENS sales representative. 46 www.i-sens.com...
-
Page 47: General Troubleshooting
• Repeat the test after inserting a new test strip. The test result doesn't match the • Check the expiration date of the test way you feel. strip. • Perform control solution test. Note If the problem is not resolved, please contact your authorised i-SENS sales representative. -
Page 48: Performance Characteristics
The performance of CareSens N POP Blood Glucose Monitoring System has been evaluated in laboratory and in clinical tests. Accuracy: The accuracy of the CareSens N POP Blood Glucose Monitoring System (Model GM505WAC, GM505WBC) was assessed by comparing blood glucose results obtained by patients with those obtained using a YSI Model 2300 Glucose Analyzer, a laboratory instrument. -
Page 49: Influence Quantities
Precision: The precision studies were performed in a laboratory using CareSens N POP Blood Glucose Monitoring Systems. Within Run Precision 2.1 mmol/L SD = 0.1 mmol/L 4.6 mmol/L SD = 0.2 mmol/L Blood average 6.9 mmol/L CV = 3.0% 11.7 mmol/L CV = 3.2%... - Page 50 Cholesterol 500 mg/dL Creatinine 3 mg/dL Dopamine 13 mg/dL EDTA 180 mg/dL Galactose 60 mg/dL Gentisic acid 50 mg/dL Glutathione (Red) 17 mg/dL Hemoglobin 500 mg/dL Heparin 8000 U/dL Hydrocortisone 1 mg/dL Ibuprofen 40 mg/dL Icodextrin 2 mg/dL 50 www.i-sens.com...
-
Page 51: User Performance Evaluation
Concentration Interferent L-Dopa 5 mg/dL (L-3,4-dihydroxyphenylalanine) Maltose 1000 mg/dL Mannitol 600 mg/dL Methyl-DOPA 1.5 mg/dL Pralidoxime Iodide (PAM) 25 mg/dL Salicylate 60 mg/dL Tolbutamide 100 mg/dL Tolazamide 100 mg/dL Triglycerides 3000 mg/dL Uric acid 20 mg/dL Xylose 25 mg/dL User Performance Evaluation A study evaluating glucose values from fingertip capillary blood samples obtained by 100 lay persons showed the following results:... -
Page 52: Warranty Information
Warranty Information Manufacturer’s Warranty i-SENS, Inc. warrants that the CareSens N POP Meter shall be free of defects in material and workmanship in normal use for a period of five (5) years. The meter must have been subjected to normal use. The warranty does not cover improper handling, tampering, use, or service of the meter. - Page 53 MEMO...
- Page 54 MEMO 54 www.i-sens.com...
- Page 55 MEMO...
- Page 56 MEMO 56 www.i-sens.com...
- Page 57 MEMO...
- Page 58 MEMO 58 www.i-sens.com...
Need help?
Do you have a question about the CareSens N POP and is the answer not in the manual?
Questions and answers