i-SENS CareSens N POP Manual
Hide thumbs
Also See for CareSens N POP:
- Owner's booklet (58 pages) ,
- Owner's booklet (27 pages) ,
- Owner's booklet (27 pages)

Related Manuals for i-SENS CareSens N POP


Summary of Contents for i-SENS CareSens N POP
-
Page 1: Table Of Contents
Table of Contents Information Important Information: Read This First! Specifications CareSens N POP Blood Glucose Monitoring System Inserting or Replacing the Batteries CareSens N Blood Glucose Test Strip CareSens N POP Blood Glucose Meter CareSens N POP Blood Glucose Meter Display... -
Page 2: Important Information: Read This First
Intended use: test strip to produce a small electrical current. The CareSens CareSens N POP Blood Glucose Monitoring System is used for N POP meter detects this electrical current and measures the quantitative measurement of the glucose level in capillary the amount of glucose in the blood sample. -
Page 3: Specifications
* Quick Reference Guide Sample type Fresh capillary whole blood * Batteries Calibration Plasma-equivalent CareSens N POP BGM System may include the following items: Assay method Electrochemical * CareSens N Blood Glucose Test Strips Battery life 2,000 tests * Lancets Power Two 3.0 V lithium batteries... -
Page 4: Inserting Or Replacing The Batteries
Inserting or Replacing the Batteries CareSens N Blood Glucose Test Strip The CareSens N POP meter uses two 3.0 V lithium batteries. The CareSens N POP blood glucose monitoring system Before using the meter, check the battery compartment and measures blood glucose quickly and accurately. It automatically insert batteries if empty. -
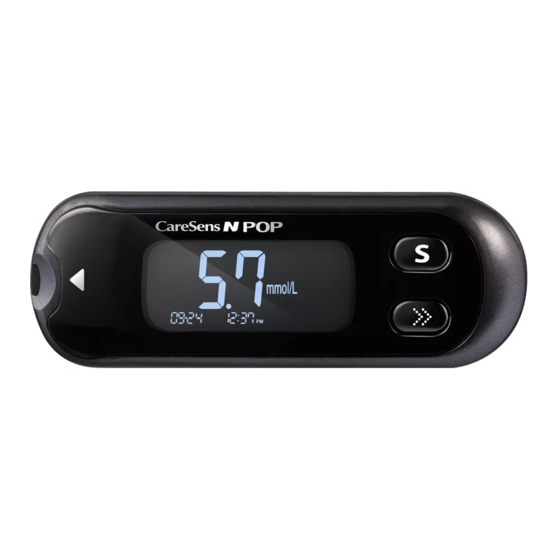
Page 5: Caresens N Pop Blood Glucose Meter
CareSens N POP Blood Glucose Meter Warning! • T he CareSens N test strips should be used only with fresh S Button capillary whole blood samples. Turns the meter on/off, confirms menu selections, • D o not reuse test strips. and changes information Display • D o not use test strips past the expiration date. Shows results, • T est strips in new, unopened vials and test strips in vials that... -
Page 6: Caresens N Pop Blood Glucose Meter Display
CareSens N POP Blood Glucose Meter Display Setting Up Your System Press and hold the button for 3 seconds to enter the SET mode. After all settings are finished, press and hold the button for 3 seconds to turn off the meter. - Page 7 The meter can be set in the AM/PM 12-hour or the 24-hour clock format. Press to select a format. The AM•PM symbol is not displayed in the 24-hour format. After selecting the format, press the button to progress to the next step. 14 www.i-sens.com www.i-sens.com 15...
-
Page 8: Setting The Sound On/Off
If the sound is set to OFF, none of the sound functions will work. After setting the sound, press the button to progress to the next step. Note: symbol is displayed only when the sound is set to OFF. 16 www.i-sens.com www.i-sens.com 17... -
Page 9: Turning On The Hypoglycemia (Hypo) Indicator
October Caution: Ask your healthcare professional to help you of 2017, the meter displays "EP" in the decide what your hypoglycemia level is before setting your beginning of November of 2017. hypoglycemic level. 18 www.i-sens.com www.i-sens.com 19... -
Page 10: Checking The System
• W hen you want to practice the test procedure using the screen. If the meter turns off, remove the strip, reinsert, and control solution instead of blood start from step 1. • W hen using the meter for the first time 20 www.i-sens.com www.i-sens.com 21... -
Page 11: Comparing The Control Solution Test Results
CareSens N Test Strip and Meter may not be Note: The CareSens Control Solution can be purchased working properly. Do not use your system and contact your separately. Please contact your authorised i-SENS sales authorised i-SENS sales representative. representative. 22 www.i-sens.com... -
Page 12: Using The Lancing Device
You will need a lancing device in order to collect a blood sample. Step 1 You may use CareLance contained in the CareSens N POP Blood Wash hands and sample site with Glucose Monitoring System or any other medically approved soap and warm water. -
Page 13: Preparing The Meter And Test Strip
1 = least penetration of lancet into the skin 7 = most penetration of lancet into the skin Flagging Post-meal Test Results The CareSens N POP meter allows you to flag a result of a Step 6 post-meal test with symbol. -
Page 14: Applying Blood Sample
3 seconds. It is recommended that the application of blood sample to the Discard used test strips safely in test strip be performed virtually vertical to the sample site as appropriate containers. shown in the diagram below. 28 www.i-sens.com www.i-sens.com 29... -
Page 15: Discarding Used Lancets
Then press the release button while continuing to apply a lancet. Always dispose of lancets properly. pressure. Keep holding the lancing device against your skin until sufficient (at least 0.5 μL, actual size: ) blood is drawn. Carefully lift the lancing device away from your skin. 30 www.i-sens.com www.i-sens.com 31... - Page 16 If the sample drop of blood runs or spreads due to • 2 hours after an insulin injection contact with hair or with a line in your palm, do not use that sample. Try puncturing again in a smoother area. 32 www.i-sens.com www.i-sens.com 33...
-
Page 17: Hi And Lo Messages
American Diabetes Association. “Standards of Medical Care in symbol also appears. Diabetes – 2012. ” Diabetes Care. January 2012; 35(1):S11-S63. Note: Please contact your authorised i-SENS sales representative if such messages are displayed even though you do not have hyperglycemia or hypoglycemia. 34 www.i-sens.com... -
Page 18: Transferring Test Results
Transferring Test Results Meter Memory The CareSens N POP meter can save up to 1,000 glucose test Test results stored in CareSens N POP results with time and date. If the memory is full, the oldest test meter can be transferred from the result will be deleted and the latest test result will be stored. -
Page 19: Viewing Test Results Stored In The Meter's Memory
Post-meal average turn off the meter. (1, 7, 14, 30, 90 days) button button Use the button to scroll back through the averages seen button previously. Hold the button to turn off the meter. 38 www.i-sens.com www.i-sens.com 39... -
Page 20: Setting The Post-Meal Alarm (Pp2 Alarm)
To turn off the PP2 alarm, press and hold for 3 seconds. "PP2" prevent loss and help keep the meter clean. and "OFF" will appear on the screen. Then the screen will change automatically to the memory check mode without "alarm" displayed. "alarm" disappears 40 www.i-sens.com www.i-sens.com 41... -
Page 21: Understanding Error Messages
The blood or control Repeat the test with a contact your solution sample was new test strip and wait authorised i-SENS sales applied before the until the symbol representative. symbol appeared. appears before applying the blood or... -
Page 22: General Troubleshooting
Troubleshooting System has been evaluated in laboratory and in clinical tests. • C heck whether the test strip is Accuracy: The accuracy of the CareSens N POP BGM System inserted with the contact bars facing (Model GM505WAC, GM505WBC) was assessed by comparing up. - Page 23 Precision: The precision studies were performed in a laboratory Interferences using CareSens N POP BGM Systems. The effect of various interfering substances was evaluated in whole blood samples on glucose measurements. Within Run Precision *Blood avg. 2.1 mmol/L SD = 0.1 mmol/L Difference Averages *Blood avg.
-
Page 24: Warranty Information
Warranty Information Manufacturer’s Warranty Difference Averages i-SENS, Inc. warrants that the CareSens N POP Meter shall be Interferent Interval1 Interval 2 free of defects in material and workmanship in normal use for (2.8~5.5 mmol/L) (13.9~19.4 mmol/L) a period of five (5) years. The meter must have been subjected to normal use. - Page 25 MEMO 50 www.i-sens.com...
Need help?
Do you have a question about the CareSens N POP and is the answer not in the manual?
Questions and answers