Table of Contents
Advertisement
Quick Links
Advertisement
Table of Contents

Related Manuals for Labomed PRIMA DNT Trainer


Summary of Contents for Labomed PRIMA DNT Trainer
- Page 1 PRIMA DNT Trainer Operating Surgical Microscopy User Manual To ensure proper use of this instrument as well as to avoid injury while operating Part No: 6167500-795 Instrument, understanding this manual completely before use is highly recommended. Issue 1.0 Printed on May,2013...
- Page 2 ANY REPAIR OR SERVICE TO THIS INSTRUMENT MUST BE PERFORMED BY EXPERIENCED PERSONAL OR DEALERS WHO ARE TRAINED BY LABOMED OR SERIOUS INJURY TO THE OPERATOR OR PATIENT MAY OCCUR. WARNING: MODIFICATIONS TO THIS INSTRUMENT ARE NOT ALLOWED. ANY MODIFICATION TO THIS UNIT BE AUTHORIZED BY LABOMED OR SERIOUS INJURY TO THE OPERATOR OR PATIENT MAY OCCUR.
- Page 3 CAUTION: THIS INSTRUMENT IS NOT TO BE USED NEAR HIGH-FREQUENCY EMITTING SURGICAL EQUIPMENT. CAUTION: THIS INSTRUMENT IS NOT INTENDED TO BE CONNECTED TO EQUIPMENT OUTSIDE THE CONTROL OF LABOMED OR MUST BE TESTED TO AN APPLICABLE IEC OR ISO STANDARDS.
-
Page 4: Table Of Contents
PRIMA DNT Trainer TABLE OF CONTENTS INTRODUCTION SAFETY INSTRUCTIONS SPECIAL INSTRUCTION FOR INSTALLATION & USE WARNING LABELS AND NOTES UNPACKING DESCRIPTION OF PARTS SYSTEM DIAGRAM INSTALLATION & INSTRUCTION INSTALLATION 10-11 ELECTRIC CONNECTION CONTROLS INSTRUCTION FOR USING THE MICROSCOPE 13-14 CHANGING THE OBJECTIVE & EYEPIECES... -
Page 5: Introduction
PRIMA DNT Trainer INTRODUCTION The LABOMED Prima DNT Trainer is designed to be used during teaching program in restorative dentistry, which is adaptable for di erent surgical needs without compromise to performance. The microscope provides extremely high optical image quality, good depth of focus and wide eld of view for precise surgery. -
Page 6: Safety Instructions
PRIMA DNT Trainer SAFETY INSTRUCTIONS SAFETY This instrument described in this manual has been developed and tested in accordance with LABOMED safety standards and with national and international regulations. A high degree on instrument safety is thus ensured. This manual contains information on safety aspects governing the use of this product and brief summary of important precaution for this user. -
Page 7: Special Instruction For Installation & Use
• Only use the instrument with the accessories supplied. Should you wish to use other accessories equip- ment, make sure that the LABOMED or the equipment manufacturer has certi ed that its use will not repair the safety of the instrument. - Page 8 • All light radiation have an e ect on skin and biological tissues. For your own protection and advices to keep the light level to the absolute minimum required for your procedure. Warning! Only the right con guration of LABOMED Prima DNT Trainer surgical microscope must be used for related procedure. Issue 1.0...
-
Page 9: Warning Labels And Notes
PRIMA DNT Trainer WARNING LABELS AND NOTES Caution: Observe all warning labels and notes! If any label is missing on your instrument or has become illegible, please contact us or one of our authorized representatives. We will supply the missing labels. -
Page 10: Unpacking
PRIMA DNT Trainer UNPACKING The appliance is delivered in sub-assembled groups along with one set of Installation Kit and one instruction / service manual. Please check following at the time of unpacking: 1. Table Mount 2. Column 3. Swivel arm and Suspension arm assembly with bre optic cable. -
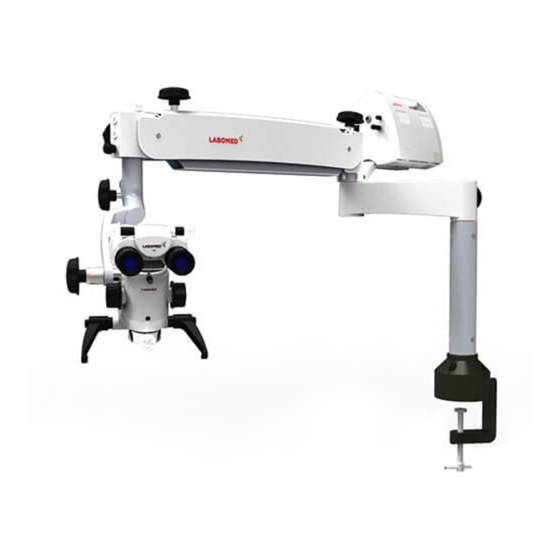
Page 11: Description Of Parts
PRIMA DNT Trainer DESCRIPTION OF PARTS Fig. 1 1. Table Clamp 2. Column 3. Swivel Arm locking knob 4. eVALUX Illumination Box 5. Tension Adjustment Knob 6. Suspension Arm 7. Suspension arm hydraulic movement lock 8. Illumination Control Knob 9. Binocular head with eyepieces 10. -
Page 12: System Diagram
PRIMA DNT Trainer SYSTEM DIAGRAM 6167500-815 6167500-500 6167500-803 6137000-000 6132012 6132012 6122015 6135100-800 6121035 6133250-801 6133400-801 6133200-801 6133300-801 6165000-979 6137300 Issue 1.0 6167500-795 PRIMA DNT Trainer Printed on May,2013... - Page 13 PRIMA DNT Trainer DESCRIPTION OF PART NO. PART NO. DESCRIPTION 1. 6167500-803 Swivel arm 2. 6167500-815 Suspension Arm Assembly 3. 6167500-500 eVALUX Illumination Box 4. 6137000-000 Microscope Carrier & Magnichanger Assembly 5. 6132012 12.5x Eyepiece 6. 6132010 10x Eyepiece 7. 6121035 45°...
-
Page 14: Installation
PRIMA DNT Trainer INSTALLATION 8.1 Engage the column on the table top by tighten the clamping screw from the bottom as shown as (A) in Fig. 2. Fig. 2 8.2 Retrieve the swivel arm and suspension arm assem- bly from the packing box. - Page 15 PRIMA DNT Trainer 8.4 Retrieve the carrier assembly from the packing and follow as below refer Fig. 5. • Install the coupling to the suspension arm by sliding the guiding shaft (1) to the suspension arm. • Lock the inclined coupling with the threaded plug (3).
-
Page 16: Electric Connection
PRIMA DNT Trainer ELECTRICAL CONNECTIONS Connect the power cable to the AC inlet socket (2) provid- ed on the back of the illumination box as shown as(1) in the g 7. Switch on the power from on/o switch provided in the front of illumination box. -
Page 17: Instruction For Using The Microscope
PRIMA DNT Trainer INSTRUCTIONS FOR USING THE MICROSCOPE Setting up of Microscope: 1. Clamp the table mount on the table properly. 2. Although tension on microscope is factory preset as per the ordered con guration. Still user can adjust up and down force by tuning the knob (B) clockwise or anticlockwise. - Page 18 PRIMA DNT Trainer INSTRUCTIONS FOR USING THE MICROSCOPE Intended use: The PRIMA DNT Trainer surgical microscope has been designed for teaching procedures in the eld of dentistry, i.e. the microscope meets the special requirements of this discipline. Description of the modules...
-
Page 19: Changing The Objective & Eyepieces
PRIMA DNT Trainer CHANGING THE OBJECTIVES / EYEPIECES 1. The objectives can be taken out by rotating it in anti-clock wise direction. It can be threaded in by rotating in clock wise direction. 2. To install the eyepieces, insert in the eye tubes of observation head. -
Page 20: Adjustment Of Tension
LED may get fuse. Here user needs to replace the LED only and thermal cut-o will start working again. To replace LED user may call LABOMED service personal or authorized dealer. LED Speci cations: 3.7V, 13.5Amp Issue 1.0... -
Page 21: Cleaning & Servicing
Wipe o any residue with a mixture of 50% ethyl alcohol and 50% distilled water plus a dash of household dish-washing liquid. 17.4 STERILIZATION The asepsis sets available from LABOMED contain rubber caps, sleeves and grips which can be Sterilized in autoclaves. We recommend the following program for sterilization: Sterilization temperature: 134°... -
Page 22: Ambient Requirement
PRIMA DNT Trainer AMBIENT REQUIREMENT +10˚C..+40˚C For Operation Temperature Rel. Humidity 30%..90% (without condensation) Air Pressure 700hPa..1,060hPa Temperature -40˚C..+70˚C For Transportation and Storage Rel. Humidity 10%..100% (without condensation) Air Pressure 500hPa..1,060hPa The unit meets the essential requirements stipulated in Annex I to the 93/42/EEC directive govern- ing medical devices. -
Page 23: Troubleshooting Table
PRIMA DNT Trainer TROUBLESHOOTING GUIDE This instrument is a high grade technological product and not required any special periodical maintenance if handed carefully. To ensure optimum performance and safe working order of the instruments, its safety must be checked once every 12months. We recommended having this check performance by our service representative as part of regular maintenance work. - Page 24 PRIMA DNT Trainer Problem Possible Cause Remedy Loosen the friction adjustment The friction adjustment screw on Up and down motion of screw on the suspension system the suspension system is knob on suspension system as needed tightened too rmly is too sti No image visible Index magnichanger properly.
-
Page 25: Disposal
PRIMA DNT Trainer DISPOSALS Disposal must comply with locally applicable laws and regulations. PRIMA DNT Trainer 6167500-795 Issue 1.0 Printed on May,2013... -
Page 26: Specifications
PRIMA DNT Trainer SPECIFICATIONS 210° or 45° inclined head Binocular Tubes WF 10x/16mm with eye guards; optional WF Eyepieces 12.5x/16mm. 0.4x, 0.6X, 1.0X, 1.6X & 2.5x Apochromatic Magnichanger f= 250mm, manual ne focus Objective 50W LED Light Source Green & Yellow... -
Page 27: Dimensions
PRIMA DNT Trainer DIMENSIONS TABLE MOUNT 600 mm 265 mm ±135° ±150° ±90° Issue 1.0 6167500-795 PRIMA DNT Trainer Printed on May,2013... - Page 28 Revision History Rev. No. Date of Release DCR # Change App. By...
- Page 29 920 Auburn Court Fremont, CA 94538 U.S.A. Phone: 510-445-1257 Fax: 510-991-9862 E-mail: sales@laboamerica.com www.laboamerica.com EU REP. Labomed Europe Essebaan 50 NL-2908 LK Capelle a/d IJssel The Netherlands Tel: +31 (0)10 4584222 Fax: +31 (0)10 4508251 E-mail: info@labomedeurope.com A16372 ISO13485 LABOTECH MICROSCOPES INDIA Pvt Ltd...
Need help?
Do you have a question about the PRIMA DNT Trainer and is the answer not in the manual?
Questions and answers