
Related Manuals for Labomed Lx 300


Summary of Contents for Labomed Lx 300
-
Page 1: User Manual
Lx 300 User Manual Clinical Microscopy To ensure proper use of this instrument as well as to avoid injury while operating instrument, understanding this manual completely before use is highly recommended. -
Page 3: Table Of Contents
CONTENTS INTRODUCTION SAFETY INFORMATION Lx 300 BINOCULAR UNPACKING YOUR MICROSCOPE STANDARD COMPONENTS OPTIONAL ACCESSORIES INITIAL SETUP ASSEMBLY 12-13 SUMMARY OF BRIGHTFIELD OBSERVATION PROCEDURE DETAILED OBSERVATION PROCEDURE 15-19 TROUBLESHOOTING GUIDE 20-21 SPECIFICATIONS... -
Page 4: Introduction
INTRODUCTION The Lx 300 is a clinical microscope reflecting a modern design as well as the latest in optical and mechanical advancements. Designed for professionals as well as clinicians, this microscope offers many features and functions with excellent ergonomics for a fatigue free usage . Here are few points highlighting the benefits of the Lx300: - Extra clarity and contrast is provided through a 360°... -
Page 5: Safety Information
Do not place microscope on a flexible surface, as this could result in blocking the air vents and cause overheating. 4. Always use the power cord provided by LABOMED. If the proper power cord is not used, product safety performance cannot be warranted. - Page 6 Lx 300 Getting Started 1. A microscope is a precision instrument with delicate glass components. Please handle with care. 2. Do not use the microscope where it is subjected to direct sunlight, high temperature humidity dust and vibrations. (For the operating conditions, see chapter 14, "SPECIFICATIONS")
- Page 7 Lx 300 Care & Maintenance Your microscope has been engineered for a long and safe operational life with the least amount of maintenance required. In general, routine maintenance is limited to keeping the microscopes working parts lubricated and optics clean. Always cover the microscope with the provided dust cover when not in use.
-
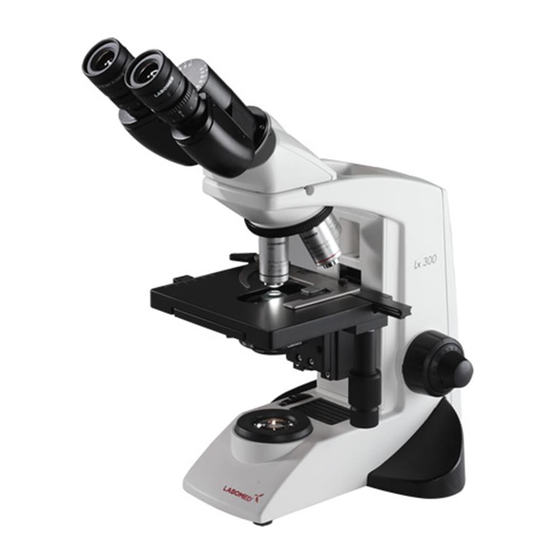
Page 8: Lx 300 Binocular
Lx 300 Lx 300 Binocular Eyepieces Binocular viewing tube, 45° inclined° Revolving nosepiece Objectives Specimen holder Mechanical stage Abbe condenser Filter holder Coarse and fine focus knob On/off intensity regulator X-Y movement control knob... -
Page 9: Unpacking Your Microscope
Lx 300 UNPACKING YOUR MICROSCOPE Power Cord Observation head Eyepieces Microscope Arm... -
Page 10: Standard Components
Lx 300 STANDARD COMPONENTS After removing your microscope from its packaging, make sure that all of the following contents are present. ¡ “Please note that the contents of your microscope may vary as the optional configuration, contrasting method or viewing body opted for may not be of the standard configuration highlighted here”... -
Page 11: Optional Accessories
Lx 300 OPTIONAL ACCESSORIES System Diagram of Optional Accessories Binocular head WF 10x SP 100x(SL,oil) SP 4x SP 40x SP PH 10x SP 10x SP PH 20x SP PH 40x (SL) SP PH 100x (SL, Oil) Abbe Condenser 1.25 Green filter... - Page 12 Lx 300 Installation and Operation of Optional Accessories Phase Turret 1. Remove the condenser from its position by loosening the screw (1) with allen key on right side of the condenser bracket as shown in figure 5. 2. Place the...
- Page 13 Lx 300 2. Place the polarizer shown as (1) in fig. 8 on the illumination assembly shown as (2). Fig. 8 3. Fix the polarizer by tightening the screw provided. Refer fig.9. Fig. 9...
-
Page 14: Initial Setup
Lx 300 INITIAL SETUP Objectives Objectives are factory set. Objectives are par- centered and par-focalised during assembly. All objectives have been secured for a tight fit to prevent them from coming loose during transit. To remove an objective, rotate it counterclockwise while holding it with a rubber grip to avoid any slippage. -
Page 15: Assembly
Lx 300 ASSEMBLY Your Lx 300 can be easily assembled by simply attaching the bulb, filter and power cord as explained below: Installing or Replacing the Lamp Bulb Before attaching the lamp bulb, remove the parts that may drop such as the filter and specimen from the microscope frame, and place the microscope on its back so that the bottom plate is exposed. - Page 16 3. Replace the primary fuse (2) with the spare fuse. 4. Engage the fuse tray back in. Always use the designated Fuse. Using a fuse other than those specified by LABOMED may lead to a fire hazard. Fig. 17 Caution : For Fuse replacement: Set the main switch to"...
-
Page 17: Summary Of Brightfield Observation Procedure
Lx 300 SUMMARY OF BRIGHTFIELD OBSERVATION PROCEDURE Flip the main switch “ON” Place the specimen on the stage. Fuse Holder Main switch Engage the 10X objective in the light path. Bring the specimen in focus. Adjust the observation tube and eyepieces Adjust the interpupillary distance. -
Page 18: Detailed Observation Procedure
Lx 300 DETAILED OBSERVATION PROCEDURE Turning the Lamp ON 1. Flip the main switch to ” ” (ON) as shown ( Figure 19). 2. Rotating the light intensity adjustment knob (Fig. 20) in the direction of the arrow increases brightness and rotating knob in the opposite direction decreases brightness. - Page 19 Lx 300 Cover glass Cover glass This is the glass plate placed on the specimen. For optimum optical performance, the cover glass thickness, which is the distance from its surface to the specimen surface, should be 0.17 mm. Slide glass...
- Page 20 Lx 300 Adjusting the Interpupillary Distance (IPD) The inter-pupillary distance adjustment consists of regulating the two eyepieces to align with both eyes’ pupils so that you can observe a single microscopic image through two eyepieces in stereo vision. This greatly helps to reduce fatigue and discomfort during observation.
- Page 21 Lx 300 Centering the Condenser The condenser is fixed and cannot de-center. In case of any error, remove the condenser by loosening thumb screw and re-install the same. Fig. 29 Adjusting the Condenser Position and Aperture Iris Diaphragm The condenser is most often used in the highest position. If the observed...
- Page 22 The designated immersion oil should be in contact with the cover lens of the 100X immersion objective. If not, the specimen will appear distorted and dull. It is recommended that LABOMED immersion oil is always used. Immersion Process: 1. Bring the specimen in focus using first the 10x, then 40x objective.
-
Page 23: Troubleshooting Guide
Under certain conditions, performance of the unit may be adversely affected by factors other than defects. If problems occur, please review the following list and take corrective action as needed. If problem persists, please contact LABOMED or your local LABOMED dealer. - Page 24 Lx 300 Observation Cause Remedy 8. Objective hits the specimen when The specimen slide is upside down Set the specimen correctly with the an objective is switched to a higher cover glass facing upwards magnification objective The cover glass is too thick Use a cover glass with thickness of 0.17mm...
-
Page 25: Specifications
Lx 300 SPECIFICATIONS 1. Illumination Built-in illumination system Halogen Bulb/ LED 2. Focusing mechanism Stage height adjustment mechanism Fine adjustment scale: 3.0µm per graduation Fine adjustment stroke: 0.3mm per turn Total stroke: 12.7mm Co-axial coarse and fine focusing on ball drive 3. - Page 26 Fax: 510 991 9862 CA 94538 sales@laboamerica.com LABOMED and Lx 300 are registered trademarks of Labo America, Inc. With a policy of continuous development, Labo America, Inc. reserves the right to change design and specifications without prior notice. ISO 9001 : 2008...
Need help?
Do you have a question about the Lx 300 and is the answer not in the manual?
Questions and answers