
Related Manuals for Labomed MET 400


Summary of Contents for Labomed MET 400
-
Page 1: User Manual
MET 400 User Manual Inverted Metallurgical Microscopy To ensure proper use of this instrument as well as to avoid injury while operating instrument, understanding this manual completely before use is highly recommended. -
Page 2: Table Of Contents
CONTENTS INTRODUCTION SAFETY INFORMATION UNPACKING YOUR MICROSCOPE MET 400 TRINOCULAR DIAGRAM INSTALLING THE INCIDENTAL LIGHT ILLUMINATOR INITIAL SETUP & ASSEMBLY DETAILED BRIGHT FIELD OBSERVATION PROCEDURE DETAILED OBSERVATION PROCEDURE OPTIONAL ACCESSORIES CARE & MAINTENANCE SPECIFICATION TROUBLESHOOTING... -
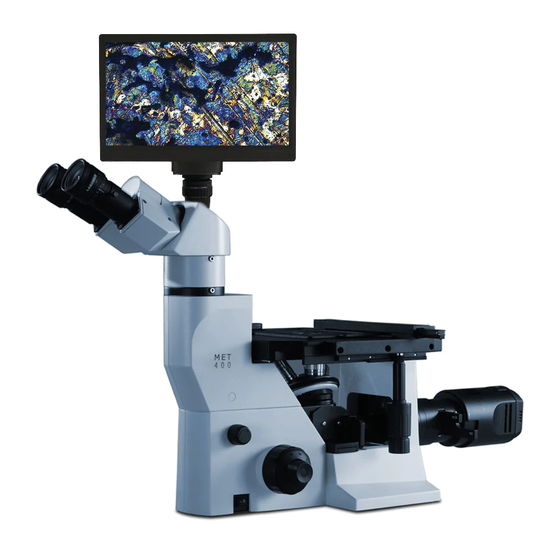
Page 3: Introduction
The MET 400 inverted microscope sets a new standard for inverted metallurgical microscopes. It combines high performance and distinctive styling with the high quality craftsmanship for which Labomed is known. The excellent image and comfort of use are the basics of Labomed MET400. -
Page 4: Safety Information
MET 400 SAFETY INFORMATION It is important to follow Safety Instructions carefully to avoid any kind of personal injury or damage to this Instrument. It is recomended for your safety to read the manual throughly & do not discard this manual rather preserve it for easy reference while operating for best results. -
Page 5: Unpacking Your Microscope
MET 400 UNPACKING YOUR MICROSCOPE MET400 comes securely packed in the custom configured foam packing, to prevent it from all shocks and transit damages. After removing your Microscope from its packing, make sure that all of the following contents are present. -
Page 6: Met 400 Trinocular Diagram
MET 400 DIAGRAM SHOWING PARTS Camera Port Specimen Holder Mechanical Stage Eyepieces (Focusable) Plate (Optional) Observation Head Binocular Aperture diaphragm Illuminator Lever Screw For Fixing Binocular head Revolving Turret For Objectives Light Intensity Control knob 2 Filter Sliders Lamp House... -
Page 7: Installing The Incidental Light Illuminator
MET 400 Installing the Incidental Light Illuminator Illuminator The Illuminator Unit is to be fixed to the main Microscope Body with 3 screws using Allen wrench supplied along with Illuminator. Three Tapped Holes are provided in the Base Unit as shown in Diagram below. -
Page 8: Initial Setup & Assembly
INITIAL SETUP & ASSEMBLY Observation Head Base unit is assembled with co-axial focus mechanism, turret and stage plate, as per procedure below: Install the observation head using the following procedure as shown in INITIAL SETUP & ASSEMBLY Fig. 4: Using the 3mm allen wrench (provided), loosen the Head Locking Screw (1) and remove the dust cover cap provided in dovetail cavity as well as on the observation head dovetail. - Page 9 Adjusting the Interpupillary Distance (IPD) The inter-pupillary distance adjustment consists of regulating the two eyepieces to align with both the eyes’ pupils so that you can observe a single microscopic image through two eyepieces in stereo vision. This greatly helps to reduce fatigue and discomfort during observation. While looking through the eyepieces, move both eyepieces laterally until the left and right fields of view coincide completely.
- Page 10 MET 400 Mounting the Mechanical Stage The Mechanical stage is to be mounted on the Right Side of Square Stage with the help of two clamping screws (provided) underneath of the plain square stage (shown with arrow marks on Fig 10.1) Fig.
-
Page 11: Detailed Bright Field Observation Procedure
MET 400 SUMMARY OF BRIGHTFIELD OBSERVATION PROCEDURE Click the main switch to “ON” Place the specimen on the stage. Polished surface facing the objectives below. On/Off Engage the 10X objective in the light path. Adjust the observation tube and eyepieces Adjust the interpupillary distance. -
Page 12: Detailed Observation Procedure
MET 400 DETAILED OBSERVATION PROCEDURE Turning the Lamp ON 1. Click the main switch to I (ON) ” ” as shown in Figure 17. 2. Rotating the light intensity adjustment knob in the direction of the arrow increases the brightness and rotating the knob in the opposite direction decreases the brightness. -
Page 13: Optional Accessories
OPTIONAL ACCESSORIES System Diagram of Optional Accessories Video adapter DSC adapter iVu 3100 iVu 5100 Binocular head Trinocular head Ergonomic head WF 16x WF 20x WF 10x LW 5x LW 10x LW 20x LW 50x (SL) Mechanical stage Dia: 25mm Dia: 38mm Dia: 53mm Installation and Operation of Optional Accessories... -
Page 14: Care & Maintenance
MET 400 Care & Maintenance Your microscope has been engineered for a long and safe operational life with the least amount of maintenance required. In general, routine maintenance is limited to keeping the microscopes working parts lubricated and optics clean. Always cover the microscope with the provided dust cover when not in use. -
Page 15: Specification
MET 400 TECHNICAL SPECIFICATIONS SHEET 1. Illumination Built-in Incident illumination system Halogen Lamp 6V-30W. 2. Focusing mechanism Stage height adjustment mechanism Fine adjustment scale: 0.002mm per graduation; Fine adjustment stroke: 0.2mm per turn Total stroke: 20mm Co-axial coarse and fine focusing on ball drive 3. -
Page 16: Troubleshooting Guide
TROUBLESHOOTING GUIDE Under certain conditions, performance of the unit may be adversely affected by factors other than defects. If problems occur, please review the following list and take remedial action as needed. In case of any other problem which cannot be rectified as below, please contact the service agents. - Page 17 Fax: 510 991 9862 CA 94538 sales@laboamerica.com LABOMED and TCM 400 are registered trademarks of Labo America, Inc. With a policy of continuous development, Labo America, Inc. reserves the right to change design and specifications without prior notice. ISO 9001 : 2008 ©...
Need help?
Do you have a question about the MET 400 and is the answer not in the manual?
Questions and answers