Table of Contents
Advertisement
Quick Links
Model W1678
***IMPORTANT UPDATE***
Applies to Models Mfd. Since 02/24
and Owner's Manual Revised 01/24
Phone #: (360) 647-0802 • Tech Support: techsupport@shopfoxtools.com • Web: www.shopfoxtools.com
The following change was recently made since the manual was printed:
•
Conveyor motor has changed.
Aside from the information contained in this update, all other content in the owner's manual is
applicable and MUST be read and understood for your own safety.
IMPORTANT: Keep this update with the owner's manual for future reference. If you have any further
questions, contact our Technical Support.
New Conveyor Motor
Old Conveyor Motor
WARNING: NO PORTION OF THIS MANUAL MAY BE REPRODUCED IN ANY SHAPE OR FORM WITHOUT
#23096JP
READ THIS FIRST
COPYRIGHT © FEBRUARY, 2024 BY GRIZZLY INDUSTRIAL, INC.
THE WRITTEN APPROVAL OF GRIZZLY INDUSTRIAL, INC.
Revised Parts
39V2-1
39V2
Revised Parts List
REF
PART #
DESCRIPTION
39V2
X1678039V2
CONVEYOR MOTOR 1/3HP 220V 1-PH V2.02.24
39V2-1 X1678039V2-1 MOTOR BRUSH 2-PC SET
Revised Service
In SERVICE section of the manual, Replacing
Conveyor Motor Brushes on Page 48 no longer
applies.
Printed in Taiwan
Advertisement
Table of Contents

Related Manuals for Shop fox W1678


Summary of Contents for Shop fox W1678
- Page 1 READ THIS FIRST Model W1678 ***IMPORTANT UPDATE*** Applies to Models Mfd. Since 02/24 and Owner's Manual Revised 01/24 Phone #: (360) 647-0802 • Tech Support: techsupport@shopfoxtools.com • Web: www.shopfoxtools.com The following change was recently made since the manual was printed: •...
- Page 2 MODEL W1678 26" DOUBLE DRUM SANDER OWNER'S MANUAL (FOR MODELS MANUFACTURED SINCE 02/24) Phone: (360) 647-0802• Online Technical Support: techsupport@shopfoxtools.com COPYRIGHT © MAY, 2003 BY GRIZZLY INDUSTRIAL, INC., REVISED JANUARY, 2024 (JP) WARNING: NO PORTION OF THIS MANUAL MAY BE REPRODUCED IN ANY SHAPE OR FORM WITHOUT THE WRITTEN APPROVAL OF GRIZZLY INDUSTRIAL, INC.
- Page 3 This manual provides critical safety instructions on the proper setup, operation, maintenance, and service of this machine/tool. Save this document, refer to it often, and use it to instruct other operators. Failure to read, understand and follow the instructions in this manual may result in fire or serious personal injury—including amputation, electrocution, or death.
-
Page 4: Table Of Contents
Contents INTRODUCTION ........2 ACCESSORIES ........30 Woodstock Technical Support ....2 Drum Sander Accessories ...... 30 Controls & Components ......6 MAINTENANCE ........31 SAFETY ..........7 General .......... 31 Standard Machinery Safety Instructions ..7 Cleaning & Protecting ......31 Additional Safety for Drum Sanders ... -
Page 5: Introduction
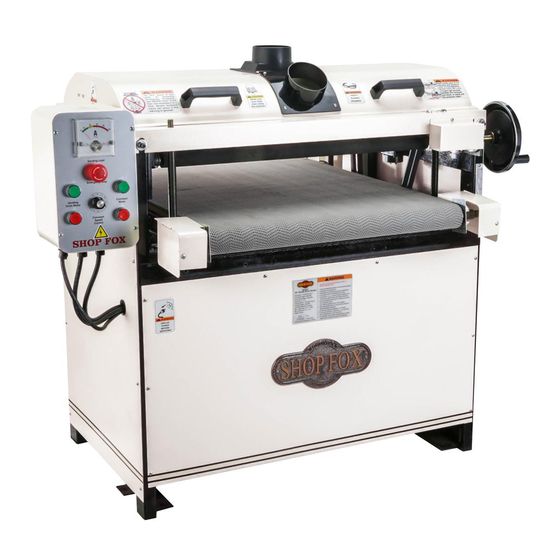
Model W1678 (For Machines Mfd. Since 02/24) INTRODUCTION Grizzly Technical Support This machine has been specially designed to provide many years of trouble-free service. Close attention to detail, ruggedly built parts and a rigid quality control program assure safe and reliable operation. - Page 6 Bearings..............Sealed & Permanently Lubricated Centrifugal Switch/Contacts Type..............External Feed Horsepower....................1/3 HP Phase....................Single‐Phase Amps......................2A Speed..................... 60 RPM Type....................Universal Power Transfer ................... Chain Drive Bearings..............Sealed & Permanently Lubricated Model W1678 Machine Specifications, Page 1 of 2...
- Page 7 Variable Speed Conveyor Industrial Rubber Conveyor Belt Similar to Wide Belt Sanders Amp/Load Meter Computer Balanced Drums Hook and Loop Sanding Belt Attachment Dual Sanding Drums Four Leadscrew Table Lifting and Lowering System Model W1678 Machine Specifications, Page 2 of 2...
- Page 8 Model W1678 (For Machines Mfd. Since 02/24) Identification Become familiar with the names and locations of the controls and features shown below to better understand the instructions in this manual. Rear Sanding Drum Front Sanding Drum 4" Dust Rear Sanding Drum...
-
Page 9: Controls & Components
Model W1678 (For Machines Mfd. Since 02/24) Controls & Components Refer to the Figures 1–2 and the following descriptions to become familiar with the basic controls and components of this machine. Understanding these items and how they work will help you understand the rest of the manual and stay safe when operating this machine. -
Page 10: Safety
Model W1678 (For Machines Mfd. Since 02/24) SAFETY SAFETY For Your Own Safety, Read Manual Before Operating Machine The purpose of safety symbols is to attract your attention to possible hazardous conditions. This manual uses a series of symbols and signal words intended to convey the level of importance of the safety messages. - Page 11 Model W1678 (For Machines Mfd. Since 02/24) WEARING PROPER APPAREL. Do not wear loose FORCING MACHINERY. Do not force machine. It clothing, gloves, neckties, or jewelry that can will do the job safer and better at the rate for become entangled in moving parts. Always which it was designed.
-
Page 12: Additional Safety For Drum Sanders
Model W1678 (For Machines Mfd. Since 02/24) Additional Safety for Drum Sanders Serious injury or death can occur from getting hands trapped between workpiece and conveyor table and being pulled into machine, or becoming entangled in rotating parts inside machine. -
Page 13: Electrical
Model W1678 (For Machines Mfd. Since 02/24) ELECTRICAL Circuit Requirements This machine must be connected to the correct size and type of power supply circuit, or fire or electrical damage may occur. Read through this section to determine if an The machine must be properly set up adequate power supply circuit is available. -
Page 14: Grounding Requirements
Model W1678 (For Machines Mfd. Since 02/24) Grounding Requirements This machine MUST be grounded. In the event of certain types of malfunctions or breakdowns, grounding provides a path of least resistance for electric current to travel—in The machine must be properly set up order to reduce the risk of electric shock. -
Page 15: Setup
Model W1678 (For Machines Mfd. Since 02/24) SETUP Unpacking This machine has been carefully packaged for safe transportation. If you notice the machine has been damaged during shipping, please contact your authorized This machine presents Shop Fox dealer immediately. serious... -
Page 16: Inventory
Model W1678 (For Machines Mfd. Since 02/24) Inventory The following is a list of items shipped with your machine. Before beginning setup, lay these items out and inventory them. Note: If you cannot find an item on this list, carefully check around/inside the machine and packaging materials. -
Page 17: Cleaning Machine
Model W1678 (For Machines Mfd. Since 02/24) Cleaning Machine To prevent corrosion during shipment and storage of your machine, the factory has coated the bare metal surfaces of your machine with a heavy-duty rust prevention compound. Gasoline and petroleum products have low flash... -
Page 18: Machine Placement
Model W1678 (For Machines Mfd. Since 02/24) Machine Placement Weight Load Physical Environment Refer to the Machine Specifications for the The physical environment where your machine is weight of your machine. Make sure that the operated is important for safe operation and the surface upon which the machine is placed will longevity of its components. -
Page 19: Lifting & Moving
Model W1678 (For Machines Mfd. Since 02/24) Lifting & Moving Use a forklift to lift the machine off the pallet and onto a suitable location. HEAVY LIFT! Review the ELECTRICAL section on Page 10 and Straining crushing Machine Placement on Page 15, then prepare a loca- injury may occur from tion for the machine. -
Page 20: Assembly
Model W1678 (For Machines Mfd. Since 02/24) Assembly Before beginning the assembly process, refer to Items Needed for Setup and gather everything you need. L-Bracket Ensure all parts have been properly cleaned of any (1 of 2) heavy-duty rust-preventative applied at the factory (if applicable). - Page 21 Model W1678 (For Machines Mfd. Since 02/24) 6. Slide micro-adjustment knob onto shaft and tighten set screw (see Figure 12); repeat for other side. Set Screw Figure 12. Location of rear drum micro- adjustment knob. 7. Apply ⁄ " foam tape around bottom perimeter of each dust port, then position on dust hood.
-
Page 22: Dust Collection
Model W1678 (For Machines Mfd. Since 02/24) Dust Collection Recommended CFM at Dust Port: ....400 CFM Do not confuse this CFM recommendation with the rating of the dust collector. To determine the CFM at the dust port, you must consider these variables: (1) CFM rating of... -
Page 23: Inspections & Adjustments
Model W1678 (For Machines Mfd. Since 02/24) Inspections & Adjustments The following list of adjustments were performed at the factory before your machine was shipped. Serious injury or death can result • Drum Alignment ........Page 35 from using this machine BEFORE •... - Page 24 Model W1678 (For Machines Mfd. Since 02/24) 5. Twist Emergency Stop button (B) clockwise until it pops out to reset switch (see Figure 16). 6. Press Sanding Drum Motor ON button (C) to start sanding drum motor. Sanding drums should run smoothly with little to no vibration or rubbing noises.
-
Page 25: Operations
Model W1678 (For Machines Mfd. Since 02/24) OPERATIONS General This machine will perform many types of operations that are beyond the scope of this manual. Many of these operations can be dangerous or deadly if performed incorrectly. The instructions in this section are written with the understanding that the operator has the necessary knowledge and skills to operate this machine. -
Page 26: Stock Inspection & Requirements
Model W1678 (For Machines Mfd. Since 02/24) 6. Feeds workpiece into sander by placing front • Foreign Objects: Tramp metal, nails, staples, end on infeed side of conveyor table and dirt, rocks and other foreign objects are supporting back end until workpiece engages often embedded in wood. -
Page 27: Choosing Sandpaper
80–100 Medium Removing planer rear. marks and initial finish sanding. The Model W1678 allows you to install a different 120–180 Fine Finish sanding. grit sandpaper on each drum. The front drum Figure 18. Abrasive group chart. should have a coarser grit than the rear. Usually this translates into combinations of successive group types. -
Page 28: Sanding Tips
Model W1678 (For Machines Mfd. Since 02/24) Sanding Tips • DO NOT edge sand boards. This can cause boards to kickback, causing serious personal injury. Edge sanding boards also can cause • Replace the sandpaper with a higher grit to damage to the conveyor belt and sandpaper. -
Page 29: Sanding
Model W1678 (For Machines Mfd. Since 02/24) Sanding To sand a workpiece, do these steps: 1. Adjust table height (refer to Setting Depth of Cut). 2. Make sure dust-collection hoses and collection DO NOT sand more than one board at system are secured and turned ON before starting a time. -
Page 30: Setting Conveyor Speed
Model W1678 (For Machines Mfd. Since 02/24) Setting Conveyor Speed The Conveyor Speed Control dial (see Figure 20) allows you to set the conveyor speed from 0–10 (0–20 FPM). The correct speed to use depends on the type of stock you are using (hardwood vs. -
Page 31: Installing/Replacing Sandpaper
Model W1678 (For Machines Mfd. Since 02/24) Installing/Replacing Sandpaper The model W1678 is designed to use 3" hook-and-loop sandpaper rolls. Items Needed Sandpaper Roll 3" X 197" ......1 Per Drum Straightedge 24" ..........1 Razor Knife ............1 Strapping Tape ⁄... -
Page 32: Cleaning Sandpaper
Model W1678 (For Machines Mfd. Since 02/24) Cleaning Sandpaper When sandpaper becomes clogged with sawdust and gum, it loses its effectiveness and begins to create more heat and will eventually fail. Regularly cleaning your sandpaper will help keep your machine running efficiently by reducing the amount of buildup. -
Page 33: Accessories
The following drum sander accessories may be available through your Grizzly Industrial, Inc. Wholesale Dealer. If you do not have a dealer in your area, these products are also available through online dealers. Please call or e-mail Shop Fox Customer Service to get a current listing of dealers at: 1-800-840-8420 or at wholesale@grizzly.com. -
Page 34: Maintenance
Lubricate worm gear, table height leadscrews, and sprockets (Page 33). Cleaning & Protecting Cleaning the Model W1678 is relatively easy. Vacuum excess sawdust, and wipe off the remaining dust with a dry cloth. If any resin has built up, use a resin dissolving cleaner to remove it. -
Page 35: Lubrication
Model W1678 (For Machines Mfd. Since 02/24) Lubrication An essential part of lubrication is cleaning the components before lubricating them. This step is critical because dust builds up on lubricated components, which makes them hard to move. Simply adding more grease to built-up grime will not result in smooth moving parts. - Page 36 Model W1678 (For Machines Mfd. Since 02/24) Worm Gear Lubrication Type ....T26419 or NLGI#2 Equivalent Worm Gear Lubrication Amount ......... Dab Lubrication Frequency ........ Monthly Items Needed Phillips Screwdriver #2 .........1 Soft Wire Brush ..........1 Mineral Spirits ........As Needed Shop Rag ............1...
- Page 37 Model W1678 (For Machines Mfd. Since 02/24) Leadscrews, Chain, and Sprockets Lubrication Type .....ISO 68 or Equivalent Light Oil Lubrication Amount ......... As Needed Lubrication Frequency ........ Monthly Items Needed Soft Wire Brush ..........1 Mineral Spirits ........As Needed Shop Rag ............1 Grease Gun ............1...
-
Page 38: Service
If this warning is ignored, serious personal injury may occur. Aligning Drums Sanding Drum For the Model W1678 to function properly, the sanding drums must be aligned in two directions: 1) perpendicular to feed direction (see Figure 30) and 2) parallel to the 90˚... - Page 39 Model W1678 (For Machines Mfd. Since 02/24) Adjusting Sanding Drums Perpendicular to Feed Direction Items Needed Measuring Tape ..........1 Wrench Open-End or Socket ⁄ " ......1 Small Hammer ...........1 Wooden Dowel 1" (or similar) .........1 To adjust sanding drums perpendicular to feed directions, do these steps: 1.
- Page 40 Model W1678 (For Machines Mfd. Since 02/24) 4. With wooden dowel and hammer, gently tap bearing block in direction it needs to move (see Figure 34). 5. Measure distances again and repeat as needed until drum is within ⁄ " or less of being parallel with front brace.
- Page 41 Model W1678 (For Machines Mfd. Since 02/24) Note: Sanding drum should touch gauge blocks and still be able to rotate with moderate force. Drum should touch both gauge blocks with equal resistance on both sides. — If drum is aligned equally on both gauges, no adjustment is necessary.
- Page 42 Model W1678 (For Machines Mfd. Since 02/24) 8. Lower table two full turns, then position gauge blocks under rear drum. 9. Slowly raise table to height referenced in Step 7. Note: If either gauge block touches sanding drum before reaching reference mark, rotate micro- adjustment knobs clockwise to raise rear sanding drum out of the way.
-
Page 43: Adjusting Pressure Roller Height & Tension
Model W1678 (For Machines Mfd. Since 02/24) Adjusting Pressure Roller Height & Tension Proper pressure on the workpiece helps avoid kickback and keeps the workpiece from slipping. However, as pressure increases on the workpiece, snipe also increases (some snipe is normal with all brands of drum sanders). - Page 44 Model W1678 (For Machines Mfd. Since 02/24) 4. Position gauge blocks to either side of conveyor belt and under all three pressure rollers, as shown in Figure 40. 5. Rotate handwheel clockwise to raise table until gauge blocks barely touch rear sanding drum.
-
Page 45: Adjusting Dust Scoop
Model W1678 (For Machines Mfd. Since 02/24) Adjusting Dust Scoop The Model W1678 features a dust scoop for each drum. The dust scoops direct the dust into the dust hood to reduce the amount of buildup that accumulates on the workpiece as it passes through the sander. -
Page 46: Adjusting Conveyor Belt Tension & Tracking
Model W1678 (For Machines Mfd. Since 02/24) Adjusting Conveyor Belt Tension & Tracking The conveyor belt tension and tracking adjustments are controlled by the adjustment bolts at each end of the front and rear conveyor rollers. If the conveyor belt slips or tracks to one side, it must be adjusted. -
Page 47: Adjusting/Replacing V-Belts
Model W1678 (For Machines Mfd. Since 02/24) Adjusting/Replacing V-Belts The sanding drums are driven by two V-belts. The belts must have proper tension for optimum power transfer. However, too much tension may cause premature bearing failure and/or damage to the motor. Proper tension is... - Page 48 Model W1678 (For Machines Mfd. Since 02/24) 4. Loosen (4) motor mount hex nuts (see Figure 50). DO NOT remove motor mount bolts or nuts! 5. Press down on motor to add tension to V-belts, then tighten motor mount hex nuts.
-
Page 49: Pulley Alignment
Model W1678 (For Machines Mfd. Since 02/24) Pulley Alignment Pulley alignment is another important factor in power transmission and belt life. The pulleys should be parallel to each other and in the same plane (coplanar) for optimum performance (see Figure 51). -
Page 50: Replacing Bearings
Model W1678 (For Machines Mfd. Since 02/24) Replacing Bearings The Model W1678 is designed for many years of reliable service. But after long periods of heavy use, it may be necessary to replace the pillow block bearings. Always replace both bearings of the same drum at the same time. -
Page 51: Replacing Conveyor Motor Brushes
Model W1678 (For Machines Mfd. Since 02/24) Replacing Conveyor Motor Brushes The Model W1678 is equipped with a universal motor that uses two carbon motor brushes to transmit electrical current inside the motor. These brushes are considered to be regular "wear items" or "consumables" that will need to be replaced during the life of the motor. -
Page 52: Troubleshooting
Model W1678 (For Machines Mfd. Since 02/24) Troubleshooting The following troubleshooting tables cover common problems that may occur with this machine. If you need replacement parts or additional troubleshooting help, contact our Technical Support. Note: Before contacting Tech Support, find the machine serial number and manufacture date, and if available, your original purchase receipt. - Page 53 Model W1678 (For Machines Mfd. Since 02/24) Motor & Electrical (Cont.) PROBLEM POSSIBLE CAUSE CORRECTIVE ACTION Machine stalls or 1. Workpiece material not suitable for machine. 1. Rotate Emergency Stop button to reset. Replace if is underpowered. at fault. 2. Sandpaper loaded with sawdust and gum.
- Page 54 Model W1678 (For Machines Mfd. Since 02/24) Operation (Cont.) PROBLEM POSSIBLE CAUSE CORRECTIVE ACTION 1. Properly tension V-belts (Page 44). Short V-belt lifes- 1. V-belts improperly tensioned. pan. 2. Pulleys not aligned correctly. 2. Align pulleys (Page 46). Conveyor belt 1.
- Page 55 Model W1678 (For Machines Mfd. Since 02/24) Operation (Cont.) PROBLEM POSSIBLE CAUSE CORRECTIVE ACTION Burn marks on 1. Incorrect sandpaper grit for operation. 1. Use correct sandpaper grit operation workpiece. (Page 24). 2. Excessive depth of cut or feed rate too slow.
-
Page 56: Electrical Safety Instructions
Model W1678 (For Machines Mfd. Since 02/24) Electrical Safety Instructions These pages are current at the time of printing. However, in the spirit of improvement, we may make changes to the electrical systems of future machines. Compare the manufacture date of your machine to the one stated in this manual, and study this section carefully. -
Page 57: Electrical Components
Model W1678 (For Machines Mfd. Since 02/24) Electrical Components Sanding Load Meter Emergency Circuit Stop Button Board Conveyor Motor Drum Motor ON Button ON Button Conveyor Motor Contactor Overload Relay Drum Motor Contactor Conveyor Speed Control Dial Conveyor Motor Drum Motor... -
Page 58: Wiring Diagram
Model W1678 (For Machines Mfd. Since 02/24) Wiring Diagram Back of Control Panel Control Panel Box Read Page 53 STOP Circuit Board Before Wiring Sanding Load Meter – FUSE 8A 250V Emergency Stop Button – Conveyor Speed Control Dial Conveyor Motor... -
Page 59: Parts
Model W1678 (For Machines Mfd. Since 02/24) PARTS Conveyor Table 74V2 74V2 74V2 74V2 39-2 39-1 39-3 -56-... -
Page 60: Conveyor Table Parts List
Model W1678 (For Machines Mfd. Since 02/24) Conveyor Table Parts List REF PART # DESCRIPTION REF PART # DESCRIPTION X1678001 SCALE X1678047 LOCK NUT 1/4-20 X1678002 TAP SCREW #8 X 3/8 X1678049 TABLE FRAME X1678003 KEY 5 X 5 X 20... -
Page 61: Drums & Rollers
Model W1678 (For Machines Mfd. Since 02/24) Drums & Rollers 137 136 -58-... -
Page 62: Drums & Rollers Parts List
Model W1678 (For Machines Mfd. Since 02/24) Drums & Rollers Parts List REF PART # DESCRIPTION REF PART # DESCRIPTION X1678052 SET SCREW 1/4-20 X 1/4 X1678120 BEVEL GEAR X1678070 PRESSURE ROLLER X1678121 SET SCREW 10-24 X 1/4 X1678071 SANDING DRUM... -
Page 63: Stand & Motor
Model W1678 (For Machines Mfd. Since 02/24) Stand & Motor 218 216 20-1 20-4 20-2 20-5 20-3 -60-... -
Page 64: Stand & Motor Parts List
Model W1678 (For Machines Mfd. Since 02/24) Stand & Motor Parts List REF PART # DESCRIPTION REF PART # DESCRIPTION X1678004 SIDE PANEL RIGHT X1678227 CAP SCREW 5/16-18 X 3/4 X1678005 SIDE PANEL LEFT X1678228 HEX NUT 5/16-18 X1678006 DRIVE SPROCKET 10T... -
Page 65: Control Panel & Handwheel
Model W1678 (For Machines Mfd. Since 02/24) Control Panel & Handwheel 300 301 344 321 348V2 -62-... -
Page 66: Control Panel & Handwheel Parts List
Model W1678 (For Machines Mfd. Since 02/24) Control Panel & Handwheel Parts List PART # DESCRIPTION PART # DESCRIPTION X1678222 CONTACTOR SDE MA-30 220V X1678317 LOCK WASHER #10 X1678223 ON SWITCH X1678318 HEX NUT 10-24 X1678224 OFF SWITCH X1678319 HEX BOLT 3/8-16 X 2... -
Page 67: Labels & Cosmetics
Model W1678 (For Machines Mfd. Since 02/24) Labels & Cosmetics 289V2 289V2 279V2 289V2 PART # DESCRIPTION PART # DESCRIPTION X1678272 SHOP FOX NAMEPLATE-MEDIUM X1678298 RESPIRATOR/GLASSES LABEL 279V2 X1678279V2 MACHINE ID LABEL V2.09.22 X1678340 ELECTRICITY LABEL X1678280 SANDER CONVEYOR PINCH LABEL... -
Page 68: Warranty
Grizzly Industrial, Inc. will repair, replace, or arrange for a dealer refund, at its expense and option, the Shop Fox machine or machine part proven to be defective for its designed and intended use, provided that the original owner returns the product prepaid to an authorized warranty or repair facility as designated by our Bellingham, Washington office with proof of their purchase of the product within two years, and provides Grizzly Industrial, Inc. - Page 69 High Quality Machines and Tools Grizzly Industrial carries thousands of products designed to meet the needs of today’s woodworkers and metalworkers. Ask your dealer about these fine products: ® WHOLESALE ONLY Phone: (360) 647-0802 Fax: (360) 671-3053 Toll Free Fax: (800) 647-8801 P.O.
Need help?
Do you have a question about the W1678 and is the answer not in the manual?
Questions and answers