Table of Contents
Advertisement
Quick Links
MODEL W1708
12" DISC SANDER
OWNER'S MANUAL
(FOR MODELS MANUFACTURED SINCE 10/07)
Phone: (360) 734-3482 • Online Technical Support: tech-support@shopfox.biz
COPYRIGHT © SEPTEMBER, 2003 BY WOODSTOCK INTERNATIONAL, INC. REVISED, OCTOBER, 2009 (BL)
WARNING: NO PORTION OF THIS MANUAL MAY BE REPRODUCED IN ANY SHAPE OR FORM WITHOUT
THE WRITTEN APPROVAL OF WOODSTOCK INTERNATIONAL, INC.
Printed in China
#5488EW
Advertisement
Table of Contents

Subscribe to Our Youtube Channel
Related Manuals for Shop fox W1708


Summary of Contents for Shop fox W1708
- Page 1 MODEL W1708 12" DISC SANDER OWNER'S MANUAL (FOR MODELS MANUFACTURED SINCE 10/07) Phone: (360) 734-3482 • Online Technical Support: tech-support@shopfox.biz COPYRIGHT © SEPTEMBER, 2003 BY WOODSTOCK INTERNATIONAL, INC. REVISED, OCTOBER, 2009 (BL) WARNING: NO PORTION OF THIS MANUAL MAY BE REPRODUCED IN ANY SHAPE OR FORM WITHOUT THE WRITTEN APPROVAL OF WOODSTOCK INTERNATIONAL, INC. Printed in China #5488EW...
-
Page 3: Table Of Contents
Contents INTRODUCTION ........2 ACCESSORIES ........20 Woodstock Technical Support ....2 Disc Sander Accessories ....... 20 Specifications ........2 MAINTENANCE ........21 SAFETY ..........4 General .......... 21 Standard Machinery Safety ..... 4 Cleaning ......... 21 Additional Safety for Disc Sanders .... 6 Unpainted Cast Iron ...... -
Page 4: Introduction
W1708 Owner's Manual (Mfg. 10/07+) INTRODUCTION Woodstock Technical Support This machine has been specially designed to provide many years of trouble-free service. Close attention to detail, ruggedly built parts and a rigid quality control program assure safe and reliable operation. -
Page 5: Controls And Features
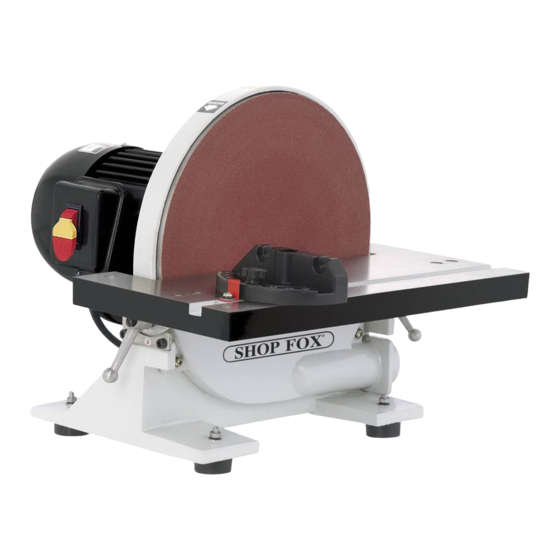
W1708 Owner's Manual (Mfg. After 10/07+) Controls and Features Precision-Ground Cast Disc Guard Aluminum Disc (Sanding Disc Attached) Motor Miter Gauge Work Table ON/OFF Switch Base Table Lock Handle Dust Port Foot To reduce the risk of serious injury when using... -
Page 6: Safety
W1708 Owner's Manual (Mfg. 10/07+) Standard SAFETY Machinery Safety... - Page 7 W1708 Owner's Manual (Mfg. 10/07+)
-
Page 8: Additional Safety For Disc Sanders
W1708 Owner's Manual (Mfg. 10/07+) Additional Safety for Disc Sanders READ and understand this USE this and other machinery with caution entire manual before using and respect. Always consider safety first, this machine. Serious per- as it applies to your individual working sonal injury may occur conditions. -
Page 9: Electrical
Figure 1, to connect the machine to power. Run" portion of this manual. 110V Operation The Model W1708 is wired for 110V operation. The power supply circuit used for this machine MUST be grounded and rated for the amperage given below. Never replace... -
Page 10: Setup
Shop Fox dealer immediately. Inventory The following is a description of the main components shipped with the Model W1708. Lay the components out to inventory them. Note: If you can't find an item on this list, check the mounting location on the machine or examine the packaging materials carefully. -
Page 11: Cleanup
W1708 Owner's Manual (Mfg. 10/07+) Cleanup The unpainted surfaces of your machine are coated with a heavy-duty rust preventative that prevents corrosion during shipment and storage. ALWAYS work in well- ventilated areas far from This rust preventative has been your machine's possible ignition sources close ally and guardian since it left the factory. -
Page 12: Site Considerations
W1708 Owner's Manual (Mfg. 10/07+) Site Considerations Weight Load Physical Environment Refer to Specifications on Page 2 for the weight of your The physical environment where your machine. Make sure that the surface upon which the machine is operated is important for... -
Page 13: Mounting
Figure 5. Example of a direct mount. Do not confuse this CFM recommendation with the rating The W1708 Model features a 2" dust port of the dust collector. To determine the CFM at the that can be connected to a dust collector... -
Page 14: Test Run
W1708 Owner's Manual (Mfg. 10/07+) Test Run Test run your machine to make sure it runs properly and is ready for regular operation. The test run consists of verifying the following: 1) The motor powers up and runs correctly, and 2) the safety disabling mechanism on the switch works correctly. -
Page 15: Operations
W1708 Owner's Manual (Mfg. 10/07+) OPERATIONS General This machine will perform many types of operations that are beyond the scope of this manual. Many of these operations can be dangerous or deadly if performed incorrectly. The instructions in this section are written with the understanding that the operator has the necessary knowledge and skills to operate this machine. -
Page 16: Basic Controls
W1708 Owner's Manual (Mfg. 10/07+) Basic Controls Refer to Figure 8 and the following descriptions to become familiar with the basic controls of this machine. Switch Disabling Key Paddle Switch: Turns the motor ON when flipped up; Miter Gauge turns motor OFF when pressed down. -
Page 17: Sanding Tips
W1708 Owner's Manual (Mfg. 10/07+) 6. Wears safety glasses and a respirator, and locates push sticks if needed. 7. Starts the machine and dust collector. 8. Holds the workpiece firmly and flatly against both the table and miter, then pushes the workpiece along the sanding disc. -
Page 18: Choosing Sandpaper
W1708 Owner's Manual (Mfg. 10/07+) Choosing Sandpaper Stock Inspection and Requirements The Model W1708 uses a 12" adhesive-backed sanding disc. Some workpieces are not safe or may require modification before they are safe to sand. There are many types of sanding discs to Before sanding, inspect all workpieces for the choose from. -
Page 19: Attaching Sandpaper
W1708 Owner's Manual (Mfg. 10/07+) Attaching Sandpaper The Model W1708 sander accepts 12" diameter adhesive- backed sanding discs. These are available in a variety of grits (refer to Page 20). The sanding disc sticks to the surface of the cast iron disc platen, using the pressure sensitive adhesive backing (PSA). -
Page 20: Disc Sanding
W1708 Owner's Manual (Mfg. 10/07+) Disc Sanding To perform 90˚disc sanding, do these steps: 1. Set the tilt angle of the table to 0˚. The angle can be set with the angle gauge on the sander or with a protractor for greater accuracy. 2. Set the miter gauge to 90˚, then place one face of the workpiece firmly against the miter gauge. -
Page 21: Angle Sanding
W1708 Owner's Manual (Mfg. 10/07+) Angle Sanding To perform angle sanding operations, do these steps: 1. Loosen the handles securing the table, use the angle gauge to set the tilt angle, then tighten the table lock handles. 2. Turn the sander ON. -
Page 22: Accessories
W1306 2" x 2" x 12" W1307 The Shop Fox Deluxe Celing Mounted 3-Speed Air Cleaner, Model W1690, is an essential machine for any shop creating dust. This machine filters out tiny dust particles that can raise big health concerns. -
Page 23: Maintenance
Cleaning Lubrication Cleaning the Model W1708 is easy. Vacuum excess wood chips and sawdust, and wipe off the remaining dust with a dry cloth. If any resin has built up, use a resin dissolving Since all bearings are sealed and cleaner to remove it. -
Page 24: Service
W1708 Owner's Manual (Mfg. 10/07+) SERVICE Troubleshooting This section covers the most common problems and corrections with this type of machine. WARNING! DO NOT make any adjustments until power is disconnected and moving parts have come to a com- plete stop! If you require additional machine service not included in this section, please contact Woodstock International Technical Support at (360) 734-3482 or send e-mail to: tech-support@shopfox.biz. - Page 25 W1708 Owner's Manual (Mfg. 10/07+) PROBLEM POSSIBLE CAUSE CORRECTIVE ACTION Machine stalls or slows 1. Too much pressure when feeding 1. Reduce pressure when feeding workpiece. when operating. workpiece 2. Workpiece is warped. 2. Straighten workpiece or use a different one.
-
Page 26: Table/Disc Parallelism
W1708 Owner's Manual (Mfg. 10/07+) Table/Disc Parallelism The edge of the table must be parallel with the face of the sanding disc, and there should be a ⁄ '' gap Flat between the two. This gap should be large enough so that... -
Page 27: Miter Gauge Calibration
W1708 Owner's Manual (Mfg. 10/07+) Miter Gauge Calibration At 90˚ the miter gauge should be perpendicular to the face of the wheel when it is mounted in the table slot. If not, follow this procedure. To calibrate the miter gauge, do these steps: 1. DISCONNECT MACHINE FROM POWER! 2. Use a try square or machinist’s square with one edge against the face of the miter gauge and the other against the disc face, as shown in Figure 16. -
Page 28: Table Tilt Calibration
W1708 Owner's Manual (Mfg. 10/07+) Table Tilt Calibration When the table tilt is set to 0˚, the table should be positioned perpendicular to the sanding disc face. If not follow this procedure. To calibrate the table tilt, do these steps: 1. DISCONNECT MACHINE FROM POWER! 2. Using a try square or machinist’s square, set one edge on the table surface and the other against the face of the disc, as shown in Figure 17. -
Page 29: Electrical Safety Instructions
W1708 Owner's Manual (Mfg. 10/07+) Electrical Safety Instructions These pages are current at the time of printing. However, in the spirit of improvement, we may make changes to the electrical systems of future machines. Study this diagram carefully. If you notice differences between your machine and these wiring diagrams, call Woodstock International Technical Support at (360) 734-3482. -
Page 30: Wiring Diagram
W1708 Owner's Manual (Mfg. 10/07+) Wiring Diagram NOTICE This motor wiring diagram is current at the time of printing; however, any wiring dia- gram on the motor will supersede this and should be used instead when rewiring your motor. Read... -
Page 31: Parts
W1708 Owner's Manual (Mfg. 10/07+) PARTS Main Breakdown -29-... -
Page 32: Main Parts List
W1708 Owner's Manual (Mfg. 10/07+) Main Parts List PART # DESCRIPTION PART # DESCRIPTION X1708001 SHOP FOX LOGO LABEL X1708022 COMPLETE MITER GAUGE XLABEL-12 READ MANUAL LABEL 22-1 X1708022-1 MITER GAUGE BODY XLABEL-11 SAFETY GLASSES LABEL 22-2 X1708022-2 GAUGE SLIDE... - Page 33 W1708 12" Disc Sander...
- Page 34 FOLD ALONG DOTTED LINE Place Stamp Here FOLD ALONG DOTTED LINE TAPE ALONG EDGES--PLEASE DO NOT STAPLE...
-
Page 35: Warranty
WARRANTY...
Need help?
Do you have a question about the W1708 and is the answer not in the manual?
Questions and answers