Table of Contents
Advertisement
Quick Links
Advertisement
Table of Contents

Related Manuals for Kemppi Flexlite GXe Series


Summary of Contents for Kemppi Flexlite GXe Series
- Page 1 Flexlite GXe Operating manual - EN Flexlite GXe © Kemppi 1922260 / 2343...
-
Page 2: Table Of Contents
6.2 Technical data: Flexlite GXe 300A (gas-cooled) 6.3 Technical data: Flexlite GXe 400A (gas-cooled) 6.4 Technical data: Flexlite GXe 300A (water-cooled) 6.5 Technical data: Flexlite GXe 400A (water-cooled) 6.6 Technical data: Flexlite GXe 500A (water-cooled) 6.7 Component selection 7. Ordering information © Kemppi 1922260 / 2343... -
Page 3: General
Operating manual - EN 1. GENERAL These instructions describe the use of Kemppi's Flexlite GXe MIG welding torches. Flexlite GXe welding torches are designed for professional manual welding. Flexlite GXe range covers both water-cooled (W) and gas-cooled (G) models for MIG welding. Flexlite GXe welding torches are available in model series 5 and 8 – both incorporating Euro welding connectors. - Page 4 While every effort has been made to ensure that the information contained in this guide is accurate and com- plete, no liability can be accepted for any errors or omissions. Kemppi reserves the right to change the spe- cification of the product described at any time without prior notice. Do not copy, record, reproduce or transmit the contents of this guide without prior permission from Kemppi.
-
Page 5: About Equipment
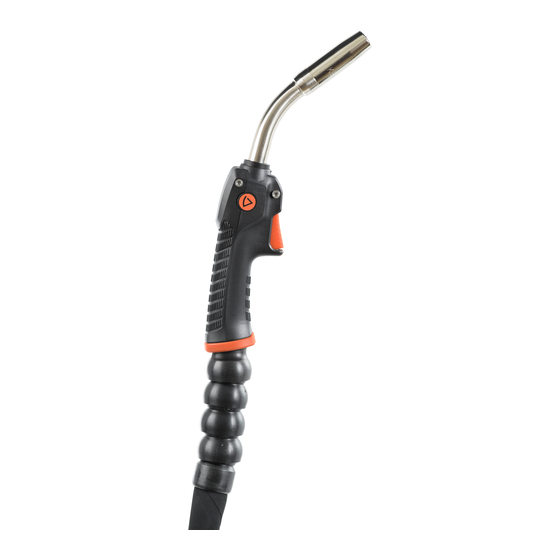
Trigger switch Cover plate or torch remote >> Cover plate covers the handle if a welding torch remote is not installed (Flexlite GXe series 5 models). For more information on the torch remotes, refer to "Installing torch remote" on page 9. - Page 6 Device-related information or a web link to such information may be found in the form of a QR code on the device. The code can be read, for example, with a mobile device camera and a QR code application. © Kemppi 1922260 / 2343...
-
Page 7: Installation
Before installation and use Ensure compliance with your local and national safety requirements regarding the installation and use of high voltage units. Check the contents of the packages and make sure the parts are not damaged. © Kemppi 1922260 / 2343... -
Page 8: Assembling Torch
Attach the contact tip adapter and hand-tighten it firmly in place. It is important to tighten the adapter properly to enable a tight connection of the contact tip to the torch. Attach the contact tip and secure it with spanner. Attach the gas nozzle and hand-tighten it firmly in place. © Kemppi 1922260 / 2343... -
Page 9: Installing Torch Remote
Operating manual - EN 3.2 Installing torch remote The Flexlite GXe series 5 welding torch remote (GRe50) is available as an optional accessory. GRe50 is not compatible with series 8 GXe welding torches. With the Flexlite GXe series 8 welding torches the torch remote GRe80 is delivered with the welding torch. Before welding, the temporary protection plate must be removed from the welding torch and the torch remote installed. - Page 10 Flexlite GXe Operating manual - EN Secure the remote control cover in place with the screws from the sides. © Kemppi 1922260 / 2343...
-
Page 11: Connecting Torch
Make sure to connect the coolant hoses to the correct hose connectors. If the connections cross, the welding torch may overheat. Flexlite GXe series 8 welding torches only: Connect the control cable to your X5 FastMig or Master M (350 models) welding equipment's control connector. -
Page 12: Installing And Replacing Wire Liner
The visual details may vary slightly between different welding torch models. The method is the same for both gas- and water- cooled welding torches. Straighten the welding torch cable. At the wire feeder end of the cable, remove the wire liner's sleeve nut. © Kemppi 1922260 / 2343... - Page 13 To ensure that the wire liner is in the correct position, temporarily remove the welding torch contact tip. For more information on the contact tip, refer to "About equipment" on page 5 and "Assembling torch" on page 8. © Kemppi 1922260 / 2343...
- Page 14 Using carpet knife, cut the wire liner flush with the sleeve nut end. Insert the retainer cone onto the wire liner and push in place. Ensure that the wire liner goes all the way into the tip of the retainer cone. © Kemppi 1922260 / 2343...
-
Page 15: Replacing Steel Wire Liner
The visual details may vary slightly between different welding torch models. The method is the same for both gas- and water- cooled welding torches. Straighten the welding torch cable. At the wire feeder end of the cable, remove the wire liner's sleeve nut. © Kemppi 1922260 / 2343... - Page 16 To ensure that the wire liner is in the correct position, temporarily remove the welding torch contact tip. For more information on the contact tip, refer to "About equipment" on page 5 and "Assembling torch" on page 8. © Kemppi 1922260 / 2343...
- Page 17 Using side cutting pliers, cut the wire liner flush with sleeve nut end. File the end of the wire liner. Don't leave any rough, inward edges that could potentially damage the filler wire. Strip the end of the wire liner for approximately 10...20 mm. © Kemppi 1922260 / 2343...
- Page 18 Insert the retainer cone onto the wire liner and push it in place. Ensure that the wire liner goes all the way into the tip of the retainer cone. Place the sleeve nut on the wire liner and secure it in place by tightening it to 5 Nm torque. © Kemppi 1922260 / 2343...
-
Page 19: Installing Additional Gun Handle And Heat Protector (Optional)
Keeping the bottom of the grip handle pointing forward, fit the inside grooves of the grip handle over the screws on the torch. Pull the handle backward to lock it in position. To remove the grip handle, press the unlock button in the grip handle rear: © Kemppi 1922260 / 2343... - Page 20 Place the heat protector's top fixing heads into the screw ends on both sides of the welding torch body. Push the bottom of the heat protector towards the handle so that the protector clicks in place. © Kemppi 1922260 / 2343...
-
Page 21: Operation
"Using torch remote GRe80 (series 8)" on page 23 With the gas-cooled Flexlite GXe welding torches (G-models), the neck direction can be adjusted (360°) by turning it. For more information on component selection and availability, refer to "Component selection" on page 42. © Kemppi 1922260 / 2343... -
Page 22: Using Torch Remote Gre50 (Series 5)
By default, the roller switch adjustment is stepwise according to the number values on the roller. The adjustment feel of the roller can be changed to stepless by turning the screw under the roller switch. This requires removing the roller switch temporarily. © Kemppi 1922260 / 2343... -
Page 23: Using Torch Remote Gre80 (Series 8)
When the parameter is adjusted with the remote and the parameter value doesn't reflect the one saved on the selected memory channel anymore, this is indicated on the display by showing only the memory channel number without the channel box around it: © Kemppi 1922260 / 2343... - Page 24 Fine tuning view: Depending on the welding process used, voltage or welding process specific parameter is fine- tuned by pressing the +/- buttons. Long press of the +/- button scrolls the parameter values faster. Long press of the right arrow button switches between different parameter sets, as applicable. © Kemppi 1922260 / 2343...
-
Page 25: Maintenance
• Check regularly that all the components are tightly fastened. • Check that the current transfer surface on the Kemppi torch adapter is clean and unscratched, and the connector pins are straight and undamaged. • Check the protective hose on the cable for damage. -
Page 26: Troubleshooting
The torch neck overheats • Make sure you are using original Kemppi consumable and spare parts. Incorrect spare part materials may cause the overheating of the neck. © Kemppi 1922260 / 2343... - Page 27 • Check the welding parameter values and welding procedure. • Check the gas type and flow. • Check the polarity of the torch/electrode. • Check that the filler wire is correct for the current application. © Kemppi 1922260 / 2343...
-
Page 28: Disposal
The owner of the equip- ment is obliged to deliver a decommissioned unit to a regional collection center, as per the instructions of local author- ities or a Kemppi representative. By applying these European Directives you improve the environment and human health. -
Page 29: Technical Data
"Technical data: Flexlite GXe 300A (gas-cooled)" on page 32 "Technical data: Flexlite GXe 400A (gas-cooled)" on page 34 "Technical data: Flexlite GXe 300A (water-cooled)" on page 36 "Technical data: Flexlite GXe 400A (water-cooled)" on page 38 "Technical data: Flexlite GXe 500A (water-cooled)" on page 40 © Kemppi 1922260 / 2343... -
Page 30: Technical Data: Flexlite Gxe 200A (Gas-Cooled)
Storage temperature range -40°C…+60°C Gun handle Rotating neck Changeable neck Neck dimensions: Length x (mm) ( see figure below ) Height y (mm) ( see figure below ) Neck angle ɑ (°) ( see figure below ) © Kemppi 1922260 / 2343... - Page 31 Flexlite GXe Operating manual - EN Standards IEC 60974-7 Torch length (m) 3.5 / 5 * Measured using the longest torch length available. Neck dimensions, G-models: Neck dimensions, MN-models: © Kemppi 1922260 / 2343...
-
Page 32: Technical Data: Flexlite Gxe 300A (Gas-Cooled)
-40°C…+60°C -40°C…+60°C Gun handle Rotating neck Changeable neck Neck dimensions: Length x (mm) ( see figure below ) Height y (mm) ( see figure below ) Neck angle ɑ (°) ( see figure below ) © Kemppi 1922260 / 2343... - Page 33 Flexlite GXe Operating manual - EN Standards IEC 60974-7 IEC 60974-7 Torch length (m) 3.5 / 5 3.5 / 5 * Measured using the longest torch length available. Neck dimensions, G-models: Neck dimensions, MN-models: © Kemppi 1922260 / 2343...
-
Page 34: Technical Data: Flexlite Gxe 400A (Gas-Cooled)
-40°C…+60°C -40°C…+60°C Gun handle Rotating neck Changeable neck Neck dimensions: Length x (mm) ( see figure below ) Height y (mm) ( see figure below ) Neck angle ɑ (°) ( see figure below ) © Kemppi 1922260 / 2343... - Page 35 Flexlite GXe Operating manual - EN Standards IEC 60974-7 IEC 60974-7 Torch length (m) 3.5 / 5 3.5 / 5 * Measured using the longest torch length available. Neck dimensions, G-models: Neck dimensions, MN-models: © Kemppi 1922260 / 2343...
-
Page 36: Technical Data: Flexlite Gxe 300A (Water-Cooled)
-40°C…+60°C -40°C…+60°C Gun handle Rotating neck Changeable neck Neck dimensions: Length x (mm) ( see figure below ) Height y (mm) ( see figure below ) Neck angle ɑ (°) ( see figure below ) © Kemppi 1922260 / 2343... - Page 37 Flexlite GXe Operating manual - EN Standards IEC 60974-7 IEC 60974-7 Torch length (m) 3.5 / 5 3.5 / 5 * Measured using the longest torch length available. Neck dimensions, W-models: © Kemppi 1922260 / 2343...
-
Page 38: Technical Data: Flexlite Gxe 400A (Water-Cooled)
-40°C…+60°C -40°C…+60°C Gun handle Rotating neck Changeable neck Neck dimensions: Length x (mm) ( see figure below ) Height y (mm) ( see figure below ) Neck angle ɑ (°) ( see figure below ) © Kemppi 1922260 / 2343... - Page 39 Flexlite GXe Operating manual - EN Standards IEC 60974-7 IEC 60974-7 Torch length (m) 3.5 / 5 3.5 / 5 * Measured using the longest torch length available. Neck dimensions, W-models: © Kemppi 1922260 / 2343...
-
Page 40: Technical Data: Flexlite Gxe 500A (Water-Cooled)
-40°C…+60°C -40°C…+60°C Gun handle Rotating neck Changeable neck Neck dimensions: Length x (mm) ( see figure below ) Height y (mm) ( see figure below ) Neck angle ɑ (°) ( see figure below ) © Kemppi 1922260 / 2343... - Page 41 Flexlite GXe Operating manual - EN Standards IEC 60974-7 IEC 60974-7 Torch length (m) 3.5 / 5 3.5 / 5 * Measured using the longest torch length available. Neck dimensions, W-models: © Kemppi 1922260 / 2343...
-
Page 42: Component Selection
The markings in the gas nozzle specification stand for: OD = outer diameter (at the widest point), D = diameter (inner diameter of the gas nozzle tip), L = length, HD = heavy-duty. In the contact tip specification: L+ = Life+ contact tip with longer life time. © Kemppi 1922260 / 2343... -
Page 43: Ordering Information
Flexlite GXe Operating manual - EN 7. ORDERING INFORMATION For Flexlite GXe ordering information and optional accessories, refer to Kemppi.com. © Kemppi 1922260 / 2343...
Need help?
Do you have a question about the Flexlite GXe Series and is the answer not in the manual?
Questions and answers