Polycom SoundStation IP 6000 User Manual
Hide thumbs
Also See for SoundStation IP 6000:
- User manual (100 pages) ,
- Quick start manual (19 pages) ,
- Quick reference manual (8 pages)
Table of Contents
Advertisement
Quick Links
Advertisement
Table of Contents

Subscribe to Our Youtube Channel
Related Manuals for Polycom SoundStation IP 6000


Summary of Contents for Polycom SoundStation IP 6000
- Page 1 Polycom SoundStation ® ® IP 6000 Phone User Guide Version 1...
-
Page 2: Table Of Contents
Contents Table of Contents Getting Started with Your Phone ................3 Setting Up the Phone ....................... 3 Features of the Phone ......................8 Understanding Line and Call Icons ..................11 Navigating Menus and Entering Data ................. 12 Customizing Your Phone ................. 12 Configuring Basic Settings .................... - Page 3 Access to Screens and Systems ..................... 62 Calling ............................ 63 Displays ..........................64 Audio ............................64 Overall Functioning ........................ 65 Testing Phone Hardware ....................... 65 Investigating Phone Warnings ....................66 Safety Notices ..................67 ® End-User License Agreement for Polycom Software ......73...
-
Page 4: Setting Up The Phone
Before you use your phone, you or your system administrator will have to register it. For detailed information on how to register your phone after you install it, see Registering Standalone SoundPoint IP, SoundStation IP, and Polycom VVX 1500 Phones (Quick Tip 44011), available from the Technical Notifications &... - Page 5 Power over Ethernet Power over Ethernet is the default connection for your phone. AC power adapters are not included in the PoE package. If you require one, see your system administrator. The following figure shows how to connect your phone to the network using a PoE source. 25-foot Network Cable To connect the phone using a PoE source: 1.
-
Page 6: Getting Started With Your Phone
AC Power To connect your phone to the network using AC power, make sure you have the optional AC Power Kit. The AC Power Kit contains a Power Adapter, Regional Power Cord, and a Power Insertion Cable. The following figure shows how to connect your phone to the network using optional AC power. Power Insertion Cable 25-foot Network Cable Power Adapter... - Page 7 Connecting Optional Extension Microphones to Your Conference Phone You can connect extension microphones to expand the room coverage of your conference phone. To connect extension microphones to your phone, you will need the optional External Microphone Kit, which contains two extension microphones. Connect the free end of the optional extension microphone cable to one of the microphone connectors on the phone, as shown next.
- Page 8 Connecting an Optional Polycom® Wireless Lapel Microphone to Your Conference Phone You can connect a Polycom® Wireless Lapel Microphone to your conference phone so that a person can roam around the conference room and still be heard clearly. The wireless lapel microphone connects to your conference phone’s 2.5mm connection port. The 2.5mm...
-
Page 9: Features Of The Phone
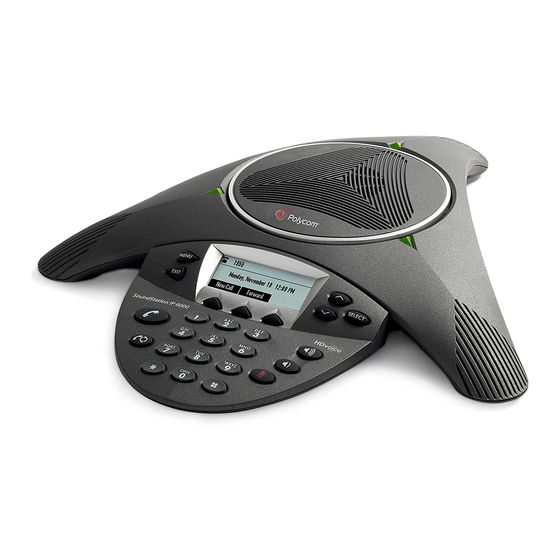
Features of the Phone The following figure shows the primary hardware features of your phone console. Feature Description Speaker Allows for ringer and hands-free audio output. Microphones Provide 360 coverage by three internal microphones. LED Indicators Indicate phone and call status through three bi- color LEDs. - Page 10 The following figure shows the primary key buttons, controls, and indicators on your phone console: Item Description Select key Allows you to: • Select a field of displayed data • Toggle features on or off Scroll keys Allow you to: •...
- Page 11 Item Description Mute key Toggles the microphone on or off during a conversation by doing the following: • Stopping local audio from being heard at the far end of the call • Allowing local audio to be heard at the far end of the call Dial pad keys Contain 10 digits, 26 alphabetic characters, and...
-
Page 12: Understanding Line And Call Icons
Understanding Line and Call Icons Icon Line or Call State Description Active call using A call is in progress using Polycom HD ® Voice. The active call icons merge into one Polycom icon on the phone screen. The following Voice™ technology... -
Page 13: Navigating Menus And Entering Data
Icon Line or Call State Description Ringing The phone is ringing. Unregistered Line The phone is unable to place and receive calls. Message You have a new message. See Using Voice Mail Using Instant Messaging. Navigating Menus and Entering Data To navigate menus and enter data, follow these tips: After 20 seconds of inactivity, the menu system automatically exits to the idle screen unless an edit session is in progress. - Page 14 If you want to... Then do this... Select a menu item Do one of the following: • Scroll to the menu item, and then press • Press the dial pad key that corresponds to the item in the numbered menu list. For example, to select the second item in a menu, press 2.
-
Page 15: Customizing Your Phone
Customizing Your Phone You can customize your SoundStation IP 6000 conference phone by adjusting certain settings, including language, volume, time and date, display contrast, backlight intensity, and ring type. You can also add contacts to the phone’s local Contact Directory. -
Page 16: Updating The Time And Date Display
Updating the Language The phone supports many languages. English (Internal) is the default language that displays. To change the language: 1. Press , and then select Settings > Basic > Preferences > Language. The Language screen displays. 2. Scroll to the language you want, and then press The text on the screen changes to the language that you selected. - Page 17 To update the time and date display: 1. Press , and then select Settings > Basic > Preferences > Time and Date. The Time and Date screen displays. 1. Do one of the following: — To change the date format, press —...
- Page 18 To change the order of the time and date display: 1. Press , and then select Settings > Basic > Preferences > 2. Time and Date > Clock Order. The Clock Order screen displays. 3. Scroll to the clock order you want, and then press .
- Page 19 Updating the Display Contrast You can set how light or dark the screen appears. To adjust the contrast on the phone screen: 1. Press , and then select Settings > Basic > Contrast. The Contrast screen displays. 2. Press the Up or Down soft keys to increase or decrease the display contrast. 3.
- Page 20 Updating the Backlight (continued) When you change the Maximum Intensity, you modify the entire backlight intensity scale. For example, if you decrease the Maximum Intensity, the low, medium, and high levels for both Backlight On and Backlight Idle intensities decrease. The backlight automatically turns on with any phone activity.
- Page 21 Updating the Ring Tone You can select from many different ring tones to distinguish your phone from your neighbor’s. You can also set distinctive ring tones for contacts in your local directory so you can identify callers when your phone rings. Selecting a Ring Tone You can choose a unique ring tone for your phone to identify it when it rings.
-
Page 22: Adjusting The Speaker And Ringer Volume
To set a distinctive ring tone for a local contact: 1. Press , and then select Features > Contact Directory. The Directory screen displays. 2. Scroll to the contact for whom you want to assign a distinctive ring tone. 3. Press the Edit soft key. The Edit Contact screen displays. -
Page 23: Using Call Lists
Using Call Lists Your phone maintains lists of missed, received and placed calls. Each list can hold up to 100 entries. If you miss a call, the idle screen will display a message indicating the number of missed calls you have. To view information about the missed call, view your Missed Calls list (see Viewing Call Lists). - Page 24 Managing Call Lists You can clear all the records in a call list, or just one record. You can also choose a record in a list and return the call, store the call details in your local Contact Directory, or view detailed information about the particular call.
- Page 25 The following figure shows a Placed Calls list. To manage your call list (press the More soft key to view all these options): — To return the call, press the Dial soft key. — To edit the phone number (if necessary) before you dial the number or store the call details in your Contact Directory, press the Edit soft key.
-
Page 26: Managing Contacts
Managing Contacts You can store a large number of contacts in your phone’s local Contact Directory. Contact your system administrator for the exact number. You can dial and search for contacts in this directory. You may be able to add, edit, and delete contacts. Contact your system administrator to see if you have read-only access to your local Contact Directory, or if you can update it. - Page 27 Accessing Your Corporate Directory When you access Corporate Directory, a search screen displays so you can search for a specific contact. You can perform a quick search or an advanced search. Each time you access Corporate Directory, a blank search screen displays, unless you enable your phone to remember the last search you performed or the last person you selected.
- Page 28 Adding Contacts Manually You can update your local Contact Directory manually, instead of importing contact information from a call list or a Corporate Directory. To add a contact manually: 1. Press , and then select Features > Contact Directory. The Directory screen displays. 2.
- Page 29 To add a contact manually (continued): — (Optional.) Update the Speed Dial Index number. The speed dial index number is automatically assigned to the next available index value, up to a maximum value of 99. You can assign any unused speed dial index number from 1 to 99. If you assign a speed dial index number that is already taken, the message “Speed dial index already exists”...
- Page 30 To add a contact manually (continued): — (Optional.) Change the Auto Reject and Auto Divert settings. If you set the Auto Reject field to enabled, each time the contact calls, the call will be directed to your voice mail system (if a voice mail system is set up). If you set the Auto Divert field to enabled, each time the contact calls, the call will be directed to a third party you specify in the Divert Contact field.
- Page 31 Adding Contacts from Call Lists You can save call information from a call list to your local Contact Directory. To add a contact to the local Contact Directory from a call list: 1. Do one of the following: — To select a call list, press , and then select Features >...
- Page 32 Searching for Contacts You can search for contacts in your local Contact Directory. Searching for Contacts in Your Local Contact Directory Search for a contact by scrolling through the directory, or entering specific search criteria. To search for a contact in the local Contact Directory: 1.
- Page 33 Updating Contacts in Your Local Contact Directory You can update contact information for contacts in your local Contact Directory. You cannot update information for contacts in your Corporate Directory. To update a contact in your local Contact Directory: 1. Press , and then select Features >...
- Page 34 Deleting Contacts from Your Local Contact Directory You can delete contacts from your local Contact Directory, but not from your Corporate Directory. To delete a contact from the local Contact Directory: 1. Press , and then select Features > Contact Directory. 2.
-
Page 35: Managing Incoming Calls
Managing Incoming Calls You can manage incoming calls from the contacts in your Contact Directory by doing the following: Setting up a distinctive ring tone for a contact. • Rejecting calls from a particular contact by sending the call to your voice mail system. (If you do •... - Page 36 2. Scroll to the contact. Or, search for the contact (see Searching for Contacts in Your Local Contact Directory). To scroll through a list of contacts, use the * key to Page Up and the # key to Page Down. 3.
- Page 37 Diverting Calls You can customize your phone so that incoming calls from a particular party are transferred directly to a third party. To divert incoming calls from a contact to a third party: 1. Press , and then select Features > Contact Directory. The Directory screen displays. 2.
-
Page 38: Understanding Shared Lines
Understanding Shared Lines Shared lines is an optional feature that your system administrator sets up. Your system may not support it. For more information, contact your system administrator. If two phones share a line, an incoming call to one number will cause both phones to ring. The call can be answered by either phone, but not both. -
Page 39: Using The Basic Features Of Your Phone
Using the Basic Features of Your Phone This chapter provides introductory information and basic operating instructions for the phone. For information on the advanced features of your phone, see Chapter 4, Using the Advanced Features of Your Phone. About Calls At any time, only one active call may be in progress on your phone. - Page 40 1. To obtain a dial tone, press or the New Call soft key. 2. Dial a phone number, enter the phone number of the party you want to call. To enter the number and letters displayed on a key, press the key one or more times quickly. To enter “@”, press the # key.
- Page 41 Placing Calls Using Speed Dials Use a speed dial index number for quick dialing. Speed dial index numbers are associated with entries in your Contact Directory. For information on managing speed dial entries from your Contact Directory, see Managing Speed Dial Entries To place a call using a speed dial index number: 1.
-
Page 42: Answering Calls
Answering Calls To answer a call: Press or the Answer soft key. >> The three LEDs flash green when the phone rings. To ignore Incoming calls, press the Reject soft key (for private lines) or the Silence soft key (for shared lines). To prevent your phone from ringing, enable the Do Not Disturb feature (see Using Do Not Disturb on page 3-14). -
Page 43: Muting The Microphone
Muting the Microphone During a call, press >> The three console LEDs glow red to indicate that the other party (or parties) cannot hear you. You can still hear all other parties while Mute is enabled. To turn off the Mute feature, press again. -
Page 44: Holding And Resuming Calls
Holding and Resuming Calls You can place up to eight calls on hold on your phone. (For information on placing conference calls on hold, see Holding and Resuming Conferences.) To place a call on hold: During a call, press the Hold soft key. The console LEDs flash red to indicate that a call is on >>... -
Page 45: Hosting Conference Calls
Hosting Conference Calls You can create a conference with up to two other parties using the phone’s local conference feature. To quickly set up a conference, you can use the Join soft key to create a conference between an active call and a call on hold. - Page 46 Setting Up a Conference Using the Conference Soft Key To set up a conference using the Conference soft key: 1. Call the first party. 2. When the first party answers, press the Confrnc soft key. The active call is placed on hold. If configured for single key-press conferences, the conference participant hears the dial tone and ringback when the conference host places the call to the new party.
- Page 47 Setting Up a Conference with an Active Call and a Call on Hold If you are currently in an active call, and you have another call on hold, you can create a conference call between the active call, the call on hold, and yourself, by pressing the Join soft key. To set up a conference call with an active call and a call on hold: If you have an active call and a call on hold, scroll to either call, and then press the Join soft key.
- Page 48 Holding and Resuming Conferences When you place a conference call on hold, you place all other conference participants on hold. To place a conference call on hold: From the Active:Conference screen, press the Hold soft key. >> The Hold:Conference screen displays. The other parties in the conference call are held. From the Hold:Conference screen, you can do the following: To resume the conference call, press the Resume soft key.
-
Page 49: Transferring Calls
Ending Conferences You can end a conference, and your connection to the other parties, by pressing the End Call soft key. When you use the End Call soft key, the other parties remain connected. To end a conference: From the Active:Conference screen, press the End Call soft key. >>... - Page 50 Performing a Consultative Transfer Perform a consultative transfer if you want to talk to the party to whom you are transferring the call. Or, you can choose not to talk to the party. In this case, you wait for the party’s ring-back sound, and then transfer call.
- Page 51 To perform a blind transfer: 1. During a call, press the Trnsfer soft key. The following screen, with the Blind soft key, displays. 2. Press the Blind soft key, and then place a call to the party to whom you want to transfer the call.
-
Page 52: Forwarding Calls
Forwarding Calls Your company’s settings may override this feature. Call forwarding is not available on shared lines. You can set up your phone to forward incoming calls to another party (static forwarding), or you can forward a call as your phone rings (dynamic forwarding). - Page 53 To forward calls to another extension: 1. From the idle screen, press the Forward soft key. The Forwarding Type Select screen displays. 2. Scroll to the forwarding type you want, and then press . The options are: — Always—To forward all incoming calls. —...
- Page 54 In the Contact field, enter a number to forward all unanswered incoming calls to. In the Forward After Rings field, enter how many rings to wait before forwarding the call. One ring is approximately six seconds. Two rings is the recommended value. If you selected Busy, the Call Forward Busy screen displays (as shown next).
- Page 55 To disable call forwarding: 1. From the idle screen, press the Forward soft key. The Forwarding Type Select screen displays, showing the forwarding type that is enabled. Always The following screen shows the forwarding type enabled. 2. Scroll to the forwarding type you want to change, and then press .
- Page 56 Forwarding Calls Dynamically You can manually forward a call to another number while your phone rings. To forward an incoming call to another extension: 1. While your phone rings, press the Forward soft key. The Call Forwarding screen displays. 2. Enter the number to forward the incoming call to. Your phone displays the last number you forwarded calls to (either statically or dynamically).
-
Page 57: Using Do Not Disturb
Using Do Not Disturb To prevent your phone from ringing, activate the Do Not Disturb feature. Calls you receive while Do Not Disturb is enabled will display in your Missed Calls Call List (see Using Call Lists). If you have chosen to forward your calls to another number, calls will be sent to that number if Do Not Disturb is enabled. -
Page 58: Managing Speed Dial Entries
Managing Speed Dial Entries Use the speed dial feature for fast, automated dialing. To use speed dial, you enter a speed dial index number instead of entering a complete phone number. When you create a Contact Directory entry, the phone automatically assigns a speed dial index number to the entry. -
Page 59: Using Voice Mail
Using Voice Mail Voice mail is an optional feature that your system administrator sets up, and your system may not support it. Screen options may vary with your application. Voice mail may be accessible with a single key press. Contact your system administrator about this option. Your voice mail is saved in a centralized location and may be accessed from your phone. -
Page 60: Using The Advanced Features Of Your Phone
Using the Advanced Features of Your Phone This chapter provides operating instructions for the advanced features of the SoundStation IP 6000 conference phone. If you require additional information or assistance with these features, contact your system administrator. Using External Microphones with the Conference Phone You can connect external microphones to your conference phone. -
Page 61: Using Instant Messaging
Using Instant Messaging Instant Messaging is an optional feature that your system administrator enables, and your system may not support it. You can send and receive instant messages using your phone. Your phone may indicate instant messages by the following: An icon, , on the phone screen •... - Page 62 Sending Instant Messages To send an instant message: 1. Press , and then select Features > Messages > Instant Messages. 2. From the Instant Messages screen, do one of the following: — To send a message, press the New soft key. Enter the phone number or IP address, and then press the Ok soft key.
-
Page 63: Troubleshooting Your Phone
This chapter contains general troubleshooting information to help you solve any problems you might encounter when you use the SoundStation IP 6000 conference phone. The tables in this chapter list possible trouble symptoms, the likely causes of these problems, and recommended corrective actions to take. -
Page 64: Power And Startup
Power and Startup Symptom Problem Corrective Action The display shows Network The network cable is not Verify that the network cable is properly Link is Down. properly connected. connected: • Check the cable termination at the switch or hub (furthest end of the cable from the phone). -
Page 65: Access To Screens And Systems
Access to Screens and Systems Symptom Problem Corrective Action Try the following: There is no response when you The phone is not in an active press a feature key. state. • Press the keys more slowly. • Call the phone to confirm that inbound call display and ringing is normal. -
Page 66: Calling
Calling Symptom Problem Corrective Action There is no dial tone. Power is not correctly applied to Verify that power is correctly applied to the phone. the phone: • Check that the display is illuminated. • Ensure the network cable is inserted properly on the underside of the phone. -
Page 67: Displays
Displays Symptom Problem Corrective Action Power is not correctly applied to Verify that power is correctly applied to There is no display. the phone. the phone: The display is • Check that the display is illuminated. incorrect. • Ensure the network cable is inserted The display has bad contrast. -
Page 68: Overall Functioning
Overall Functioning Symptom Problem Corrective Action The phone is malfunctioning. Restart the phone: The phone may need to be restarted. Note: If your phone malfunctions, you may be able to restore normal operation without restarting it. Before you restart your phone, contact your system administrator. -
Page 69: Investigating Phone Warnings
Investigating Phone Warnings If your phone is unable to perform certain tasks, a warning icon, , will display in the status bar. The warning icon lets you know that your phone has one or more issues that you should know about. You can view information about phone issues from the Warnings screen. To view a detailed list of phone issues: Press , and then select Status >... -
Page 70: Safety Notices
Polycom, Inc. Do not remove (or allow anybody else to remove) any product identification, copyright or other notices. - Page 71 Exclusions Polycom will not be liable under this limited warranty if its testing and examination disclose that the alleged defect or malfunction in the product does not exist or results from: • Failure to follow Polycom’s installation, operation, or maintenance instructions.
- Page 72 In accordance with Part 15 of the FCC Rules, the user is cautioned that any changes or modifications not expressly approved by Polycom, Inc. could void the user’s authority to operate the equipment. This equipment may not be used on a coin service or party line.
- Page 73 Con la presente Polycom (UK) Ltd dichiara che questo SoundStation IP 5000 è conforme ai requisiti essenziali ed alle altre disposizioni pertinenti stabilite dalla direttiva 1999/5/CE. Hér með lýsir Polycom (UK) Ltd yfir því að SoundStation IP 5000 er í samræmi við grunnkröfur og aðrar kröfur, sem gerðar eru í tilskipun 1999/5/EC Ar šo Polycom (UK) Ltd deklare, ka SoundStation IP 5000 atbilst Direktivas 1999/5/EK butiskajam...
- Page 74 Safety and Compliance Polycom (UK) Ltd declara que este SoundStation IP 5000 está conforme com os requisitos essenciais e outras disposições da Directiva 1999/5/CE. Polycom (UK) Ltd týmto vyhlasuje, že SoundStation IP 5000 splna základné požiadavky a všetky príslušné ustanovenia Smernice 1999/5/ES.
- Page 75 TypeApproval@polycom.com. Waste Electrical and Electronic Equipment (WEEE) All Polycom products that fall within the scope of the EU Directive Waste Electrical and Electronic Equipment (WEEE) 2002/96/EC carry the crossed wheelie bin symbol which advises customers not to dispose of electronic products in the domestic waste stream but to recycle them safely as e-waste.
-
Page 76: End-User License Agreement For Polycom Software
Agreement. GRANT OF LICENSE. Subject to the terms of this Agreement, Polycom grants to you a nonexclusive license to install and use the Software Product included with the Polycom product that incorporates or uses the Software Product (the “Product”). - Page 77 Product is protected by copyright laws and international treaty provisions. Title, ownership rights, and intellectual property rights in the Software Product shall remain In Polycom or its suppliers. Title and related rights in the content accessed through the Software Product is the property of such content owner and may be protected by applicable law.
- Page 78 Software Product and all of its component parts. UPGRADES. If the Software Product is labeled as an upgrade, you must be properly licensed to use the software identified by Polycom as being eligible for the upgrade in order to use the Software Product. A Software...
- Page 79 Polycom with a copy of your receipt, or to replace any defective media with software which substantially conforms to applicable Polycom published specifications. Any replacement Software Product will be warranted for the remainder of the original warranty period or thirty (30) days, whichever is longer.
- Page 80 Polycom’s option. TO THE FULL EXTENT ALLOWED BY LAW, THE FOREGOING WARRANTIES AND REMEDIES ARE EXCLUSIVE AND ARE IN LIEU OF...
- Page 81 LIMITATION OF LIABILITY. TO THE MAXIMUM EXTENT PERMITTED BY APPLICABLE LAW, IN NO EVENT SHALL POLYCOM SUPPLIERS LIABLE SPECIAL, INCIDENTAL, INDIRECT, CONSEQUENTIAL DAMAGES WHATSOEVER (INCLUDING. WITHOUT LIMITATION, DAMAGES FOR LOSS OF BUSINESS PROFITS, BUSINESS INTERRUPTION, LOSS OF BUSINESS INFORMATION, OR ANY OTHER PECUNIARY LOSS) ARISING OUT OF THE USE OR INABILITY...
- Page 82 EXPORT CONTROLS. The Software Product may not be downloaded or otherwise exported or re-exported (i) into (or to a national or resident of) Cuba, North Korea, Iran, Syria, Sudan, or any other country to which the U.S. has embargoed goods; or (ii) to anyone on the U.S Treasury Department’s List of Specially Designated Nationals or the U.S.
- Page 83 Contact. If you have any questions concerning this Agreement, or if you desire to contact • Polycom for any reason, please contact the Polycom office serving your country. U.S. Government Restricted Rights. The software and documentation provided by Polycom •...
- Page 84 As between the parties, Polycom, Inc., retains title to and ownership of all proprietary rights with respect to the software contained within its products. The software is protected by United States copyright laws and international treaty provision.
- Page 85 The entire risk arising out of its use remains with the recipient. In no event shall Polycom and/or its respective suppliers be liable for any direct, consequential, incidental, special, punitive or other damages whatsoever (including without limitation, damages for loss of business profits, business interruption, or loss of business information), even if Polycom has been advised of the possibility of such damages.
Need help?
Do you have a question about the SoundStation IP 6000 and is the answer not in the manual?
Questions and answers