Polycom SoundStation IP 6000 User Manual
Hide thumbs
Also See for SoundStation IP 6000:
- User manual (94 pages) ,
- Quick start manual (19 pages) ,
- Quick reference manual (8 pages)

Related Manuals for Polycom SoundStation IP 6000


Summary of Contents for Polycom SoundStation IP 6000
- Page 1 User Guide for the ® ® Polycom SoundStation IP 6000 Phone UC Software 4.0.1 March 2012 1725-15645-001 Rev.F...
- Page 2 As between the parties, Polycom, Inc., retains title to and ownership of all proprietary rights with respect to the software contained within its products. The software is protected by United States copyright laws and international treaty provision.
-
Page 3: About This Guide
Changes to This Guide This user guide has been updated to include new features and information. The following sections have been added to this edition: • Connecting an Optional Polycom® Wireless Lapel Microphone to Your Conference Phone on page •... - Page 4 User Guide for the Polycom SoundStation IP 6000 Phone...
-
Page 5: Table Of Contents
Conference Phone ......... . . 1–4 Connecting an Optional Polycom® Wireless Lapel Microphone to Your Conference Phone . - Page 6 User Guide for the Polycom SoundStation IP 6000 Phone Adding Contacts to Your Local Contact Directory ....2–13 Adding Contacts Manually ......2–13 Adding Contacts from Call Lists .
- Page 7 Contents 4 Using the Advanced Features of Your Phone ... 4–1 Using External Microphones with the Conference Phone ... . . 4–1 Handling Multiple Call Appearances .
- Page 8 User Guide for the Polycom SoundStation IP 6000 Phone 5 Troubleshooting Your Phone ..... . . 5–1 Safety Notices ......Safety Notices–1 End-User License Agreement for Polycom®...
-
Page 9: Getting Started With Your Phone
• Navigating Menus and Entering Data on page 1-10 • Configuring Your Phone Using the Polycom Web Configuration Utility page 1-12 To read about how to change the settings on your phone, see Chapter Customizing Your Phone. To read about the phone’s basic features, see... -
Page 10: Setting Up The Phone
User Guide for the Polycom SoundStation IP 6000 Phone Generally, your phone will be deployed with multiple other phones. In this case, Note your system administrator will configure the phone parameters beforehand, so that after you set up your phone, the phone will be registered and ready to use. -
Page 11: Ac Power
Getting Started with Your Phone The following figure shows how to connect your phone to the network using a PoE source. 25-foot Network Cable To connect the phone using a PoE source: 1. Connect one end of the 25-foot Network Cable to the LAN jack on the phone. -
Page 12: Connecting Optional Extension Microphones To Your
User Guide for the Polycom SoundStation IP 6000 Phone The following figure shows how to connect your phone to the network using optional AC power. Power Insertion Cable 25-foot Network Cable Power Adapter To connect the phone using AC power: 1. -
Page 13: Connecting An Optional Polycom® Wireless Lapel Microphone To Your Conference Phone
Connecting an Optional Polycom® Wireless Lapel Microphone to Your Conference Phone You can connect a Polycom® Wireless Lapel Microphone to your conference phone so that a person can roam around the conference room and still be heard clearly. -
Page 14: Features Of The Phone
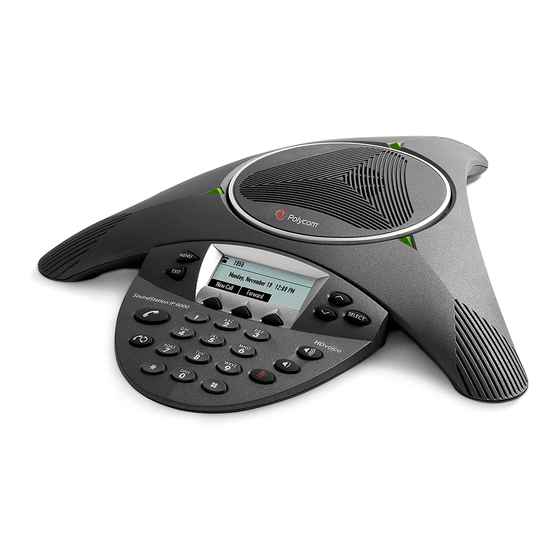
User Guide for the Polycom SoundStation IP 6000 Phone Features of the Phone The following figure shows the primary hardware features of your phone console. Feature Description Speaker Allows for ringer and hands-free audio output. Microphones Provide 360 coverage by three internal microphones. - Page 15 Getting Started with Your Phone The following figure shows the primary key buttons, controls, and indicators on your phone console: Item Description Select key Allows you to: Select a field of displayed data • Toggle features on or off • Scroll keys Allow you to: Scroll through displayed information...
- Page 16 User Guide for the Polycom SoundStation IP 6000 Phone Item Description Mute key Toggles the microphone on or off during a conversation by doing the following: Stopping local audio from being heard at the • far end of the call Allowing local audio to be heard at the far end •...
-
Page 17: Understanding Line And Call Icons
Understanding Line and Call Icons Icon Line or Call State Description Active call using A call is in progress using Polycom HD Voice. The active call icons merge into one icon on Polycom ® HD Voice™ the phone screen. The following figure shows... -
Page 18: Navigating Menus And Entering Data
User Guide for the Polycom SoundStation IP 6000 Phone Icon Line or Call State Description Ringing The phone is ringing. Unregistered Line The phone is unable to place and receive calls. Message You have a new message. See Using Voice... - Page 19 Getting Started with Your Phone If you want to... Then do this... Select a menu item Do one of the following: Scroll to the menu item, and then press • Press the dial pad key that corresponds to • the item in the numbered menu list. For example, to select the second item in a menu, press 2.
-
Page 20: Configuring Your Phone Using The Polycom
User Guide for the Polycom SoundStation IP 6000 Phone Configuring Your Phone Using the Polycom Web Configuration Utility This user guide explains how to update phone settings from your phone, using your phone’s menu system. If you want, you can update these settings remotely with the Polycom Web Configuration Utility. -
Page 21: Customizing Your Phone
Customizing Your Phone You can customize your SoundStation IP 6000 conference phone by adjusting certain settings, including language, volume, time and date, display contrast, backlight intensity, and ring type. You can also add contacts to the phone’s local Contact Directory. -
Page 22: Updating Preferences
User Guide for the Polycom SoundStation IP 6000 Phone Updating Preferences The Preferences menu allows you to customize the language that displays on your phone and to specify how the time and date display on the idle screen. You can also enable your phone to save Corporate Directory search results, if... - Page 23 Customizing Your Phone The following figure shows the default format for the date and time display on the phone screen. To update the time and date display: 1. Press , and then select Settings > Basic > Preferences > Time and Date. The Time and Date screen displays.
- Page 24 User Guide for the Polycom SoundStation IP 6000 Phone To change the order of the time and date display: 1. Press , and then select Settings > Basic > Preferences > Time and Date > Clock Order. The Clock Order screen displays.
-
Page 25: Updating The Display Contrast
Customizing Your Phone Updating the Display Contrast You can set how light or dark the screen appears. To adjust the contrast on the phone screen: 1. Press , and then select Settings > Basic > Contrast. The Contrast screen displays. 2. -
Page 26: Updating The Ring Tone
User Guide for the Polycom SoundStation IP 6000 Phone When you change the Maximum Intensity, you modify the entire backlight intensity scale. For example, if you decrease the Maximum Intensity, the low, medium, and high levels for both Backlight On and Backlight Idle intensities decrease. -
Page 27: Selecting A Ring Tone
Customizing Your Phone Selecting a Ring Tone You can choose a unique ring tone for your phone to identify it when it rings. To select a different ring tone: 1. Press , and then select Settings > Basic > Ring Type. The Ring Type screen displays. -
Page 28: Adjusting The Speaker And Ringer Volume
User Guide for the Polycom SoundStation IP 6000 Phone 3. Press the Edit soft key. The Edit Contact screen displays. 4. Use the Next soft key to scroll to Ring Type, and then use to select a ring type. 5. Press the Save soft key. -
Page 29: Viewing Call Lists
Customizing Your Phone Viewing Call Lists You can access any call list from the Call Lists menu, or you can quickly access missed calls from the idle screen. To view a call list: Do one of the following: >> — Press , and then select Features >... -
Page 30: Managing Contacts
User Guide for the Polycom SoundStation IP 6000 Phone To manually clear all calls in all call lists, restart the phone. See Overall Functioning Note on page 5-7. — To view and manage a call list, scroll to either Missed Calls, Received Calls, or Placed Calls, and then press . -
Page 31: Viewing Your Local Contact Directory
Customizing Your Phone If your system administrator sets up Corporate Directory on your phone, you may also have read access to portions of your Corporate Directory. Your system administrator determines which contacts you can see. You can search for contacts in the Corporate Directory, and add contacts from the Corporate Directory to your local Contact Directory. -
Page 32: Search Results
User Guide for the Polycom SoundStation IP 6000 Phone To access your Corporate Directory: 1. Press , and then select Features > Corporate Directory. The Corporate Directory search screen displays. If you have enabled your phone to save the results of your last search (or... -
Page 33: Adding Contacts To Your Local Contact Directory
Customizing Your Phone Adding Contacts to Your Local Contact Directory You can add contacts to your local Contact Directory in the following ways: • Manually, if you have permission to update your local Contact Directory • From a call list •... - Page 34 User Guide for the Polycom SoundStation IP 6000 Phone — (Optional.) Update the Speed Dial Index number. The speed dial index number is automatically assigned to the next available index value, up to a maximum value of 99. You can assign any unused speed dial index number from 1 to 99.
-
Page 35: Adding Contacts From Call Lists
Customizing Your Phone If you do not have a voice mail system set up, enabling the Auto Reject field will Note have no effect. — (Optional.) Change the Watch Buddy and Block Buddy settings. If you set the Watch Buddy field to enabled, you can monitor the contact’s status. -
Page 36: Adding Contacts To Your Contact Directory From A
User Guide for the Polycom SoundStation IP 6000 Phone You may want to go to the Contact Directory to see if the contact was saved Note correctly and to add any missing contact information. To view your Contact Directory, see Managing Contacts on page 2-10. -
Page 37: Searching For Contacts
Customizing Your Phone Searching for Contacts You can search for contacts in your local Contact Directory, or in a Corporate Directory (if this is set up on your phone). Searching for Contacts in Your Local Contact Directory Search for a contact by scrolling through the directory, or entering specific search criteria. - Page 38 User Guide for the Polycom SoundStation IP 6000 Phone To search for a contact in the Corporate Directory: 1. Press , and then select Features > Corporate Directory. 2. From the Search screen, perform a quick search or an advanced search.
-
Page 39: Updating Contacts In Your Local Contact Directory
Customizing Your Phone Updating Contacts in Your Local Contact Directory You can update contact information for contacts in your local Contact Directory. You cannot update information for contacts in your Corporate Directory. To update a contact in your local Contact Directory: 1. -
Page 40: Deleting Contacts From Your Local Contact Directory
User Guide for the Polycom SoundStation IP 6000 Phone Deleting Contacts from Your Local Contact Directory You can delete contacts from your local Contact Directory, but not from your Corporate Directory. To delete a contact from the local Contact Directory: 1. -
Page 41: Managing Incoming Calls
Customizing Your Phone To place a call to a contact in the Corporate Directory: 1. Press , and then select Features > Corporate Directory. The Corporate Directory search screen displays. If you have enabled your phone to save the results of your last search (or Note remember the last contact you selected), your previous search results (or the contact), will display instead of a blank search screen. -
Page 42: Rejecting Calls
User Guide for the Polycom SoundStation IP 6000 Phone Rejecting Calls You can customize your phone so that incoming calls from a particular party are immediately sent to your voice mail system. (If you do not have a voice mail system set up, the call will still ring on your phone.) Rejecting calls is not available on shared lines. -
Page 43: Diverting Calls
Customizing Your Phone Diverting Calls You can customize your phone so that incoming calls from a particular party are transferred directly to a third party. To divert incoming calls from a contact to a third party: 1. Press , and then select Features > Contact Directory. The Directory screen displays. -
Page 44: Understanding Shared Lines
User Guide for the Polycom SoundStation IP 6000 Phone Understanding Shared Lines Shared lines is an optional feature that your system administrator sets up. Your Note system may not support it. For more information, contact your system administrator. If two phones share a line, an incoming call to one number will cause both phones to ring. -
Page 45: Using The Basic Features Of Your Phone
Using the Basic Features of Your Phone This chapter provides introductory information and basic operating instructions for the phone. It includes the following topics: • About Calls on page • Placing Calls on page • Answering Calls on page • Ending Active Calls on page •... -
Page 46: About Calls
User Guide for the Polycom SoundStation IP 6000 Phone About Calls At any time, only one active call may be in progress on your phone. The active call is the one that has audio associated with it. In addition to an active call, your phone can handle up to seven other calls, including conference calls, on hold. -
Page 47: Placing Calls Using Speed Dials
Using the Basic Features of Your Phone To place a call on-hook (to dial a phone number): Enter the phone number of the party you want to call, and then press the >> Dial soft key. Instead of entering a phone number from memory, you can access call lists, Note directories, and speed dial lists to display and dial the number for you. -
Page 48: Answering Calls
User Guide for the Polycom SoundStation IP 6000 Phone Answering Calls To answer a call: Press or the Answer soft key. >> The three LEDs flash green when the phone rings. To ignore Incoming calls, press the Reject soft key (for private lines) or the Note Silence soft key (for shared lines). -
Page 49: Redialing Numbers
Using the Basic Features of Your Phone To mute the microphone if you use external microphones: Press on the phone or the button on the top of the external >> microphones. To turn off the Mute feature, press again. Redialing Numbers You can redial the last number you dialed, or search a list of placed calls to find a previously-dialed number. -
Page 50: Hosting Conference Calls
User Guide for the Polycom SoundStation IP 6000 Phone To place a call on hold: During a call, press the Hold soft key. The console LEDs flash red to >> indicate that a call is on hold. The following screen shows Jane Smith on hold. The Resume soft key now displays on the screen. - Page 51 Using the Basic Features of Your Phone Setting Up a Conference Using the Conference Soft Key To set up a conference using the Conference soft key: 1. Call the first party. 2. When the first party answers, press the Confrnc soft key. The active call is placed on hold.
-
Page 52: Holding And Resuming Conferences
User Guide for the Polycom SoundStation IP 6000 Phone To set up a conference call with an active call and a call on hold: If you have an active call and a call on hold, scroll to either call, and then >>... -
Page 53: Splitting Conferences
Using the Basic Features of Your Phone Splitting Conferences When a conference has been established, a Split soft key is available. When you split a conference, you end the conference and place all parties on hold. To split a conference: From the Active:Conference screen, press the Split soft key. -
Page 54: Performing A Consultative Transfer
User Guide for the Polycom SoundStation IP 6000 Phone Performing a Consultative Transfer Perform a consultative transfer if you want to talk to the party to whom you are transferring the call. Or, you can choose not to talk to the party. In this case, you wait for the party’s ring-back sound, and then transfer the call. -
Page 55: Forwarding Calls
Using the Basic Features of Your Phone Forwarding Calls Your company’s settings may override this feature. Call forwarding is not available Note on shared lines. You can set up your phone to forward incoming calls to another party (static forwarding), or you can forward a call as your phone rings (dynamic forwarding). - Page 56 User Guide for the Polycom SoundStation IP 6000 Phone 3. Do one of the following: — If you selected Always, the Call Forward Always screen displays (as shown next). Enter a forwarding number. — If you selected No Answer, the Call Forward No Answer screen displays.
-
Page 57: Forwarding Calls Dynamically
Using the Basic Features of Your Phone To disable call forwarding: 1. From the idle screen, press the Forward soft key. The Forwarding Type Select screen displays, showing the forwarding type that is enabled. The following screen shows the forwarding type Always enabled. 2. -
Page 58: Using Do Not Disturb
User Guide for the Polycom SoundStation IP 6000 Phone Using Do Not Disturb To prevent your phone from ringing, activate the Do Not Disturb feature. Calls you receive while Do Not Disturb is enabled will display in your Missed Calls Call List (see Using Call Lists on page 2-8). -
Page 59: Managing Speed Dial Entries
Using the Basic Features of Your Phone Managing Speed Dial Entries Use the speed dial feature for fast, automated dialing. To use speed dial, you enter a speed dial index number instead of entering a complete phone number. When you create a Contact Directory entry, the phone automatically assigns a speed dial index number to the entry. -
Page 60: Using Voice Mail
User Guide for the Polycom SoundStation IP 6000 Phone Using Voice Mail Voice mail is an optional feature that your system administrator sets up, and your Note system may not support it. Screen options may vary with your application. Voice mail may be accessible with a single key press. -
Page 61: Using The Advanced Features Of Your Phone
Using the Advanced Features of Your Phone This chapter provides operating instructions for the advanced features of the SoundStation IP 6000 conference phone. If you require additional information or assistance with these features, contact your system administrator. This chapter includes the following topics: •... -
Page 62: Handling Multiple Call Appearances
User Guide for the Polycom SoundStation IP 6000 Phone Handling Multiple Call Appearances Your system administrator can set up your phone to have one or more call appearances. If your phone is set up to have multiple call appearances, your phone screen can display information for multiple calls, and you can handle active and held calls at the same time. -
Page 63: Selecting Contacts To Monitor
Using the Advanced Features of Your Phone To change your presence setting: 1. Do one of the following: — Press , and then select Features > Presence > My Status. — From the idle screen, press the MyStat soft key. The My Status screen displays. -
Page 64: Blocking Contacts From Viewing Your Status
User Guide for the Polycom SoundStation IP 6000 Phone 3. Press the Edit soft key. The Edit Contact screen displays. 4. Use the Next and Prev soft keys to scroll to the Watch Buddy field, and then use the scroll keys or the Change soft key to choose Enabled or Disabled. -
Page 65: Using Your Blocked List To Unblock Contacts
Using the Advanced Features of Your Phone 3. Press the Edit soft key. The Edit Contact screen displays. 4. Use the Next and Prev soft keys to scroll to the Block Buddy field, and then use the scroll keys or the Change soft key to choose Enabled or Disabled. -
Page 66: Monitoring The Status Of Contacts In Your Buddy List
User Guide for the Polycom SoundStation IP 6000 Phone Monitoring the Status of Contacts in Your Buddy List You can monitor the status of all the contacts in your buddy list, except those contacts that have blocked you from viewing their status. To add contacts to... -
Page 67: Sending Instant Messages
Using the Advanced Features of Your Phone To manage instant messages: 1. Press , and then select Features > Messages > Instant Messages. 2. From the Instant Messages screen, you can do the following: — To view instant messages, press the Next or Prev soft keys to cycle through the messages in order. -
Page 68: Broadcasting Messages Using Push-To-Talk And Group Paging
User Guide for the Polycom SoundStation IP 6000 Phone Broadcasting Messages Using Push-to-Talk and Group Paging The Group Paging feature enables you to make pages—one-way audio announcements—to users subscribed to a page group. The Push-to-Talk (PTT) feature is a collaborative tool that enables you to exchange broadcasts to users subscribed to a PTT channel, much like a walkie-talkie. - Page 69 Using the Advanced Features of Your Phone When you end a PTT broadcast, the channel remains open and enters a waiting period. This waiting period gives people who received the broadcast a chance to respond. If no one responds within the waiting period, the channel closes. Sending PTT Broadcasts Before you can send a PTT broadcast, you need to choose a channel to broadcast on.
-
Page 70: Replying To Ptt Broadcasts
User Guide for the Polycom SoundStation IP 6000 Phone Receiving PTT Broadcasts To receive a broadcast sent on a particular channel, you need to be subscribed to that channel. To subscribe to a channel, see Updating Channel Subscriptions on page 4-12. -
Page 71: Ending Ptt Broadcasts
Using the Advanced Features of Your Phone Ending PTT Broadcasts You can end a PTT broadcast by releasing the Talk soft key, or by pressing the End PTT soft key. After you end a broadcast, the channel remains open so others can respond. -
Page 72: Updating Channel Subscriptions
User Guide for the Polycom SoundStation IP 6000 Phone Updating Channel Subscriptions You can subscribe to any channel that has been enabled by the system administrator and appears in your channels list. When you subscribe to a channel, you can send and receive PTT broadcasts on that channel. -
Page 73: Group Paging Mode
Using the Advanced Features of Your Phone Group Paging Mode Your system administrator may enable your phone to operate in a broadcast mode called Group Paging mode. In this mode, you broadcast one-way announcements to a specified group of phones, called a Paging Group. In Group Paging mode, users must subscribe to Paging Groups to send and receive pages. -
Page 74: Adjusting The Volume Of Pages
User Guide for the Polycom SoundStation IP 6000 Phone Receiving Pages To receive a page sent to a particular paging group, you need to be subscribed to that group. To subscribe to a paging group, see Updating Paging Group Subscriptions on page 4-15. -
Page 75: Muting Pages
Using the Advanced Features of Your Phone Muting Pages While you send a page, you can press to mute your audio so that the people receiving your page won’t hear anything. This behavior is similar to a phone call. Updating the Default Paging Group If you press and hold the Paging soft key, your page will automatically go to the default paging group, Paging Group 1. -
Page 76: Allowing Pages To Play During Active Calls
User Guide for the Polycom SoundStation IP 6000 Phone Allowing Pages to Play During Active Calls The Accept While Busy option allows pages to come in as active calls (if enabled) or held calls (if disabled). If enabled, a page will interrupt telephone calls and you’ll be able to hear the audio of both the telephone call and the page. -
Page 77: Logging In And Out Of A Phone
Using the Advanced Features of Your Phone If the User Login feature is set up on your company’s phones, you’ll need to know how to: • Log in to a phone to access your personal phone settings. • Log out of a phone after you finish using it. •... -
Page 78: Placing Calls From Phones That Are In The Logged Out State
User Guide for the Polycom SoundStation IP 6000 Phone To log out of a phone: 1. From the idle screen, do one of the following: — Press the Log out soft key. — Press , and then select Features > User Login > Log out. -
Page 79: Locking The Phone
Using the Advanced Features of Your Phone Locking the Phone Lock your phone to do the following: • Prevent unauthorized outgoing calls. • Allow only authorized people to answer calls. • Prevent people from viewing or modifying phone information, such as your directory or call lists. -
Page 80: Locking And Unlocking Your Phone
User Guide for the Polycom SoundStation IP 6000 Phone Locking and Unlocking Your Phone You can choose how you want your phone to handle incoming calls when it is locked. If you set up your phone to allow incoming calls when it is locked (the default setting), incoming calls will ring on your phone, and you can answer calls by entering your user password. -
Page 81: Calling And Answering From A Locked Phone
Using the Advanced Features of Your Phone Calling and Answering from a Locked Phone From a locked phone, anyone can dial the standard emergency number, such as 911, and other authorized numbers that an administrator can set up. You can’t call any other numbers from a locked phone. If you set up your phone so you can answer incoming calls when your phone is locked, you can answer calls by entering your user password. - Page 82 User Guide for the Polycom SoundStation IP 6000 Phone 4 - 22...
-
Page 83: Troubleshooting Your Phone
Troubleshooting Your Phone This chapter contains general troubleshooting information to help you solve any problems you might encounter when you use the SoundStation IP 6000 conference phone. The tables in this chapter list possible trouble symptoms, the likely causes of these problems, and recommended corrective actions to take. -
Page 84: Installation Configuration
User Guide for the Polycom SoundStation IP 6000 Phone Installation Configuration Symptom Problem Corrective Action The display shows: The phone installation Verify that you have installed the phone configuration is not supported. and any components correctly: General configuration error Setting Up the Phone... - Page 85 Troubleshooting Your Phone Controls Symptom Problem Corrective Action The dial pad does not work. The dial pad on the phone does Try the following: not respond. Check for a response from other • feature keys or from the dial pad. Place a call to the phone from a known •...
-
Page 86: Access To Screens And Systems
User Guide for the Polycom SoundStation IP 6000 Phone Access to Screens and Systems Symptom Problem Corrective Action There is no response when you The phone is not in an active Try the following: press a feature key. state. Press the keys more slowly. - Page 87 Troubleshooting Your Phone Calling Symptom Problem Corrective Action There is no dial tone. Power is not correctly applied to Verify that power is correctly applied to the the phone. phone: Check that the display is illuminated. • Ensure the network cable is inserted •...
- Page 88 User Guide for the Polycom SoundStation IP 6000 Phone Displays Symptom Problem Corrective Action There is no display. Power is not correctly applied to Verify that power is correctly applied to the the phone. phone: The display is incorrect. Check that the display is illuminated.
-
Page 89: Overall Functioning
Troubleshooting Your Phone Overall Functioning Symptom Problem Corrective Action The phone is malfunctioning. The phone may need to be Restart the phone: restarted. Note: If your phone malfunctions, you may be able to restore normal operation without restarting it. Before you restart your phone, contact your system administrator. - Page 90 User Guide for the Polycom SoundStation IP 6000 Phone After you view the phone warnings, you can press the Clear Icon soft key to remove the icon from the status bar. The warning will still display in the Warnings list until the phone issue is fixed.
-
Page 91: Safety Notices
Polycom, Inc. Do not remove (or allow anybody else to remove) any product identification, copyright or other notices. - Page 92 Replacement products or parts may be new or reconditioned. Polycom is expected to warrant any replaced or repaired product or part for ninety (90) days from shipment, or the remainder of the initial warranty period, whichever is longer. Products returned to Polycom must be sent prepaid and packaged appropriately for safe shipment, and it is recommended that they be insured or sent by a method that provides for tracking of the package.
- Page 93 CE and VCCI Mark This SoundStation IP 6000 phone is marked with the CE mark. This mark indicates compliance with EC Directives 1999/5/EC. A full copy of the Declaration of Conformity can be obtained from Polycom Ltd., 270 Bath Road, Slough, Berkshire, SL1 4DX, UK.
- Page 94 Con la presente Polycom (UK) Ltd dichiara che questo SoundStation IP 6000 è conforme ai requisiti essenziali ed alle altre disposizioni pertinenti stabilite dalla direttiva 1999/5/CE. Hér með lýsir Polycom (UK) Ltd yfir því að SoundStation IP 6000 er í samræmi við grunnkröfur og aðrar kröfur, sem gerðar eru í tilskipun 1999/5/EC Ar šo Polycom (UK) Ltd deklare, ka SoundStation IP 6000 atbilst Direktivas 1999/5/EK butiskajam prasibam un...
- Page 95 Polycom Take Back In addition to any mandated take back requirement, Polycom offers free recycling of its branded products to business users. Details can be found at http://www.polycom.eu/documents/company/about_us/producer_responsibility_statement.pdf...
- Page 96 User Guide for the Polycom SoundStation IP 6000 Phone Safety Notices - 6...
- Page 97 Agreement. 1. GRANT OF LICENSE. Subject to the terms of this Agreement, Polycom grants to you a nonexclusive license to install and use the Software Product included with the Polycom product that incorporates or uses the Software Product (the “Product”).
- Page 98 If the Software Product is labeled as an upgrade, you must be properly licensed to use the software identified by Polycom as being eligible for the upgrade in order to use the Software Product. A Software Product labeled as an upgrade replaces and/or supplements the software that formed the basis for your eligibility for the upgrade.
- Page 99 Polycom with a copy of your receipt, or to replace any defective media with software which substantially conforms to applicable Polycom published specifications. Any replacement Software Product will be warranted for the remainder of the original warranty period or thirty (30) days, whichever is longer.
- Page 100 10.3 Contact. If you have any questions concerning this Agreement, or if you desire to contact Polycom for any reason, please contact the Polycom office serving your country.
Need help?
Do you have a question about the SoundStation IP 6000 and is the answer not in the manual?
Questions and answers