Polycom IP 6000 Quick Start Manual
Intermedia hosted pbx soundstation
Hide thumbs
Also See for IP 6000:
- User manual (100 pages) ,
- Quick start manual (12 pages) ,
- Quick reference manual (8 pages)

Subscribe to Our Youtube Channel
Related Manuals for Polycom IP 6000


Summary of Contents for Polycom IP 6000
-
Page 1: Quick Start Guide
Quick Start Guide Intermedia Hosted PBX Polycom SoundStation IP 6000 -7000 SoundStation IP 6000 SoundStation IP 7000... - Page 2 Welcome to your Hosted PBX service.
-
Page 3: What's In The Box
What’s in the box? SoundStation IP 7000 Polycom SoundStation IP 6000 SoundStation IP 5000 Quick Start Guide ® A. Phone E. AC Adapter (optional) B. Network Cable F. Expansion Microphones C. Quick Start Guide (optional) D. Power Injector Cable (optional) -
Page 4: Guided Setup
Network Cable To install the SoundStation IP 6000 / 7000, plug one end of the network cable into the network port on the bottom of the SoundStation IP 6000 / 7000 console, and plug the other end of the network cable into your data port with PoE. - Page 5 External Microphones Connect external microphones (optional accessories), as shown below. Connect Optional Network Accessories Cable Not Shown: Country-Specific Power Cable Once the phone has been plugged in it will become operational.
- Page 6 Voicemail Box Setup RECORDING YOUR PERSONAL VOICEMAIL GREETING Press the “Messages” button , and press the “Connect” soft key. Enter the default PIN of 0000. Select option 8 for User Options. Select option 1 to record the Unavailable greeting. Follow the voice prompts to record and check your greeting. CHANGING THE PIN FROM THE PHONE Press the “Messages”...
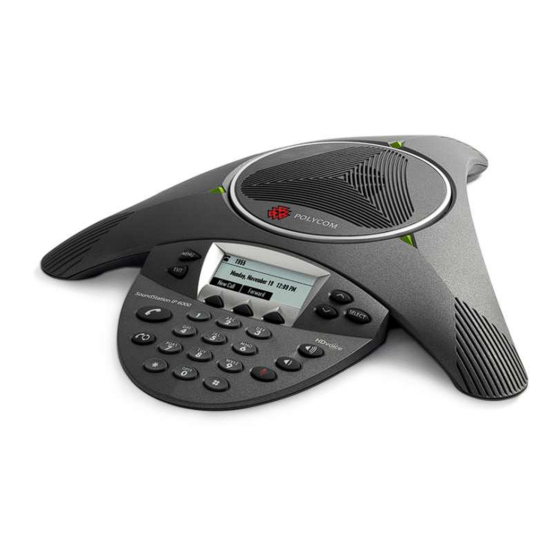
- Page 8 Features Polycom SoundStation IP 6000 Navigation Buttons Menu Button Select Exit Button Button Soft Keys Volume Up/ Call Button Down Buttons Microphone Mute Redial Button Button Dialing Keys...
- Page 9 Microphone Speaker LED Indicator LED Indicator Microphone LED Indicator Graphic LCD Display Microphone Keypad...
- Page 10 Features Polycom SoundStation IP 7000 Navigation Pad and Select Soft Keys Button End Call Button Call Button Menu Button Volume Up/Down Buttons Conference Button Redial Button Microphone Mute Button Dialing Keypad...
- Page 11 Speaker Microphone LED Indicator LED Indicator Microphone LED Indicator Keypad Graphic LCD Display Microphone...
-
Page 12: Commonly Used Features
Commonly Used Features PLACING OUTGOING CALLS When the phone is not in use: Press the “Call” button or the “New Call” soft key. Dial a 3-digit extension or telephone number. ANSWERING AN INCOMING CALL Press the “Call” button OR the “Answer” soft key. REJECTING AN INCOMING CALL Press the “Reject”... -
Page 13: Transferring Calls
TRANSFERRING CALLS Blind Transfers: While on a call, press the “Transfer” soft key. Press the “Blind” soft key. Dial the desired phone number or extension number. The call is automatically transferred. Attended (Consultative or Warm ) Transfers: While on a call, press the “Transfer” soft key. Dial the desired phone number or extension number. -
Page 14: Volume Adjustment
VOLUME ADJUSTMENT In-Call Volume: • While on a call, press the “+” and “-” buttons to raise or lower the volume. Ringer Volume: • While the phone is not in use, press the “+” and “-” buttons to adjust the ringer volume on the phone. CALL WAITING When an inbound call rings in, you will hear a beep tone emitted by your phone. -
Page 15: Forwarding Calls
FORWARDING CALLS Press the “Forward” soft key OR press the Menu button, and select 1 for Features, and 2 for Forwarding. If “Always Forward” is currently disabled, “Always (Disabled)” will be displayed. Press 1 for “Always”. Enter / verify the contact number where calls will be forwarded. Press the “Enable”... - Page 16 FREE Download CallScape for increased desktop productivity: www.intermedia.net/callscape...
- Page 17 We are here to help. www.intermedia.net/knowledgebase/voice voicesupport@intermedia.net 1.877.880.0055...
- Page 18 www.intermedia.net PolycomIP6000-7000-QS-001 *POLYCOMIP6000-7000-QS-001*...
Need help?
Do you have a question about the IP 6000 and is the answer not in the manual?
Questions and answers