Avaya J189 Manual
Hide thumbs
Also See for J189:
- Quick start manual ,
- Instructions manual (163 pages) ,
- Using manual (150 pages)
Table of Contents
Advertisement
Quick Links
Advertisement
Table of Contents

Related Manuals for Avaya J189


Summary of Contents for Avaya J189
- Page 1 Using Avaya J189 IP Phone SIP Release 4.0.6 Issue 1 August 2020...
- Page 2 RESERVES THE RIGHT TO TAKE LEGAL ACTION AGAINST YOU the express behalf of Avaya. End User agrees to indemnify and hold AND ANYONE ELSE USING OR SELLING THE SOFTWARE harmless Avaya, Avaya's agents, servants and employees against all WITHOUT A LICENSE.
- Page 3 MAY BE OBTAINED FROM MPEG LA, L.L.C. SEE HTTP:// written consent of Avaya can be a criminal, as well as a civil offense WWW.MPEGLA.COM. under the applicable law. Compliance with Laws...
- Page 4 • Please only use the connecting cables, power cord, and television reception, which can be determined by turning the AC adapters shipped with the equipment or specified by Avaya to be used with the equipment. If you use any other equipment, it may cause failures, malfunctioning, or fire.
- Page 5 • Increase the separation between the equipment and receiver. owned by Bluetooth SIG, Inc. and any use of such marks by Avaya Inc. is under license. • Connect the equipment into an outlet on a circuit different from that to which the receiver is connected.
-
Page 6: Table Of Contents
Contents Chapter 1: Introduction...................... 12 .......................... 12 Purpose Chapter 2: Avaya J189 phone overview................ 13 ........................ 13 Phone overview ........................ 15 Physical layout ................ 17 Connections jacks for J189 IP Phone ...................... 19 Secondary display ....................... 19 Optional components Chapter 3: Getting started...................... 20 .................... - Page 7 Making a call transfer with a shortcut key .............. 56 Making a conference call with a shortcut key .................... 57 Activating the screen saver ...................... 57 Activating Send All Calls ........................ 58 Automatic Callback August 2020 Using Avaya J189 IP Phone SIP Comments on this document? infodev@avaya.com...
- Page 8 Acknowledging the crisis alert after an error in the first acknowledgment ................ 78 Displaying your extension on outgoing calls ................ 78 Excluding others from bridging on to your call .................. 79 Extending a call to your cell phone August 2020 Using Avaya J189 IP Phone SIP Comments on this document? infodev@avaya.com...
- Page 9 Setting the dialing mode ....................... 97 Displaying сall timers .................... 98 Setting key repeat delay ....................... 98 Setting redial options ..................... 99 Assigning speed dial entries ...................... 100 Setting Mute alert August 2020 Using Avaya J189 IP Phone SIP Comments on this document? infodev@avaya.com...
- Page 10 .................. 119 Setting the phone screen width ................ 120 Customizing keys of the secondary display ..................... 120 Adding a labelled key ......................... 121 Moving a key ....................... 122 Deleting a key August 2020 Using Avaya J189 IP Phone SIP Comments on this document? infodev@avaya.com...
- Page 11 Viewing the Device type ....................... 128 Viewing the Server type Chapter 14: Resources...................... 129 ........................ 129 Documentation ............ 131 Finding documents on the Avaya Support website ................. 131 Avaya Documentation Center navigation .................... 132 Viewing Avaya Mentor videos .......................... 133 Support August 2020 Using Avaya J189 IP Phone SIP Comments on this document? infodev@avaya.com...
-
Page 12: Chapter 1: Introduction
Chapter 1: Introduction Purpose This document describes the features of the Avaya J189 IP Phone and also provides instructions on how to use this phone. This document is for end users. August 2020 Using Avaya J189 IP Phone SIP Comments on this document? infodev@avaya.com... -
Page 13: Chapter 2: Avaya J189 Phone Overview
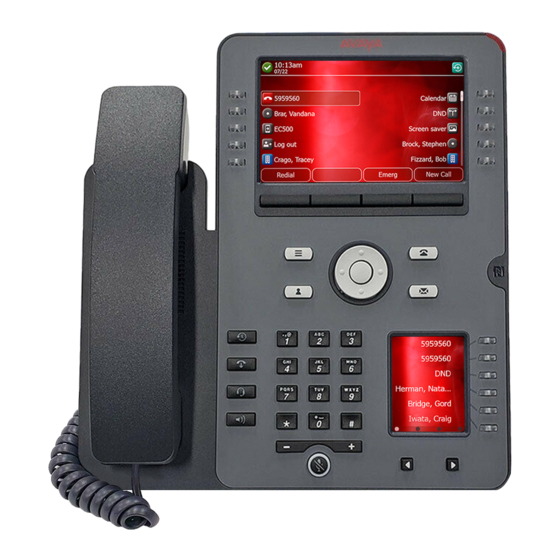
Chapter 2: Avaya J189 phone overview Phone overview Avaya J189 IP Phone is a SIP-based phone for business communications. The phone supports up to 5 call appearances with two lines of call display. Physical specifications • Two color displays • Primary display – 800 x 480 pixels, Secondary display 240 x 320 pixels •... - Page 14 • Speaker • Volume • Mute • Hard Release Key (End call) Related links Physical layout on page 15 Connections jacks for J189 IP Phone on page 17 Secondary display on page 19 Optional components on page 19 August 2020 Using Avaya J189 IP Phone SIP Comments on this document? infodev@avaya.com...
-
Page 15: Physical Layout
Phone overview Physical layout Name Description Beacon LED Provides visual alerts for the following: • Incoming call • Voice mail Table continues… August 2020 Using Avaya J189 IP Phone SIP Comments on this document? infodev@avaya.com... - Page 16 Note: The default action depends on the application and the context. Secondary display Provides quick access to line appearances, features, and phone menus. Table continues… August 2020 Using Avaya J189 IP Phone SIP Comments on this document? infodev@avaya.com...
-
Page 17: Connections Jacks For J189 Ip Phone
Related links Phone overview on page 13 Connections jacks for J189 IP Phone The following image illustrates the connection jacks that are present on the back panel of Avaya J189 IP Phone. August 2020 Using Avaya J189 IP Phone SIP... - Page 18 To connect the computer. Note: PC port is disabled when a Wi-Fi network is used. Headset Jack To connect the headset. Handset Jack To connect the handset. Table continues… August 2020 Using Avaya J189 IP Phone SIP Comments on this document? infodev@avaya.com...
-
Page 19: Secondary Display
You can use the following optional components with the phone: • PSAC12R–050 – 5V DC Power adapter • 2 Avaya J100 Expansion Modules • PoE power supply • J100 wireless card support August 2020 Using Avaya J189 IP Phone SIP Comments on this document? infodev@avaya.com... -
Page 20: Chapter 3: Getting Started
• Config: To enter the file server address. • Never: To never prompt for the file server address. • Cancel: To cancel the prompt and display the Login screen. August 2020 Using Avaya J189 IP Phone SIP Comments on this document? infodev@avaya.com... -
Page 21: Identifying The Device Type During Phone Boot-Up
Identifying the device type during phone boot-up About this task Avaya J100 Series IP Phones screen displays the device type during the phone boot-up. This feature is supported only in the phone software version 4.0.3 and later. Procedure 1. Set up the phone hardware. -
Page 22: Logging Out Of Your Phone
If you do not know or remember your PIN or password, contact your administrator. You cannot unlock the phone if you enter an incorrect PIN or password. August 2020 Using Avaya J189 IP Phone SIP Comments on this document? infodev@avaya.com... -
Page 23: Connecting To A Wifi Network
3. Scroll to a WiFi network you want to connect to from the list of available networks and press Connect. 4. Press Info to view the selected network details. Next steps Switching back to Ethernet network mode causes the phone to reboot. August 2020 Using Avaya J189 IP Phone SIP Comments on this document? infodev@avaya.com... -
Page 24: Chapter 4: Navigation
If there are two or more pages of soft keys, the OK key is active only when the phone screen displays the first page of soft keys. August 2020 Using Avaya J189 IP Phone SIP Comments on this document? infodev@avaya.com... -
Page 25: Text Input
• In half-width lists, the interface selects the list item adjacent to the key. • In page scroll mode and then scroll on to the next or previous page, the selected item remains highlighted. August 2020 Using Avaya J189 IP Phone SIP Comments on this document? infodev@avaya.com... -
Page 26: Main Menu
For example, when you press a line key in Contacts, the interface initiates a call to the contact because the first soft key represents the Call key. Main menu The following table lists the Main menu icons used in Avaya J189 IP Phone: Icons Name... - Page 27 Team icon indicating this team member is not on a call, but is forwarding incoming calls. Team icon indicating this team member is busy on a call and is forwarding incoming calls. Table continues… August 2020 Using Avaya J189 IP Phone SIP Comments on this document? infodev@avaya.com...
-
Page 28: Presence Icons
9. Autodialing feature Presence icons The following table lists presence icons for the Avaya J189 IP Phone and their description: August 2020 Using Avaya J189 IP Phone SIP Comments on this document? infodev@avaya.com... -
Page 29: Multiple Level Precedence And Preemption Icons
Related links Changing your Presence status on page 89 Multiple Level Precedence and Preemption icons The following table lists the icons used in Avaya J189 IP Phone. Icon Precedence level Description Priority Priority icon for a priority call. -
Page 30: Bluetooth Icons
Navigation Bluetooth icons The following table lists the Wi-Fi icons used in the Avaya J189 IP Phone: Icon Description Bluetooth headset is connecting. Default Bluetooth headset. Unpaired Bluetooth headset. Bluetooth headset is connected. Bluetooth headset is disconnected. Wi-Fi icons The following table lists the Wi-Fi icons used in the Avaya J189 IP Phone:... -
Page 31: Chapter 5: Handling Incoming Calls
You can receive a call on a secondary call appearance only if the call appearance is free. Procedure Press one of the following: • The Answer soft key August 2020 Using Avaya J189 IP Phone SIP Comments on this document? infodev@avaya.com... -
Page 32: Handling Calls And Conferences Using Multiple Device Access
Navigation cluster to select the call and answer it. Procedure On the Incoming call screen, press one of the following: • Ignore soft key • + volume button August 2020 Using Avaya J189 IP Phone SIP Comments on this document? infodev@avaya.com... -
Page 33: Declining A Call
The call is declined. Depending on your Call decline policy, the caller receives one of the following alert: • An audio message alert • A busy tone alert August 2020 Using Avaya J189 IP Phone SIP Comments on this document? infodev@avaya.com... -
Page 34: Chapter 6: Handling Outgoing Calls
DTMF feedback tone. The phone automatically places the call when it detects that the dialing string is complete or when there is a time out. August 2020 Using Avaya J189 IP Phone SIP Comments on this document? infodev@avaya.com... -
Page 35: Redialing A Number
2. (Optional) To see the list of dialed numbers: a. Scroll to the number you want to redial. b. Press Call. Related links Setting redial options on page 98 August 2020 Using Avaya J189 IP Phone SIP Comments on this document? infodev@avaya.com... -
Page 36: Making A Call By Using Speed Dial
For example, press 76484 to search for someone whose name is Smith. 4. Press Search again. The phone displays the contact saved in the corporate database. 5. Press Call. August 2020 Using Avaya J189 IP Phone SIP Comments on this document? infodev@avaya.com... -
Page 37: Making An International Call
In the IP Office environment, the Emerg soft key is unavailable. You must dial the emergency number by using the dial pad. Making an emergency call Before you begin Ensure that the Emerg soft key is assigned by your administrator. August 2020 Using Avaya J189 IP Phone SIP Comments on this document? infodev@avaya.com... - Page 38 • On the Phone screen, press the Emerg soft key, and again press Emerg when the phone prompts you for confirmation. • Dial the emergency number by using the dial pad. August 2020 Using Avaya J189 IP Phone SIP Comments on this document? infodev@avaya.com...
-
Page 39: Chapter 7: Call-Related Features
1. To put an active call on hold, press the Hold soft key, or press the line key of the active call. 2. To resume the held call, press the Resume soft key, or press the line key of the held call. August 2020 Using Avaya J189 IP Phone SIP Comments on this document? infodev@avaya.com... -
Page 40: Chapter 8: Managing Contacts
The contact extension can include uppercase and lowercase letters, numbers 0 - 9, and special symbols, such as comma (,), plus (+), and dot (.). 6. Press Save. Related links Adding a contact to the local group on page 45 August 2020 Using Avaya J189 IP Phone SIP Comments on this document? infodev@avaya.com... -
Page 41: Adding A Contact From The Recents List
Using the Quick Search feature of the phone, you can quickly search for a saved contact from the Contacts list without entering the entire name of the contact. Before you begin Ensure that at least one contact is available in the Contacts list. August 2020 Using Avaya J189 IP Phone SIP Comments on this document? infodev@avaya.com... -
Page 42: Viewing The Contact Details
• To call the contact, press Call. • To edit the contact, press Edit. • To delete the contact, press Delete. • To view more options, press More. August 2020 Using Avaya J189 IP Phone SIP Comments on this document? infodev@avaya.com... -
Page 43: Searching For A Contact
Ensure the Contacts list is not empty. Procedure 1. Press Contacts. 2. (Optional) To navigate through Main menu, do the following: a. Scroll to Applications, and press Select. August 2020 Using Avaya J189 IP Phone SIP Comments on this document? infodev@avaya.com... -
Page 44: Deleting A Contact
Scroll to Contacts, and press Select. 3. Press Groups. 4. Press NewGroup. 5. In the Enter group name field, type your group name. 6. Press Save. August 2020 Using Avaya J189 IP Phone SIP Comments on this document? infodev@avaya.com... -
Page 45: Adding A Contact To The Local Group
4. Scroll to the group, and press Members. The phone displays the list of contacts in the group. 5. Select a contact, and press Remove. The contact will be removed from your Contacts list. August 2020 Using Avaya J189 IP Phone SIP Comments on this document? infodev@avaya.com... -
Page 46: Assigning A Ringtone To A Contact
You can add frequently used LDAP contacts to your local Contacts with the help of the +Contact soft key. You can combine any found LDAP contact with an existing local contact with the help of the Combine soft key. August 2020 Using Avaya J189 IP Phone SIP Comments on this document? infodev@avaya.com... -
Page 47: Setting Ldap Directory As The Contact Search Source
• Scroll to Applications, and press Select. • Scroll to Contacts, and press Select. 3. If you are searching from a LDAP Directory, scroll to LDAP Directory, and press Select. August 2020 Using Avaya J189 IP Phone SIP Comments on this document? infodev@avaya.com... - Page 48 8. (Optional) Press +Contact from the Details view to add an LDAP contact to the list of your local contacts. 9. (Optional) Press Combine from the Details view to select an existing local contact and merge it with the selected LDAP contact. August 2020 Using Avaya J189 IP Phone SIP Comments on this document? infodev@avaya.com...
-
Page 49: Chapter 9: Managing Recents
• Call time-stamp • Call duration Avaya J100 Series IP Phones software version 4.0.3 and later always encrypts the content of the call log file. When the offline call log feature is disabled in System Manager, if you downgrade the software of your phone to a version earlier than 4.0.3, you will lose the call log details. -
Page 50: Deleting A Call Record From Recents
6. Select one of the following when the phone prompts for confirmation: • Delete: To delete the entry. The phone deletes the number from the call history list. • Cancel: To cancel and return to the previous menu. August 2020 Using Avaya J189 IP Phone SIP Comments on this document? infodev@avaya.com... -
Page 51: Clearing The Recents List
4. Select one of the following when the phone prompts for confirmation: • Delete: To delete all entries. • Cancel: To cancel and return to the previous menu. August 2020 Using Avaya J189 IP Phone SIP Comments on this document? infodev@avaya.com... -
Page 52: Chapter 10: Managing Conference Calls
3. Press Held Call soft key to see a list of held calls. 4. Select the call on hold that you want to add to the conference. 5. Press one of the following: • Join August 2020 Using Avaya J189 IP Phone SIP Comments on this document? infodev@avaya.com... -
Page 53: Putting A Conference Call On Hold And Resuming A Call
2. Press End Call when the conference is active. Result The participant who was added last gets disconnected from the conference. Related links Adding a participant to no hold conference on page 86 August 2020 Using Avaya J189 IP Phone SIP Comments on this document? infodev@avaya.com... -
Page 54: Viewing The Details Of A Conference
4. When the person answers, press Join or OK to add the person to the existing call. 5. Press Add and repeat the steps to add another person to the conference. 6. Press the Details button to access the details of the participants. August 2020 Using Avaya J189 IP Phone SIP Comments on this document? infodev@avaya.com... -
Page 55: Chapter 11: Advanced Features
• Transferring an active call to the selected user immediately or after talking to this user first • Adding the selected user to an active call to set up a conference call To configure any of these shortcut actions, contact your system administrator. August 2020 Using Avaya J189 IP Phone SIP Comments on this document? infodev@avaya.com... -
Page 56: Making A Call Transfer With A Shortcut Key
If you need to include the other agent in your conversation with the caller, you can add an Autodial user or a contact to an active call to set up a conference call. August 2020 Using Avaya J189 IP Phone SIP Comments on this document? infodev@avaya.com... -
Page 57: Activating The Screen Saver
Enabling both features at the same time can cause duplicate entries in the call log. Procedure 1. Navigate to the Features screen. 2. Scroll to choose Do not disturb. August 2020 Using Avaya J189 IP Phone SIP Comments on this document? infodev@avaya.com... -
Page 58: Automatic Callback
IT Help Desk for autodialing. These numbers are displayed on the phone screen. Before you begin Ensure that your system administrator has set up few frequently called numbers to use this feature. August 2020 Using Avaya J189 IP Phone SIP Comments on this document? infodev@avaya.com... -
Page 59: Blocking Your Extension From Displaying During Calls
Use this procedure to make a call on another user’s bridged line. Before you begin Ensure that the required bridged line is idle. Procedure 1. Press the line key of the bridged number that you want to use. August 2020 Using Avaya J189 IP Phone SIP Comments on this document? infodev@avaya.com... -
Page 60: Answering A Bridged Line Call
With the Busy Indicator (BI) feature, you can do the following: • View the status of other users in the network • Make quick calls to the monitored users August 2020 Using Avaya J189 IP Phone SIP Comments on this document? infodev@avaya.com... -
Page 61: Busy Indicator Icons And Led Indication
Busy Indicator icons look the same as Presence “Available” and “On a call” icons but they might differ depending on the phone or the button module model. The following table displays the Busy Indicator icons and LED indication for , Avaya J189 IP Phone, and Avaya J100 Expansion Module. -
Page 62: Call Transfer To A Monitored User
• Press the Phone key, scroll to the required Busy Indicator line, and press Select. The phone displays the Transfer now or talk with [BI extension number]? window. 3. Press Now. August 2020 Using Avaya J189 IP Phone SIP Comments on this document? infodev@avaya.com... -
Page 63: Calendar
Use this procedure to open calendar on your phone. Before you begin Ensure that your administrator has activated Exchange credentials on your phone. Procedure 1. Press Main menu. 2. Scroll to Applications, and press Select. August 2020 Using Avaya J189 IP Phone SIP Comments on this document? infodev@avaya.com... -
Page 64: Configuring The Microsoft Exchange Server Calendar
• Exchange username: Enter your email ID. • Exchange password: Enter your password. • Exchange domain: Enter the domain name, for example, avaya.com. 6. (Optional) To enable or disable Name/Password Prompt, do one of the following: • Toggle: To enable or disable the prompt. -
Page 65: Call Forwarding
The Enhanced Call Forward feature is used to set rules on call forwarding. You can set the rules by entering the internal and external phone numbers in the corresponding Call Forward types. August 2020 Using Avaya J189 IP Phone SIP Comments on this document? infodev@avaya.com... -
Page 66: Forwarding A Call To Another Extension
You can use this feature to forward the incoming calls on your phone to various destination numbers based on the call type and call state. Before you begin Ensure that the feature is activated by the administrator. Contact your administrator for details. August 2020 Using Avaya J189 IP Phone SIP Comments on this document? infodev@avaya.com... - Page 67 3. Scroll to Enhanced Call Forward, and press Select. 4. Select the rule that you want to edit, and press Edit. 5. Enter the destination number. 6. Press Save. August 2020 Using Avaya J189 IP Phone SIP Comments on this document? infodev@avaya.com...
-
Page 68: Call Forwarding To Your Cell Phone Using Ec500
Call forwarding to your cell phone using EC500 About this task Use this procedure to forward calls from your Avaya deskphone to your personal phone. Before you begin • Ensure that the feature is activated by the administrator. Contact your administrator for details. -
Page 69: Calling In Your Intercom Group
Use this procedure to park an active call on your phone extension. Before you begin Ensure that you are on a call. Procedure 1. Press Main menu. 2. Scroll to Features, and press Select. August 2020 Using Avaya J189 IP Phone SIP Comments on this document? infodev@avaya.com... -
Page 70: Unparking A Call
Ensure that the feature is activated by the administrator. Contact your administrator for details. Ensure that you are on an active call. Procedure 1. Press Main menu, and scroll to Features. 2. Press Select. August 2020 Using Avaya J189 IP Phone SIP Comments on this document? infodev@avaya.com... -
Page 71: Retrieving A Parked Call
With the Call Pickup feature, you can answer an incoming call on behalf of a pickup group member. The administrator must add you to a Call Pickup group extension so that you can redirect August 2020 Using Avaya J189 IP Phone SIP Comments on this document? infodev@avaya.com... -
Page 72: Answering A Call For A Call Pickup Group Member
® Avaya J100 Series IP Phones support the following three ways of Call Pickup in Avaya Aura Communication Manager. • Call Pickup: Allows you to answer a call on behalf of a member of the same Call Pickup group. -
Page 73: Answering A Call Using The Extension Number
Some countries, states, and localities have laws that determine if and under what circumstances you can record telephone conversations. Before using the Audix Record feature, you must understand and comply with these laws. August 2020 Using Avaya J189 IP Phone SIP Comments on this document? infodev@avaya.com... -
Page 74: Recording A Call
• Dial the number to transfer the call. • Search for the number in Contacts or Recents. 3. To initiate a consultative transfer, press Talk. The call transfer recipient’s phone starts ringing. August 2020 Using Avaya J189 IP Phone SIP Comments on this document? infodev@avaya.com... -
Page 75: Making A Blind Transfer
In a crisis alert station, when an emergency caller calls an emergency number, all the crisis alert watchers receive a notification about this, so that they can attend to the caller immediately. The system administrator assigns the crisis alert watchers. August 2020 Using Avaya J189 IP Phone SIP Comments on this document? infodev@avaya.com... -
Page 76: Acknowledging The Crisis Alert
To view the new crisis alert details, press Back. Emergency caller information The Phone screen displays the following details of an emergency caller: August 2020 Using Avaya J189 IP Phone SIP Comments on this document? infodev@avaya.com... -
Page 77: Stopping The Crisis Alert
Crisis alert station Field Description Extension The emergency caller extension. ® The following fields will display details only if Avaya Aura Communication Manager has this information. User name The emergency caller name. Date The crisis occurrence date. Time The crisis occurrence time. -
Page 78: Displaying Your Extension On Outgoing Calls
1. Press Main menu, and scroll to Features. 2. Press Select. 3. Scroll to Exclusion, and press one of the following: • Select • Corresponding line button August 2020 Using Avaya J189 IP Phone SIP Comments on this document? infodev@avaya.com... -
Page 79: Extending A Call To Your Cell Phone
• Obtain the user ID and password of your voicemail from your system administrator. Procedure 1. To log in to your voicemail, press the Message button. 2. Follow the voice prompts to playback your voice messages. August 2020 Using Avaya J189 IP Phone SIP Comments on this document? infodev@avaya.com... -
Page 80: Hunt Group Busy
3. Scroll to Whisper page, and press Select. 4. Enter the extension number that you want to call. 5. Press Enter. 6. Deliver the message when your call is received. August 2020 Using Avaya J189 IP Phone SIP Comments on this document? infodev@avaya.com... -
Page 81: Limit Incoming Calls
You can deactivate the Limit Incoming Calls feature to remove the limit on number of incoming calls and change a single call appearance to multiple call appearance. August 2020 Using Avaya J189 IP Phone SIP Comments on this document? infodev@avaya.com... -
Page 82: Long-Term Acoustic Exposure Protection
The Limit Incoming Calls feature will be deactivated. Long-term acoustic exposure protection Avaya J100 Series IP Phones have the long-term acoustic exposure protection to prevent the users from getting acoustic shocks. This feature reduces the loud volume of the conversations on the phone call to permissible acoustic limits. -
Page 83: Multiple Device Access
With the Multiple Device Access (MDA) feature, you can register up to 10 SIP devices with the same extension to transfer active calls between devices. ® This feature is available only in an Avaya Aura environment. Multiple Device Access is configured ®... -
Page 84: Using Uri Dialing To Make A Call
With the Multicast Paging feature, you can receive a page that will be automatically played on the phone. If configured by the system administrator, you can send a multicast page to a group of phones in the network. August 2020 Using Avaya J189 IP Phone SIP Comments on this document? infodev@avaya.com... -
Page 85: Sending A Multicast Page
With the No Hold Conference feature, you can add participants to your call while continuing your active conversation. The No Hold Conference feature lets you create a conference call without putting any call participant on hold. August 2020 Using Avaya J189 IP Phone SIP Comments on this document? infodev@avaya.com... -
Page 86: Adding A Participant To No Hold Conference
No Hold Conference button, the call is placed to the pre-configured number when the participant answers the call joins the no hold conference. If the participants do not answer the call within the configured time-out duration Avaya J100 Series IP Phones will display the appropriate message on the phone screen. -
Page 87: Making A Precedence Call By Using The Main Menu
1. Lift the handset or press one of the following: • Speaker • Headset • Corresponding line button 2. Dial the FAC followed by the extension number. August 2020 Using Avaya J189 IP Phone SIP Comments on this document? infodev@avaya.com... -
Page 88: Pre-Configuration Of Keys
Scroll to Contacts, and press Select. 3. Scroll to the required contact. The phone displays the corresponding Presence icon of the contact. Related links Adding a new contact on page 40 August 2020 Using Avaya J189 IP Phone SIP Comments on this document? infodev@avaya.com... -
Page 89: Changing Your Presence Status
Presence icons on page 28 ™ SLA Mon ™ SLA Mon technology is a patented Avaya technology embedded in Avaya products to facilitate ™ advanced diagnostics. The phones support SLA Mon agent which works with Avaya Diagnostic Server (ADS). ™... -
Page 90: Shared Control
™ With the Shared Control feature, you can operate phones from the Avaya IX Workplace Client client and use high quality audio of the phone. Shared control is supported on all the Avaya J100 Series IP Phones models. ® Phones must be registered with Avaya Aura to establish a shared control connection. -
Page 91: Team Button
For more information to set the overriding permission on Avaya Aura Session Manager, see ® Administering Avaya Aura System Manager. The following table shows icons of the Team Button feature icons for Avaya J189 IP Phone and Avaya J100 Expansion Module: Icon Description The monitored extension is idle. -
Page 92: Answering An Active Call On A Monitored Extension
2. Press Select. 3. Scroll to choose the monitored phone that you want to call. 4. Press Select twice. The phone makes a call to the monitored extension. August 2020 Using Avaya J189 IP Phone SIP Comments on this document? infodev@avaya.com... -
Page 93: Transferring A Call To A Monitored Phone
4. If necessary, scroll to the line button for the extension you want to check. 5. If that extension is in use, the phone displays Busy next to the extension number. August 2020 Using Avaya J189 IP Phone SIP Comments on this document? infodev@avaya.com... -
Page 94: Tracing A Malicious Call
Ensure that the feature is activated by the administrator. Contact your administrator for details. Procedure 1. Press Main menu. 2. Scroll to Applications, and press Select. 3. Scroll to Guest login, and press Select. 4. Enter your extension and password. August 2020 Using Avaya J189 IP Phone SIP Comments on this document? infodev@avaya.com... -
Page 95: Wml Browser
Logging out of your phone on page 22 WML browser Wireless Markup Language (WML) is an XML-based markup language used by Avaya J100 Series IP Phones. The WML browser feature allows you to view WML web pages. With the WML browser feature, you can access the Home page, Click to Dial and Add to Contacts applications. - Page 96 Advanced features d. Home to go to the Home page e. Refresh to reload the current card f. Exit to return to the Applications menu August 2020 Using Avaya J189 IP Phone SIP Comments on this document? infodev@avaya.com...
-
Page 97: Chapter 12: Customization
Using URI dialing to make a call on page 84 Displaying сall timers About this task Use this procedure to display the duration of calls. Procedure 1. Press Main menu. August 2020 Using Avaya J189 IP Phone SIP Comments on this document? infodev@avaya.com... -
Page 98: Setting Key Repeat Delay
Use this procedure to see the last dialed numbers. Procedure 1. Press Main menu. 2. Scroll to Settings, and press Select. 3. Scroll to Phone, and press Select. 4. Scroll to the Redial option. August 2020 Using Avaya J189 IP Phone SIP Comments on this document? infodev@avaya.com... -
Page 99: Assigning Speed Dial Entries
About this task Use this procedure to assign speed dial numbers to your contacts. You can assign up to nine speed dial entries. ® This feature is only available in the Avaya Aura environment. Procedure 1. Press Main menu. 2. Scroll to Settings, and press Select. -
Page 100: Setting Mute Alert
• If there are new voice mail messages, the beacon LED is lit continuously. • If the speaker is on during an active call and there are new voice mail messages, the beacon LED turns off every 15 seconds. August 2020 Using Avaya J189 IP Phone SIP Comments on this document? infodev@avaya.com... -
Page 101: Customizing Phone Keys
• To add a feature, press Feature. • To add an application, press App. You can use the Navigation keys to scroll to the required functionality, and press Select. August 2020 Using Avaya J189 IP Phone SIP Comments on this document? infodev@avaya.com... -
Page 102: Restoring Customized Keys To Default
5. Scroll to Restore, and press Select. 6. In the confirmation window, press Restore. Applications Enabling the Away timer Procedure 1. Press Main menu. 2. Scroll to Settings, and press Select. August 2020 Using Avaya J189 IP Phone SIP Comments on this document? infodev@avaya.com... -
Page 103: Enabling Phone Auto-Lock
4. Scroll to Recents, and press Select. 5. Scroll to Log calls, and press one of the following: • Toggle: To toggle call history on or off. August 2020 Using Avaya J189 IP Phone SIP Comments on this document? infodev@avaya.com... -
Page 104: Enabling And Disabling Microsoft Exchange Contact Integration
• Right Arrow key: To enable Exchange calendar. • Left Arrow key: To disable Exchange calendar. 6. Press Save. Related links Reviewing your Calendar event on page 64 August 2020 Using Avaya J189 IP Phone SIP Comments on this document? infodev@avaya.com... - Page 105 5. Scroll to Reminder Time, and enter the number of minutes. The range is 0 to 99. 6. Scroll to Snooze Time, and enter the number of minutes. The range is 0 to 99. August 2020 Using Avaya J189 IP Phone SIP Comments on this document? infodev@avaya.com...
-
Page 106: Activating Do Not Disturb
7. Press Save. Activating Do not disturb About this task Use this procedure to direct incoming calls to a predefined coverage number that is set by the system administrator. August 2020 Using Avaya J189 IP Phone SIP Comments on this document? infodev@avaya.com... -
Page 107: Redirecting Calls When Do Not Disturb Is Active
Use this procedure to adjust the audio output level to for better quality audio. Procedure 1. Press Main menu. 2. Scroll to Settings, and press Select. 3. Scroll to Audio settings, and press Select. August 2020 Using Avaya J189 IP Phone SIP Comments on this document? infodev@avaya.com... -
Page 108: Enabling And Disabling Bluetooth
• Ensure the wireless module is installed in your phone. • Ensure that the feature is activated by the administrator. Contact your administrator for details. • Ensure your Bluetooth headset is in pairing mode. August 2020 Using Avaya J189 IP Phone SIP Comments on this document? infodev@avaya.com... -
Page 109: Turning Button Clicks On And Off
3. Scroll to Audio settings, and press Select. 4. Use the Down Arrow key to go to the Error Tones screen. 5. Press Toggle to turn error tones on or off. 6. Press Save. August 2020 Using Avaya J189 IP Phone SIP Comments on this document? infodev@avaya.com... -
Page 110: Enabling Wireless Headset Bidirectional Signaling
1. Press Main menu. 2. Scroll to Settings, and press Select. 3. Scroll to Audio settings, and press Select. 4. Scroll to Headset mic level, and press Select. August 2020 Using Avaya J189 IP Phone SIP Comments on this document? infodev@avaya.com... -
Page 111: Configuring Hearing Aid Compatibility
Headset profiles 6, 7, and 8 are designed to work only with wireless headsets. Procedure 1. Press Main menu. 2. Scroll to Settings, and press Select. 3. Scroll to Audio settings, and press Select. August 2020 Using Avaya J189 IP Phone SIP Comments on this document? infodev@avaya.com... -
Page 112: Setting A Personalized Ringtone
2. Scroll to Settings, and press Select. 3. Scroll to Audio settings, and press Select. 4. Scroll to Personalize ringing, and press Select. 5. Scroll to one of the following options: • Primary August 2020 Using Avaya J189 IP Phone SIP Comments on this document? infodev@avaya.com... -
Page 113: Display
3. Scroll to Display, and press Select. 4. Scroll to Background, and press Select. 5. Scroll to Secondary display, and press Select. 6. Scroll down to the new image. August 2020 Using Avaya J189 IP Phone SIP Comments on this document? infodev@avaya.com... -
Page 114: Changing The Screen Saver
5. Scroll to Secondary display, and press Select. 6. Scroll down to the new image. 7. To preview the image, press Preview and then Back. 8. Press Select. 9. Press Save. August 2020 Using Avaya J189 IP Phone SIP Comments on this document? infodev@avaya.com... -
Page 115: Setting The Screen Saver Details
• Name of the button module attached to the phone. 6. On Phone, press one of the following: • Right Arrow key: To increase the brightness. • Left Arrow key: To decrease the brightness. August 2020 Using Avaya J189 IP Phone SIP Comments on this document? infodev@avaya.com... -
Page 116: Adjusting The Brightness Of The Secondary Screen
Adjusting phone screen width Procedure 1. Press Main menu. 2. Scroll to Settings, and press Select. 3. Scroll to Display, and press Select. 4. Scroll to Phone screen width. August 2020 Using Avaya J189 IP Phone SIP Comments on this document? infodev@avaya.com... -
Page 117: Setting The Backlight Timer
• Time Format 24 Hour • Time Format 12 Hour 6. Press Save. Setting the date format Procedure 1. Press Main menu. 2. Scroll to Settings, and press Select. August 2020 Using Avaya J189 IP Phone SIP Comments on this document? infodev@avaya.com... -
Page 118: Setting The Time Zone
5. To set the required time, do one of the following: • Use the Left Arrow and Right Arrow key. • Press - or + soft key. 6. Press Save. August 2020 Using Avaya J189 IP Phone SIP Comments on this document? infodev@avaya.com... -
Page 119: Setting The Text Size
7. (Optional) Press Default to restore the default font size. 8. Press Save. Setting the phone screen width Procedure 1. Press Main menu. 2. Scroll to Settings, and press Select. August 2020 Using Avaya J189 IP Phone SIP Comments on this document? infodev@avaya.com... -
Page 120: Customizing Keys Of The Secondary Display
8. In the new screen, scroll to the contact, feature or application you want to add, and press Select. Related links Relabeling a key on page 121 August 2020 Using Avaya J189 IP Phone SIP Comments on this document? infodev@avaya.com... -
Page 121: Moving A Key
Use the Navigation keys to move the selected line key. c. If the new location is empty, press Select. d. If the new location is already assigned with a key, press Swap. August 2020 Using Avaya J189 IP Phone SIP Comments on this document? infodev@avaya.com... -
Page 122: Deleting A Key
Ethernet or a specific Wi-Fi network. Before you begin Ensure that the system administrator gave you access to perform this task. Procedure 1. Press Main menu. August 2020 Using Avaya J189 IP Phone SIP Comments on this document? infodev@avaya.com... -
Page 123: Setting The Network Configuration
124, irrespective of the pre-configured network that your administrator has set Note: Any time you manually change the connected network, the phone will automatically set Network config to Manual. August 2020 Using Avaya J189 IP Phone SIP Comments on this document? infodev@avaya.com... -
Page 124: Connecting To A Wi-Fi Network
• When you set the network mode, note the SSID, as this is the name of the Wi-Fi network that the phone will attempt to connect to. August 2020 Using Avaya J189 IP Phone SIP Comments on this document? infodev@avaya.com... - Page 125 • Password: Either your personal password or the shared password provided by your system administrator. Result If the credentials are authenticated successfully, the phone automatically restarts to complete the connection. August 2020 Using Avaya J189 IP Phone SIP Comments on this document? infodev@avaya.com...
-
Page 126: Chapter 13: Troubleshooting
Incoming calls might not reach you and can go to voice mail. • Emergency calls might or might not work, depending on the stage of failover and the functionality available on the alternate server. August 2020 Using Avaya J189 IP Phone SIP Comments on this document? infodev@avaya.com... -
Page 127: Recording Audio Parameters
Product ID on the phone screen. Procedure 1. Press Main menu. 2. Scroll to Network Information, and press Select. 3. Scroll to System, and press Select. 4. Scroll to Product ID. August 2020 Using Avaya J189 IP Phone SIP Comments on this document? infodev@avaya.com... -
Page 128: Viewing The Device Type
Viewing the Device type About this task View your device type when your system administrator asks you to provide your device type information. The device type can be either Avaya SIP or Open SIP. Procedure 1. Press Main menu. 2. Scroll to Network Information, and press Select. -
Page 129: Chapter 14: Resources
Chapter 14: Resources Documentation See the following related documents at http://support.avaya.com. Title Use this document to: Audience Overview ® Avaya Aura Session Manager See characteristics and capabilities, For people who want Overview and Specification including feature descriptions, to gain a high-level... - Page 130 Using Avaya IP Office Platform See information about the maintenance For people who System Status Application tasks for System Status Application. maintain System Status Application. Table continues… August 2020 Using Avaya J189 IP Phone SIP Comments on this document? infodev@avaya.com...
-
Page 131: Finding Documents On The Avaya Support Website
The latest customer documentation for some programs is now available on the Avaya Documentation Center website at https://documentation.avaya.com. Important: For documents that are not available on Avaya Documentation Center, click More Sites > Support on the top menu to open https://support.avaya.com. Using the Avaya Documentation Center, you can: •... -
Page 132: Viewing Avaya Mentor Videos
Avaya Mentor videos provide technical content on how to install, configure, and troubleshoot Avaya products. About this task Videos are available on the Avaya Support website, listed under the video document type, and on the Avaya-run channel on YouTube. • To find videos on the Avaya Support website, go to https://support.avaya.com/... -
Page 133: Support
Support • To find the Avaya Mentor videos on YouTube, go to www.youtube.com/AvayaMentor and do one of the following: - Enter a key word or key words in the Search Channel to search for a specific product or topic. - Scroll down Playlists, and click a topic name to see the list of videos available for the topic. - Page 134 ..........110 call forward busy ............65 Autodialing call forward no answer ..........65 calling a person ............call history Avaya support website ............133 viewing ................49 August 2020 Using Avaya J189 IP Phone SIP Comments on this document? infodev@avaya.com...
- Page 135 ............automatic dialing ............97 connecting manual dialing .............. Wi-Fi ................Dial intercom call ..............connecting network disabling bluetooth .............108 August 2020 Using Avaya J189 IP Phone SIP Comments on this document? infodev@avaya.com...
- Page 136 ..............blocking display ............profile setting ...............111 unblocking display ............headset profile ..............112 hold putting a conference call on hold ........53 Hunt Group Busy August 2020 Using Avaya J189 IP Phone SIP Comments on this document? infodev@avaya.com...
- Page 137 ..............Main menu ................unlock ................making a call phone settings auto-dial ................34 call history ..............103 dial mode ..............call timers ..............dial plan ................ August 2020 Using Avaya J189 IP Phone SIP Comments on this document? infodev@avaya.com...
- Page 138 ..............screen saver ...............114 audio alert ..............77 screen saver details visual alert ..............screen saver clock ............support ................133 screen saver time ............115 screen width ............... searching August 2020 Using Avaya J189 IP Phone SIP Comments on this document? infodev@avaya.com...
- Page 139 ..............using Hunt Group Busy ............videos ................Viewing product ID ..............watch list ................Wi-Fi icons ................WML browser accessing application ........... overview ............... August 2020 Using Avaya J189 IP Phone SIP Comments on this document? infodev@avaya.com...
Need help?
Do you have a question about the J189 and is the answer not in the manual?
Questions and answers