Avaya J189 Using Manual
Hide thumbs
Also See for J189:
- Quick start manual ,
- Instructions manual (163 pages) ,
- Using manual (150 pages)
Table of Contents
Advertisement
Quick Links
Advertisement
Table of Contents

Related Manuals for Avaya J189


Summary of Contents for Avaya J189
- Page 1 Using Avaya J189 IP Phone H.323 Release 6.8.5 Issue 2 April 2022...
- Page 2 RESERVES THE RIGHT TO TAKE LEGAL ACTION AGAINST YOU the express behalf of Avaya. End User agrees to indemnify and hold AND ANYONE ELSE USING OR SELLING THE SOFTWARE harmless Avaya, Avaya's agents, servants and employees against all WITHOUT A LICENSE.
- Page 3 MAY BE OBTAINED FROM MPEG LA, L.L.C. SEE HTTP:// written consent of Avaya can be a criminal, as well as a civil offense WWW.MPEGLA.COM. under the applicable law. Compliance with Laws...
- Page 4 • Please only use the connecting cables, power cord, and AC adapters shipped with the equipment or specified by 取得審驗證明之低功率射頻器材,非經核准,公司、商號或使 用者均 Avaya to be used with the equipment. If you use any 不得擅自變更頻率、加大功率或變更原設計之特性及功能。低功率射 other equipment, it may cause failures, malfunctioning, 頻器材之使用不得影響飛航安全及干擾合法通信;經發現有干擾現象...
- Page 5 Bluetooth SIG, Inc. and any use of such marks by Avaya • Reorient or relocate the receiving antenna. Inc. is under license.
-
Page 6: Table Of Contents
Contents Chapter 1: Introduction...................... 9 .......................... 9 Purpose Chapter 2: Phone overview .................... 10 ........................ 12 Physical layout .................. 14 Connections jacks for J189 IP Phone ......................... 16 Secondary display ...................... 16 Optional components ................... 17 Avaya J100 phone display modes Chapter 3: Getting started...................... 18 .............. 18... - Page 7 Using pictures from your USB device as a screensaver Chapter 7: Customization...................... 49 ......................... 49 Options & Settings ........................ 49 Call Settings ...................... 54 Application Settings .................... 56 Screen and Sound Options ...................... 59 Advanced options April 2022 Using Avaya J189 IP Phone H.323 Comments on this document? infodev@avaya.com...
- Page 8 Chapter 8: Troubleshooting.................... 64 .................... 64 Limited access during failover Chapter 9: Resources...................... 66 ........................ 66 Documentation ............. 66 Finding documents on the Avaya Support website .................... 67 Viewing Avaya Mentor videos .......................... 67 Support April 2022 Using Avaya J189 IP Phone H.323...
-
Page 9: Chapter 1: Introduction
Chapter 1: Introduction Purpose This document describes the features of the Avaya J189 IP Phone and provides instructions on how to use this phone. It is intended for the end user. April 2022 Using Avaya J189 IP Phone H.323 Comments on this document? infodev@avaya.com... -
Page 10: Chapter 2: Phone Overview
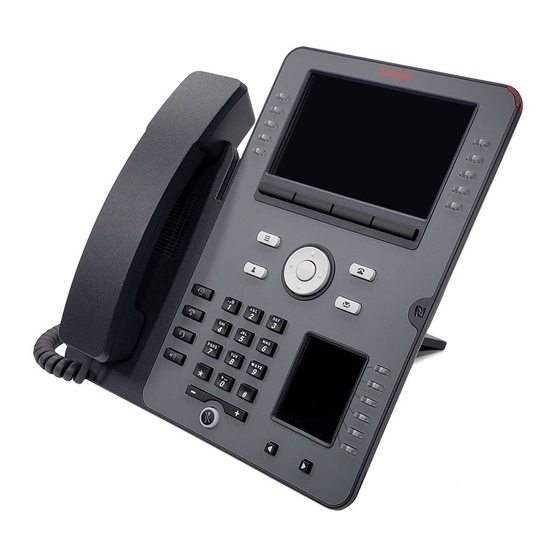
Chapter 2: Phone overview Avaya J189 IP Phone is a phone for business communications. The phone supports 96 buttons. The primary display of the phone provides 96 buttons by scrolling or paging using the navigation cluster. Optionally, the phone supports up to two Avaya J100 Expansion Module (JEM24). Avaya J189 IP Phone also has a secondary screen which is the first effective module with six line buttons and two navigation buttons. - Page 11 • Volume • Mute • Drop • Dial pad Related links Physical layout on page 12 Connections jacks for J189 IP Phone on page 14 Secondary display on page 16 Optional components on page 16 Avaya J100 phone display modes...
-
Page 12: Physical Layout
Phone overview Physical layout Name Description Beacon LED Provides visual alerts for the following: • Incoming call • Voice mail Table continues… April 2022 Using Avaya J189 IP Phone H.323 Comments on this document? infodev@avaya.com... - Page 13 Secondary display Provides quick access to line appearances, features, and phone menus. Volume • (+) : To increases the volume. • (-): To decrease the volume. Table continues… April 2022 Using Avaya J189 IP Phone H.323 Comments on this document? infodev@avaya.com...
-
Page 14: Connections Jacks For J189 Ip Phone
Related links Phone overview on page 10 Connections jacks for J189 IP Phone The following image illustrates the connection jacks that are present on the back panel of Avaya J189 IP Phone. April 2022 Using Avaya J189 IP Phone H.323... - Page 15 Connections jacks for J189 IP Phone The image schematically describes which device to connect to which jack: Name Description 5V DC Jack To connect the power supply. Network port To connect the Ethernet cable. PC port To connect the computer.
-
Page 16: Secondary Display
10 Secondary display The secondary display is an additional screen available in Avaya J189 IP Phone that provides the phones with additional call appearances and feature or application display. The secondary display is located at the lower right corner. -
Page 17: Avaya J100 Phone Display Modes
10 Avaya J100 phone display modes The Avaya J100 Series IP Phones have three types of phone screen width options: • Full: In full-width mode, the phone screen shows in full line with the current call. The feature screen also displays only one feature per line. -
Page 18: Chapter 3: Getting Started
Identifying the device type during phone boot-up About this task Avaya J100 Series IP Phones displays the device type on the primary screen while the phone boots up. You can configure your phone according to the device type while the phone boots up. -
Page 19: Unlocking Your Phone
Procedure 1. Press Home 2. Press Main menu. 3. Select Guest Login. 4. Enter your extension number. 5. Press Enter. 6. Enter your password. 7. Press Enter. April 2022 Using Avaya J189 IP Phone H.323 Comments on this document? infodev@avaya.com... - Page 20 8. Scroll left or right to select the duration from 1 to 12 hours for using this phone. You can log out at any time despite the duration that you select. 9. Press Enter. April 2022 Using Avaya J189 IP Phone H.323 Comments on this document? infodev@avaya.com...
-
Page 21: Chapter 4: Navigation
• Scrolling between pages when navigating the phone screen, provided your administrator switches on the page scrolling mode. The directional keys are context-sensitive. Table continues… April 2022 Using Avaya J189 IP Phone H.323 Comments on this document? infodev@avaya.com... -
Page 22: Enhanced Navigation In Half-Width Mode
OK, center button of the navigation cluster. This button is used to make the selection or activate the selected cell. April 2022 Using Avaya J189 IP Phone H.323 Comments on this document? infodev@avaya.com... -
Page 23: Line Keys
For example, when you press a line key in Contacts, the interface initiates a call to the contact because the first soft key represents the Call key. Main menu The following table lists the Main menu icons used in Avaya J189 IP Phone: Name Description Options &... - Page 24 Log in with a valid extension and password. Indicates that the call is using a wideband codec for excellent voice quality. Indicates a low network performance that might result in lower call quality. April 2022 Using Avaya J189 IP Phone H.323 Comments on this document? infodev@avaya.com...
-
Page 25: Chapter 5: Call Operations
This moves the call appearance list to the top of your screen. Note: Set the Phone Screen on Ringing option to Yes to automatically display the phone screen when you receive a call. April 2022 Using Avaya J189 IP Phone H.323 Comments on this document? infodev@avaya.com... -
Page 26: Ignoring A Call
Making an emergency call About this task If your administrator configured emergency calling for your phone, the Phone screen displays the Emerg softkey to dial a preset emergency services number. April 2022 Using Avaya J189 IP Phone H.323 Comments on this document? infodev@avaya.com... -
Page 27: Calling A Person From The Contacts List
Depending on how your administrator has administered your phone, returning a missed call might result in the phone deleting the call history entry when the call goes through. April 2022 Using Avaya J189 IP Phone H.323 Comments on this document? infodev@avaya.com... -
Page 28: Making A Call Using Edit Dialing
6. Press OK to dial the call. Redialing a number About this task Use this procedure to redial the last number or the most recent numbers in a call log. April 2022 Using Avaya J189 IP Phone H.323 Comments on this document? infodev@avaya.com... -
Page 29: Clearing A Number
While on a call, you can mute the microphone of your phone so that the other party cannot hear you. You can also use the Bluetooth headset to mute the call. April 2022 Using Avaya J189 IP Phone H.323 Comments on this document? infodev@avaya.com... -
Page 30: Placing A Call On Hold And Resuming The Call
4. Press the Resume soft key , or select the line key of the held call to retrieve the call. Contacts Using the contacts feature You can save up to 250 names and up to 3 telephone numbers for each name. April 2022 Using Avaya J189 IP Phone H.323 Comments on this document? infodev@avaya.com... -
Page 31: Adding A New Contact
The primary number is the one that will always display without having to go into contact details. Note: When adding a contact number, you must use your enterprise phone number as the Primary number as this number is utilized for presence indication. April 2022 Using Avaya J189 IP Phone H.323 Comments on this document? infodev@avaya.com... -
Page 32: Deleting A Contact
Viewing the contact details About this task Use this procedure to view the details of a contact. You can call, edit, or delete a contact from the Details window. April 2022 Using Avaya J189 IP Phone H.323 Comments on this document? infodev@avaya.com... -
Page 33: Searching For A Contact
Press Call to call the person or press More > Edit to edit contact information. Call History Viewing the call history Procedure 1. Press Recents. You can go to the top of the list by pressing Recents again. April 2022 Using Avaya J189 IP Phone H.323 Comments on this document? infodev@avaya.com... -
Page 34: Viewing Call History Details
Removing an entry from call history Procedure 1. Press Recents. 2. Select the number you want to delete. 3. Press More, and then press Delete. 4. Press Delete to confirm the deletion. April 2022 Using Avaya J189 IP Phone H.323 Comments on this document? infodev@avaya.com... -
Page 35: Clearing All Call History Entries
You can use conference calls to speak with people from different locations on the same call. Additional conferencing options might be available through Expanded Meet-Me Conferencing. Contact your administrator for more information about this feature. April 2022 Using Avaya J189 IP Phone H.323 Comments on this document? infodev@avaya.com... -
Page 36: Adding A Person To An Active Call
Dropping a person from a conference call About this task This feature is not available on all systems. Procedure 1. From the Phone screen, select your active conference call. 2. Press Details. April 2022 Using Avaya J189 IP Phone H.323 Comments on this document? infodev@avaya.com... -
Page 37: Dropping Or Disconnecting The Last Participant From A Conference Call
1. Press Hold soft key during a conference call. 2. Do one of the following: • Press Resume. • Select the call appearance to resume the conference call. April 2022 Using Avaya J189 IP Phone H.323 Comments on this document? infodev@avaya.com... -
Page 38: Muting A Person On A Conference Call
Listening to your voicemail About this task Use this procedure to listen to your voicemail on your phone. For more details on using your voicemail services see, Avaya OneCloud-ReadyNow Messaging Service User Guide. Before you begin • Ensure that the system administrator configures the voicemail for your extension. - Page 39 Using Voicemail 2. Follow the voice prompts to playback your voice messages. April 2022 Using Avaya J189 IP Phone H.323 Comments on this document? infodev@avaya.com...
-
Page 40: Chapter 6: Advance Features
When Send All Calls (SAC) feature is on, your incoming calls go directly to a predefined coverage number, typically your voice mail. Incoming calls ring once at your extension and then go directly April 2022 Using Avaya J189 IP Phone H.323 Comments on this document? infodev@avaya.com... -
Page 41: Activating Ec500 For Simultaneous Ringing On Multiple Phones
The system administrator has to add your cell phone number and program the desk phone. Procedure 1. From the Phone screen, go to the Features screen. 2. Scroll to EC500, and press Select. April 2022 Using Avaya J189 IP Phone H.323 Comments on this document? infodev@avaya.com... -
Page 42: Bridged Call Appearances
Recents list or select the Redial softkey . Joining a call on a bridged line About this task Use this task to join an existing call on a bridged line. April 2022 Using Avaya J189 IP Phone H.323 Comments on this document? infodev@avaya.com... -
Page 43: Wml Browser
For multiple call appearance alerting, the phone highlights the call appearance with the most recent incoming call. WML browser Wireless Markup Language (WML) is an XML-based markup language used by Avaya J100 Series IP Phones. The WML browser feature allows you to view WML web pages. -
Page 44: Accessing The Wml Browser
USB flash drive to add contacts to your Contacts list from an E-mail or other PC software program, and use the pictures from the device as screensaver on your phone. April 2022 Using Avaya J189 IP Phone H.323 Comments on this document? infodev@avaya.com... -
Page 45: Adding Contacts From An External File To Your Contacts List
One way to ensure that the file is in the proper format is to export the contacts list of your deskphone to your USB device, which automatically creates a formatted file. Avaya also provides a spreadsheet tool that uses macros to convert your Outlook contacts into the ®... -
Page 46: Overwriting Contacts List With An External File
If the USB flash drive already contains a contact file, you must first confirm that you want to replace that file. April 2022 Using Avaya J189 IP Phone H.323 Comments on this document? infodev@avaya.com... -
Page 47: Temporarily Using A Usb Contacts List
By default, a picture is displayed for 5 seconds. The administrator can configure the time to display. Avaya J189 IP Phone is 800 x 420 pixels. April 2022 Using Avaya J189 IP Phone H.323... - Page 48 A picture file must be in JPEG (.jpg or .jpeg) format. Your administrator can help you set up this feature. Your administrator can also disable this feature, in which case the My Pictures option does not appear on the Avaya Menu. In addition to the features described in the...
-
Page 49: Chapter 7: Customization
You can configure the Go to Phone Screen on Calling option to Yes to automatically display the Phone screen when you make a call. Procedure 1. Press Main menu > Options & Settings. 2. Press Select or OK. 3. Select Call Settings. April 2022 Using Avaya J189 IP Phone H.323 Comments on this document? infodev@avaya.com... - Page 50 4. Press Select or OK. 5. Select Go to Phone Screen on Answer. 6. Press Change or OK to set the option to Yes or No, depending on the current setting. April 2022 Using Avaya J189 IP Phone H.323 Comments on this document? infodev@avaya.com...
- Page 51 Use this task to cause the LED in the top right corner of the phone to flash when the phone gets incoming calls. Procedure 1. Press Main Menu. April 2022 Using Avaya J189 IP Phone H.323 Comments on this document? infodev@avaya.com...
- Page 52 7. Select Pair Contacts to Calls. 8. Press Change or OK to change the setting to On or Off. 9. Press Save. Related links Options & Settings on page 49 April 2022 Using Avaya J189 IP Phone H.323 Comments on this document? infodev@avaya.com...
- Page 53 • Switchhook only: The phone does not send the ringing tone to the headset. The headset switch-hook button is non functional. 5. Press Save. Related links Options & Settings on page 49 April 2022 Using Avaya J189 IP Phone H.323 Comments on this document? infodev@avaya.com...
-
Page 54: Application Settings
The phones sets the option to No by default. Press Change to change the setting to Yes. 6. Press Save to save the change. Related links Options & Settings on page 49 April 2022 Using Avaya J189 IP Phone H.323 Comments on this document? infodev@avaya.com... - Page 55 11. (Optional) To revert to the default button labels, select Main Menu > Options & Settings > Application Settings > Restore Default Button Labels. a. Press Select. b. Press Default. Related links Options & Settings on page 49 April 2022 Using Avaya J189 IP Phone H.323 Comments on this document? infodev@avaya.com...
-
Page 56: Screen And Sound Options
2. Navigate to Options & Settings > Screen & Sound Options > Button Clicks. 3. Press Select. 4. Press Change to turn sound on or off. 5. Press Save. Related links Options & Settings on page 49 April 2022 Using Avaya J189 IP Phone H.323 Comments on this document? infodev@avaya.com... - Page 57 If you set the value of Phone Screen Width to Half or Feature-Half and Text Size to Large, the screen width automatically changes from half to full, to allow the larger text size April 2022 Using Avaya J189 IP Phone H.323 Comments on this document? infodev@avaya.com...
- Page 58 Procedure 1. Press Main menu > Options & Settings > Screen & Sound Options. 2. Press Select or OK. April 2022 Using Avaya J189 IP Phone H.323 Comments on this document? infodev@avaya.com...
-
Page 59: Screen And Sound Options
Performing a manual backup or a manual restore of backed up files is not usually necessary, but your system administrator may ask you to do this in the event of system problems. Procedure 1. Press Main menu > Options & Settings. April 2022 Using Avaya J189 IP Phone H.323 Comments on this document? infodev@avaya.com... - Page 60 3. Select the Handset, Headset, or Speaker for which you want to turn AGC on or off. 4. Press Save. Related links Options & Settings on page 49 Selecting handset audio equalization April 2022 Using Avaya J189 IP Phone H.323 Comments on this document? infodev@avaya.com...
- Page 61 49 Acoustic Protection Avaya J100 Series IP Phones have the acoustic exposure protection, to protect the user’s ears from the acoustic shocks. This feature reduces the loud volume of the conversations on the phone call to permissible acoustic limit. The user can set the permissible acoustic limit to dynamic or predefined static values.
-
Page 62: Administrative Messages
• An audible alert broadcast through the Speaker or the headset if that device is active. • An interrupt screen notifying you that you are receiving an audio alert. April 2022 Using Avaya J189 IP Phone H.323 Comments on this document? infodev@avaya.com... - Page 63 While receiving an audible alert, you can change between the speaker, handset, and headset, can stop the transmission of pushed audio content by going on-hook, and can adjust the volume, as you normally do during a call. April 2022 Using Avaya J189 IP Phone H.323 Comments on this document? infodev@avaya.com...
-
Page 64: Chapter 8: Troubleshooting
Incoming calls might not reach you and can go to voice mail. • Emergency calls might or might not work, depending on the stage of failover and the functionality available on the alternate server. April 2022 Using Avaya J189 IP Phone H.323 Comments on this document? infodev@avaya.com... - Page 65 • The Message Waiting Indicator is cleared, but voice mail might still be available if the voice mail server to which calls are being sent is not in failover. Transitions back to the normal server will restore all original functionality. April 2022 Using Avaya J189 IP Phone H.323 Comments on this document? infodev@avaya.com...
-
Page 66: Chapter 9: Resources
Chapter 9: Resources Documentation See the following related documents at http://support.avaya.com. Title Use this document to: Audience Installing and Administering Avaya See information about how to perform 9600 For people who want 9600 Series and J100 Series IP Series IP Deskphones and Avaya J100 to gain a high-level Phones H.323... -
Page 67: Viewing Avaya Mentor Videos
Avaya Mentor videos provide technical content on how to install, configure, and troubleshoot Avaya products. About this task Videos are available on the Avaya Support website, listed under the video document type, and on the Avaya-run channel on YouTube. • To find videos on the Avaya Support website, go to https://support.avaya.com/... - Page 68 ............... adding a person on hold ..........getting started dropping a person ............36 login ................configuring ................Go to Phone Screen on answer connection jacks ..............April 2022 Using Avaya J189 IP Phone H.323 Comments on this document? infodev@avaya.com...
- Page 69 USB files as a screensaver ........Main Menu problems with the phone ............64 options ................purpose of document ............. making a call ................26 contacts list ..............27 memory sticks ..............44 messages April 2022 Using Avaya J189 IP Phone H.323 Comments on this document? infodev@avaya.com...
- Page 70 USB files ................merging with contacts list ..........pictures ................. USB flash drives working with ..............44 videos .................. Visual Alerts configuring ..............WML browser accessing application ........... overview ............... April 2022 Using Avaya J189 IP Phone H.323 Comments on this document? infodev@avaya.com...
Need help?
Do you have a question about the J189 and is the answer not in the manual?
Questions and answers