
Related Manuals for Extreme Networks ExtremeWireless AP3000X


Summary of Contents for Extreme Networks ExtremeWireless AP3000X
- Page 1 ExtremeWireless™ AP3000X Access Point Installation Guide 9037812-00 Rev AA May 2023...
- Page 2 Extreme Networks, Inc. reserves the right to make changes in specifications and other information contained in this document and its website without prior notice. The reader should in all cases consult representatives of Extreme Networks to determine whether any such changes have been made.
-
Page 3: Table Of Contents
Table of Contents Preface.............................. 5 Text Conventions....................................5 Documentation and Training..............................6 Help and Support....................................7 Subscribe to Product Announcements........................7 Send Feedback..................................... 8 AP3000X Overview........................9 Product Specifications.................................. 10 Antennas......................................10 Radios....................................... 10 Ports and Connectors................................11 Physical Dimensions................................11 Environmental Specifications............................11 Troubleshoot....................................11 Hardware Ports....................................12 LED Status ......................................13 Power Profile...................................... - Page 4 Brazil Anatel Statement................................39 Mexico Compliance Statement.............................39 UK Statement and CE Statement............................40 Extreme Networks UK Address............................40 Extreme Networks EU Importer Address........................40 Taiwan Regulatory Statement..............................41 European Waste Electrical and Electronic Equipment (WEEE) Notice..........41 Supplement to Product Instructions..........................42 Declaration of Conformity in Languages of the European Community..........
-
Page 5: Preface
Preface Read the following topics to learn about: • The meanings of text formats used in this document. • Where you can find additional information and help. • How to reach us with questions and comments. Text Conventions Unless otherwise noted, information in this document applies to all supported environments for the products in question. -
Page 6: Documentation And Training
When a backslash separates two lines of a command input, enter the entire command at the prompt without the backslash. Documentation and Training Find Extreme Networks product information at the following locations: Current Product Documentation Release Notes ExtremeWireless™ AP3000X Access Point Installation Guide... -
Page 7: Help And Support
Extreme Optics Compatibility Other resources such as white papers, data sheets, and case studies Extreme Networks offers product training courses, both online and in person, as well as specialized certifications. For details, visit www.extremenetworks.com/education/. Help and Support If you require assistance, contact Extreme Networks using one of the following... -
Page 8: Send Feedback
You can modify your product selections or unsubscribe at any time. Send Feedback The Information Development team at Extreme Networks has made every effort to ensure that this document is accurate, complete, and easy to use. We strive to improve our documentation to help you in your work, so we want to hear from you. -
Page 9: Ap3000X Overview
The AP3000X access point is an indoor access point with a Wi-Fi 6E dual radio and support for multiple Extreme Networks operating systems. It is designed for high density environments where a large number of people will access your network such as classrooms, warehouses, healthcare clinics, and manufacturing sites. -
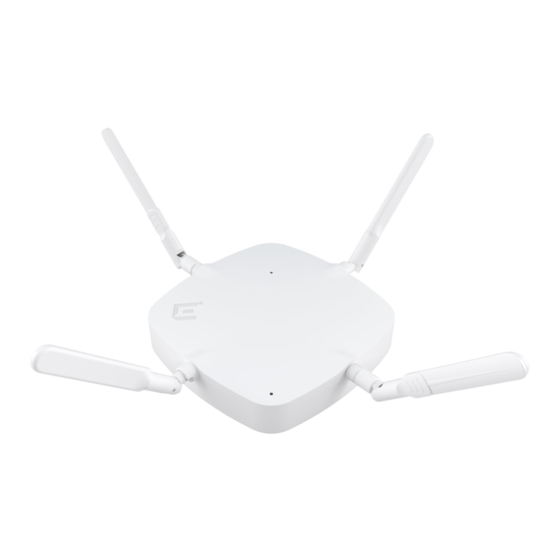
Page 10: Product Specifications
Product Specifications AP3000X Overview Figure 1: The AP3000X Access point Product Specifications The AP3000X access point supports both PoE 802.3af and 802.3at. It is supported on the following platforms: • ExtremeCloud™ IQ • Extreme IQ Controller Antennas The AP3000X ships with the following antennas: •... -
Page 11: Ports And Connectors
AP3000X Overview Ports and Connectors Users per radio: 512 with a total of 1024 ◦ Table 4: Radio Modes AP3000X Radio 1 Radio 2 Ports in use Mode 1 2.4 GHz 5 GHz Two dual band ports. You can change the antennas. Mode 2 6 GHz 5 GHz... -
Page 12: Hardware Ports
Hardware Ports AP3000X Overview Hardware Ports The AP3000X has several ports and hardware features to help you when you install the access point. Use the following diagrams and locate the ports and other hardware features. Figure 2: AP3000X Hardware ports Table 6: AP3000X Ports and Connections Item Port... -
Page 13: Led Status
Use the port when you troubleshoot the AP. The best practice is to use the Extreme Networks micro USB cable (ACC-WIFI-MICRO-USB). When you connect to the device, the management station must have a VT100 emulation program, such as the terminal emulator TeraTerm Pro or Hilgraeve HyperTerminal®. -
Page 14: Power Profile
Power Profile AP3000X Overview Table 8: IQ Engine Status LED Activity LED State Description Dark AP is not being powered. Solid white Power is on and the access point is ready to use. The AP has a Control And Provisioning of Wireless Access Points (CAPWAP) connection to ExtremeCloud IQ. -
Page 15: Supported Accessories
AP3000X Overview Supported Accessories Supported Accessories The AP3000X comes with the AH-ACC-BKT-AX-TB mounting bracket that can be used to mount the access point on flat surfaces, such as Prelude ceilings (15/16 in. ceiling grid), Suprafine ceilings (flat bottomed 9/16 in. ceiling grid), and walls. The ceiling tile sides must be flat. -
Page 16: Supported Power Accessories
Table 14: Accessories Part number Description ACC-WIFI-MICRO-USB Extreme Networks micro USB cable. Note: When you connect to the device using the micro USB Console port, the management station from which you connect to the device must have a VT100 emulation program, such as TeraTerm Pro (a free terminal emulator) or Hilgraeve HyperTerminal. -
Page 17: Micro Usb Console Port Information
AP3000X Overview Micro USB Console Port Information Micro USB Console Port Information Use the console port to make a serial connection between your management system and the access point. You can order a micro USB console adapter for your access point using the part number ACC-WIFI-MICRO-USB. -
Page 18: Cleaning Guidelines For Radome
Cleaning Guidelines for Radome AP3000X Overview Figure 5: Access Point MAC address Cleaning Guidelines for Radome You can use the following cleaning solutions: • Hydrogen peroxide (a 3% solution) • Chlorine bleach • Sodium hypochlorite (a 0.05% solution) • Ethyl alcohol (a 75% solution) •... -
Page 19: Purchase Information
AP3000X Overview Purchase Information Purchase Information The AP3000X access point is sold with the AH-ACC-BKT-AX-TB mounting bracket. Use the information below when you order the AP. Table 16: Access point part number Part number Description AP3000X-WW Indoor Dual Radio Wi-Fi 6E AP, 2.4 GHz and 5 GHz or 5GHz and 6GHz, Multirate Port, External antennas. -
Page 20: Access Point Installation
Access Point Installation Installation Work Flow on page 21 Box Contents on page 21 Install the Access Point on a Wall or a Flat Ceiling on page 22 Install the Access Point on a Silhouette Ceiling on page 22 Install the Access Point to a 9/16th T-bar Ceiling on page 25 Install the Access Point to a Wall with AH-ACC-BKT-AX-WL on page 28... -
Page 21: Installation Work Flow
Access Point Installation Installation Work Flow Installation Work Flow Use the information in the following table to help you install your AP3000X access point. Table 17: Installation Work flow Steps Action Purpose Verify the box contents. Confirm that your AP and accessories arrived complete and undamaged. -
Page 22: Install The Access Point On A Wall Or A Flat Ceiling
Install the Access Point on a Wall or a Flat Ceiling Access Point Installation Table 18: Hardware (continued) Quantity Item AH-ACC-BKT-AX-TB mounting bracket Phillips pan head wood screws Screw-in anchors Install the Access Point on a Wall or a Flat Ceiling Before You Begin Confirm that you have the following items: •... - Page 23 Access Point Installation Install the Access Point on a Silhouette Ceiling About This Task You can mount the access point to a ceiling grid with 1/8 in. or 1/4 in. bottom opening. Silhouette is an Armstrong Ceiling Solutions name. Figure 6: Ceiling grid with 1/8 in. or ¼ in. bottom openings Procedure 1.
- Page 24 Install the Access Point on a Silhouette Ceiling Access Point Installation 3. Lightly push onto to the ceiling rail and rotate the accessory clockwise until the hinges hook over the edge of the rail and the white tabs click in place. Note There are two white tabs in the back of the bracket that holds on to the ceiling rail in place.
-
Page 25: Install The Access Point To A 9/16Th T-Bar Ceiling
Access Point Installation Install the Access Point to a 9/16th T-bar Ceiling Figure 8: AH-ACC-BKT-AX-SL accessory bracket circular tip Call out Description AH-ACC-BKT-AX-SL bracket circular tip 5. Press and rotate the access point clockwise until it locks into place on the accessory. 6. - Page 26 Install the Access Point to a 9/16th T-bar Ceiling Access Point Installation Figure 9: 9/16 in. wide T-bar with protrusion Procedure 1. Remove the ceiling tiles. 2. Place the bracket on the ceiling rail in such a way that the accessory center is over the protrusion and the metal hinges are between perpendicular and about one-eighth of a turn from the sides of the ceiling rail.
- Page 27 Access Point Installation Install the Access Point to a 9/16th T-bar Ceiling Figure 10: AH-ACC-BKT-AX-IL accessory bracket Call out Description Metal hinges on the AH-ACC-BKT-AX-IL bracket. White tabs on the AH-ACC-BKT-AX-IL bracket. Drawing of 9/16 in. ceiling grid, for your reference. 4.
-
Page 28: Install The Access Point To A Wall With Ah-Acc-Bkt-Ax-Wl
Install the Access Point to a Wall with AH-ACC-BKT-AX- Access Point Installation Figure 11: AH-ACC-BKT-AX-IL accessory bracket circular tip Call out Description AH-ACC-BKT-AX-IL bracket circular tip 5. Press and rotate the access point clockwise about one-sixth of a turn until it locks into place on the accessory bracket. -
Page 29: Install The Access Point On A Junction Box
Access Point Installation Install the Access Point on a Junction Box 2. Bring the LAN cable from the wall through the bracket hole. Align the cable before attaching the bracket to the wall. Note A standard Ethernet cable can be used if you do not mind the cable being visible. - Page 30 Install the Access Point on a Junction Box Access Point Installation Figure 12: ACC-BKT-AX-JB accessory bracket metal part • A plastic part that attaches to the metal part and the access point (also called the plastic twist plate) ExtremeWireless™ AP3000X Access Point Installation Guide...
-
Page 31: Install The Access Point On A Beam
Access Point Installation Install the Access Point on a Beam Figure 13: ACC-BKT-AX-JB accessory bracket plastic part Procedure 1. Align the red dot on the back of the access point against the red dot on the plastic part. 2. Push the access point onto the plastic part and turn it clockwise until you hear it lock in place. - Page 32 Install the Access Point on a Beam Access Point Installation • Beam attachment area is at least 0.5 in. (12.7mm) wide and as long as the access point's largest dimension. • Beam mounting surface is at least 0.040 in. (1.0 mm) thick, but less than 0.650 in. (16.5mm) thick.
-
Page 33: Connect Antennas
Access Point Installation Connect Antennas 6. Tighten the beam clip top screw to a torque of 50 in-lbs. Figure 15: Beam clip top screw Call out Description Beam clip top screw that is used to attach the beam accessory bracket to a beam Connect Antennas Before You Begin Locate the 2 RPSMA dual banded 2.4/5 GHz antennas which are shipped with the... -
Page 34: Connect A Power Supply
Connect a Power Supply Access Point Installation 4. Rotate each antenna to the 45 or 90-degree position for maximum signal strength. Connect a Power Supply Before You Begin Obtain a Powertron 12V DC power supply. The power supply is ordered separately. See the table below. -
Page 35: Lock Your Access Point
Access Point Installation Lock Your Access Point Lock Your Access Point Before You Begin You will need the following items: • A 3 mm diameter security cable • A lock to secure the cable About This Task You can use the Kensington security slot to secure your access point. The security feature prevents someone from taking the AP. -
Page 36: Regulatory And Compliance Information
39 UK Statement and CE Statement on page 40 Extreme Networks UK Address on page 40 Extreme Networks EU Importer Address on page 40 Taiwan Regulatory Statement on page 41 European Waste Electrical and Electronic Equipment (WEEE) Notice... -
Page 37: Professional Installation Instruction
Regulatory and Compliance Information Professional Installation Instruction Professional Installation Instruction Installation personnel This product is designed for specific application and needs to be installed by a qualified personnel who has RF and related rule knowledge. The general user shall not attempt to install or change the setting. -
Page 38: Fcc Radiation Exposure Statement
FCC Radiation Exposure Statement Regulatory and Compliance Information device must accept any interference received, including interference that may cause undesired operation. Note This equipment has been tested and found to comply with the limits for a class B digital device, pursuant to Part 15 of the FCC rules. These limits are designed to provide reasonable protection against harmful interference when the equipment is operated in a commercial environment. -
Page 39: Conformitè Europëenne (Ce) Information
Regulatory and Compliance Information Conformitè Europëenne (CE) Information Conformitè Europëenne (CE) Information Warning CE co-location MPE Statement: This equipment complies with CE radiation exposure limits set forth for an uncontrolled environment. This equipment should be installed and operated with minimum distance of 20 cm between the radiator and your body. -
Page 40: Uk Statement And Ce Statement
UK - The device is restricted to indoor use only when operating in the 5945 to 6425 MHz frequency range. Hereby, Extreme Networks declares that the radio equipment AP3000X is in compliance with Radio Equipment Regulations 2017. Operation on oil platforms, cars, trains, boats, and aircraft shall be prohibited except for on large aircraft flying above 10,000 ft. -
Page 41: Taiwan Regulatory Statement
Regulatory and Compliance Information Taiwan Regulatory Statement Taiwan Regulatory Statement 請至此連結 讀中文 明: https://www.extremenetworks.com/support/documentation. European Waste Electrical and Electronic Equipment (WEEE) Notice In accordance with Directive 2012/19/EU of the European Parliament on waste electrical and electronic equipment (WEEE): 1. The symbol above indicates that separate collection of electrical and electronic equipment is required. -
Page 42: Supplement To Product Instructions
Regulatory and Compliance Information Supplement to Product Instructions Declaration of Conformity in Languages of the European Community English Hereby, Extreme Networks declares that the radio equipment type (AP3000X) is in compliance with Directive 2014/53/EU. For full text of the EU Declaration of... - Page 43 French Par la présente Extreme Networks déclare que l'appareil Radio LAN device (AP3000X) est conforme aux exigences essentielles et aux autres dispositions pertinentes de la directive 2014/53/EU. Pour obtenir le texte intégral du processus de Déclaration de la...
- Page 44 παρακαλούμε επικοινωνήστε με την ακραία κανονιστική συμμόρφωση στο compliancerequest@extremenetworks.co Icelandic Extreme Networks lysir her med yfir að thessi bunadur, Radio LAN device (AP3000X), uppfyllir allar grunnkrofur, sem gerdar eru i R&TTE tilskipun ESB nr 2014/53/EU. Fyrir fullan texta í ESB yfirlýsingu um samræmi, vinsamlegast...
- Page 45 Declaration of Conformity in Languages of the Regulatory and Compliance Information European Community Portuguese Extreme Networks declara que este Radio LAN device (AP3000X) está conforme com os requisitos essenciais e outras disposições da Directiva 2014/53/EU. Para o texto integral da declaração de...
-
Page 46: Index
Index access point features 10, 11 junction box installation 29 access point overview 9 announcements 7 AP3000X features 10–12 MAC address location 17 Media Access Control address (MAC address) 17 Mexico compliance statement 39 beam installation 31 Micro USB Console Port 17 box contents AP3000X access point 21 Quick Reference Guide 21... - Page 47 Index Taiwan regulatory 41 technical support contacting 7 UK address 40 wall installation with AH-ACC-BKT-AX-WL 28 warnings 5...
Need help?
Do you have a question about the ExtremeWireless AP3000X and is the answer not in the manual?
Questions and answers