Inficon Ecotec E3000 Translation Of The Original Operating Instructions
Leak detector
Hide thumbs
Also See for Ecotec E3000:
- Original operating instructions (92 pages) ,
- Technical handbook (146 pages)

Related Manuals for Inficon Ecotec E3000


Summary of Contents for Inficon Ecotec E3000
- Page 1 Translation of the original operating instructions Ecotec E3000 Leak Detector Catalog No. 530-001, 530-002, 530-103, 530-104 From software version V3.34 kina22en1-28-(2211)
- Page 2 INFICON GmbH Bonner Strasse 498 50968 Cologne, Germany...
-
Page 3: Table Of Contents
5.3 Connecting the ECO-Check calibrated leak................... 23 5.4 Connecting the external display unit to the Ecotec E3000RC.............. 24 5.5 Connecting IC1000/BM1000 ........................ 24 5.6 Connecting to the power supply system .................... 24 5.6.1 Connecting to a PC........................ 25 Ecotec E3000-Operating-instructions-kina22en1-28-(2211) - Page 4 Starting the I•Guide program ..................... 54 6.5 Idle state (sleep)............................. 57 6.6 SERVICE ............................... 57 6.7 Retrieve information about the device.................... 57 6.8 Special features of individual gases....................... 61 6.9 Switch off.............................. 63 7 Warning and error messages........................ 64 8 Maintenance .............................. 71 Ecotec E3000-Operating-instructions-kina22en1-28-(2211)
- Page 5 9.1 Disposing of the device .......................... 83 9.2 Returning the device for maintenance, repair or disposal.............. 83 10 Appendix ............................... 85 10.1 Accessories............................ 85 10.2 Gas library.............................. 87 10.3 Menu tree ............................... 96 10.4 CE Declaration of Conformity......................... 99 Index ................................ 100 Ecotec E3000-Operating-instructions-kina22en1-28-(2211)
-
Page 6: About This Manual
These operating instructions are intended for the owner of the leak detection unit E3000 and for technically qualified personnel with experience in leak detection technology and integration of leak detection devices in leak detection systems. 6 / 104 Ecotec E3000-Operating-instructions-kina22en1-28-(2211) -
Page 7: Safety
– International, national and local standards and guidelines – Additional device-related provisions and regulations Personnel qualifications • Allow only qualified service technicians to work with and on the device. The qualified service technicians must have received training on the device. Ecotec E3000-Operating-instructions-kina22en1-28-(2211) 7 / 104... -
Page 8: Operator Requirements
Ex/ATEX certified equipment. Ecotec E3000 including INFICON sniffer lines are not EX/ATEX certified. In risk-free areas and non-classified environments Ecotec E3000 can be safely used. The major risk associated with the leak detector is always the atmosphere around and inside the instrument enclosure and not the gas aspired by the sniffer into the interior of the detector. - Page 9 Exposure of the eyes to LED light can lead to lasting eye damage. exposure to light • Do not look into the LEDs of the sniffer handle from a short distance or for a longer period of time. Ecotec E3000-Operating-instructions-kina22en1-28-(2211) 9 / 104...
-
Page 10: Shipment, Transport, Storage
3 | Shipment, Transport, Storage INFICON 3 Shipment, Transport, Storage Item Quantity Ecotec E3000 (basic unit) Power supply cable, 3 m length Fuses Replacement air filter 8 mm Allen wrench 19 mm box wrench Operating manual Interface description Table 1: Scope of delivery ►... -
Page 11: Description
4 Description 4.1 Function and setup of the device The Ecotec E3000 is comprised of main unit and sniffer line. The Ecotec E3000 can verify and quantify gases sucked in by the sniffer line with the help of a selective mass spectrometer. -
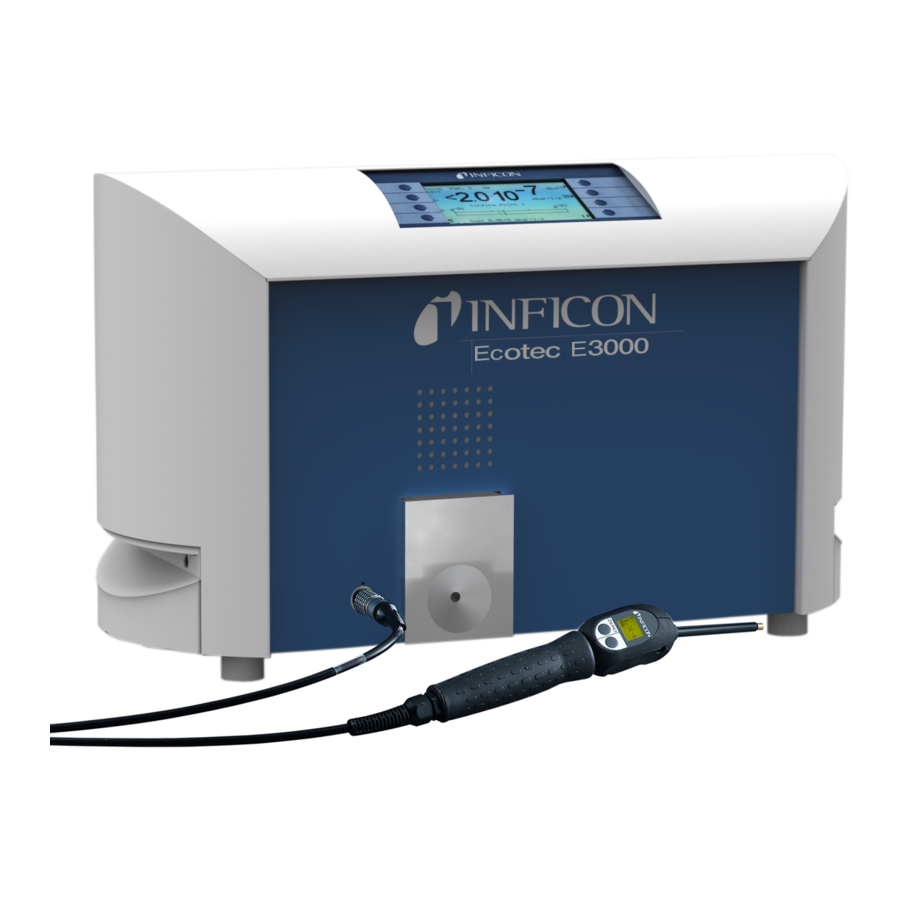
Page 12: Basic Unit
INFICON 4.2 Basic unit The basic unit is only called a “device” in the following as long as the meaning remains clear. Fig. 1: Ecotec E3000 Front view Display ECO-Check calibrated leak Handles and ventilation openings Lemo plug-in connector for sniffer... - Page 13 In order to better hear signals in a loud environment, you can connect headphones. Inputs/outputs (I/O port): The I/O port enables communication with a PLC. Some functions of the Ecotec E3000 can be controlled from the outside and measurement results and device states of the Ecotec E3000 can be transmitted to the outside.
- Page 14 Fuses behind cover: For information on replacing the fuses, see "Replace mains fuses. [} 79]." Power supply: For information on the power connection as well as the labeling on the power connection (nameplate), see "Technical data [} 16]." 14 / 104 Ecotec E3000-Operating-instructions-kina22en1-28-(2211)
-
Page 15: Sniffer Line
If the measuring value limit is exceeded, the display switches from green to red. You can additionally set one speaker in the handle to output a signal and the LEDs in the handle to flash or shine with maximum brightness, see "Basic settings [} 32]." Ecotec E3000-Operating-instructions-kina22en1-28-(2211) 15 / 104... -
Page 16: Technical Data
4 | Description INFICON 4.4 Technical data 4.4.1 Mechanical data Ecotec E3000 Dimensions (W x H x D) 610mm x 370mm x 265mm Weight 34 kg 4.4.2 Electrical data Ecotec E3000 Mains voltages and mains frequencies 100 - 120 V ±10%, 50 / 60 Hz 207 - 236 V ±10%, 50 / 60 Hz... -
Page 17: Ambient Conditions
INFICON Description | 4 Ecotec E3000 3 m sniffer line 0.7 seconds 5 m sniffer line 0.9 seconds 10 m sniffer line 1.4 seconds 15 m sniffer line 3.0 seconds 4.4.4 Ambient conditions Ecotec E3000 Permissible ambient temperature (during 10 °C to 45 °C... - Page 18 4 | Description INFICON Ecotec E3000 I•Guide Deactivated Calibration (cal), internal Activated Contrast Not inverted, setting 30 Volume Minimum volume Leak rate, selected, highest Automatic Leak rate filter I-Filter Menu PIN Deactivated, 0000 Measurement time (I•Guide) 1 second Measuring mass Peak value Deactivated, 5 seconds...
-
Page 19: Installation
Moisture entering the device can lead to personal injury due to electric shocks as well as damage to property due to short circuiting. ► Operate the Ecotec E3000 only in a dry environment. ► Operate the Ecotec E3000 away from sources of liquid and moisture. CAUTION Danger due to dropping heavy loads The device is heavy and can damage persons and items through tilting or dropping. -
Page 20: Connecting The Sniffer Line
The transport restraint blocks the mechanical system in the device. ► Remove the transport restraint before start-up. The transport protection is on the bottom of the Ecotec E3000 and consists of a yellow star screw. Fig. 5: Unscrew the yellow transport restraint before the start-up 5.2 Connecting the sniffer line... -
Page 21: Replacing The Plastic Capillary Filter With The Metal Capillary Filter
[} 20]“. Screw in the metal capillary filter on the sniffer tip end. Calibrate the Ecotec E3000, see "Calibrate [} 43]." 5.2.1.2 Replacing the metal capillary filter with the plastic capillary filter If you want to switch from a capillary filter made of metal to a capillary filter made of plastic, you have to the remove the cone seal. -
Page 22: Install And Remove Water Protection Tip
► If you wear a pacemaker, do not perform the installation yourself. ► If you wear a pacemaker, always maintain a distance of at least 10 cm from the holder when operating the device. 22 / 104 Ecotec E3000-Operating-instructions-kina22en1-28-(2211) -
Page 23: Connecting The Eco-Check Calibrated Leak
5.3 Connecting the ECO-Check calibrated leak A built-in calibrated leak (ECO-Check) and various external calibrated leaks are available as accessories for the Ecotec E3000, see "Accessories [} 85]." Please refer to the ECO-Check installation manual on how to connect the ECO-Check. -
Page 24: Connecting The External Display Unit To The Ecotec E3000Rc
• Baud rate: 38400 5.6 Connecting to the power supply system The supply voltage of the Ecotec E3000 is specified on the labeling of the mains plug (rating plate). The Ecotec E3000 cannot be switched for other supply voltages. WARNING Danger from electric shock Improperly grounded or fused products may be dangerous to life in case of a fault. -
Page 25: Connecting To A Pc
Installation | 5 5.6.1 Connecting to a PC The connection is made with a commercially available 9-pin Sub-D plug. Please refer to the “Interface description Ecotec E3000” (doc. no. kins22e1) for further information on data exchange. 5.6.2 Connecting with a PLC The connection is made with a commercially available 25-pin Sub-D plug. -
Page 26: Operation
There is no separate Start function. However, you still have to calibrate the device and make different settings for your intended measurement. If the ECO-Check calibrated leak is not in the Ecotec E3000, an acoustic warning signal and the warning 71 are output during the first start-up. -
Page 27: Operating The Device
Back to last menu level. Navigates in a selection list. Pressing the key assigns the allocation “0” to that key and “1” to an adjacent key. The same setting option exists for the numbers “2/3”, “4/5”, “6/7”, and “8/9”. Ecotec E3000-Operating-instructions-kina22en1-28-(2211) 27 / 104... - Page 28 Closing the window and calling up the measurement view. Back to the window with Measurement with I•Guide: Bring up list of I•Guide programs. Calling up help for the current function. Confirm an entry or selection. Table 2: Function symbols 28 / 104 Ecotec E3000-Operating-instructions-kina22en1-28-(2211)
-
Page 29: Measurement Display Elements
The button on the top right next to the display can be used to start a calibration of the (CAL) Ecotec E3000 with an external test leak at any time. For further information on performing an external calibration, see "External calibration with external calibrated leak [} 45]."... - Page 30 [} 31]." Information button Pressing the information button i (to the bottom right of the display) shows information on the status of the Ecotec E3000. Details: See "Calling up information on the measurement [} 51]." Status line Status information is displayed in the lower line of the measurement window.
-
Page 31: Operating Elements And Display On The Sniffer Handle
The green LED shows that the Ecotec E3000RC is switched on. It has a steady green light if an external display is connected and flashes if no external display can be detected. The red LED flashes in case of an error message; a steady red light indicates a warning. Ecotec E3000-Operating-instructions-kina22en1-28-(2211) 31 / 104... -
Page 32: Basic Settings
• The current measured background value is set as the zero point with the ZERO button, see "Vacuum & access control [} 36]." • The START/STOP buttons do not have any function (the external display unit can also be used with other leak detectors made by INFICON that require these buttons.) 6.3 Basic settings Before making your first measurement, set the device using the following menu: •... - Page 33 Deactivate the function when surface conditions are stable again. Wake up If the Ecotec E3000 is in an idle state (sleep), a time can be set for it to start automatically. This way you can set the Ecotec up to run through its warm-up phase already before the shift starts.
-
Page 34: Audio Settings
You can also switch off the speaker completely. Alarm profile You can assign one of three alarm profiles to the device speaker: • Pinpoint • Setpoint • Trigger/alarm 34 / 104 Ecotec E3000-Operating-instructions-kina22en1-28-(2211) -
Page 35: Display Settings
Increase or reduce the contrast of the display using the arrow keys. If you press and hold the buttons, the values change continuously. The setting is applied immediately to the display. • To adjust the contrast of the currently displayed menu, select “Automatic”. Ecotec E3000-Operating-instructions-kina22en1-28-(2211) 35 / 104... -
Page 36: Gas Display Handle
The hold time can be set to 5, 10, 15, or 20 seconds. 6.3.4 Vacuum & access control ZERO The gas concentration contained in the measurement environment can be set as ZERO point for measurement (background suppression). The function has the brief name “ZERO.” 36 / 104 Ecotec E3000-Operating-instructions-kina22en1-28-(2211) - Page 37 The adjustment range is 160 to 999 sccm or 0 to 160 sccm. The closer the lower limit value is set to the actual flow rate, the more sensitive the Ecotec E3000 reacts to a beginning clogging of the filter and the sniffer line. Fig. 16: Setting flow limits The flow through the sniffer line depends on the atmospheric pressure of the environment.
-
Page 38: Interfaces
6 | Operation INFICON correct signal strength with it. The monitoring ensures that the Ecotec E3000 does not become insensitive and that leaks are not detected without the user noticing. If the sensitivity is reduced, the “Sensitivity too low” error message is issued. Recalibration can restore sensitivity in this case, see "Calibrate [} 43]."... -
Page 39: Settings For The Measurements
PIN if all functions on the device are to be inaccessible, see "Vacuum & access control [} 36]." Local and RS-232: The Ecotec E3000 can be controlled via the interface and via inputs on the device. Recorder output > • linear Recorder scaling •... -
Page 40: Selecting The Gas, Changing Gas Parameters, Activating Measurement
“Settings gas” window will open. Fig. 20: Changing the settings for gas 1 With the buttons up and down you select a setting. Pressing the “change” button on the bottom right opens the associated settings menu. 40 / 104 Ecotec E3000-Operating-instructions-kina22en1-28-(2211) - Page 41 0.004 999999 mbar l/s 2 x 10 9.9 x 10 Pa m 2 x 10 9.9 x 10 atm cc/s 2 x 10 9.9 x 10 Torr l/s 2 x 10 9.9 x 10 Ecotec E3000-Operating-instructions-kina22en1-28-(2211) 41 / 104...
- Page 42 You can find a list of all possible gases with their normal and alternative mass positions in the Appendix, see "Gas library [} 87]." 42 / 104 Ecotec E3000-Operating-instructions-kina22en1-28-(2211)
-
Page 43: Calibrate
The ECO-Check calibrated leak includes R134a. It can be used for the calibration of gases with a mass position from 40 to 105 amu because the Ecotec E3000 converts the calibration result for the measurement of these gases. -
Page 44: Internal Calibration With Eco-Check
“Gas deactivated” is displayed, see "Selecting the gas, changing gas parameters, activating measurement [} 40]." The Ecotec E3000 notices if you insert the sniffer tip in the opening of the calibrated leak and starts calibration automatically. Messages subsequently guide you through the calibration process. -
Page 45: External Calibration With External Calibrated Leak
6.4.2.2 External calibration with external calibrated leak For external calibration of the Ecotec E3000, we recommend calibrated leaks with leak rates > 2 g/a. If there are significantly elevated background concentrations in the test environment, a calibrated leak with a high leak rate is required. -
Page 46: Gas Equivalent To Helium And Hydrogen, Settings For Diluted Gas
3. Select “Equivalent name” in the window that opens. The gas library will be displayed again. 4. Select the equivalent name and confirm with “OK.” Fig. 26: Example for a measurement view with helium as refrigerant equivalent 46 / 104 Ecotec E3000-Operating-instructions-kina22en1-28-(2211) - Page 47 The bottom right shows the correction factor of helium/Hydrogen based on the gas equivalent. If a set of parameters that exceeds the limits of the Ecotec E3000 is entered, the correction factor is displayed with inverted colors. In this case, adjust the parameter until the correction factor display returns to normal.
-
Page 48: Suppress Interfering Gases
For the additional IGS calibration, you need a cyclopentane test leak and an isopentane test leak, available as “Calibration set for IGS mode.” The Ecotec E3000 recognizes errors you make in the gas sequence during the alignment and notifies you with a flashing gas display. -
Page 49: Setting Custom Gas
The standard factor is used to convert the current supplied by the sensor into a leak rate signal. If you are setting a user-defined gas, the Ecotec E3000 should subsequently be calibrated with and external test leak, if possible. If calibration is successful, you will not modify the standard factor. -
Page 50: Measure
The device is calibrated, see "Calibrate [} 43]." You have configured the device settings required for measurement, see "Basic settings [} 32]." You have configured the measurement settings required for your measurement, see "Settings for the measurements [} 39]." 50 / 104 Ecotec E3000-Operating-instructions-kina22en1-28-(2211) -
Page 51: Calling Up Information On The Measurement
• Selected gases with mass position and trigger value. Gases that are set but that are not currently sought for are marked. Fig. 31: Information on the measurement If there is an error message or a warning then this will be displayed instead of the gases. Ecotec E3000-Operating-instructions-kina22en1-28-(2211) 51 / 104... -
Page 52: Measuring With I•Guide
You can also do without the calculation of an overall leak rate. The I•Guide program signal then serves merely as a default for time-controlled measuring. Set the number of measuring points to ZERO for this. 52 / 104 Ecotec E3000-Operating-instructions-kina22en1-28-(2211) -
Page 53: Setting The I•Guide Program
1 to 25 seconds. You must not set the measurement time to be shorter than the response time of the device, see "Technical data [} 16]." Idle time You can set a time between 0.1 and 25 seconds for the transition to the next measuring point. Ecotec E3000-Operating-instructions-kina22en1-28-(2211) 53 / 104... -
Page 54: Starting The I•Guide Program
Measure Measure point ..Measure pos..Ticking Measurement Tip to point ..To pos..Short signal Short signal time elapsed 54 / 104 Ecotec E3000-Operating-instructions-kina22en1-28-(2211) - Page 55 During a cycle, you can use the key to move back one measuring point. The key takes you back to the beginning of the cycle. Fig. 35: Display after a successful measurement Ecotec E3000-Operating-instructions-kina22en1-28-(2211) 55 / 104...
- Page 56 • Serial number • Date and time • Alarm profile • Information on the current I•Guide program If two gases were selected for the I•Guide program, gas type A/B and leak rate sums A/B are displayed alternately. 56 / 104 Ecotec E3000-Operating-instructions-kina22en1-28-(2211)
-
Page 57: Idle State (Sleep)
If you press the SLEEP button in the main menu of the device, the device goes into idle state. The mass spectrometer is switched off and the pumps are stopped. “Sleep” is replaced with “START” in the main menu and the Ecotec E3000 is run up again with “START” or the wake-up function. - Page 58 Control SW version x.xx Measure SW version x.xx Filament A or B/A or B Set cathode / active cathode Power on time Emission on time A Emission on time B Serial number box Serial number sensor 58 / 104 Ecotec E3000-Operating-instructions-kina22en1-28-(2211)
- Page 59 Low / High Gas a/b/select Low / Low / Low High / High / High Input reserved Low / High Leak/Ready/Error Low / Low / Low High / High / High Relay “Leak“ Low / High Ecotec E3000-Operating-instructions-kina22en1-28-(2211) 59 / 104...
- Page 60 Foreline pressure AIN1 AIN1 Flow sccm Flow Page 9: RS-232 Info Ecotec E3000 ® Sniffer ASCII string Command sent from main device to sniffer line Sniffer ® Ecotec E3000 ASCII string Command sent from sniffer line to main device The information in the first two lines can be switched with the buttons “Sniffer”...
-
Page 61: Special Features Of Individual Gases
Setting the IGS mass position, see "Suppress interfering gases [} 48]." Special features with If you are sniffing for helium, the Ecotec E3000 needs longer for an analysis than with helium refrigerants. Therefore stick to the following times during which you will not move the sniffer tip. - Page 62 You can use a PRO-Check calibrated leak for the internal calibration of hydrogen / forming gas. Because the PRO-Check calibrated leak does not fit into the opening on the front panel of the Ecotec E3000, you have to connect it with a SUB –D cable, see installation manual of the ECO-Check.
-
Page 63: Switch Off
► Allow the turbo molecular pump to power down before any maintenance work is performed or before moving the device. You can switch off the Ecotec E3000 at any time with the power switch (position “0”). It takes a few minutes for the turbo molecular pump to come to a standstill. The Ecotec E3000 must not be moved during that time. -
Page 64: Warning And Error Messages
Error messages Errors are events that the Ecotec E3000 cannot remedy itself and that force an interruption of operation. The error message consists of a number and a descriptive text. - Page 65 Enter the date and time, see reset! Please enter Miscellaneous [} 32]. date and time. The battery on CPU-board MC50 is Contact INFICON customer service. defective. Voltage 24V on the Fuse F6 on the wiring board is blown. Replace the fuse.* audio output is too low! The speaker is defective.
- Page 66 If the problem still switched on at both can occur during the first 10 minutes exists: Contact INFICON customer cathodes.) after start-up. service. Both cathodes are defective. The Transpector is defective.
- Page 67 Confirm the error message and (The emission failed restart the device. If the problem still The Transpector is defective. during operation.) exists: Contact INFICON customer service. No emission with first Start-up of the Emission failed. The You can continue to measure but...
- Page 68 Fault rectification TSP parameters The Transpector was replaced. Check the Transpector parameters. inconsistent! Please The wiring board was replaced. Contact INFICON customer service. check! The EEPROM on the wiring board is defective. There are warnings Confirmed but not yet valid warnings Remedy the cause of the warning.
- Page 69 Switch the instrument off. Wait until unit (E015) control. the pump has stopped (> 5 min). Switch the device back on. Contact INFICON customer service. Electronic drive unit Error in the communication between Contact INFICON customer service. does not recognize turbo molecular pump and control.
- Page 70 The ambient temperature is too high. Confirm the work, see Calling up and managing maintenance information [} 71]. Error of the The temperature sensor is defective. Contact INFICON customer service. temperature sensor in the TC (E026) Error in the motor stage There is an error in the motor stages Contact INFICON customer service.
-
Page 71: Maintenance
The error list includes the errors and warnings that occurred during the operation of the Ecotec E3000. Date and time are shown followed by an identification for the error or the warning (E… with errors and W… with warnings), with a brief description of the error or the warning. - Page 72 To have the complete entry displayed, select the appropriate line and press the button with the magnifying glass. 72 / 104 Ecotec E3000-Operating-instructions-kina22en1-28-(2211)
- Page 73 If you select “Maintenance schedule,” you have the option of deactivating the plan and thus the reminder messages. Under the maintenance schedule menu item, the warning W80 "Cathode switched over!" can be deactivated irrespective of the other reminders. Ecotec E3000-Operating-instructions-kina22en1-28-(2211) 73 / 104...
-
Page 74: Maintenance Work
Check replaced, you have to enter the serial number as well as the identification with the calibration data. The installation of the ECO-Check in the Ecotec E3000 as well as the gas store replacement are described in the ECO-Check manual. - Page 75 • 2 screwdrivers, size 2 • Box wrench, 19mm (included in the delivery scope) • Allen wrench, 8 mm (included in the scope of delivery) • Allen wrench, 3 mm (not included in the scope of delivery) • Tweezers Ecotec E3000-Operating-instructions-kina22en1-28-(2211) 75 / 104...
-
Page 76: Maintenance Plan
1 Heavier soiling of the measurement environment can also require earlier replacement. Explanation of maintenance levels: Maintenance level I: Customer without any technical training Maintenance level II: Customer with technical and INFICON training Maintenance level III: INFICON Service 76 / 104 Ecotec E3000-Operating-instructions-kina22en1-28-(2211) -
Page 77: Replacing The Air Filter Of The Main Unit
5. Retighten the cover plate in front of the duct. 6. Put the device back on its feet and connect sniffer line and ECO-Check, if needed. 7. Confirm the work, see "Calling up and managing maintenance information [} 71]." Ecotec E3000-Operating-instructions-kina22en1-28-(2211) 77 / 104... -
Page 78: Replace Operating Fluid Reservoir
8 soaked sticks (Porex rods). Plastic container and Porex rods are below the turbo molecular pump and accessible from the bottom of the Ecotec E3000. The bore for the oil wick cartridge is closed with an aluminum plug and a plastic screw. -
Page 79: Replace Mains Fuses
The fuses are located behind a flap near the mains switch. They are in two slots. The mains fuses are available with order no. 200 000 914. Two identical fuses must be used at all times. Ecotec E3000-Operating-instructions-kina22en1-28-(2211) 79 / 104... -
Page 80: Replacing The Filter Inserts Of The Capillary Filter And The Water Conservation Tip
The plastic capillary filter, the metal capillary filter and the water conservation tip are equipped with filter inserts. There is a cone seal below the metal capillary filter and the water conservation tip. This seal is already integrated into the plastic capillary filter. 80 / 104 Ecotec E3000-Operating-instructions-kina22en1-28-(2211) - Page 81 If not then there is a leak somewhere and you have to check the screw connection. The cone seal may also have fallen out. 8. Confirm the work, see "Calling up and managing maintenance information [} 71]." 9. Calibrate the Ecotec E3000, see "Calibrate [} 43]." Ecotec E3000-Operating-instructions-kina22en1-28-(2211) 81 / 104...
-
Page 82: Replacing The Sinter Filter Of The Sniffer Handle
If not then there is a leak somewhere and you have to check sniffer tip and handle. 9. Confirm the work, see "Calling up and managing maintenance information [} 71]." 10. Calibrate the Ecotec E3000, see "Calibrate [} 43]." 82 / 104... -
Page 83: Decommissioning
9 Decommissioning 9.1 Disposing of the device The owner can dispose of the device or it can be sent to INFICON. The device consists of materials that can be recycled. This option should be exercised to prevent waste and also to protect the environment. - Page 84 9 | Decommissioning INFICON 84 / 104 Ecotec E3000-Operating-instructions-kina22en1-28-(2211)
-
Page 85: Appendix
Calibrated leaks for individual refrigerants, leak rate 2–5 g/a, leak rate 16 g/a also available R134a 122 20 R600a 122 21 R404A 122 22 R152a 122 27 R407C 122 28 R410A 122 29 R401A 122 30 Halon 1301 (R13B1) 122 34 Ecotec E3000-Operating-instructions-kina22en1-28-(2211) 85 / 104... - Page 86 Ecotec E3000RC, 5 m 551-102 for Ecotec E3000RC, 1 m 551-103 Module IC1000 525-200 Data cable, 0.5 m IC1000 <-> BM1000 560-334 Bus module BM1000 PROFIBUS 560-315 BM1000 PROFINET IO 560-316 BM1000 DeviceNet 560-317 BM1000 EtherNet/IP 560-318 86 / 104 Ecotec E3000-Operating-instructions-kina22en1-28-(2211)
-
Page 87: Gas Library
Appendix | 10 10.2 Gas library The software of the Ecotec E3000 includes a list with approx. 100 gases that can be relevant for the refrigeration industry. These gases are saved to ROM (read only memory) and can be selected from the list in the appropriate menus for gases and trigger values. - Page 88 R245fa 0.58 6.50E+07 0.520 1.00 0.32 0.03 0.13 R290 Propane 44.1 0.91 9.10E+08 0.433 1.00 0.32 R356 166.1 1.00 7.00E+07 0.561 1.00 R404A 44 % 97.6 1.00 9.30E+07 0.607 R125 0.52 52 % 0.23 R143a 4 % R134a 88 / 104 Ecotec E3000-Operating-instructions-kina22en1-28-(2211)
- Page 89 20 % R134a R407C 10 % 86.2 1.00 1.80E+08 0.627 0.75 70 % 0.38 R125 20 % R134a R407D 23 % 1.00 7.00E+07 0.612 1.00 25 % R125 52 % R134a R407E 25 % 83.8 1.00 7.00E+07 0.622 1.00 15 % R125 60 % R134a Ecotec E3000-Operating-instructions-kina22en1-28-(2211) 89 / 104...
- Page 90 9 % 1.00 7.00E+07 0.581 R218 1.00 88 % R134a 3 % R600 R417A 50 % 106.7 1.00 1.80E+08 0.610 R134a 0.70 46 % 0.22 R125 4 % R600a R422D 65.1 % 112.2 1.00 8.78E+07 0.622 R125 0.36 31.5 % R134a 3.4 % R600a 90 / 104 Ecotec E3000-Operating-instructions-kina22en1-28-(2211)
- Page 91 R134a 8.5 % 1.7 % R600 0.6 % R601a R441A 54.8 % 49.6 1.00 7.80E+08 0.398 R290 0.59 36.1 % R600 6 % R600a 3.1 % R170 R442A 31 % 81.8 1.00 2.40E+08 0.629 0.33 31 % R125 30 % R134a 5 % R227ea 3 % R152a Ecotec E3000-Operating-instructions-kina22en1-28-(2211) 91 / 104...
- Page 92 58 % 1.00 1.91E+08 0.592 R1234ze 0.37 42 % 0.33 R134a 0.22 0.17 R452A 59 % 103.5 1.00 1.30E+08 0.612 R125 0.32 30 % 0.12 R1234yf 11 % R452B 67 % 72.9 1.00 2.34E+08 0.639 0.39 26 % 0.31 R1234yf 7 % R125 92 / 104 Ecotec E3000-Operating-instructions-kina22en1-28-(2211)
- Page 93 44 % 108.7 1.00 1.70E+08 0.582 R134a 0.60 56 % 0.34 R1234yf R600 Butane 58.1 1.00 7.00E+07 0.377 1.00 R600a Isobutane 58.1 1.00 2.60E+08 0.377 0.75 1.00 0.08 0.91 R601 Pentane 72.2 1.00 7.00E+07 0.341 1.00 1.00 Ecotec E3000-Operating-instructions-kina22en1-28-(2211) 93 / 104...
- Page 94 3.40E+08 0.619 0.82 0.48 R1243zf 1.00 2.90E+08 0.600 0.52 0.48 0.41 0.85 R1270 Propene 44.1 1.00 3.50E+08 0.433 0.62 Argon 1.00 7.00E+07 1.127 R744 1.00 1.00E+08 0.744 Hydrogen 1.00 5.00E+06 0.448 R718 1.00 7.00E+07 0.459 94 / 104 Ecotec E3000-Operating-instructions-kina22en1-28-(2211)
- Page 95 20.2 1.00 7.00E+07 1.586 R717 1.00 7.00E+07 0.505 Oxygen 1.00 7.00E+07 1.030 146.1 0.80 9.10E+07 0.765 Xenon 131.3 1.00 1.20E+08 1.153 1.00 ZT130 Galden 0.25 7.00E+07 1.000 ZT130 0.32 1.00 0.50 0.12 Table 11: Gas library Ecotec E3000-Operating-instructions-kina22en1-28-(2211) 95 / 104...
-
Page 96: Menu Tree
5 Flow limits upper flow limit lower flow limit 6 Monitoring Sensitivity Automatic cathode 7 Calibration 8 Change menu PIN 3 Audio 2 Audio acknowledgement 3 Device speaker 5 Handle speaker 6 Alarm profile 7 Volume level 96 / 104 Ecotec E3000-Operating-instructions-kina22en1-28-(2211) - Page 97 6 Gas display handle 8 Interfaces 2 Control location 3 Recorder output 6 Scaling recorder 7 Gas recorder 5 PLC setting 6 Defining SPS inputs 7 Defining SPS outputs 6 RS232 protocol 7 RS232 settings 8 ECO-Check Ecotec E3000-Operating-instructions-kina22en1-28-(2211) 97 / 104...
- Page 98 4/11 ECO-Check 5/11 Sniffer line 6/11 I/O port 7/11 Analog 8/11 Analog (2) 9/11 RS232 10/11 Info field bus CAL --> External calibration 11/11 Info field bus Adjust IGS BM1000 Table 12: Menu tree of Ecotec E3000 98 / 104 Ecotec E3000-Operating-instructions-kina22en1-28-(2211)
-
Page 99: Ce Declaration Of Conformity
INFICON Appendix | 10 10.4 CE Declaration of Conformity Ecotec E3000-Operating-instructions-kina22en1-28-(2211) 99 / 104... -
Page 100: Index
Power consumption 16 Pressure unit 33 Protection class 16 Factory settings 18 Function allocation 27 Function symbols 28 Relative humidity 17 Fuses 16 Retrieve information about the device 57 Return shipment 83 RS-232 connection 13 100 / 104 Ecotec E3000-Operating-instructions-kina22en1-28-(2211) - Page 101 61 Standard factor 49 Storage temperature 17 Supply voltage 16 Suppress interfering gases 48 Switch off 63 Transport protection 20 Vacuum and access control 36 Wake up 33 Warning and error messages 64 ZERO 36 Ecotec E3000-Operating-instructions-kina22en1-28-(2211) 101 / 104...
- Page 102 Index INFICON 102 / 104 Ecotec E3000-Operating-instructions-kina22en1-28-(2211)
Need help?
Do you have a question about the Ecotec E3000 and is the answer not in the manual?
Questions and answers