Table of Contents
Advertisement
Quick Links
Installation Manual
LT1
with HeatShift
Installer: Leave this manual with the appliance.
Consumer: Retain this manual for future reference.
WARNING:
FIRE OR EXPLOSION HAZARD
Failure to follow safety warnings
exactly could result in serious
injury, death, or property damage.
Do not store or use gasoline or other
fl ammable vapors and liquids in the
vicinity of this or any other appliance.
WHAT TO DO IF YOU SMELL GAS
Do not try to light any appliance.
▪
DANGER
4008705-03
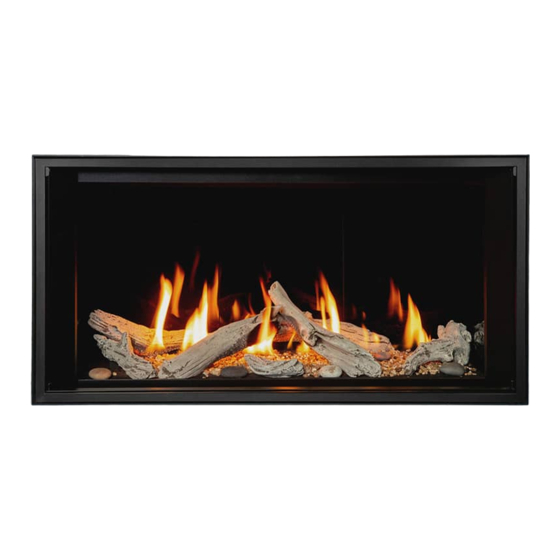
Direct Vent Zero Clearance
Gas Fireplace
natural gas
propane gas
TM
System
Hot glass
will cause burns.
Do not touch glass
until cooled.
Never allow children
to touch glass.
2500KN
2500KP
Installer: Place model/serial number here.
Do not touch any electrical switch; do
▪
not use any phone in your building.
Leave the building immediately.
▪
Immediately call your gas supplier from
▪
a neighbor's phone. Follow the gas
supplier's instructions.
If you cannot reach your gas supplier,
▪
call the fi re department.
Installation and service must be
performed by a qualifi ed installer, service
agency or the gas supplier.
A barrier designed to reduce
the risk of burns from the hot
viewing glass is provided with this
appliance and must be installed for
the protection of children and
other at-risk individuals.
Advertisement
Table of Contents

Related Manuals for Valor LT1 2500KN


Summary of Contents for Valor LT1 2500KN
- Page 1 Installation Manual Direct Vent Zero Clearance Gas Fireplace natural gas 2500KN propane gas 2500KP with HeatShift System Installer: Place model/serial number here. Installer: Leave this manual with the appliance. Consumer: Retain this manual for future reference. Do not touch any electrical switch; do ▪...
- Page 2 Miles Industries Ltd. grants no warranty, implied or stated, for the installation or maintenance of your heater, and assumes no responsibility for any consequential Valor Fireplaces damage(s). 190–2255 Dollarton Highway North Vancouver, BC, Canada V7H 3B1 ©...
-
Page 3: Table Of Contents
Welcome to Valor ® This appliance has been professionally installed by: Please read this manual BEFORE Dealer Name: ________________________________ installing and operating this Phone:______________________________________ appliance. Fireplace Safety .................4 Installation ................29 Appliance Preparation ................ 29 Specifi cations ................6 Window Removal .................30 Kits &... -
Page 4: Fireplace Safety
fi replace. Failure to follow these instructions may result in possible fi re hazard and will void the warranty. Replacement manuals are available by contacting the Valor Customer Service at 1-800-468-2567, or by visiting valorfi replaces.com. - Page 5 Fireplace Safety Glass windows Intended use • This appliance is designed and approved as a supple- mental heater and provides the potential for most WARNING energy conservation when used while attended. The Do not operate this appliance with the use of an alternate primary heat source is advisable. glass front removed, cracked, or broken.
-
Page 6: Specifications
Specifications Approval & Codes Supply Gas This appliance is certifi ed to ANSI Z21.88/CSA 2.33 Heater engine 2500KN uses natural gas. American National Standard / CSA Standard for Vented Heater engine 2500KP uses propane gas. Gas Fireplace Heaters for use in Canada and USA, and The supply pressure must be to CGA 2.17-91 High Altitude Standard in Canada. -
Page 7: Kits & Accessories
Kits & Accessories Information accurate at the time of printing and subject to change Required Kits without notice. Fuel Beds (choose one) 1500DGM Murano Decorative Glass Kit 1505BLKV2 Birch Logs Kit 1505DWKV2 Driftwood Kit 1505SWKV2 Split Wood Kit 1514RSS Rock and Shale Kit Liners Panels (choose one) 2515FBL Fluted Black Liners... -
Page 8: Dimensions & Location
Dimensions & Location Dimensions Top View 45-3/4” [1161 mm] 42” [1067 mm] Zero Clearance Center of vent 16-7/8” 6-5/8” dia. [429 mm] Venting 13-11/16” 8-3/4” [222 mm] [348 mm] HeatShift outlets Zero Clearance Header Center of rear vent Gas line Electrical 39-13/16”... -
Page 9: Installation Planning
Installation Planning Before Installing Caution Only qualified, license, or trained personnel should install this appliance. 1. YOU NEED TO KNOW FROM THE HOMEOWNER: • Height of appliance and shelf, if used; • Thickness and type of wall fi nish around appliance;... -
Page 10: Overview
Installation Planning Overview Note: This appliance may be installed in outdoor, weather protected environments as defi ned in the GV60CKO Outdoor Conversion 1/2 inch thick non-combustible Kit instruction manual. board –NOT supplied Required HeatShift plenum (LDK4 pictured) Remote Handset Wall Holder Required HeatShift piping Mantel—See Mantel &... -
Page 11: Mantel Clearances
Installation Planning Mantel Clearances Combustible Mantel—Left Side View WARNING HeatShift System MUST be installed on this appliance! HeatShift pipes (4) Combustible materials must Vent be kept behind this line 45° 10” 38-3/16” 6” Mantel Height 34-3/16” (from Bottom of Unit) 28-3/16”... - Page 12 Installation Planning Mantel Clearances Combustible Sidewall / Mantel Leg—Top View FIREPLACE Face of Finished Wall Fireplace Opening 39-11/16” Wall Min. 4” to wall or combustible mantel leg...
-
Page 13: Framing
Installation Planning Framing Framing Dimensions WARNING HeatShift System MUST be installed on this appliance! NOTE: Height of cavity may be - see page page 20. 1/2” thick non-combustible board required above, on each side and below Between underside engine opening (NOT supplied) of header and bottom NOTE: This unit requires a solid platform to support it. - Page 14 Installation Planning Framing Framing with Partial Shelf—Top Outlet 15-1/16” (383 mm) 10-3/4” HeatShift collars connected to a (274 mm) pair of 5” 90 deg Max. from back surface elbows. to front surface of appliance 1/2” thick case w/no non-combustible board Min.
-
Page 15: Wall Finish
Installation Planning Wall Finish Material Specifi cations Non-Combustible Board The LT1 Linear fi replace requires a 1/2” (13 mm) thick Non-Combustible non-combustible board to be used as a wall surface Material which will not ignite and burn. Such materials immediately surrounding the unit’s opening—see are those consisting entirely of steel, iron, brick, tile, diagram for minimum coverage. -
Page 16: Do Not Drill/Screw Areas
Installation Planning Wall Finish Non-Combustible Finishing Over Non-Combustible Board Additional material such as tile, etc., may be applied over top of the non- combustible board or you may choose to leave it fi nished clean with no tile, etc. Be aware that a trim is always required. Finish should not cover the trims. -
Page 17: Avoiding Cracking Wall Finishes
Installation Planning Wall Finish • Behind joints, double up studs or use studs “on the Avoiding Cracking Wall Finishes fl at” to add extra support to the joint. Adhesive on If a clean fi nish with no tile, etc. is desired, joints in the the backside of wall board behind any joints can help non-combustible board and the transition to gypsum control diff... -
Page 18: Venting
Venting Overview Top or Rear Outlet Framing Vent in Combustible Walls & Ceilings This unit is supplied with a vent outlet which can When penetrating through combustible walls and be installed either as top facing or rear racing. See ceilings, frame a minimum of 10 in x 10 in opening and Appliance Preparation section for more information. -
Page 19: Co-Axial
Venting Co-Axial Typical Co-axial Venting Components Note: Provide support for vertical pipe runs, particularly at off sets. Do not rely on the appliance for support of long vertical pipe runs. Horizontal pipe runs should be HORIZONTAL TERMINATION supported every 4 feet using strapping. -
Page 20: Venting Chart
Venting Co-Axial 5. Each 90 degrees elbow installed on the horizontal How to Read the Venting Chart plane is equivalent to a 3 feet horizontal pipe; The chart below applies to co-axial roof or wall therefore, 3 feet must be subtracted from allowable termination. -
Page 21: Restrictor Settings
Venting Co-Axial Restrictor Settings The restrictors are located in the roof of the fi rebox hidden above the top liner panel. Adjust the restrictors before installation of the top liner panel. Should subsequent adjustment be required, you will need to remove the top liner panel—see page 43. -
Page 22: Horizontal Vent Termination
Venting Co-Axial Horizontal Vent Termination Location air ow or a safety hazard. Local codes or regulations Horizontal Vent Termination may require greater clearances. • The vent terminal must be located on an outside wall or through the roof. • The vent terminal must not be recessed into a wall or siding. -
Page 23: Vertical Vent Termination
Venting Co-Axial Vertical Vent Termination Overhang should not Minimum Roof Pitch extend beyond vent if "H" (feet) within 48” of Horizontal Flat to 7/12 termination cap overhang Over 7/12 to 1.5' 8/12 Termination Over 8/12 to Min. 24” 2’ 9/12 (unvented soffit) Min. -
Page 24: Co-Linear Conversion
Venting Co-Linear Conversion Co-Linear Conversion Installations Note: Co-linear portion of vent system may only be installed within a solid-fuel burning fi replace and chimney. The appliance can be adapted to co-linear applications using an existing chimney. The appliance must not be connected to a chimney fl... -
Page 25: Installation Partially Into Fireplace Cavity
Required accessories: liner liner and approved • Co-axial to co-linear adapter at co-axial Flashing appliance, Valor 1156CLA or equiva- termination lent; • 2 lengths of 2-ply, fl exible chimney Co-linear adapter liner approved for venting gas appli- ances: •... -
Page 26: Installation Into An Adjacent Chimney
Venting Co-Linear Conversion Installation Into an Adjacent Chimney Required accessories: • Co-axial to co-linear adapter at chimney face, 46DVA-34CLAA or equivalent; • 2 lengths of 2-ply, fl exible chimney liner approved for venting gas appliances: • 1 x 3-inch diameter for air inlet and •... -
Page 27: Installation Into An Adjacent Chimney
Venting Co-Linear Conversion Installation Into an Adjacent Chimney Required accessories: • Co-axial to co-linear adapter at chimney face, 46DVA-GCL34 or equivalent; • 2 lengths of 2-ply, fl exible chimney liner approved for venting gas appliances: • 1 x 3-inch diameter for air inlet and •... -
Page 28: Example Of Co-Linear Conversion Accessories
Venting Co-Linear Conversion Example of Co-linear Conversion Accessories Examples of Co-axial to Co-linear Appliance Adapters 46DVA-GCL34 46DVA-34CLAA Examples of Co-linear Terminal Configurations 10” 10” 7-5/8” dia. collar 3” Inlet & Exhaust A 3” - 4” Collars adapter may be used for exhaust liner. -
Page 29: Installation
Installation Appliance Preparation Unpack Appliance Beware of sharp edges! Wear gloves! 1. Unpack the appliance and all material around it. 2. Unpack any loose items from around the appliance. 3. Remove vertical crating walls. 4. Unscrew the 4 tabs retaining the appliance to the pallet. -
Page 30: Window Removal
Installation Window Removal 3. Gently pull the top of the window outward. WARNING Risk of severe burns! Surfaces of the fireplace are very hot during operation. Ensure fireplace has cooled off before touching it. Remove the Window The windows are attached to the fi rebox by 4 levers in the corners. -
Page 31: Window Reinstallation & Check
All four levers should Damage caused by incorrect window now be connected. Replace the tool under the fi re- installation is not covered by the Valor box. Warranty. 4. Pull out top of window to test and ensure spring loaded levers work properly, and repeat at the bot- tom of the window. - Page 32 Installation Appliance Preparation Fit Standoff s Install Vent Outlet The standoff s are supplied fl at on the fi rebox top, and This unit is supplied with a vent outlet which must be are fi xed at one end. fi eld-installed into a rear or top vent confi guration. 1.
- Page 33 Installation Appliance Preparation Install HeatShift Take-Off Collars to Appliance Fit Appliance into Framing 1. Install the collars on the holes on top of the appli- 1. Taking great care not to cut your hands on the sheet ance’s case (6 screws each). metal edges, lift the appliance and place it in the framing.
-
Page 34: Electrical Wiring
Installation Electrical Wiring • Wiring within the receptacle enclosure must have a Install Electrical Wiring minimum 90°C temperature rating. This section provides information to install the electric • Wire nuts not included. pre-wiring required for use with the decorative lighting, or the optional GV60WIFI WiFi Kit. - Page 35 Installation Electrical Wiring 4. Pull the inner cover and receptacle (attached) out of 7. Place the inner cover and receptacle in position and the fi replace. secure with 2 screws. 5. Thread the cable through the stud and the strain 8.
-
Page 36: Gas Supply
Installation Gas Supply Set-up Gas Supply Pressure Test Supply Line The appliance and its individual shut-off valve must be The gas supply inlet disconnected from the gas supply piping system during connection is a 3/8” NPT male any pressure testing of that system at test pressures in connector located on the left excess of 1/2 psig (3.5 kPa). - Page 37 Installation Gas Supply Pressure Test Points Valve Inlet Pressure The minimum supply pressure is given in the section Manifold pressure “Specifi cations” on page 6. adjustment screw All piping and connections must be tested for leaks located behind plastic mushroom after installation or servicing.
-
Page 38: Liner Installation
Installation Liner Installation 4. Place the right panel bottom fi rst, then fl atten to the Ceramic Liner Installation wall from front to back. Rotate the anchor down The liners install in the manner outlined below with the once the panel is in place. exception of the 2525RGL—Refl ective Glass Liners: see instructions supplied with the liners. - Page 39 7. Orient the left roof panel as shown. Insert the panel, 10. Replace the top center bracket to hold up the roof fi rst angling it in from the front then placing it on panels. top of the rear and left panels. Front Rear Bottom...
-
Page 40: Fuel Beds
Installation Fuel Beds Birch Log Kit 1505BLKV2 Installation 1. Carefully unpack the kit, as the logs are fragile. Material required 2. Install the steel platform around the burner as • Black steel platform (supplied with appliance) indicated. The openings in the platform should be •... - Page 41 Vacuum area after installation. the front of the media platform. IMPORTANT: Approved for use only with the ceramic embers and splinters provided with your Valor fi re- place. The use of any other products may void your fi replace warranty.
- Page 42 Installation Fuel Beds...
-
Page 43: Driftwood Kit 1505Dwkv2
Installation Fuel Beds Driftwood Kit 1505DWKV2 Installation 1. Carefully unpack the kit, as the logs are fragile. Material required 2. Install the steel platform around the burner as • Black steel platform (supplied with appliance) indicated. The openings in the platform should be •... - Page 44 Installation Fuel Beds 4. Place log L34 with the pin in the hole as shown. The 7. Place log L16 from the front side of the platform left end of the log should rest gently on the pilot onto the natural curve in log 18 as shown. shield.
- Page 45 10. Place pebbles as desired. The two smallest pebbles IMPORTANT: Use only the vermiculite provided with can go directly on the burner. your Valor fi replace The use of any other types of ma- terial may void your fi replace warranty. WARNING...
-
Page 46: Split Wood Kit 1505Swkv2
Installation Fuel Beds Split Wood Kit 1505SWKV2 Installation 1. Carefully unpack the kit, as the logs are fragile. Material required 2. Install the steel platform around the burner as • Black steel platform (supplied with appliance) indicated. The openings in the platform should be •... - Page 47 Installation Fuel Beds 5. Place log 20 as shown, on top of the pilot shield. 8. Place log 23 from the front platform to the top of 26. 9. Place log 24 into the notch on top of 23. 6. Place log 25 with the pin in the front platform. 7.
- Page 48 11. Place log 27 on top of log 28 to the front of the IMPORTANT: Approved for use only with the ceramic platform. embers provided with your Valor fi replace. The use of any other products may void your fi replace warranty. WARNING...
-
Page 49: Decorative Glass Murano 1500Dgm
Pilot shield above the platform. IMPORTANT: Approved for use only with the fi reglass provided with your Valor fi replace or the tempered crushed fi reglass brands American Fireglass™ or fi regear. The use of any other fi reglass products may void your fi... -
Page 50: Rocks & Shale Set 1514Rss
Installation Fuel Beds 3. Place the rocks around the burner, on the media Rocks & Shale Set 1514RSS platform. Material required • Black steel platform (supplied with appliance) • Rock & Shale Set, which contains: • 5 twigs • 29 rocks (assorted colors) •... - Page 51 9. Place (do not pour) the shale directly onto the directly on the burner. burner. IMPORTANT: Use only the ceramic rocks, twigs and shale provided with your Valor fi replace The use of any other types of rocks, twigs or shale may void your fi replace warranty. WARNING...
-
Page 52: Wall Switch
Installation Wall Switch 4. Run harness assembly to mounted position of junc- Install Remote Battery and Wall Switch Kit tion box, securing harness to framing using insu- (required) lated staples (not included) The Remote Battery and Wall Switch Kit is provided 5. - Page 53 Installation Wall Switch 8. Mount switch plate to junction box with 2 long 11. Feed cable tie through the 2 side slots of battery screws provided. Note: switch position left or right cover assembly. to suit homeowner wishes. 12. Position battery holder to rear face and secure to- gether with cable tie.
-
Page 54: Remote Control
Installation Remote Control Radio Frequency 918.0 MHz for USA and Canada. This device complies with Part 15 of the FCC Rules and with Industry Canada license-exempt RSS standard(s). Operation is subject to the following two conditions: (1) this device may not cause harmful interference, (2) this device must accept any interference received, including interference that may cause undesired operation. - Page 55 Installation Remote Control Install Remote Control Handset Wall Holder The remote control kit for this fi replace comes complete with a wall-mounted holder. This holder is not required in all installations but is provided as an optional feature for those customers who wish to mount the remote handset to the wall.
-
Page 56: Checking Operation And Aeration
Installation Checking Operation and Aeration Checking Operation Locating Aeration Control Turn the fi replace fl ame up and down using the remote control to confi rm that the full range of inputs is achieved—see the remote control operation instructions in “Appendix B—Remote Control Operation”... -
Page 57: Checking Decorative Lighting
Installation Checking Decorative Lighting This appliance comes with built-in decorative lighting (see page 66 for use instructions). If a bulb is Wear gloves when changing these bulbs. Most bulb manufacturers recommend no skin contact burned out upon installation, it can be replaced. The as oil from skin can shorten the bulbs’... -
Page 58: Trim & Barrier Screen
Installation Trim & Barrier Screen Install Trim and Barrier Screen Install the trim chosen by the customer for their fi replace. Install as well the barrier screen which is provided with the trim. Show the customer how to remove the barrier screen and other parts to access the controls. -
Page 59: Wiring Diagram
Wiring Diagram GV60 Wiring Diagram AC Power MAN Knob Battery Holder (integral to fireplace) Main Valve Knob Lights RBWSK (option) Combination Control Valve POWER LIGHT black Interruptor V-module Block Connector Thermocouple yellow WiFi Module Antenna (optional) V-module required Receiver Battery Power Battery Holder RESET Button WARNING... -
Page 60: Approved Venting Components
Approved Venting Components Venting Parts Code / availability by Manufacturer Venting Parts Description Standard Co-axial 46DVA-HC 4DT-HC TM-4HT — — 4DHC round 658DVK2 940160 Deluxe Co-axial — — TM-4RHT — — 4DHCS square — 940160 High Wind Co-axial — — —... - Page 61 Approved Venting Components Venting Parts Code / availability by Manufacturer Venting Parts Description Galvanized 46DVA-06 4DT-06 TC-4DL6 SV4L6 94610606 6” long — — — Black 46DVA-06B 4DT-06(B) TC-4DL6B SV4LB6 90410606B Galvanized 7” long — — — — — — — Black 4D7B Galvanized...
-
Page 62: Commonwealth Of Massachusetts
Commonwealth of Massachusetts 4. INSPECTION. The state or local gas inspector of the State of Massachusetts Carbon Monoxide side wall horizontally vented gas fueled equipment shall Detector/Vent Terminal Signage not approve the installation unless, upon inspection, Requirements the inspector observes carbon monoxide detectors and For all side wall horizontally vented gas fueled equipment signage installed in accordance with the provisions of 248 installed in every dwelling, building or structure used in... -
Page 63: Appendix A-Lighting Instructions
Appendix A—Lighting Instructions FOR YOUR SAFETY, READ BEFORE LIGHTING WARNING : If you do not follow these instructions exactly a fire or explosion may result causing property damage, personal injury or loss of life. A. This appliance has a pilot which must be lighted by hand or by remote control. Follow these instructions exactly. To save gas, turn the pilot off when not using the appliance for a prolonged period of time. -
Page 64: Appendix B-Remote Control Operation
Appendix B—Remote Control Operation Initial Pairing Before the remote control can be used with the fi replace, it must be paired. See “Remote Control Initial Pairing” on page 54. Main Display Child Proof Time Signal Indicator Thermostatic Mode Battery Status Fan (if included) (not available) Countdown Timer... - Page 65 Appendix B—Remote Control Operation Designated Low Fire and High Fire To deactivate functions: To go to low re, double-click . “LO” 1. Install batteries. All icons are displayed and ashing. is displayed. 2. While the icons are ashing, press the relevant func- tion button and hold for 10 seconds.
- Page 66 Appendix B—Remote Control Operation Child Proof Light/Dimmer Operation Your handset can be set to lock out all commands to the replace, except OFF. Press is displayed. Light is on at preset level. To turn Child Proof ON: 1. Press and hold simultaneously.
- Page 67 Appendix B—Remote Control Operation Modes of Operation Thermostatic Mode Thermostatic Mode The room temperature is measured and Press . is displayed. Preset compared to the set temperature. The temperature displays brie y, followed ame height is automatically adjusted by the room temperature. to achieve the set temperature.
- Page 68 Appendix B—Remote Control Operation Temperature Setting: Off Time Setting (PROGRAM 1) , 1, OFF 1. Press and hold until ashes. are displayed. ALL is ON and set temperature (set in Ther- displayed brie y. Hour ashes. mostatic Mode) is displayed. 2.
- Page 69 Appendix B—Remote Control Operation Low Battery Indication Low Battery Receiver With low battery power in the battery holder, the system shuts o the re completely. (This will not CAUTION: Do not use a screwdriver or other happen if the power is completely interrupted.) metallic object to remove the batteries from the battery holder or the handset.
- Page 70 Appendix B—Remote Control Operation Error Codes In the event of an error condition with the handset or replace, the handset will display an error code. Failure Message on Duration of Symptom Possible Cause Code Handset Display 4 sec • No pilot ame within 30 sec •...
-
Page 71: Appendix C-Wall Switch Operation
Appendix C—Wall Switch Operation The Wall Switch can be used to Adjusting Flame Height control your fi replace. You can Press and hold large fl ame button turn the pilot on or off and you can to gradually increase fl ame height. increase or decrease the fl... -
Page 72: Appendix D-Heatshift™System
Appendix D—HeatShift™System Planning Installation: LT1 with HeatShift ™ Instructions for use with the following Valor Heater Models: 2500K only Application Approvals The HeatShift™ system redistributes the warm air ow The LDK1, LDK3, LDK4, LDK7 and LDK9 duct kits are away from the replace opening to a more desirable CSA approved for use only with Valor Series replaces location using natural convection without use of a fan. - Page 73 Appendix D—HeatShift™System Kits There are 5 kits to choose from: • LDK1—48” Plenum • LDK3—14” Plenums (2), includes grilles • LDK4—38” Plenum • LDK7—Duct Termination Plates (2)—for wall valance discharge ONLY • LDK9—30” Plenum Kits Contents LDK1 LDK4 48” x 2” 38”...
- Page 74 Appendix D—HeatShift™System Optional accessories • LDK2—48” Finishing Frame, to use with LDK1 • LDK5—38” Finishing Frame, to use with LDK4 • LDK6— 5” dia Aluminum 2-ply Flex Kit— 2 x 10’–0” lengths, may be cut to required length • LDK10—30” Finishing Frame, to use with LDK9 Kits Contents 39-5/8”...
- Page 75 Appendix D—HeatShift™System Suggested Con gurations (top view) Corner installations Front wall outlet using LDK1, LDK4 (shown) or LDK9 WARNING The plenum duct kits are approved Rear wall outlet using LDK1, LDK4 (shown) or LKD9 for horizontal discharge ONLY. The Note: Fireplace vent may con ict with plenum. O set vent around plenum.
- Page 76 Appendix D—HeatShift™System Overview (applies to LKD1, LDK3, LDK4 and LDK9 kits) Ceiling Min. 2-1/2” Flexible or rigid, clearance 5” diameter to ceiling UL-181, Class 1 Air Duct (4) (use LDK6 kit or equivalent) Min. 1” clearance to combustibles around pipe 8-3/4”...
- Page 77 Appendix D—HeatShift™System Overview (applies to LDK7) NOTE Discharge opening must be located in the same room as fireplace when using LDK7. Ceiling Wall Min. 2-1/2” opening Flexible or rigid, 5” diameter UL-181, Class 1 Air Duct (4) (use LDK6 kit or equivalent) Min.
- Page 78 Appendix D—HeatShift™System Max. Allowable With Plenum Vertical Rise Horizontal LDK 1, LDK 3 or LDK 4 Ceiling Offset 30” 24” Min. 2-1/2” 36” 36” clearance 8” to ceiling 42” 48” 48” 60” Min. bend 54” 72” radius 5” 60” 84” Support horizontal Min.
- Page 79 Appendix D—HeatShift™System LDK 1 3-5/8” 11-1/2” 7-7/8” Top View 1/2” wallboard 48” LDK 1 11-1/2” mounting 1/2” bracket and standoffs 1-1/2” standoff 3” 2” 8” mounting bracket and 1/2” standoff 1/2” standoff 6” openings 12” LDK 1 14” LDK 1 12”...
- Page 80 Appendix D—HeatShift™System 14” 1/2” wallboard LDK 3 11-1/2” mounting 1/2” bracket and standoffs 3” 1-1/2” standoff 6” 8” 1/2” standoff 5” dia. mounting 7” collars (2) bracket and 1/2” standoff Front View Right Side View LDK 9 3” 9-1/2” 6-1/2” Top View 1/2”...
- Page 81 Appendix D—HeatShift™System LDK7 Plates Dimensions Perimeter of plates may be trimmed to suit installation Warning Label 16” Stand-offs Stand-offs Top View (fold down for shipping) 5” dia. collars (4) 4-1/2” 7” 4-1/2” 9-3/4” 9-3/4” 19-1/2” Front View Right Side View...
- Page 82 Appendix D—HeatShift™System Rough Frame Openings LDK 1 = 49” LDK 3 = 15” LDK 4 = 39” Min. 1” below 4” Min. 1” below 8” 5” Top of plenum LDK 3 LDK 1 = 13” LDK 4 = 11” LDK 1 & LDK 4 LDK9 Minimum 31”...
- Page 83 Appendix D—HeatShift™System Framing and Clearances—Plenums, front view Rough Frame Opening LDK 1 = 49” LDK 4 = 39” LDK 3 = 15” See detail LDK 9 = 31” Rough Min. 1/2” Frame clearance to 2 x 4 on edge Opening combustibles at ends LDK 1 = 4”...
- Page 84 Appendix D—HeatShift™System Framing and Clearances—Plenums, side view LDK 1 & 4 Min. 2-1/2” clearance to ceiling 1-1/2” min. clearance to combustibles (top) Ceiling 1/2” min. 1/2” clearance to combustibles 5-1/2” 5” rear & sides Plenum 2” min. clearance support to combustibles (wood) (use steel stud for Maintain 1”...
- Page 85 Appendix D—HeatShift™System Wall Valance Discharge Opening using LDK7—Duct Termination Plates Continuous ceiling Minimum length required within cavity of opening, front and sides = 40” Plate stand-off 2-1/2” min. See clearances to combustibles Wall finish required Ceiling next page to form plenum 14”...
- Page 86 Appendix D—HeatShift™System LDK7 Clearances to Combustibles Perimeter of plates may be trimmed to 4” suit installation 4” Stand-off Stand-off 16” Non-combustible zone above plates Top View 4” 4” 4” 4” Stand-offs Combustible framing allowed below plates 5” dia. pipes - maintain 1”...
- Page 87 Appendix D—HeatShift™System LDK Duct Kit LDK 1, LDK 4 with optional 1270RBK Remote Blower Kit (not approved with outdoor installations) Universal take-off supplied with 1270RBK kit. Can mount to either end of plenum. Maximum 1 x 1270RBK kit per plenum. LDK1 or LDK4 plenum* *LDK9 cannot be installed with1270RBK...
- Page 88 Appendix D—HeatShift™System Install Plenum Kits (LDK1, LDK3, LDK4 & LDK9) 6. Paint the inside surfaces of the plenum using high- temperature at black spray paint for installations —see next page for LDK7 Duct Termination where the inside of the plenums may be visible. Plates Note: The anges of the white nishing frame (when 1.
- Page 89 Appendix D—HeatShift™System Install Duct Termination Plates (LDK7) Repair Parts List —see previous page for LDK1, LDK3, LDK4 & LDK9 Description Part no. Plenum kits LDK1 48” Quad Hot Air Plenum Kit 1. Frame a rough opening and platform at the desired 48”...
-
Page 90: Appendix E-Spare Parts
Red cable to interrupter 4001035 Electrical box access plate - outer 4007973 Wire harness GV60 4001187 Window assembly 4008193 Receiver (Valor 10 two way) 4005597 Hot glass warning plate 4003093 Handset wall holder 4004459 Black steel platform 4004885AH Valor 10 Handset... - Page 91 Appendix E—Spare Parts Part Part Description Description Number Number RH side panel` Split Wood Kit 1505SWKV2 Fluted Black 4008344 Log 20 4008743 Refl ective Glass 4008478 Log 21 4008744 Plain Black Log 22 4008745 4008344 Top panel Log 23 4008746 Fluted Black (2) Log 24 4008747...
- Page 92 Appendix E—Spare Parts 21-25...
- Page 93 Appendix E—Spare Parts 1505BLKV2 LDK6 1505DWKV2 1500DGM 1505SWKV2 1514RSS 99-108 x 29...
Need help?
Do you have a question about the LT1 2500KN and is the answer not in the manual?
Questions and answers