Table of Contents
Advertisement
Quick Links
READ AND SAVE THESE INSTRUCTIONS
BLEND
®
USER
SCC P/N
MANUAL
21-27948
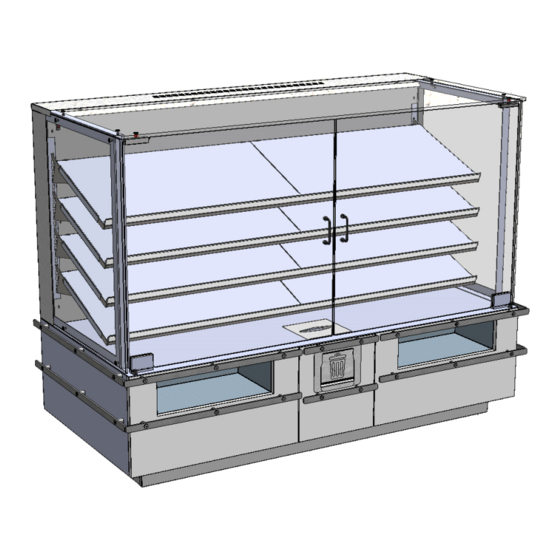
BLEND® SELF-SERVICE DRY (AMBIENT) MERCHANDISERS
> THIS USER GUIDE IS APPLICABLE TO MODEL NM7255DSSV
> SOLID REAR PLENUM / PRESSURIZED FAN SYSTEM TO PREVENT INSECT INFILTRATION
> HINGED FRONT GLASS DOORS WITH CENTER HANDLES /
> FRONT CUBBIES / FRONT NAPKIN DISPENSER INSIDE UNIT / TRASH DOOR
> CAUTION! DO NOT PUSH OR PULL ON GLASS UPRIGHTS!
> ONLY USE HANDLES (AT EACH END OF CASE) TO PUSH OR PULL CASE INTO POSITION!
Model NM7255DSSV Ambient
Merchandiser Shown Above
Note: See Blend® Case-To-Case Adjoinment
Guide P/N 21-26284 For Lineup Options As
Well As Step-By-Step Lineup Instructions.
Structural Concepts Corp. ∙ 888 E. Porter Rd ∙ Muskegon, MI 49441 Phone: 231.798.8888 Fax: 231.798.4960 ∙ www.structuralconcepts.com
REV A DATE: 06/21/2022
USER MANUALS\21-27948_BLEND_SELF-SVC_AMBIENT_CASE_USER MANUAL_NMXX55DSSV
Advertisement
Table of Contents
Troubleshooting

Related Manuals for Structural Concepts BLEND 21-27948


Summary of Contents for Structural Concepts BLEND 21-27948
- Page 1 Note: See Blend® Case-To-Case Adjoinment Guide P/N 21-26284 For Lineup Options As Well As Step-By-Step Lineup Instructions. Structural Concepts Corp. ∙ 888 E. Porter Rd ∙ Muskegon, MI 49441 Phone: 231.798.8888 Fax: 231.798.4960 ∙ www.structuralconcepts.com REV A DATE: 06/21/2022 USER MANUALS\21-27948_BLEND_SELF-SVC_AMBIENT_CASE_USER MANUAL_NMXX55DSSV...
-
Page 2: Table Of Contents
TABLE OF CONTENTS TABLE OF CONTENTS …………………………………………………………………………………..…... OVERVIEW / COMPLIANCE / LED LIGHTS PRECAUTION / ELECTRICAL HAZARD WARNING / WIRING DIAGRAM ……………………………………………………………………..……..………... BLEND® FREE STANDING REFRIGERATED SELF-SERVICE MODEL APPLICABILITY AND INDIVIDUAL MODEL DIMENSIONS ……………...………………………………………….…..…... INSTALLATION: TOE-KICK & REAR PANEL REMOVAL / REMOVING SKID BRACKETS AND BLOCKS ……………………………………………………………………………………………..…... -
Page 3: Wiring Diagram
OVERVIEW / COMPLIANCE / LED LIGHTS / ELECTRICAL HAZARD WARNING / WIRING DIAGRAM OVERVIEW ELECTRICAL HAZARD WARNING These Blend® merchandisers should be installed Please read the important warning in this document and operated according to this operating manual’s carefully as it can prevent injury or death. -
Page 4: Blend® Free Standing Refrigerated Self-Service Model Applicability And Individual Model Dimensions
BLEND® FREE STANDING REFRIGERATED SELF-SERVICE MODEL APPLICABILITY & DIMENSIONS Upper Display Model Overall Case Height Case Depth x Width Case Height NM7255DSSV 35 1/4” 54 5/8” 33”D x 71 3/4”W... -
Page 5: Installation: Toe-Kick & Rear Panel Removal / Removing Skid Brackets And Blocks
INSTALLATION: TOE-KICK & REAR PANEL REMOVAL / REMOVING SKID BRACKETS AND BLOCKS 1. Remove Toe-Kicks To prevent damage to case, front and side toe-kick should NOT be on case at shipment. If they are, you must remove toe- kicks from case before removing case from skid. -
Page 6: Skid
INSTALLATION, CONT’D.: CASTER ADJUSTMENT / LOCK / UNLOCK / CASE REMOVAL FROM SKID 3. Caster Height: Raising and Lowering Vertical Raise or lower casters (to adjust case height) by Adjustment rotating casters’ vertical adjustment rings. Ring Rotate vertical adjustment ring clockwise to lower caster (and increase height of case). -
Page 7: Installation, Cont'd: Toe-Kick Reattachment
INSTALLATION, CONT’D: TOE-KICK REATTACHMENT 7. Return Toe-Kicks To Case After case has been rolled into position and casters height adjusted and locked, return toe-kicks to case. Toe-kicks are held in place by magnets only. See illustration below. Side Front Toe-Kick... -
Page 8: Installation, Cont'd: Shelving Assembly Components
INSTALLATION, CONT’D: SHELVING ASSEMBLY COMPONENTS 8. Shelving Assembly Components See illustrations below for components comprising each shelf assembly. Check that shelving is in proper position before Nylon retainer clips (2 per shelf) secure brackets placing product in case during shipment. -
Page 9: Installation, Cont'd: Field Wire (Or Plug In) Case / Turn On Led Lights
INSTALLATION, CONT’D: FIELD WIRE (OR PLUG IN) CASE / TURN ON LED LIGHTS 9. Field Wire (Or Plug In) Case / Turn on LED Lights Field-wired case or plug unit into outlet (if factory-supplied plug is present). Case will energize when properly field-wired (or plugged into outlet). ... -
Page 10: Case Design: Top Side View Of Ambient, Self-Service Merchandisers
CASE DESIGN: TOP SIDE VIEW OF AMBIENT, SELF-SERVICE MERCHANDISERS 1. Front View of Ambient, Self-Service Merchandisers Note: Illustrations shown may Solid back panel is shown. Your unit may have rear sliding doors. not reflect every feature or Field access box and electrical box (with LED drivers) are option of your particular case. -
Page 11: Case Design, Cont'd: Underside View Of Ambient Self-Service Merchandisers
CASE DESIGN, CONT’D: UNDERSIDE VIEW OF AMBIENT SELF-SERVICE MERCHANDISERS 2. Underside Vew Of Ambient Self-Service Slide-out drawer (shown below-right) may be Merchandisers pulled out to access trash bags. Power cord route may differ depending upon customer request. Casters Spacer Buttons / Casters Brackets For Front... -
Page 12: Case Design, Cont'd: Led Style Light Fixtures
Adjust magnetic mounting clips so they are equally LED lights rarely require change-out. spaced on LED light. Contact Structural Concepts’ Technical Service Reattach LED light assembly to its shelf/header. Department for replacement LED lights. Position properly in shelf/header. -
Page 13: Case Design, Cont'd: Pressurized Fan System To Prevent Insect Infiltration
CASE DESIGN, CONT’D: PRESSURIZED FAN SYSTEM TO PREVENT INSECT INFILTRATION 4. Side view of axial fans and rear chimney with 4. Pressurized Fan System airflow route. Case is pressurized from inside to out using 5. Sectioned view of case showing airflow from axial fans at rear plenum. -
Page 14: Cleaning Schedule (To Be Performed By Store Personnel)
CLEANING SCHEDULE (TO BE PERFORMED BY STORE PERSONNEL) FREQUENCY INSTRUCTIONS Daily Glass Surfaces: Clean side glass and shelves with household or commercial glass cleaner. Daily Exterior Glass: Clean with household or commercial glass cleaner. Daily End Panels, Front Panel, Toe-Kick, etc.: Wipe off all surfaces with warm water and mild soap solution and non-abrasive cloth. -
Page 15: Troubleshooting (To Be Performed By Store Personnel)
Troubleshooting to be performed by trained service providers only is on next page. If case light still do not come on, it may need to be replaced. Contact Structural Concepts’ Technical Service Department for replacement light (see TECHNICAL SERVICE section of this manual for contact information). ... -
Page 16: Troubleshooting (To Be Performed By Trained Service Providers Only)
Fan(s) Not If power is supplied to the case but axial fans are not operational, case’s power Working supply may be faulty. Axial fan(s) may be faulty and need to be replaced. Contact Structural Concepts for replacement fan(s). -
Page 17: Serial Label Information & Location
TECHNICAL SERVICE page in this manual for Serial labels are affixed at a wide range of places instructions on contacting Structural Concepts’ (on the header, at case rear, behind panels or Technical Service Department. toe-kicks, on electrical boxes, etc.). -
Page 18: Technical Service Contact Information & Warranty Information
LIMITED WARRANTY Overview: All sales by Structural Concepts Corporation (hereafter, “SCC”) are subject to the following limited warranty. “Goods” refers to the product or products being sold by SCC. Warranty Scope: Warranty is for equipment sold in the United States, Canada, Mexico and Puerto Rico. Equipment sold elsewhere may carry modified warranties.
Need help?
Do you have a question about the BLEND 21-27948 and is the answer not in the manual?
Questions and answers